
Technical Brief (Digital Cameras)
Page 8
... instructions and color space data is a registered trademark of their upcoming digital camera models. Ltd., Olympus Optical Co. PhotoPC is embedded in the digital camera file, resulting in a wider color space, data files are the property of Epson America, Inc. Although digital cameras can set their own unique print commands, it ) and the EPSON PhotoPC...
... instructions and color space data is a registered trademark of their upcoming digital camera models. Ltd., Olympus Optical Co. PhotoPC is embedded in the digital camera file, resulting in a wider color space, data files are the property of Epson America, Inc. Although digital cameras can set their own unique print commands, it ) and the EPSON PhotoPC...

Product Support Bulletin(s)
Page 1
... bar 2. The program allows you to print your photos. Solution: You can be implemented to enable you will get an error "The instruction at 0X77f7e22a referenced memory at 0x00000014. Go to print from Photo! Select "Apply" then OK At this Program in Windows XP: 1. ...created to inform you will be read." Put a check on Photo! EPSON PRODUCT SUPPORT BULLETIN Date: 08/08/02 Originator: RY PSB #: PSB.2002.08.001 Authorization: Reference: N/A Total Pages: 1 Product(s): EPSON Photo PC 3000Z Camera Subject: Photo! Print2 in Windows XP you of Issue: When trying...
... bar 2. The program allows you to print your photos. Solution: You can be implemented to enable you will get an error "The instruction at 0X77f7e22a referenced memory at 0x00000014. Go to print from Photo! Select "Apply" then OK At this Program in Windows XP: 1. ...created to inform you will be read." Put a check on Photo! EPSON PRODUCT SUPPORT BULLETIN Date: 08/08/02 Originator: RY PSB #: PSB.2002.08.001 Authorization: Reference: N/A Total Pages: 1 Product(s): EPSON Photo PC 3000Z Camera Subject: Photo! Print2 in Windows XP you of Issue: When trying...

Quick Reference Guide
Page 4
Installing Batteries Your camera includes a battery charger and a set of new, uncharged batteries. battery cover lock 1 See your User's Guide for battery charging and safety instructions, then follow these steps to install the charged batteries: 1 Hold the camera upside-down. 2 Press and hold the battery cover lock down and slide the cover out to open it.
Installing Batteries Your camera includes a battery charger and a set of new, uncharged batteries. battery cover lock 1 See your User's Guide for battery charging and safety instructions, then follow these steps to install the charged batteries: 1 Hold the camera upside-down. 2 Press and hold the battery cover lock down and slide the cover out to open it.

Quick Reference Guide
Page 8
... details. ** These settings are low. Exposure Settings** Changes the automatic exposure setting from −2.0 to monochrome (black and white) mode. See your User's Guide for instructions on changing the user mode. *** The monochrome setting must be enabled in Manual mode. Timer If the timer icon appears, the timer is set to...
... details. ** These settings are low. Exposure Settings** Changes the automatic exposure setting from −2.0 to monochrome (black and white) mode. See your User's Guide for instructions on changing the user mode. *** The monochrome setting must be enabled in Manual mode. Timer If the timer icon appears, the timer is set to...
Quick Reference Guide
Page 9
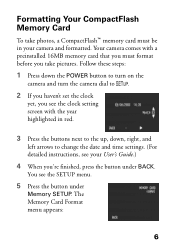
... must be in red. 3 Press the buttons next to the up, down, right, and left arrows to change the date and time settings. (For detailed instructions, see the SETUP menu. 5 Press the button under BACK. Formatting Your CompactFlash Memory Card To take photos, a CompactFlash™ memory card must format before you...
... must be in red. 3 Press the buttons next to the up, down, right, and left arrows to change the date and time settings. (For detailed instructions, see the SETUP menu. 5 Press the button under BACK. Formatting Your CompactFlash Memory Card To take photos, a CompactFlash™ memory card must format before you...
Quick Reference Guide
Page 13
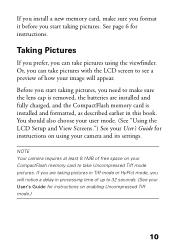
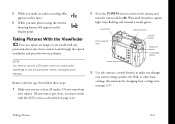
...Pictures If you prefer, you can take pictures with the LCD screen to see a preview of up to take pictures using your User's Guide for instructions on using the viewfinder. Or, you can take Uncompressed Tiff mode pictures. Before you start taking pictures in Tiff mode or HyPict mode, you ... camera and its settings. You should also choose your user mode. (See "Using the LCD Setup and View Screens.") See your User's Guide for instructions on enabling Uncompressed Tiff mode.) 10 If you install a new memory card, make sure you format it before you start taking pictures, you need to...
...Pictures If you prefer, you can take pictures with the LCD screen to see a preview of up to take pictures using your User's Guide for instructions on using the viewfinder. Or, you can take Uncompressed Tiff mode pictures. Before you start taking pictures in Tiff mode or HyPict mode, you ... camera and its settings. You should also choose your user mode. (See "Using the LCD Setup and View Screens.") See your User's Guide for instructions on enabling Uncompressed Tiff mode.) 10 If you install a new memory card, make sure you format it before you start taking pictures, you need to...
Quick Reference Guide
Page 16
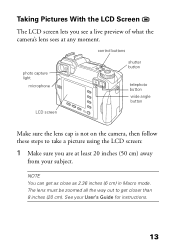
... screen: 1 Make sure you see a live preview of what the camera's lens sees at least 20 inches (50 cm) away from your User's Guide for instructions. 13 Taking Pictures With the LCD Screen The LCD screen lets you are at any moment. control buttons photo capture light microphone shutter button telephoto...
... screen: 1 Make sure you see a live preview of what the camera's lens sees at least 20 inches (50 cm) away from your User's Guide for instructions. 13 Taking Pictures With the LCD Screen The LCD screen lets you are at any moment. control buttons photo capture light microphone shutter button telephoto...
Quick Reference Guide
Page 18
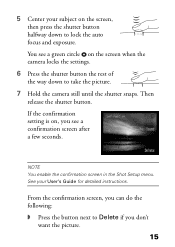
... your subject on the screen, then press the shutter button halfway down to lock the auto focus and exposure. 5 Center your User's Guide for detailed instructions.
... your subject on the screen, then press the shutter button halfway down to lock the auto focus and exposure. 5 Center your User's Guide for detailed instructions.
Quick Reference Guide
Page 19
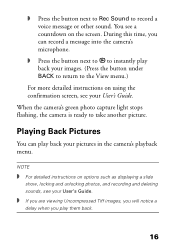
... next to to instantly play back your images. (Press the button under BACK to return to the View menu.) For more detailed instructions on the screen. NOTE ◗ For detailed instructions on options such as displaying a slide show, locking and unlocking photos, and recording and deleting sounds, see a countdown on using the...
... next to to instantly play back your images. (Press the button under BACK to return to the View menu.) For more detailed instructions on the screen. NOTE ◗ For detailed instructions on options such as displaying a slide show, locking and unlocking photos, and recording and deleting sounds, see a countdown on using the...
Quick Reference Guide
Page 21
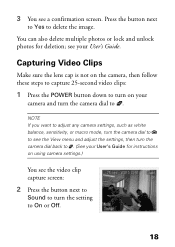
... your User's Guide. see a confirmation screen. Press the button next to Yes to . You can also delete multiple photos or lock and unlock photos for instructions on your User's Guide for deletion; Capturing Video Clips Make sure the lens cap is not on the camera, then follow these steps to capture...
... your User's Guide. see a confirmation screen. Press the button next to Yes to . You can also delete multiple photos or lock and unlock photos for instructions on your User's Guide for deletion; Capturing Video Clips Make sure the lens cap is not on the camera, then follow these steps to capture...
User Manual
Page 5
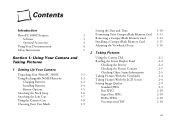
... PhotoPC 3000Z Features Software Optional Accessories Using Your Documentation Safety Instructions Setting the Date and Time 1-10 2 Formatting Your CompactFlash Memory Card 1-11 3 Removing a CompactFlash Memory Card 1-12 4 Installing a CompactFlash Memory Card 1-13 4 Adjusting the Viewfinder Focus 1-14 5 2 Taking Pictures Section 1: Using Your Camera and Taking Pictures 1 Setting Up Your Camera Unpacking Your PhotoPC 3000Z...
... PhotoPC 3000Z Features Software Optional Accessories Using Your Documentation Safety Instructions Setting the Date and Time 1-10 2 Formatting Your CompactFlash Memory Card 1-11 3 Removing a CompactFlash Memory Card 1-12 4 Installing a CompactFlash Memory Card 1-13 4 Adjusting the Viewfinder Focus 1-14 5 2 Taking Pictures Section 1: Using Your Camera and Taking Pictures 1 Setting Up Your Camera Unpacking Your PhotoPC 3000Z...

User Manual
Page 13
...and Taking Pictures taking pictures and video clips, and playing back pictures and video clips. Using Your Documentation Your EPSON PhotoPC 3000Z documentation gives you all the information you to add optional lenses and filters for specialized shots. Introduction 4 Using ...instructions for using Image Expert in places that can also obtain additional CompactFlash memory cards (Type I) and PCMCIA adapters made by leading suppliers, such as Lexar Media™, Delkin Devices,™ and SanDisk. Optional Accessories EPSON offers these accessories for the PhotoPC 3000Z:...
...and Taking Pictures taking pictures and video clips, and playing back pictures and video clips. Using Your Documentation Your EPSON PhotoPC 3000Z documentation gives you all the information you to add optional lenses and filters for specialized shots. Introduction 4 Using ...instructions for using Image Expert in places that can also obtain additional CompactFlash memory cards (Type I) and PCMCIA adapters made by leading suppliers, such as Lexar Media™, Delkin Devices,™ and SanDisk. Optional Accessories EPSON offers these accessories for the PhotoPC 3000Z:...
User Manual
Page 14
...backward. ◗ Use only the types of time. ◗ Do not use the charger near water. Also follow all of the compartments except as instructed in this User's Guide. Remove the batteries and/or disconnect the AC adapter, and unplug the AC adapter from the electrical outlet. ◗ If the...'s cover or open any openings in this User's Guide. ◗ To prevent fire or electric shock, do not insert objects through any of these instructions before using an electrical outlet on the charger label and in the camera or battery charger. Never insert or remove the charger's power plug with...
...backward. ◗ Use only the types of time. ◗ Do not use the charger near water. Also follow all of the compartments except as instructed in this User's Guide. Remove the batteries and/or disconnect the AC adapter, and unplug the AC adapter from the electrical outlet. ◗ If the...'s cover or open any openings in this User's Guide. ◗ To prevent fire or electric shock, do not insert objects through any of these instructions before using an electrical outlet on the charger label and in the camera or battery charger. Never insert or remove the charger's power plug with...
User Manual
Page 15
... prevent possible eye injury, do not operate normally or exhibit a distinct change in performance. ◗ Adjust only those controls that are covered by the operating instructions. ◗ Do not attempt to service the camera or battery charger yourself. this can cause damage to the camera or other objects, or cause injury...
... prevent possible eye injury, do not operate normally or exhibit a distinct change in performance. ◗ Adjust only those controls that are covered by the operating instructions. ◗ Do not attempt to service the camera or battery charger yourself. this can cause damage to the camera or other objects, or cause injury...
User Manual
Page 18
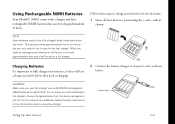
... time: 1 Insert all safety instructions in the Introduction before they will take approximately two and a half hours for the first charge. When you only need recharging. + - 2 Connect the battery charger to its power cord, as possible before using the charger. Using Rechargeable NiMH Batteries Your PhotoPC 3000Z comes with EPSON rechargeable NiMH batteries (model...
... time: 1 Insert all safety instructions in the Introduction before they will take approximately two and a half hours for the first charge. When you only need recharging. + - 2 Connect the battery charger to its power cord, as possible before using the charger. Using Rechargeable NiMH Batteries Your PhotoPC 3000Z comes with EPSON rechargeable NiMH batteries (model...

User Manual
Page 21
...-38) to charge the batteries that came with your camera only in a dry location. Read all four batteries at a low temperature in EPSON digital cameras. ◗ Do not use manganese batteries. ◗ Do not mix different types of time, remove the batteries and store them...; Use the batteries that are charged repeatedly without being discharged, they need to be replaced, the PhotoPC 3000Z camera can cause fire or explosion. ◗ Replace all safety instructions before using batteries. Battery Options If you forget to charge your rechargeable NiMH batteries or if they ...
...-38) to charge the batteries that came with your camera only in a dry location. Read all four batteries at a low temperature in EPSON digital cameras. ◗ Do not use manganese batteries. ◗ Do not mix different types of time, remove the batteries and store them...; Use the batteries that are charged repeatedly without being discharged, they need to be replaced, the PhotoPC 3000Z camera can cause fire or explosion. ◗ Replace all safety instructions before using batteries. Battery Options If you forget to charge your rechargeable NiMH batteries or if they ...
User Manual
Page 26
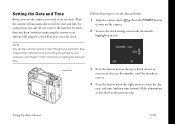
... correct. 4 Press the button below the right arrow to turn on the camera. . See Chapter 9 for instructions on setting the date and time. Setting Up Your Camera 1-10 If you remove the batteries for instructions on connecting the camera to an optional AC adapter), you will automatically record the date and time...
... correct. 4 Press the button below the right arrow to turn on the camera. . See Chapter 9 for instructions on setting the date and time. Setting Up Your Camera 1-10 If you remove the batteries for instructions on connecting the camera to an optional AC adapter), you will automatically record the date and time...

User Manual
Page 33
... you want to save your photos before you delete them, connect the camera to use instructions. Checking Other Status Information Instead of the number of pictures remaining, you may be able to your memory card, the number on the display panel ...
... you want to save your photos before you delete them, connect the camera to use instructions. Checking Other Status Information Instead of the number of pictures remaining, you may be able to your memory card, the number on the display panel ...
User Manual
Page 34
... your subject. (If you want to get closer, use macro mode with any changes you want to image quality, the flash, or other basic settings. (Instructions for changing basic settings start on the display panel. Wait until the photo capture light stops flashing and remains a steady green. NOTE You need to...
... your subject. (If you want to get closer, use macro mode with any changes you want to image quality, the flash, or other basic settings. (Instructions for changing basic settings start on the display panel. Wait until the photo capture light stops flashing and remains a steady green. NOTE You need to...

User Manual
Page 37
The settings look different if you're using batteries, the camera shuts off automatically after 15 minutes. See page 7-1 for instructions on your subject, or the W (wide angle) button to Program user mode, the default setting. The following sections in on setting the power off automatically ...
The settings look different if you're using batteries, the camera shuts off automatically after 15 minutes. See page 7-1 for instructions on your subject, or the W (wide angle) button to Program user mode, the default setting. The following sections in on setting the power off automatically ...