
User's Guide
Page 2
... Up the PCU 9 Calibrating the PCU 11 Installing the Plate Guide on the Printer 13 Setting Up the RIP 18 Loading a Plate in the Printer 19 Unloading a Plate from the Printer 21 Using the PCU 21 Using Epson DirectPlate Aluminum Plates 23 Plate Curing Tips 23 Punching the Plate 23 Press Tips 23 Cleaning...
... Up the PCU 9 Calibrating the PCU 11 Installing the Plate Guide on the Printer 13 Setting Up the RIP 18 Loading a Plate in the Printer 19 Unloading a Plate from the Printer 21 Using the PCU 21 Using Epson DirectPlate Aluminum Plates 23 Plate Curing Tips 23 Punching the Plate 23 Press Tips 23 Cleaning...
User's Guide
Page 3
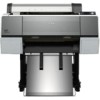
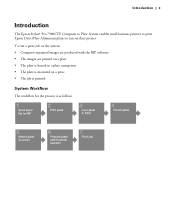
To run on a press • The job is printed System Workflow The workflow for the process is as follows: Introduction | 3 Introduction The Epson Stylus® Pro 7900CTP Computer to Plate System enables small business printers to print Epson DirectPlate Aluminum plates to run a print job on the system: • Computer-separated images are produced with the RIP software • The images are printed on a plate • The plate is heated in a plate curing unit • The plate is mounted on their presses.
To run on a press • The job is printed System Workflow The workflow for the process is as follows: Introduction | 3 Introduction The Epson Stylus® Pro 7900CTP Computer to Plate System enables small business printers to print Epson DirectPlate Aluminum plates to run a print job on the system: • Computer-separated images are produced with the RIP software • The images are printed on a plate • The plate is heated in a plate curing unit • The plate is mounted on their presses.
User's Guide
Page 4
When the PCU temperature reads less than the unit. See additional safety instructions for the printer in the Epson Stylus Pro 7900/9900 Printer Guide. if the plate is larger than 100 °C it is safe to follow this could create steam and cause burns. • Do not open ...
When the PCU temperature reads less than the unit. See additional safety instructions for the printer in the Epson Stylus Pro 7900/9900 Printer Guide. if the plate is larger than 100 °C it is safe to follow this could create steam and cause burns. • Do not open ...

User's Guide
Page 7
Setting Up Pre-installation Checklist You will need the following components: • Epson Stylus Pro 7900 printer Setting Up | 7 • Plate curing unit (PCU) • Plate guide • Epson DirectPlate Aluminum sample pack (12 × 18 inches) • EFI™ eXpress CTP software RIP CD • Hexagonal (Allen) (2.5 mm/0.10 inch) wrench • Teflon® tape for use on plate guide • THERMAX® temperature strips
Setting Up Pre-installation Checklist You will need the following components: • Epson Stylus Pro 7900 printer Setting Up | 7 • Plate curing unit (PCU) • Plate guide • Epson DirectPlate Aluminum sample pack (12 × 18 inches) • EFI™ eXpress CTP software RIP CD • Hexagonal (Allen) (2.5 mm/0.10 inch) wrench • Teflon® tape for use on plate guide • THERMAX® temperature strips
User's Guide
Page 8
...8226; Ethernet® (CAT-5) network cable or USB cable for the printer's setup instructions and additional space requirements. Setting Up the Printer See the Epson Stylus Pro 7900/9900 Printer Guide for connecting computer and printer (not included) • Metric ruler (with half-millimeter increments) (...not included) Before you begin, make sure you have sufficient space to your printer, and troubleshooting tips. • The Epson Stylus Pro 7900/9900 Quick Reference Guide provides a summary of procedures for daily use the system. For additional...
...8226; Ethernet® (CAT-5) network cable or USB cable for the printer's setup instructions and additional space requirements. Setting Up the Printer See the Epson Stylus Pro 7900/9900 Printer Guide for connecting computer and printer (not included) • Metric ruler (with half-millimeter increments) (...not included) Before you begin, make sure you have sufficient space to your printer, and troubleshooting tips. • The Epson Stylus Pro 7900/9900 Quick Reference Guide provides a summary of procedures for daily use the system. For additional...

User's Guide
Page 13
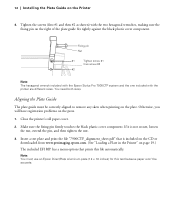
...exit the PCU. Open the roll paper cover on the plate guide. See the Epson Stylus Pro 7900/9900 Printer Guide for more information. 3. This reduces the surface temperature of of gloves is turned on the printer. 1. Remove the roll paper if installed, to have room to avoid injury. ... before you need to avoid burns. Installing the Plate Guide on the Printer To assure proper registration when printing on Epson DirectPlate Aluminum plates, you turn off the power switch. Installing the Plate Guide on the Printer | 13 Caution: The transport belt should be kept moving when the ...
...exit the PCU. Open the roll paper cover on the plate guide. See the Epson Stylus Pro 7900/9900 Printer Guide for more information. 3. This reduces the surface temperature of of gloves is turned on the printer. 1. Remove the roll paper if installed, to have room to avoid injury. ... before you need to avoid burns. Installing the Plate Guide on the Printer To assure proper registration when printing on Epson DirectPlate Aluminum plates, you turn off the power switch. Installing the Plate Guide on the Printer | 13 Caution: The transport belt should be kept moving when the ...
User's Guide
Page 14
...firmly touches the black plastic cover component. If it is included on the CD or downloaded from www.proimaging.epson.com. (See "Loading a Plate in the Printer" on the press. 1. Close the printer's roll paper cover. 2. You need both sizes. Fixing pin Nut #1 Tighten screw #1 then screw ...#2 #2 Note: The hexagonal wrench included with the Epson Stylus Pro 7900CTP system and the one included with the two...
...firmly touches the black plastic cover component. If it is included on the CD or downloaded from www.proimaging.epson.com. (See "Loading a Plate in the Printer" on the press. 1. Close the printer's roll paper cover. 2. You need both sizes. Fixing pin Nut #1 Tighten screw #1 then screw ...#2 #2 Note: The hexagonal wrench included with the Epson Stylus Pro 7900CTP system and the one included with the two...

User's Guide
Page 15
If they vary by more than 1.0 mm, the plate guide is not correctly aligned. Continue with step 5 to step 7. Installing the Plate Guide on the printed plate. Note: For best results, use a metric ruler to measure the distance from the left edge of the plate to point A on the Printer | 15 4. When the plate prints out, use a ruler delineated in half-millimeter increments and a magnifying lens. Then measure the distance from the left edge of the plate to point B. If the distances to points A and B are equal, go to adjust the alignment.
If they vary by more than 1.0 mm, the plate guide is not correctly aligned. Continue with step 5 to step 7. Installing the Plate Guide on the printed plate. Note: For best results, use a metric ruler to measure the distance from the left edge of the plate to point A on the Printer | 15 4. When the plate prints out, use a ruler delineated in half-millimeter increments and a magnifying lens. Then measure the distance from the left edge of the plate to point B. If the distances to points A and B are equal, go to adjust the alignment.

User's Guide
Page 16
Use the hexagonal wrench included with the Epson Stylus Pro 7900CTP system to print a test pattern (see "Loading a Plate in the Printer" on page 19), then print the test pattern again on the Printer 5. Leading edge Plate Leading edge Plate No more than 1.0 mm difference More than 1.0 mm. 16 | Installing the Plate Guide on...
Use the hexagonal wrench included with the Epson Stylus Pro 7900CTP system to print a test pattern (see "Loading a Plate in the Printer" on page 19), then print the test pattern again on the Printer 5. Leading edge Plate Leading edge Plate No more than 1.0 mm difference More than 1.0 mm. 16 | Installing the Plate Guide on...

User's Guide
Page 17
Remove the adhesive backing from catching under the plate guide. 1. Teflon strip Note: You should cover the markings on the Printer | 17 Applying the Guide Strip After the plate guide is recommended because long-term use of the roll paper cover. Installing the Plate Guide on ... from just above the top of the guide to prevent plates from the strip. 2. This is aligned correctly, attach the Teflon guide strip to the printer to the bottom edge of the plates may wear the markings off.
Remove the adhesive backing from catching under the plate guide. 1. Teflon strip Note: You should cover the markings on the Printer | 17 Applying the Guide Strip After the plate guide is recommended because long-term use of the roll paper cover. Installing the Plate Guide on ... from just above the top of the guide to prevent plates from the strip. 2. This is aligned correctly, attach the Teflon guide strip to the printer to the bottom edge of the plates may wear the markings off.
User's Guide
Page 19
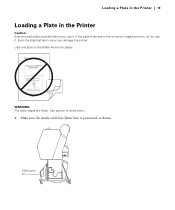
Media catch bin WARNING: The plate edges are bent, do not use it . Make sure the media catch bin (fabric bin) is dented or the corners or edges are sharp. If the plate is positioned as shown. Even the slightest bent corner can damage the printer. Use caution to avoid injury. 1. Use only Epson DirectPlate Aluminum plates. Loading a Plate in the Printer | 19 Loading a Plate in the Printer Caution: Examine each plate carefully before you use it .
Media catch bin WARNING: The plate edges are bent, do not use it . Make sure the media catch bin (fabric bin) is dented or the corners or edges are sharp. If the plate is positioned as shown. Even the slightest bent corner can damage the printer. Use caution to avoid injury. 1. Use only Epson DirectPlate Aluminum plates. Loading a Plate in the Printer | 19 Loading a Plate in the Printer Caution: Examine each plate carefully before you use it .

User's Guide
Page 20
.... Insert the plate (with light gray, coated side face up) into the printer until the Sheet icon appears on the printer's LCD screen when the printer detects the plate and the paper release has closed . 3. Set the printer to increase the suction. 6. Press the Paper release (ePlaten) button. Lower ...slide it against the guide, press the Paper release (ePlaten) button again to close the paper release. 20 | Loading a Plate in the Printer 2. Make sure the printer is turned on, the P power light is not flashing, and the roll paper cover is firmly closed . Press the l Paper Source ...
.... Insert the plate (with light gray, coated side face up) into the printer until the Sheet icon appears on the printer's LCD screen when the printer detects the plate and the paper release has closed . 3. Set the printer to increase the suction. 6. Press the Paper release (ePlaten) button. Lower ...slide it against the guide, press the Paper release (ePlaten) button again to close the paper release. 20 | Loading a Plate in the Printer 2. Make sure the printer is turned on, the P power light is not flashing, and the roll paper cover is firmly closed . Press the l Paper Source ...

User's Guide
Page 21
... the same direction each time. Turn on the press, the plate must be sure to load plates into the printer in the printer. Power switch To avoid injury remove your hand from the Printer | 21 WARNING: The plate edges are sharp. Press the Pause/reset button and let go of minor differences in... the correct position. 9. The printer loads and aligns the plate in final printing. Hold the plate and do one of the unit. on the printing press, it on the power ...
... the same direction each time. Turn on the press, the plate must be sure to load plates into the printer in the printer. Power switch To avoid injury remove your hand from the Printer | 21 WARNING: The plate edges are sharp. Press the Pause/reset button and let go of minor differences in... the correct position. 9. The printer loads and aligns the plate in final printing. Hold the plate and do one of the unit. on the printing press, it on the power ...

User's Guide
Page 25
... the PCU is normal. You can be reused if you plan to retain their low-friction properties. Maintenance • See the Epson Stylus Pro 7900/9900 Printer Guide for printer maintenance. • Keep the PCU trays clean to reuse a plate: 1. If you would like to reprint the job. Washing... the Press The following press washes are recommended (not carried by Epson): • Varn EC Wash • Ultrachem Prima Wash • Varn News 75...
... the PCU is normal. You can be reused if you plan to retain their low-friction properties. Maintenance • See the Epson Stylus Pro 7900/9900 Printer Guide for printer maintenance. • Keep the PCU trays clean to reuse a plate: 1. If you would like to reprint the job. Washing... the Press The following press washes are recommended (not carried by Epson): • Varn EC Wash • Ultrachem Prima Wash • Varn News 75...
User's Guide
Page 27
..., electronic, mechanical, photocopying, recording, or otherwise, without notice. © 2010 Epson America, Inc. 10/10 Generic Copyright Notice All rights reserved. Epson is not responsible for any consumable products other printers. Epson Preferred is subject to change without the prior written permission of Seiko Epson Corporation. General Notice: Other product names used herein are registered...
..., electronic, mechanical, photocopying, recording, or otherwise, without notice. © 2010 Epson America, Inc. 10/10 Generic Copyright Notice All rights reserved. Epson is not responsible for any consumable products other printers. Epson Preferred is subject to change without the prior written permission of Seiko Epson Corporation. General Notice: Other product names used herein are registered...


