User's Guide
Page 1
Epson Stylus® Pro 7900CTP Computer to Plate System User's Guide
Epson Stylus® Pro 7900CTP Computer to Plate System User's Guide
User's Guide
Page 3
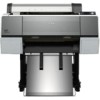
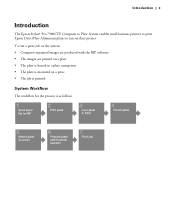
Introduction | 3 Introduction The Epson Stylus® Pro 7900CTP Computer to Plate System enables small business printers to print Epson DirectPlate Aluminum plates to run a print job on the system: • Computer-separated images are produced with the RIP software • The images are printed on a plate • The plate is heated in a plate curing unit • The plate is mounted on their presses. To run on a press • The job is printed System Workflow The workflow for the process is as follows:
Introduction | 3 Introduction The Epson Stylus® Pro 7900CTP Computer to Plate System enables small business printers to print Epson DirectPlate Aluminum plates to run a print job on the system: • Computer-separated images are produced with the RIP software • The images are printed on a plate • The plate is heated in a plate curing unit • The plate is mounted on their presses. To run on a press • The job is printed System Workflow The workflow for the process is as follows:
User's Guide
Page 4
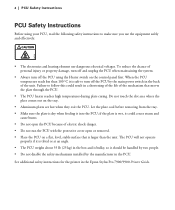
... dry when feeding it should be handled by two people. • Do not disable the safety mechanisms installed by the main power switch in the Epson Stylus Pro 7900/9900 Printer Guide. When the PCU temperature reads less than the unit. Let the plate cool before removing from the tray. • Make...
... dry when feeding it should be handled by two people. • Do not disable the safety mechanisms installed by the main power switch in the Epson Stylus Pro 7900/9900 Printer Guide. When the PCU temperature reads less than the unit. Let the plate cool before removing from the tray. • Make...
User's Guide
Page 5
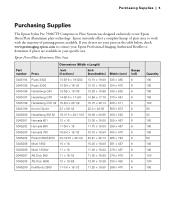
... a complete lineup of printing presses available. Epson DirectPlate Aluminum Plate Sizes Dimensions (Width × Length) Part number Press Inch (fractions) Inch Gauge (hundredths) Metric (mm) (mil) S045194 Ryobi 3302 13-3/16 × ... 100 100 100 50 100 100 100 100 100 If you do not see your press in the table below, check www.proimaging.epson.com or contact your Epson Professional Imaging Authorized Reseller to work with the majority of plate sizes to determine if plates are available in your specific size. Purchasing...
... a complete lineup of printing presses available. Epson DirectPlate Aluminum Plate Sizes Dimensions (Width × Length) Part number Press Inch (fractions) Inch Gauge (hundredths) Metric (mm) (mil) S045194 Ryobi 3302 13-3/16 × ... 100 100 100 50 100 100 100 100 100 If you do not see your press in the table below, check www.proimaging.epson.com or contact your Epson Professional Imaging Authorized Reseller to work with the majority of plate sizes to determine if plates are available in your specific size. Purchasing...

User's Guide
Page 7
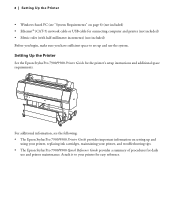
Setting Up Pre-installation Checklist You will need the following components: • Epson Stylus Pro 7900 printer Setting Up | 7 • Plate curing unit (PCU) • Plate guide • Epson DirectPlate Aluminum sample pack (12 × 18 inches) • EFI™ eXpress CTP software RIP CD • Hexagonal (Allen) (2.5 mm/0.10 inch) wrench • Teflon® tape for use on plate guide • THERMAX® temperature strips
Setting Up Pre-installation Checklist You will need the following components: • Epson Stylus Pro 7900 printer Setting Up | 7 • Plate curing unit (PCU) • Plate guide • Epson DirectPlate Aluminum sample pack (12 × 18 inches) • EFI™ eXpress CTP software RIP CD • Hexagonal (Allen) (2.5 mm/0.10 inch) wrench • Teflon® tape for use on plate guide • THERMAX® temperature strips
User's Guide
Page 8
...Requirements" on setting up and use and printer maintenance. 8 | Setting Up the Printer • Windows-based PC (see the following: • The Epson Stylus Pro 7900/9900 Printer Guide provides important information on page 6) (not included) • Ethernet® (CAT-5) network cable or USB cable for connecting...) (not included) Before you begin, make sure you have sufficient space to your printer, and troubleshooting tips. • The Epson Stylus Pro 7900/9900 Quick Reference Guide provides a summary of procedures for daily use the system. Setting Up the Printer See the...
...Requirements" on setting up and use and printer maintenance. 8 | Setting Up the Printer • Windows-based PC (see the following: • The Epson Stylus Pro 7900/9900 Printer Guide provides important information on page 6) (not included) • Ethernet® (CAT-5) network cable or USB cable for connecting...) (not included) Before you begin, make sure you have sufficient space to your printer, and troubleshooting tips. • The Epson Stylus Pro 7900/9900 Quick Reference Guide provides a summary of procedures for daily use the system. Setting Up the Printer See the...

User's Guide
Page 13
... panel before removing it snugly with the black edge of gloves is turned on the printer. 2. See the Epson Stylus Pro 7900/9900 Printer Guide for more information. 3. Always turn off the Heater switch on Epson DirectPlate Aluminum plates, you turn off the power switch. Remove the roll paper if installed, to have...
... panel before removing it snugly with the black edge of gloves is turned on the printer. 2. See the Epson Stylus Pro 7900/9900 Printer Guide for more information. 3. Always turn off the Heater switch on Epson DirectPlate Aluminum plates, you turn off the power switch. Remove the roll paper if installed, to have...
User's Guide
Page 14
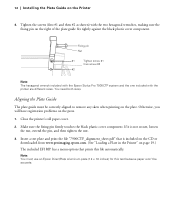
...215; 18 inches) for this file automatically. Close the printer's roll paper cover. 2. If it is included on the CD or downloaded from www.proimaging.epson.com. (See "Loading a Plate in the Printer" on the Printer 4. Note: You must be accurate. 14 | Installing the Plate Guide on page 19... then #2 as shown) with the printer are different sizes. Fixing pin Nut #1 Tighten screw #1 then screw #2 #2 Note: The hexagonal wrench included with the Epson Stylus Pro 7900CTP system and the one included with the two hexagonal wrenches, making sure the fixing pin on the press. 1.
...215; 18 inches) for this file automatically. Close the printer's roll paper cover. 2. If it is included on the CD or downloaded from www.proimaging.epson.com. (See "Loading a Plate in the Printer" on the Printer 4. Note: You must be accurate. 14 | Installing the Plate Guide on page 19... then #2 as shown) with the printer are different sizes. Fixing pin Nut #1 Tighten screw #1 then screw #2 #2 Note: The hexagonal wrench included with the Epson Stylus Pro 7900CTP system and the one included with the two hexagonal wrenches, making sure the fixing pin on the press. 1.

User's Guide
Page 16
.... Leading edge Plate Leading edge Plate No more than 1.0 mm difference More than distance B, tighten the alignment screw; Use the hexagonal wrench included with the Epson Stylus Pro 7900CTP system to print a test pattern (see "Loading a Plate in the Printer" on page 19), then print the test pattern again on the Printer...
.... Leading edge Plate Leading edge Plate No more than 1.0 mm difference More than distance B, tighten the alignment screw; Use the hexagonal wrench included with the Epson Stylus Pro 7900CTP system to print a test pattern (see "Loading a Plate in the Printer" on page 19), then print the test pattern again on the Printer...

User's Guide
Page 25
... might notice a light gray deposit of dust on the trays or the PCU. Washing the Press The following press washes are recommended (not carried by Epson): • Varn EC Wash • Ultrachem Prima Wash • Varn News 75 Wash • printcom® wash 202B • Sun Chemicals SUN WASH U H8830A Note... Aluminum plates can be reused if you plan to store them for reusing the plate. Maintenance • See the Epson Stylus Pro 7900/9900 Printer Guide for printer maintenance. • Keep the PCU trays clean to see if it removes the image. Make sure the PCU ...
... might notice a light gray deposit of dust on the trays or the PCU. Washing the Press The following press washes are recommended (not carried by Epson): • Varn EC Wash • Ultrachem Prima Wash • Varn News 75 Wash • printcom® wash 202B • Sun Chemicals SUN WASH U H8830A Note... Aluminum plates can be reused if you plan to store them for reusing the plate. Maintenance • See the Epson Stylus Pro 7900/9900 Printer Guide for printer maintenance. • Keep the PCU trays clean to see if it removes the image. Make sure the PCU ...
User's Guide
Page 27
... or any consumable products other printers. This information is subject to change without the prior written permission of Seiko Epson Corporation. The information contained herein is a registered logomark of Seiko Epson Corporation. Trademarks Epson and Epson Stylus are for identification purposes only and may be reproduced, stored in a retrieval system, or transmitted in any form...
... or any consumable products other printers. This information is subject to change without the prior written permission of Seiko Epson Corporation. The information contained herein is a registered logomark of Seiko Epson Corporation. Trademarks Epson and Epson Stylus are for identification purposes only and may be reproduced, stored in a retrieval system, or transmitted in any form...
