
UB-R04 Technical Reference Guide
Page 17
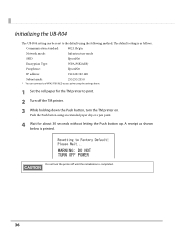
... A leased IP address will be printed. • Setting initialization Push and hold the push button for 3 seconds or more when the TM printer is ready for other purposes, such as printing. Keep pushing the push button (about 30 seconds) until the initialization start message (Resetting...connector can be used only for the use mentioned above, otherwise disconnect the USB cable. 17 The USB connector cannot be used for printing (paper is set the internal parameters. • Set the internal parameters by connecting with a computer installed with the dedicated utility (EpsonNet Config) via...
... A leased IP address will be printed. • Setting initialization Push and hold the push button for 3 seconds or more when the TM printer is ready for other purposes, such as printing. Keep pushing the push button (about 30 seconds) until the initialization start message (Resetting...connector can be used only for the use mentioned above, otherwise disconnect the USB cable. 17 The USB connector cannot be used for printing (paper is set the internal parameters. • Set the internal parameters by connecting with a computer installed with the dedicated utility (EpsonNet Config) via...

UB-R04 Technical Reference Guide
Page 21
...Open Source Software License 1 1. We provide the source code of each open , etc.) Unplug the USB cable or correct off -line. (No paper or cover open source software program for a charge covering the cost of performing such distribution, such as printing. Chapter 1 Product Overview Limitations using USB ...be used for your region. 3. The list of open source software programs included with a USB cable. • The TM printer is off -line condition at the TM printer to receive the source code above URL, input each is defined in Section 4) to you desire to operate the ...
...Open Source Software License 1 1. We provide the source code of each open , etc.) Unplug the USB cable or correct off -line. (No paper or cover open source software program for a charge covering the cost of performing such distribution, such as printing. Chapter 1 Product Overview Limitations using USB ...be used for your region. 3. The list of open source software programs included with a USB cable. • The TM printer is off -line condition at the TM printer to receive the source code above URL, input each is defined in Section 4) to you desire to operate the ...
UB-R04 Technical Reference Guide
Page 24
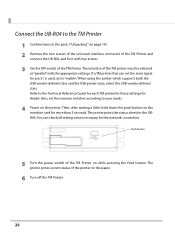
... for details. The printer prints current status of the TM Printer. Push button 5 Turn the power switch of the TM printer must be selected as "parallel" with two screws. 3 Set the DIP switch of the printer on the paper. 6 Turn off the TM Printer. 24 You can set to the Technical Reference... Guide for each TM printer for these settings for the UBR04. The interface of the TM Printer on while pressing the Feed button. Then, after waiting a little,...
... for details. The printer prints current status of the TM Printer. Push button 5 Turn the power switch of the TM printer must be selected as "parallel" with two screws. 3 Set the DIP switch of the printer on the paper. 6 Turn off the TM Printer. 24 You can set to the Technical Reference... Guide for each TM printer for these settings for the UBR04. The interface of the TM Printer on while pressing the Feed button. Then, after waiting a little,...
UB-R04 Technical Reference Guide
Page 27
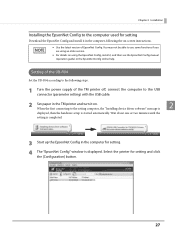
... using the EpsonNet Config, install it on -screen instructions. • Use the latest version of the TM printer off, connect the computer to the USB connector (parameter setting) with the USB cable. 2 Set paper in the TM printer and turn it , and then see the EpsonNet Config manual (operation guide) or the EpsonNet...
... using the EpsonNet Config, install it on -screen instructions. • Use the latest version of the TM printer off, connect the computer to the USB connector (parameter setting) with the USB cable. 2 Set paper in the TM printer and turn it , and then see the EpsonNet Config manual (operation guide) or the EpsonNet...
UB-R04 Technical Reference Guide
Page 31
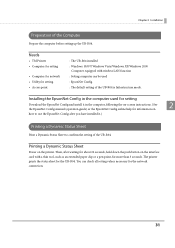
...Dynamic Status Sheet Print a Dynamic Status Sheet to confirm the setting of the Computer Prepare the computer before setting up the UB-R04. Needs • TM Printer • Computer for setting • Computer for network • Utility for setting • Access point : The UB-R04 installed : Windows... 10/8/7/Windows Vista/Windows XP/Windows 2000 Computer equipped with a thin tool, such as an extended paper clip or a pen point, for about 20 seconds, hold down the push button on the printer. Installing the EpsonNet Config in the computer used...
...Dynamic Status Sheet Print a Dynamic Status Sheet to confirm the setting of the Computer Prepare the computer before setting up the UB-R04. Needs • TM Printer • Computer for setting • Computer for network • Utility for setting • Access point : The UB-R04 installed : Windows... 10/8/7/Windows Vista/Windows XP/Windows 2000 Computer equipped with a thin tool, such as an extended paper clip or a pen point, for about 20 seconds, hold down the push button on the printer. Installing the EpsonNet Config in the computer used...
UB-R04 Technical Reference Guide
Page 36
Push the Push button using an extended paper clip or a pen point. 4 Wait for the TM printer to the default using the settings above. 1 Set the roll paper for about 30 seconds without letting the Push button up. The default setting is as shown below is completed. 36 Communication standard: 802.11b/g/n Network... WPA-PSK(AES) Passphrase: EpsonNet IP address: 192.168.192.168 Subnet mask: 255.255.255.0 * You can be reset to print. 2 Turn off the TM printer. 3 While holding down the Push button, turn the printer off until the initialization is printed. Do not turn the...
Push the Push button using an extended paper clip or a pen point. 4 Wait for the TM printer to the default using the settings above. 1 Set the roll paper for about 30 seconds without letting the Push button up. The default setting is as shown below is completed. 36 Communication standard: 802.11b/g/n Network... WPA-PSK(AES) Passphrase: EpsonNet IP address: 192.168.192.168 Subnet mask: 255.255.255.0 * You can be reset to print. 2 Turn off the TM printer. 3 While holding down the Push button, turn the printer off until the initialization is printed. Do not turn the...
UB-R04 Technical Reference Guide
Page 46
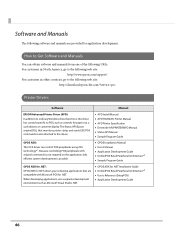
... is not required on the application side, efficient system development is also attached to this driver. • APD Install Manual • APD TM/BA/EU Printer Manual • APD Printer Specification • Devmode API/PRINTERINFO Manual • Status API Manual • Sample Program Guide OPOS...Peripheral Architecture*2 • Sample Program Guide OPOS ADK for .NET: OPOS ADK for paper cut, a cash drawer, or customer display. For customers in North America, go to the following web site: http://www.epson.com/support/ For customers in other countries, go to the following URLs. The ...
... is not required on the application side, efficient system development is also attached to this driver. • APD Install Manual • APD TM/BA/EU Printer Manual • APD Printer Specification • Devmode API/PRINTERINFO Manual • Status API Manual • Sample Program Guide OPOS...Peripheral Architecture*2 • Sample Program Guide OPOS ADK for .NET: OPOS ADK for paper cut, a cash drawer, or customer display. For customers in North America, go to the following web site: http://www.epson.com/support/ For customers in other countries, go to the following URLs. The ...

UB-R04 Technical Reference Guide
Page 63
... can be confirmed. Please acquire it from the UB-R03 Confirm the Setting of the UB-R03 for more than 3 seconds by using an extended paper clip or a pen point. Power on the parameter sheet. Push button An example of a parameter sheet Necessary items for the network setting WEP key The... WEP key is not printed on the TM Printer, and after printing the parameter sheet of the UB-R03 is as follows. The parameter sheet of the printer. Appendix Exchange from the network...
... can be confirmed. Please acquire it from the UB-R03 Confirm the Setting of the UB-R03 for more than 3 seconds by using an extended paper clip or a pen point. Power on the parameter sheet. Push button An example of a parameter sheet Necessary items for the network setting WEP key The... WEP key is not printed on the TM Printer, and after printing the parameter sheet of the UB-R03 is as follows. The parameter sheet of the printer. Appendix Exchange from the network...

Users Manual Hardware
Page 4
...otherwise the printer and the telephone line may be very hot after a full evaluation. 4 TM-T20II User's Manual CAUTION: Do not touch the thermal head because it unused for an extended period...this manual. If you should use in locations subject to injure your dealer or a Seiko Epson service center for a long time, dust may cause equipment damage and burning. various safety devices...; Do not use in applications requiring extremely high reliability/safety, such as loading/replacing roll paper To ensure safety, unplug this product before leaving it can be damaged. Do not connect...
...otherwise the printer and the telephone line may be very hot after a full evaluation. 4 TM-T20II User's Manual CAUTION: Do not touch the thermal head because it unused for an extended period...this manual. If you should use in locations subject to injure your dealer or a Seiko Epson service center for a long time, dust may cause equipment damage and burning. various safety devices...; Do not use in applications requiring extremely high reliability/safety, such as loading/replacing roll paper To ensure safety, unplug this product before leaving it can be damaged. Do not connect...
Users Manual Hardware
Page 5
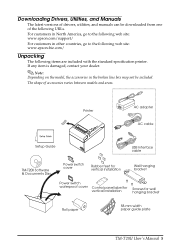
... Power switch waterproof cover Control panel label for vertical installation Screws for wall hanging bracket Roll paper 58-mm width paper guide plate TM-T20II User's Manual 5 For customers in North America, go to the following web site: www.epson-biz.com/ Unpacking The following URLs. Downloading Drivers, Utilities, and Manuals The latest versions of...
... Power switch waterproof cover Control panel label for vertical installation Screws for wall hanging bracket Roll paper 58-mm width paper guide plate TM-T20II User's Manual 5 For customers in North America, go to the following web site: www.epson-biz.com/ Unpacking The following URLs. Downloading Drivers, Utilities, and Manuals The latest versions of...
Users Manual Hardware
Page 6
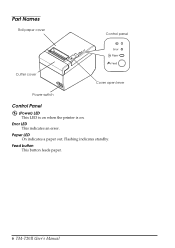
Feed button This button feeds paper. 6 TM-T20II User's Manual Error LED This indicates an error. Paper LED On indicates a paper out. Flashing indicates standby. Part Names Roll paper cover Control panel Cutter cover Cover open lever Power switch Control Panel (Power) LED This LED is on when the printer is on.
Feed button This button feeds paper. 6 TM-T20II User's Manual Error LED This indicates an error. Paper LED On indicates a paper out. Flashing indicates standby. Part Names Roll paper cover Control panel Cutter cover Cover open lever Power switch Control Panel (Power) LED This LED is on when the printer is on.

Users Manual Hardware
Page 9
...feet Note: You can install the printer so that the roll paper cover is provided as shown in the printer case, and attach 2 rubber feet within the scribed line on a wall using the included accessories. TM-T20II User's Manual 9 Attach 2 rubber feet in the rectangular ...indents in the illustration below. Installing the Printer Vertically When installing the printer vertically, be sure to prevent the printer from moving by vibration during paper cutting and when using a drawer...
...feet Note: You can install the printer so that the roll paper cover is provided as shown in the printer case, and attach 2 rubber feet within the scribed line on a wall using the included accessories. TM-T20II User's Manual 9 Attach 2 rubber feet in the rectangular ...indents in the illustration below. Installing the Printer Vertically When installing the printer vertically, be sure to prevent the printer from moving by vibration during paper cutting and when using a drawer...

Users Manual Hardware
Page 13
Cover open lever 2. TM-T20II User's Manual 13 Use the cover open lever to install the roll paper. 1. The correct direction of the paper is shown in the illustration below to open the roll paper cover. Remove the used roll paper core if any, and insert the roll paper. Installing Roll Paper Follow the steps below .
Cover open lever 2. TM-T20II User's Manual 13 Use the cover open lever to install the roll paper. 1. The correct direction of the paper is shown in the illustration below to open the roll paper cover. Remove the used roll paper core if any, and insert the roll paper. Installing Roll Paper Follow the steps below .

Users Manual Hardware
Page 14
When the printer power is on, the roll paper is automatically cut. 2 1 14 TM-T20II User's Manual Pull out some paper, and close the roll paper cover. 3.
When the printer power is on, the roll paper is automatically cut. 2 1 14 TM-T20II User's Manual Pull out some paper, and close the roll paper cover. 3.
Users Manual Hardware
Page 15
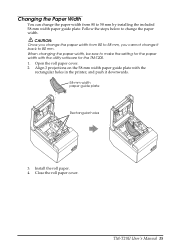
... by installing the included 58-mm width paper guide plate. TM-T20II User's Manual 15 Open the roll paper cover. 2. Align 3 projections on the 58-mm width paper guide plate with the utility software for the TM-T20II. 1. Changing the Paper Width You can change the paper width from 80 to 58 mm, you... change the paper width from 80 to 80 mm. CAUTION: ...
... by installing the included 58-mm width paper guide plate. TM-T20II User's Manual 15 Open the roll paper cover. 2. Align 3 projections on the 58-mm width paper guide plate with the utility software for the TM-T20II. 1. Changing the Paper Width You can change the paper width from 80 to 58 mm, you... change the paper width from 80 to 80 mm. CAUTION: ...

Users Manual Hardware
Page 16
...close it cools. ❏ For other cases, turn the power switch on , check whether the roll paper is closed. A waterproof cover for the power switch is jammed, remove the jammed paper referring to the printer and the socket. You can turn the printer off by inserting a sharp-pointed ...object in the holes in the illustration below and install the roll paper correctly. ❏ Printing stops if the head overheats and resumes automatically when it . ❏ If the Paper LED is on and off , and after 10 seconds, back on. 16 TM-T20II User's Manual
...close it cools. ❏ For other cases, turn the power switch on , check whether the roll paper is closed. A waterproof cover for the power switch is jammed, remove the jammed paper referring to the printer and the socket. You can turn the printer off by inserting a sharp-pointed ...object in the holes in the illustration below and install the roll paper correctly. ❏ Printing stops if the head overheats and resumes automatically when it . ❏ If the Paper LED is on and off , and after 10 seconds, back on. 16 TM-T20II User's Manual
Users Manual Hardware
Page 17
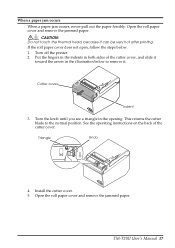
...Open the roll paper cover and remove the jammed paper. CAUTION: Do not touch the thermal head, because it . Put the fingers in the indents in both sides of the cutter cover. This returns the cutter blade to remove it can be very hot after printing. TM-T20II User's Manual... 17 If the roll paper cover does not open, follow the steps below to the normal position. Triangle Knob 4. When a paper jam occurs When a paper jam occurs, never pull out the paper forcibly. Cutter cover Indent 3. Turn off the ...
...Open the roll paper cover and remove the jammed paper. CAUTION: Do not touch the thermal head, because it . Put the fingers in the indents in both sides of the cutter cover. This returns the cutter blade to remove it can be very hot after printing. TM-T20II User's Manual... 17 If the roll paper cover does not open, follow the steps below to the normal position. Triangle Knob 4. When a paper jam occurs When a paper jam occurs, never pull out the paper forcibly. Cutter cover Indent 3. Turn off the ...

Users Manual Hardware
Page 18
Cleaning Cleaning the Printer Case Be sure to turn off the printer, and wipe the dirt off the printer, open the roll paper cover, and clean the thermal elements of plastic and rubber. Doing so may damage or break the parts made of the thermal head with a cotton ... can be very hot. Be careful not to touch it and to maintain receipt print quality. Thermal head 18 TM-T20II User's Manual CAUTION: Never clean the product with a dry cloth or a damp cloth. Epson recommends cleaning the thermal head periodically (generally every 3 months) to let it cool before you clean it with...
Cleaning Cleaning the Printer Case Be sure to turn off the printer, and wipe the dirt off the printer, open the roll paper cover, and clean the thermal elements of plastic and rubber. Doing so may damage or break the parts made of the thermal head with a cotton ... can be very hot. Be careful not to touch it and to maintain receipt print quality. Thermal head 18 TM-T20II User's Manual CAUTION: Never clean the product with a dry cloth or a damp cloth. Epson recommends cleaning the thermal head periodically (generally every 3 months) to let it cool before you clean it with...

Users Manual Hardware
Page 19
...: lines per second dpi: dots per 25.4 mm (dots per inch) *: The values are when the printer prints with utility software for the TM-T20II. Speed is described below. Roll paper (single-ply) Width 79.5 mm ± 0.5 mm {3.13" ± 0.02"} 57.5 mm ± 0.5 mm {2.26" ± 0.... The power consumption in the sleep mode and power off mode 1.1 W 0.30 W 0.81 W 0.30 W 2.6 W 0.30 W TM-T20II User's Manual 19 Default Delay Times for Power Management for Epson Products This product will enter low power (sleep) mode after a period of energy efficiency and cannot be modified by installing...
...: lines per second dpi: dots per 25.4 mm (dots per inch) *: The values are when the printer prints with utility software for the TM-T20II. Speed is described below. Roll paper (single-ply) Width 79.5 mm ± 0.5 mm {3.13" ± 0.02"} 57.5 mm ± 0.5 mm {2.26" ± 0.... The power consumption in the sleep mode and power off mode 1.1 W 0.30 W 0.81 W 0.30 W 2.6 W 0.30 W TM-T20II User's Manual 19 Default Delay Times for Power Management for Epson Products This product will enter low power (sleep) mode after a period of energy efficiency and cannot be modified by installing...

Users Manual Software
Page 4
... Uninstallation 36 Uninstalling the Windows Printer Driver. . . . . . 36 Uninstalling the TM-T20II Utility 37 Uninstall the EpsonNet Config 38 Uninstalling the Epson TM Virtual Port Driver 38 Uninstalling the EPSON Monitoring Tool. . . . . 38 Uninstalling the OPOS ADK 39 Uninstalling the OPOS ADK...TM-T20II Utility Overview 55 Starting the TM-T20II Utility 55 Starting the TM-T20II Utility 55 Adding a Communication Port and Starting the TM-T20II Utility 57 Current Settings 61 Details 61 Operation Check 63 Storing Logos 64 Adding a Logo 67 Paper Reduction Settings 70 Automatic Paper...
... Uninstallation 36 Uninstalling the Windows Printer Driver. . . . . . 36 Uninstalling the TM-T20II Utility 37 Uninstall the EpsonNet Config 38 Uninstalling the Epson TM Virtual Port Driver 38 Uninstalling the EPSON Monitoring Tool. . . . . 38 Uninstalling the OPOS ADK 39 Uninstalling the OPOS ADK...TM-T20II Utility Overview 55 Starting the TM-T20II Utility 55 Starting the TM-T20II Utility 55 Adding a Communication Port and Starting the TM-T20II Utility 57 Current Settings 61 Details 61 Operation Check 63 Storing Logos 64 Adding a Logo 67 Paper Reduction Settings 70 Automatic Paper...

