
Operation Manual
Page 3
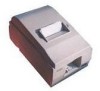
Printer parts Printer coverr Drawer kick-out connectors Interface Connector Power connector Power switch Model with Serial Interface Model with Parallel Interface DIP switches Control panel PAPER FEED button PAPER OUT light ERROR light POWER light
Printer parts Printer coverr Drawer kick-out connectors Interface Connector Power connector Power switch Model with Serial Interface Model with Parallel Interface DIP switches Control panel PAPER FEED button PAPER OUT light ERROR light POWER light

Operation Manual
Page 6
... Roll Near-End Detector (Option 1-2 Connecting the Printer to the Computer 1-4 TM-U200B 1-4 TM-U200PB 1-5 Connecting the Printer to the Drawer 1-6 Grounding the Printer 1-8 Connecting the Power Supply 1-9 Installing the Ribbon Cassette 1-11 Installing the Paper Roll 1-13 Running the Self Test 1-17 Setting the DIP Switches 1-18 Using the Power Switch Cover 1-21 Affixing the Fastening Tape (Option...
... Roll Near-End Detector (Option 1-2 Connecting the Printer to the Computer 1-4 TM-U200B 1-4 TM-U200PB 1-5 Connecting the Printer to the Drawer 1-6 Grounding the Printer 1-8 Connecting the Power Supply 1-9 Installing the Ribbon Cassette 1-11 Installing the Paper Roll 1-13 Running the Self Test 1-17 Setting the DIP Switches 1-18 Using the Power Switch Cover 1-21 Affixing the Fastening Tape (Option...

Operation Manual
Page 8
... Manual Setting Up and Using t Chapter 1 contains information on using the printer. Reference t Chapter 4 contains specifications. CAUTION: Cautions must be observed to avoid minor injury to yourself or damage to avoid serious bodily injury. iv t Chapter 2 contains information on unpacking the printer, setting it up, running the self test, and setting the DIP switches.
... Manual Setting Up and Using t Chapter 1 contains information on using the printer. Reference t Chapter 4 contains specifications. CAUTION: Cautions must be observed to avoid minor injury to yourself or damage to avoid serious bodily injury. iv t Chapter 2 contains information on unpacking the printer, setting it up, running the self test, and setting the DIP switches.

Operation Manual
Page 26
... can damage the printer. Turn the printer over and remove the DIP switch access cover, as shown below. Setting the DIP Switches CAUTION: Turn off . 2. There are in the second. 1-18 Setting Up the Printer Notice that ON is off the printer while removing the DIP switch cover to prevent... an electrical short, which can change your serial interface and print column settings by changing the DIP switch settings. 1. SW 1 SW 2 3. Numbers starting ...
... can damage the printer. Turn the printer over and remove the DIP switch access cover, as shown below. Setting the DIP Switches CAUTION: Turn off . 2. There are in the second. 1-18 Setting Up the Printer Notice that ON is off the printer while removing the DIP switch cover to prevent... an electrical short, which can change your serial interface and print column settings by changing the DIP switch settings. 1. SW 1 SW 2 3. Numbers starting ...

Operation Manual
Page 27
... change the settings of switches 2-2 and 2-4 (always on). Setting Up the Printer 1-19 Setting must not be changed . (Fixed to ON) 2-3 I/F pin 6 reset signal Enabled Disabled 2-4 Reserved. Changing these settings may cause inferior print quality. Model with Serial Interface DIP-Switch Functions DIP Switch Set 1 Switch Function 1-1 Data reception ... Yes No Even Odd 4800 BPS 9600 BPS Receive buffer full Off line or receive buffer full DIP Switch Set 2 Switch Function ON OFF 2-1 Print column selection 42/35 7 × 9 font/9 × 9 font 40/33 2-2 Reserved.
... change the settings of switches 2-2 and 2-4 (always on). Setting Up the Printer 1-19 Setting must not be changed . (Fixed to ON) 2-3 I/F pin 6 reset signal Enabled Disabled 2-4 Reserved. Changing these settings may cause inferior print quality. Model with Serial Interface DIP-Switch Functions DIP Switch Set 1 Switch Function 1-1 Data reception ... Yes No Even Odd 4800 BPS 9600 BPS Receive buffer full Off line or receive buffer full DIP Switch Set 2 Switch Function ON OFF 2-1 Print column selection 42/35 7 × 9 font/9 × 9 font 40/33 2-2 Reserved.

Operation Manual
Page 28
Changing these settings may cause inferior print quality. 5. Replace the DIP switch cover and secure it with Parallel Interface DIP-Switch Functions DIP Switch Set 1 Switch Function 1-1 Auto-line feed 1-2 Receive buffer capacity 1-3 Undefined ... Approximately 1K byte Receive buffer full or reading data Off line, receive buffer full, or reading data DIP Switch Set 2 Switch Function ON OFF 2-1 Print column selection 42/35 7 × 9 font/9 × 9 font... CAUTION: Do not change the settings of switches 2-2 and 2-4 (always on). Model with the screw. 1-20 Setting Up the...
Changing these settings may cause inferior print quality. 5. Replace the DIP switch cover and secure it with Parallel Interface DIP-Switch Functions DIP Switch Set 1 Switch Function 1-1 Auto-line feed 1-2 Receive buffer capacity 1-3 Undefined ... Approximately 1K byte Receive buffer full or reading data Off line, receive buffer full, or reading data DIP Switch Set 2 Switch Function ON OFF 2-1 Print column selection 42/35 7 × 9 font/9 × 9 font... CAUTION: Do not change the settings of switches 2-2 and 2-4 (always on). Model with the screw. 1-20 Setting Up the...

Operation Manual
Page 35
...person. The ribbon may be worn out. See the self test instructions in Chapter 1. 3-2 Troubleshooting Check the connection at both the printer and the computer. 2. The ribbon cassette may be installed properly. Make sure that this cable meets the specifications for data transmission are...1 to check that the printer works properly. The ribbon may not be worn out. You can print the printer's interface settings using the self test. Also make sure that the printer's DIP switch settings for both ends of the interface cable between the printer and computer. The ERROR ...
...person. The ribbon may be worn out. See the self test instructions in Chapter 1. 3-2 Troubleshooting Check the connection at both the printer and the computer. 2. The ribbon cassette may be installed properly. Make sure that this cable meets the specifications for data transmission are...1 to check that the printer works properly. The ribbon may not be worn out. You can print the printer's interface settings using the self test. Also make sure that the printer's DIP switch settings for both ends of the interface cable between the printer and computer. The ERROR ...

Operation Manual
Page 41
After you changed DIP switch 1-2, set DIP switch 1-2 to turn off the hex dump mode. 6. If you make sure the printer is printed for emphasis. Turn on the printer while you hold down the PAPER FEED button; When the printer enters the hex dump mode, it to ON. 2. Run any software program... the hexadecimal codes, and the second column gives the ASCII characters that has no ASCII equivalent. t Control codes are disabled. 5. The printer prints all commands except DLE EOT and DLE ENQ are printed in a two-column format. then release and press the PAPER FEED button ...
After you changed DIP switch 1-2, set DIP switch 1-2 to turn off the hex dump mode. 6. If you make sure the printer is printed for emphasis. Turn on the printer while you hold down the PAPER FEED button; When the printer enters the hex dump mode, it to ON. 2. Run any software program... the hexadecimal codes, and the second column gives the ASCII characters that has no ASCII equivalent. t Control codes are disabled. 5. The printer prints all commands except DLE EOT and DLE ENQ are printed in a two-column format. then release and press the PAPER FEED button ...

Operation Manual
Page 43
... = Characters per inch LPS = Lines per second Notes: • The default is 7 x 9 with 3 -dot spacing in half-dot units. • 7 x 9 with 2 -dot spacing in half-dot units and 9 x 9 with 2 -dot spacing in half dot units) See table below. dot units depend on the DIP switch setting. 4-2 Reference Information Character Specifications Number of characters: Alphanumeric characters: 95 Extended graphics: 128...
... = Characters per inch LPS = Lines per second Notes: • The default is 7 x 9 with 3 -dot spacing in half-dot units. • 7 x 9 with 2 -dot spacing in half-dot units and 9 x 9 with 2 -dot spacing in half dot units) See table below. dot units depend on the DIP switch setting. 4-2 Reference Information Character Specifications Number of characters: Alphanumeric characters: 95 Extended graphics: 128...


