
Users Guide
Page 3
...ES-400/ES-500W User's Guide ...7 Scanner Basics...8 Scanner Parts Locations ...8 Scanner Parts...8 Scanner Buttons and Lights...11 User Replaceable Epson Scanner Parts and Accessories 14 Changing the Power Off and Sleep Timer Settings 15 Loading Originals...17 Loading Originals in the Input Tray...17 Loading Multiple Sizes of Originals in the Input Tray 23 Original Document... 41 Manually Connecting to a Wi-Fi Router Using EpsonNet Config 42 Setting Up Network Scanning...43 Determining the Scanner's IP Address 46 Direct Wi-Fi Mode Setup ...46 Enabling a Direct Wi-Fi (AP Mode) Connection ...
...ES-400/ES-500W User's Guide ...7 Scanner Basics...8 Scanner Parts Locations ...8 Scanner Parts...8 Scanner Buttons and Lights...11 User Replaceable Epson Scanner Parts and Accessories 14 Changing the Power Off and Sleep Timer Settings 15 Loading Originals...17 Loading Originals in the Input Tray...17 Loading Multiple Sizes of Originals in the Input Tray 23 Original Document... 41 Manually Connecting to a Wi-Fi Router Using EpsonNet Config 42 Setting Up Network Scanning...43 Determining the Scanner's IP Address 46 Direct Wi-Fi Mode Setup ...46 Enabling a Direct Wi-Fi (AP Mode) Connection ...

Users Guide
Page 4
... Cloud Service 85 Using the Optional Flatbed Scanner Dock 88 Flatbed Scanner Dock Parts ...88 Scanning from the Flatbed Scanner Dock 89 Scanning from the Docked Flatbed Scanner 89 Scanning from the ADF with NFC from a Scanning Program 59 Scanning with Document Capture Pro and Document Capture 61 Scanning in Epson Scan 2 ...63 Additional Scanning Settings - Advanced...
... Cloud Service 85 Using the Optional Flatbed Scanner Dock 88 Flatbed Scanner Dock Parts ...88 Scanning from the Flatbed Scanner Dock 89 Scanning from the Docked Flatbed Scanner 89 Scanning from the ADF with NFC from a Scanning Program 59 Scanning with Document Capture Pro and Document Capture 61 Scanning in Epson Scan 2 ...63 Additional Scanning Settings - Advanced...

Users Guide
Page 5
...Scanner Dock 98 Cleaning and Transporting Your Scanner 100 Cleaning Your Scanner ...100 Cleaning Inside Your Scanner...100 Checking the Scanner Roller Counter 105 Replacing the Scanner Rollers ...106 Resetting the Scanner Roller Counter 112 Transporting Your Scanner ...114 Solving Problems ...115 Scanner Light Status ...115 Solving Scanning Problems ...118 Scanner...or Lines Appear in All Scanned Images 128 Scanned Image is Cropped ...130 Resetting the Epson Scan 2 Settings 130 Solving Flatbed Scanner Dock Problems 131 Scanned Image Edges are Cropped 131 Line of Dots Appears in All ...
...Scanner Dock 98 Cleaning and Transporting Your Scanner 100 Cleaning Your Scanner ...100 Cleaning Inside Your Scanner...100 Checking the Scanner Roller Counter 105 Replacing the Scanner Rollers ...106 Resetting the Scanner Roller Counter 112 Transporting Your Scanner ...114 Solving Problems ...115 Scanner Light Status ...115 Solving Scanning Problems ...118 Scanner...or Lines Appear in All Scanned Images 128 Scanned Image is Cropped ...130 Resetting the Epson Scan 2 Settings 130 Solving Flatbed Scanner Dock Problems 131 Scanned Image Edges are Cropped 131 Line of Dots Appears in All ...

Users Guide
Page 17
... Loading Special Originals Loading Originals in the Input Tray You can load originals that meet the document specifications in the input tray. Caution: Do not load photos, or valuable original documents or artwork, directly into the scanner. Open the input tray and pull up its extension. 17 The steps below describe loading originals... Originals Follow the instructions here to load your originals into the input tray. This may wrinkle or damage the original. Note: The illustrations show the ES-500W, but the steps are the same for the ES-400.
... Loading Special Originals Loading Originals in the Input Tray You can load originals that meet the document specifications in the input tray. Caution: Do not load photos, or valuable original documents or artwork, directly into the scanner. Open the input tray and pull up its extension. 17 The steps below describe loading originals... Originals Follow the instructions here to load your originals into the input tray. This may wrinkle or damage the original. Note: The illustrations show the ES-500W, but the steps are the same for the ES-400.

Users Guide
Page 26
... to 130 g/m²) Up to this size: Letter (8.5 × 11 inches [216 × 279 mm]). 26 Parent topic: Loading Originals in the Input Tray Original Document Specifications You can load originals of different sizes, paper types, and thicknesses up to 56 lb (210 g/m²) Loading capacity 21 lb (80 g/m²): 50... sheets 110 lb (413 g/m²): 9 sheets Loading capacity may vary depending on the paper type. 1 sheet 15 cards loaded horizontally Note: You can load original documents that meet these specifications in your scanner.
... to 130 g/m²) Up to this size: Letter (8.5 × 11 inches [216 × 279 mm]). 26 Parent topic: Loading Originals in the Input Tray Original Document Specifications You can load originals of different sizes, paper types, and thicknesses up to 56 lb (210 g/m²) Loading capacity 21 lb (80 g/m²): 50... sheets 110 lb (413 g/m²): 9 sheets Loading capacity may vary depending on the paper type. 1 sheet 15 cards loaded horizontally Note: You can load original documents that meet these specifications in your scanner.

Users Guide
Page 27
Caution: Do not load the following types of originals in the scanner, or they may be damaged or may damage the scanner: • Thermal paper • Coated paper • Originals with uneven surfaces, such as embossed documents • Photos • Originals with wet ink • Ripped, curled, or wrinkled originals • Originals containing staples...
Caution: Do not load the following types of originals in the scanner, or they may be damaged or may damage the scanner: • Thermal paper • Coated paper • Originals with uneven surfaces, such as embossed documents • Photos • Originals with wet ink • Ripped, curled, or wrinkled originals • Originals containing staples...

Users Guide
Page 48
... your computer or device, or enable the WPS feature. Note: To check if your router is WPS-enabled, look for details. Check your network product documentation for a button labeled WPS on your computer or device, search for at least 3 seconds, then release it when the Wi-Fi on/off and back... panel. 2. If there is no hardware button, there may be a virtual WPS button in AP mode from the smart device when you turn the scanner off light flashes blue. Parent topic: Direct Wi-Fi Mode Setup Wi-Fi Protected Setup (WPS) If your network uses a WPS-enabled wireless router or ...
... your computer or device, or enable the WPS feature. Note: To check if your router is WPS-enabled, look for details. Check your network product documentation for a button labeled WPS on your computer or device, search for at least 3 seconds, then release it when the Wi-Fi on/off and back... panel. 2. If there is no hardware button, there may be a virtual WPS button in AP mode from the smart device when you turn the scanner off light flashes blue. Parent topic: Direct Wi-Fi Mode Setup Wi-Fi Protected Setup (WPS) If your network uses a WPS-enabled wireless router or ...

Users Guide
Page 49
...off light flashes blue. 3. Press and hold the WPS button on the router or access point, see the documentation provided with your router or access point for details. 3. The Wi-Fi on , the scanner is connected to the network. Press the stop button to the network. 1. Parent topic: Wi-Fi Protected Setup... there are no buttons on your wireless router or access point until the security light flashes. When the Wi-Fi on/off light on the scanner stays on /off and AP mode lights flash alternately while establishing the connection. Parent topic: Wi-Fi Networking Using WPS to Connect to a ...
...off light flashes blue. 3. Press and hold the WPS button on the router or access point, see the documentation provided with your router or access point for details. 3. The Wi-Fi on , the scanner is connected to the network. Press the stop button to the network. 1. Parent topic: Wi-Fi Protected Setup... there are no buttons on your wireless router or access point until the security light flashes. When the Wi-Fi on/off light on the scanner stays on /off and AP mode lights flash alternately while establishing the connection. Parent topic: Wi-Fi Networking Using WPS to Connect to a ...

Users Guide
Page 51
...: Using the Network Interface Unit Connecting the Network Interface Unit See the documentation that came with the optional Epson Network Interface Unit for instructions on connecting it to set up your scanner. After connecting the Network Interface Unit, you need to your scanner for network scanning. See the link below. Parent topic: Using the...
...: Using the Network Interface Unit Connecting the Network Interface Unit See the documentation that came with the optional Epson Network Interface Unit for instructions on connecting it to set up your scanner. After connecting the Network Interface Unit, you need to your scanner for network scanning. See the link below. Parent topic: Using the...

Users Guide
Page 52
...a network group, make a note of your scan job settings are set up a password in Document Capture Pro and then select the computer you want to send the scanned file to the computer... you need to solve a problem with your network connection (ES-500W). Note: If your scanner is disabled. If you can scan to a network computer directly from the ...Default Network Settings If you selected. Select a scan job and press the OK button on the scanner for Epson DocumentScan. Scanning to Network Computers from the Network Interface Unit (Windows). Note: Make sure your ...
...a network group, make a note of your scan job settings are set up a password in Document Capture Pro and then select the computer you want to send the scanned file to the computer... you need to solve a problem with your network connection (ES-500W). Note: If your scanner is disabled. If you can scan to a network computer directly from the ...Default Network Settings If you selected. Select a scan job and press the OK button on the scanner for Epson DocumentScan. Scanning to Network Computers from the Network Interface Unit (Windows). Note: Make sure your ...

Users Guide
Page 54
... one of these methods. Load an original in your scanner over a wireless network (ES-500W). Press the start button on your computer or network. 2. This automatically starts Document Capture Pro (Windows) and Document Capture (OS X) and the scan job you have ... start scanning using the start button in Epson Scan 2 Scan Resolution Guidelines Scanning with Document Capture Pro and Document Capture Scanning in Document Capture Pro (Windows) or Document Capture (OS X). 54 Starting a Scan from a Scanner Button Starting a Scan Using the Epson Scan 2 Icon Starting a Scan from ...
... one of these methods. Load an original in your scanner over a wireless network (ES-500W). Press the start button on your computer or network. 2. This automatically starts Document Capture Pro (Windows) and Document Capture (OS X) and the scan job you have ... start scanning using the start button in Epson Scan 2 Scan Resolution Guidelines Scanning with Document Capture Pro and Document Capture Scanning in Document Capture Pro (Windows) or Document Capture (OS X). 54 Starting a Scan from a Scanner Button Starting a Scan Using the Epson Scan 2 Icon Starting a Scan from ...
Users Guide
Page 88
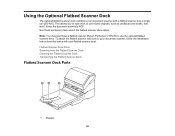
... 1 Stopper 88 Using the Optional Flatbed Scanner Dock The optional flatbed scanner dock combines your document scanner with your document scanner, follow the installation instructions that won't fit into a single unit (ES-400). To attach the flatbed scanner and dock to learn about the flatbed scanner dock option. Note: You must purchase a flatbed scanner (Epson Perfection V19/V39) to scan thick or...
... 1 Stopper 88 Using the Optional Flatbed Scanner Dock The optional flatbed scanner dock combines your document scanner with your document scanner, follow the installation instructions that won't fit into a single unit (ES-400). To attach the flatbed scanner and dock to learn about the flatbed scanner dock option. Note: You must purchase a flatbed scanner (Epson Perfection V19/V39) to scan thick or...

Users Guide
Page 89
... 2 (for connecting flatbed dock to document scanner) 3 Power inlet Parent topic: Using the Optional Flatbed Scanner Dock Scanning from the Docked Flatbed Scanner You can place originals directly on the scanner glass of the flatbed scanner attached to scan when using the optional flatbed scanner dock. Scanning from the Docked Flatbed Scanner Scanning from the ADF with the...
... 2 (for connecting flatbed dock to document scanner) 3 Power inlet Parent topic: Using the Optional Flatbed Scanner Dock Scanning from the Docked Flatbed Scanner You can place originals directly on the scanner glass of the flatbed scanner attached to scan when using the optional flatbed scanner dock. Scanning from the Docked Flatbed Scanner Scanning from the ADF with the...

Users Guide
Page 90
Close the document scanner's output tray. 90 Do not leave photos on the scanner glass for an extended period, or they may damage the scanner. Do not place heavy objects on the scanner glass and do not press on a flat surface. Caution: Make sure the scanner dock is placed on the glass with too much force, or it may stick to the glass. 1.
Close the document scanner's output tray. 90 Do not leave photos on the scanner glass for an extended period, or they may damage the scanner. Do not place heavy objects on the scanner glass and do not press on a flat surface. Caution: Make sure the scanner dock is placed on the glass with too much force, or it may stick to the glass. 1.

Users Guide
Page 93
... originals, you are scanning a book or other . 4. Start Epson Scan 2. 6. Click Scan. Note: Place your original 0.1 inch (2.5 mm) from the top and side edges of the scanner glass as you scan. 5. For originals shorter then A5 (8.2 inches [210 mm] long): • Open the document scanner's input tray, pull out the output tray and output...
... originals, you are scanning a book or other . 4. Start Epson Scan 2. 6. Click Scan. Note: Place your original 0.1 inch (2.5 mm) from the top and side edges of the scanner glass as you scan. 5. For originals shorter then A5 (8.2 inches [210 mm] long): • Open the document scanner's input tray, pull out the output tray and output...

Users Guide
Page 95
For originals between A5 and A4 size (8.2 inches to 11.7 inches [210 mm to 297 mm] long): • Open and extend the document scanner's input tray, open the flatbed scanner's stopper, and slide the stopper forward or backward so that it is a little longer than the length of the original. (Do not open the output tray on the document scanner.) 95
For originals between A5 and A4 size (8.2 inches to 11.7 inches [210 mm to 297 mm] long): • Open and extend the document scanner's input tray, open the flatbed scanner's stopper, and slide the stopper forward or backward so that it is a little longer than the length of the original. (Do not open the output tray on the document scanner.) 95

Users Guide
Page 96
... originals that are legal size (14 inches [356 mm]) or longer: • Open the document scanner's input tray. Parent topic: Scanning from the Flatbed Scanner Dock Related tasks Scanning from the Docked Flatbed Scanner Scanning in Epson Scan 2 Cleaning the Flatbed Scanner Dock To keep your product working at its best, you may damage it. Do... or other lubricants inside the product or let water get inside it several times a year. Leave the output tray closed and close the flatbed and document scanner's stoppers.
... originals that are legal size (14 inches [356 mm]) or longer: • Open the document scanner's input tray. Parent topic: Scanning from the Flatbed Scanner Dock Related tasks Scanning from the Docked Flatbed Scanner Scanning in Epson Scan 2 Cleaning the Flatbed Scanner Dock To keep your product working at its best, you may damage it. Do... or other lubricants inside the product or let water get inside it several times a year. Leave the output tray closed and close the flatbed and document scanner's stoppers.

Users Guide
Page 97
... 3. Unplug the AC power cord and disconnect the USB cable that no power button on the surface of glass cleaner on the scanner glass. If the scanner glass is stained with grease or some other hard-to remove it with mild detergent and water. 4. Note: Do not spray ...-remove material, use a small amount of the scanner glass. 1. Clean the outer case with a cloth dampened with a soft dry cloth. Parent topic: Using the Optional Flatbed Scanner Dock 97 If the glass surface is dirty, clean it . Wipe off the document scanner using the power button. Dust can cause spots in...
... 3. Unplug the AC power cord and disconnect the USB cable that no power button on the surface of glass cleaner on the scanner glass. If the scanner glass is stained with grease or some other hard-to remove it with mild detergent and water. 4. Note: Do not spray ...-remove material, use a small amount of the scanner glass. 1. Clean the outer case with a cloth dampened with a soft dry cloth. Parent topic: Using the Optional Flatbed Scanner Dock 97 If the glass surface is dirty, clean it . Wipe off the document scanner using the power button. Dust can cause spots in...

Users Guide
Page 98
Note: There is no power button on the flatbed scanner. 2. Unplug the AC power cord and disconnect the USB cable that connects the flatbed scanner dock to ship your product, transport it a long distance, or store it for an extended period, prepare it for transportation as described here. 1. Turn off the document scanner using the power button. Transporting the Flatbed Scanner Dock If you need to the computer. 98
Note: There is no power button on the flatbed scanner. 2. Unplug the AC power cord and disconnect the USB cable that connects the flatbed scanner dock to ship your product, transport it a long distance, or store it for an extended period, prepare it for transportation as described here. 1. Turn off the document scanner using the power button. Transporting the Flatbed Scanner Dock If you need to the computer. 98

Users Guide
Page 99
... you are transporting only the flatbed scanner dock (without the document scanner), follow the installation instructions that came with cushioning around the scanner. Parent topic: Using the Optional Flatbed Scanner Dock 99 Place the flatbed scanner dock in its original packing materials if possible, or use equivalent materials with the flatbed scanner dock in reverse to keep...
... you are transporting only the flatbed scanner dock (without the document scanner), follow the installation instructions that came with cushioning around the scanner. Parent topic: Using the Optional Flatbed Scanner Dock 99 Place the flatbed scanner dock in its original packing materials if possible, or use equivalent materials with the flatbed scanner dock in reverse to keep...


