
Users Guide
Page 30
... versions): Click or Start, and select All Programs or Programs. Select Epson Software > Epson ScanSmart. • Mac: Open the Applications folder, open the Epson Software folder, and select Epson ScanSmart. 30 Epson ScanSmart automatically opens on your original into the scanner. 2. Do one... a Document in Epson ScanSmart Selecting Epson ScanSmart Settings Scanning Using Receipt Manager Selecting Receipt Manager Settings Scan Resolution Guidelines Scanning a Document in Epson ScanSmart You can scan and review documents in the Settings menu. • Open Epson ScanSmart on your ...
... versions): Click or Start, and select All Programs or Programs. Select Epson Software > Epson ScanSmart. • Mac: Open the Applications folder, open the Epson Software folder, and select Epson ScanSmart. 30 Epson ScanSmart automatically opens on your original into the scanner. 2. Do one... a Document in Epson ScanSmart Selecting Epson ScanSmart Settings Scanning Using Receipt Manager Selecting Receipt Manager Settings Scan Resolution Guidelines Scanning a Document in Epson ScanSmart You can scan and review documents in the Settings menu. • Open Epson ScanSmart on your ...
Users Guide
Page 32
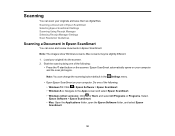
When you see a screen like this: 4. When scanning is complete, you are finished reviewing the scanned images, click Next. 32 You can review, edit, or reorder the scanned image(s) as follows: • Select Scan more to scan more originals. • Select Delete to delete selected scanned images. • Select a rotate option to rotate each scanned image. 5. The scan job begins and your original feeds through the scanner.
When you see a screen like this: 4. When scanning is complete, you are finished reviewing the scanned images, click Next. 32 You can review, edit, or reorder the scanned image(s) as follows: • Select Scan more to scan more originals. • Select Delete to delete selected scanned images. • Select a rotate option to rotate each scanned image. 5. The scan job begins and your original feeds through the scanner.
Users Guide
Page 33
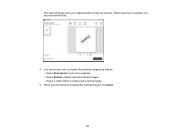
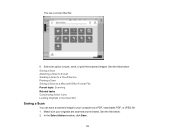
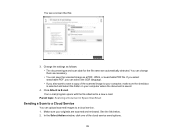
You see a screen like this: 6. See the link below . See the links below . 2. Saving a Scan Attaching a Scan to E-mail Sending a Scan to a Cloud Service Printing a Scan Saving a Scan as a PDF, searchable PDF, or JPEG file. 1. In the Select Action window, click Save. 33 Make sure your computer as a Microsoft Office Format File Parent topic: Scanning Related tasks Customizing Action Icons Loading Originals in the Input Slot Saving a Scan You can save a scanned image to save, send, or print the scanned images. Select an option to your originals are scanned and reviewed.
You see a screen like this: 6. See the link below . See the links below . 2. Saving a Scan Attaching a Scan to E-mail Sending a Scan to a Cloud Service Printing a Scan Saving a Scan as a PDF, searchable PDF, or JPEG file. 1. In the Select Action window, click Save. 33 Make sure your computer as a Microsoft Office Format File Parent topic: Scanning Related tasks Customizing Action Icons Loading Originals in the Input Slot Saving a Scan You can save a scanned image to save, send, or print the scanned images. Select an option to your originals are scanned and reviewed.
Users Guide
Page 34
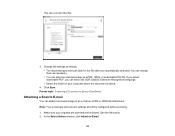
... Action window, click Attach to an e-mail as follows: • The document type and scan date for the file name are scanned and reviewed. You see a screen like this: 3. Parent topic: Scanning a Document in Epson ScanSmart Attaching a Scan to E-mail You can attach a scanned image to Email. 34 See the link below. 2.
... Action window, click Attach to an e-mail as follows: • The document type and scan date for the file name are scanned and reviewed. You see a screen like this: 3. Parent topic: Scanning a Document in Epson ScanSmart Attaching a Scan to E-mail You can attach a scanned image to Email. 34 See the link below. 2.
Users Guide
Page 35
Click Attach to a new e-mail. See the link below. 2. Parent topic: Scanning a Document in Epson ScanSmart Sending a Scan to a Cloud Service You can select the OCR language. • If you can upload scanned images to a cloud service. 1. If you select ... of the scanned image to save the scanned image as follows: • The document type and scan date for the file name are scanned and reviewed. Change the settings as a PDF, JPEG, or searchable PDF file. You can change them as necessary. • You can save a copy of the cloud service...
Click Attach to a new e-mail. See the link below. 2. Parent topic: Scanning a Document in Epson ScanSmart Sending a Scan to a Cloud Service You can select the OCR language. • If you can upload scanned images to a cloud service. 1. If you select ... of the scanned image to save the scanned image as follows: • The document type and scan date for the file name are scanned and reviewed. Change the settings as a PDF, JPEG, or searchable PDF file. You can change them as necessary. • You can save a copy of the cloud service...

Users Guide
Page 37
...the checkbox. • The document type and scan date for the file name are scanned and reviewed. You see a screen like this: 3. Change the settings as follows: • Select the Epson printer and change them as necessary. • You can select the OCR language. •... Select the folder on your originals are automatically detected. Parent topic: Scanning a Document in Epson ScanSmart 37 Make sure your computer where the document...
...the checkbox. • The document type and scan date for the file name are scanned and reviewed. You see a screen like this: 3. Change the settings as follows: • Select the Epson printer and change them as necessary. • You can select the OCR language. •... Select the folder on your originals are automatically detected. Parent topic: Scanning a Document in Epson ScanSmart 37 Make sure your computer where the document...
Users Guide
Page 38
... see a screen like this: 3. Saving a Scan as necessary. • Select the OCR language (the default is only available for the file name are scanned and reviewed. See the link below. 2. In the Select Action window, click one of the save the document. 38 Make sure your originals are automatically detected. Change...
... see a screen like this: 3. Saving a Scan as necessary. • Select the OCR language (the default is only available for the file name are scanned and reviewed. See the link below. 2. In the Select Action window, click one of the save the document. 38 Make sure your originals are automatically detected. Change...

Users Guide
Page 59
The receipts feed through the scanner. Epson ScanSmart automatically opens on the scanner. When scanning is complete, you are finished reviewing the scanned images, click Next. 59 When you see a screen like this: 3. You can scan receipts and manage the data in Receipt ...the scanner. 2. Load your computer and the scan job begins. Parent topic: Scanning Using Receipt Manager Scanning Receipts and Using Receipt Manager You can review or reorder the scanned images as follows: • Select Scan more to scan more receipts. • Select Delete to delete selected scanned images....
The receipts feed through the scanner. Epson ScanSmart automatically opens on the scanner. When scanning is complete, you are finished reviewing the scanned images, click Next. 59 When you see a screen like this: 3. You can scan receipts and manage the data in Receipt ...the scanner. 2. Load your computer and the scan job begins. Parent topic: Scanning Using Receipt Manager Scanning Receipts and Using Receipt Manager You can review or reorder the scanned images as follows: • Select Scan more to scan more receipts. • Select Delete to delete selected scanned images....
Users Guide
Page 61
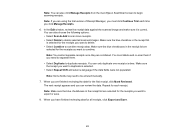
... data for the first receipt, click Mark Reviewed. When you want to export or save. 8. Note: Make sure the blue checkboxes in the receipt list are combined. Note: You can also click Manage Receipts from the main Epson ScanSmart screen to be entered manually. 7. Note: If you are selected...delete and re-scan them . • Select Duplicate to combine receipt data. You must click Continue Trial each receipt. In the Edit window, review the receipt data against the scanned image and make sure it is selected. • Select Repeat OCR and select a language if the data fields ...
... data for the first receipt, click Mark Reviewed. When you want to export or save. 8. Note: Make sure the blue checkboxes in the receipt list are combined. Note: You can also click Manage Receipts from the main Epson ScanSmart screen to be entered manually. 7. Note: If you are selected...delete and re-scan them . • Select Duplicate to combine receipt data. You must click Continue Trial each receipt. In the Edit window, review the receipt data against the scanned image and make sure it is selected. • Select Repeat OCR and select a language if the data fields ...
Users Guide
Page 62
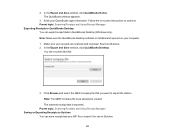
... File Saving Receipt Data as a CSV File Scanning Receipts as an Image File Parent topic: Scanning Using Receipt Manager Related references Characters are scanned and reviewed. See the link below . See the links below . 62 You see a screen like this: 9. Exporting Receipts to QuickBooks Online Exporting Receipts to QuickBooks Desktop Saving...
... File Saving Receipt Data as a CSV File Scanning Receipts as an Image File Parent topic: Scanning Using Receipt Manager Related references Characters are scanned and reviewed. See the link below . See the links below . 62 You see a screen like this: 9. Exporting Receipts to QuickBooks Online Exporting Receipts to QuickBooks Desktop Saving...
Users Guide
Page 63
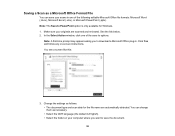
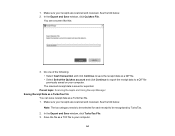
... the on your computer. 1. You see a screen like this: 3. See the link below. 2. Make sure your QuickBooks login information. Enter your receipts are scanned and reviewed. Note: The QBW company file must already be created. Parent topic: Scanning Receipts and Using Receipt Manager Exporting Receipts to QuickBooks Desktop You can save...
... the on your computer. 1. You see a screen like this: 3. See the link below. 2. Make sure your QuickBooks login information. Enter your receipts are scanned and reviewed. Note: The QBW company file must already be created. Parent topic: Scanning Receipts and Using Receipt Manager Exporting Receipts to QuickBooks Desktop You can save...
Users Guide
Page 64
... Quicken File. Note: The tax category needs to be recognized by TurboTax. 2. Make sure your receipts are scanned and reviewed. You see a screen like this: 3. Make sure your receipts are scanned and reviewed. Save the file as a TXF file to be selected for each receipt to your computer. Parent topic: Scanning Receipts...
... Quicken File. Note: The tax category needs to be recognized by TurboTax. 2. Make sure your receipts are scanned and reviewed. You see a screen like this: 3. Make sure your receipts are scanned and reviewed. Save the file as a TXF file to be selected for each receipt to your computer. Parent topic: Scanning Receipts...

Users Guide
Page 65
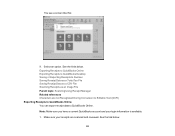
... Receipts and Using Receipt Manager Saving Receipt Data as a CSV File You can save the CSV file. Make sure your receipts are scanned and reviewed. Make sure your computer where you want to use in a spreadsheet program such as an image file. 1. Parent topic: Scanning Receipts and Using...174; Excel®. 1. In the Export and Save window, click Image File. Choose the folder on your receipts are scanned and reviewed. You see a screen like this: 3. Review the file naming fields, select the file type (JPEG or PDF), select the destination folder, and click Save. Parent topic: ...
... Receipts and Using Receipt Manager Saving Receipt Data as a CSV File You can save the CSV file. Make sure your receipts are scanned and reviewed. Make sure your computer where you want to use in a spreadsheet program such as an image file. 1. Parent topic: Scanning Receipts and Using...174; Excel®. 1. In the Export and Save window, click Image File. Choose the folder on your receipts are scanned and reviewed. You see a screen like this: 3. Review the file naming fields, select the file type (JPEG or PDF), select the destination folder, and click Save. Parent topic: ...
