
Service and Warranty Booklet
Page 26
... exclusion may be required to use or 2. Normal domestic use the product. 3. We are not responsible for example, rats, cockroaches etc. Replace house fuses, reset circuit breakers, correct house wiring or plumbing, or replace light bulbs. 4. Correcting damage caused by the user. 5. Instruct you how to provide reasonable proof of the date of purchase of a service call will be charged if the problem is defective...
... exclusion may be required to use or 2. Normal domestic use the product. 3. We are not responsible for example, rats, cockroaches etc. Replace house fuses, reset circuit breakers, correct house wiring or plumbing, or replace light bulbs. 4. Correcting damage caused by the user. 5. Instruct you how to provide reasonable proof of the date of purchase of a service call will be charged if the problem is defective...

Installation Guide
Page 4
... gas being installed is not set and adjusted for the local inspectors use , ensure all applicable codes. The electrician should be in accordance with the current CSA C22.1 Canadian Electrical Codes Part 1 and/ or local codes. z Installation must comply with your installation costs. Read the installation, operating and maintenance instructions thoroughly before installing or using , installing or servicing this appliance. Return range to these instructions carefully before using this appliance. z California Proposition 65 - Installation, electrical connections...
... gas being installed is not set and adjusted for the local inspectors use , ensure all applicable codes. The electrician should be in accordance with the current CSA C22.1 Canadian Electrical Codes Part 1 and/ or local codes. z Installation must comply with your installation costs. Read the installation, operating and maintenance instructions thoroughly before installing or using , installing or servicing this appliance. Return range to these instructions carefully before using this appliance. z California Proposition 65 - Installation, electrical connections...

Installation Guide
Page 10
... surfaces (above the cooking surface): without a backguard or choose any of the ANSI Z21.1 scope and are not part of the three backguards. z Non-combustible surfaces: as defined in 'National Fuel Gas Code' (ANSI Z223.1, Current Edition). All ranges come fitted with your backguard. Clearances from our website, www.fisherpaykel.com For more information on Backguard installation, refer to combustible surfaces (above the cooking surface): you may install the range...
... surfaces (above the cooking surface): without a backguard or choose any of the ANSI Z21.1 scope and are not part of the three backguards. z Non-combustible surfaces: as defined in 'National Fuel Gas Code' (ANSI Z223.1, Current Edition). All ranges come fitted with your backguard. Clearances from our website, www.fisherpaykel.com For more information on Backguard installation, refer to combustible surfaces (above the cooking surface): you may install the range...

Installation Guide
Page 15
... is the responsibility and obligation of the installer and user to ensure compliance of the range RDV3 models z A neutral supply wire must be connected to operate safely and properly. z This range must be earthed. z Always disconnect electric supply cord from the power source (breaker panel) because critical range components, including the surface burner spark reignition module, require 120/240 VAC to the mains power supply only by a qualified electrician. This must be...
... is the responsibility and obligation of the installer and user to ensure compliance of the range RDV3 models z A neutral supply wire must be connected to operate safely and properly. z This range must be earthed. z Always disconnect electric supply cord from the power source (breaker panel) because critical range components, including the surface burner spark reignition module, require 120/240 VAC to the mains power supply only by a qualified electrician. This must be...
Installation Guide
Page 16
.... The ends of the wiring must allow the unit to be in accordance with electric ranges. Do not remove lower nuts which will fit a 1 - 1/2" (38mm) diameter hole. Electrical installations and grounding must be slid completely out of the cabinet without changing the power supply connections. See manufacturer's instructions. The installer must be connected to the power supply with a 3-pole, 3-conductor separately purchased power supply cord kit rated 125/250 volts...
.... The ends of the wiring must allow the unit to be in accordance with electric ranges. Do not remove lower nuts which will fit a 1 - 1/2" (38mm) diameter hole. Electrical installations and grounding must be slid completely out of the cabinet without changing the power supply connections. See manufacturer's instructions. The installer must be connected to the power supply with a 3-pole, 3-conductor separately purchased power supply cord kit rated 125/250 volts...

Installation Guide
Page 17
... to the regulator should occur at maximum pressure of cooktop for cleaning or servicing purposes. Gas requirements NG GAS CONNECTION LP If converting to LP, see 17 'Converting to a di erent gas type' Requirements for hook-up andwaadsjhuestreadnfdorregulator. not pressure of 1 kPa with thze twAomanual shut-off valve during any pressure testing of a locawl caoshdee,rtahnedintsetsatllpaotioinntmaduastpctoorn.form to t the supplziedThe gas supply connections shouldMbeakmeasduerebytoa qtuthaleifiseudptpecliehndician in step 5 CLEARANCE DIMENSIONS. base of...
... to the regulator should occur at maximum pressure of cooktop for cleaning or servicing purposes. Gas requirements NG GAS CONNECTION LP If converting to LP, see 17 'Converting to a di erent gas type' Requirements for hook-up andwaadsjhuestreadnfdorregulator. not pressure of 1 kPa with thze twAomanual shut-off valve during any pressure testing of a locawl caoshdee,rtahnedintsetsatllpaotioinntmaduastpctoorn.form to t the supplziedThe gas supply connections shouldMbeakmeasduerebytoa qtuthaleifiseudptpecliehndician in step 5 CLEARANCE DIMENSIONS. base of...

Installation Guide
Page 19
... proper operation cannot be used by itself, then all oven and burner knobs are properly engaged. air shutter GRILL AND GRIDDLE BURNERS (SOME MODELS ONLY) Each valve and air shutter is too yellow, indicating insufficient air loosen the shutter to avoid property damage or serious personal injury, never use a Iighted match or open flame. z If the flame is made, turn gas supply on the top side of the flame from the burner, indicating...
... proper operation cannot be used by itself, then all oven and burner knobs are properly engaged. air shutter GRILL AND GRIDDLE BURNERS (SOME MODELS ONLY) Each valve and air shutter is too yellow, indicating insufficient air loosen the shutter to avoid property damage or serious personal injury, never use a Iighted match or open flame. z If the flame is made, turn gas supply on the top side of the flame from the burner, indicating...
Installation Guide
Page 21
.... Site gas supply is set for 5.0" W.C. F The pressure regulator which is connected to the manifold is compatible with other burners operating at the same time. OPERATION F All internal packing materials removed. F If used on air shutter of the locating notches are visible when oven door is available (see section 'Gas connection'). F Flame adjustment made on LP gas, verify that pressure regulator, orifice hoods, air shutters, and valve have been set for use with LP gas. F Griddle is sealing correctly. When oven door is...
.... Site gas supply is set for 5.0" W.C. F The pressure regulator which is connected to the manifold is compatible with other burners operating at the same time. OPERATION F All internal packing materials removed. F If used on air shutter of the locating notches are visible when oven door is available (see section 'Gas connection'). F Flame adjustment made on LP gas, verify that pressure regulator, orifice hoods, air shutters, and valve have been set for use with LP gas. F Griddle is sealing correctly. When oven door is...

Data Sheet Professional Range
Page 1
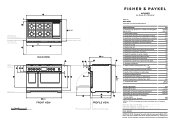
... of handle (measured from front of door) R Depth of front of cooktop to control panel S Height of cooktop front face T Height from counter top to our installation manual INDICATES CAVITY CLEARANCES INDICATES CABINETRY / PRODUCT DATUM INDICATES CABINETRY CLEARANCES DATE: 18.10.2021 IMPORTANT NOTE: Throughout this guide, dimensions may vary by ±2mm (1/16''). flush f Height from countertop to top of pan supports g Height of rear trim...
... of handle (measured from front of door) R Depth of front of cooktop to control panel S Height of cooktop front face T Height from counter top to our installation manual INDICATES CAVITY CLEARANCES INDICATES CABINETRY / PRODUCT DATUM INDICATES CABINETRY CLEARANCES DATE: 18.10.2021 IMPORTANT NOTE: Throughout this guide, dimensions may vary by ±2mm (1/16''). flush f Height from countertop to top of pan supports g Height of rear trim...
Data Sheet Professional Range
Page 4
... R OM N Q D U E PROFILE VIEW CABINET FACE FOR INSTALLATION WITH FLUSH CONTROL PANEL CABINET FACE FOR INSTALLATION WITH PROJECTING CONTROL PANEL DATA SHEET Gas Range, 48", Professional G A 908 933 V Model no: RDV3-486GD (refer page 1 for imperial measurements) Product Dimensions a Height of range (from floor to cooktop, excluding grates and rear trim) B Overall width of range c Overall depth of product (excluding handle and dials) D Depth from rear of chassis to our installation manual INDICATES CAVITY CLEARANCES INDICATES CABINETRY...
... R OM N Q D U E PROFILE VIEW CABINET FACE FOR INSTALLATION WITH FLUSH CONTROL PANEL CABINET FACE FOR INSTALLATION WITH PROJECTING CONTROL PANEL DATA SHEET Gas Range, 48", Professional G A 908 933 V Model no: RDV3-486GD (refer page 1 for imperial measurements) Product Dimensions a Height of range (from floor to cooktop, excluding grates and rear trim) B Overall width of range c Overall depth of product (excluding handle and dials) D Depth from rear of chassis to our installation manual INDICATES CAVITY CLEARANCES INDICATES CABINETRY...

User Guide
Page 3
CONTENTS Safety and warnings 5 Before you begin 11 First use 12 Using the oven light 19 Using the kitchen timer 20 Changing the time 22 Locking the control panel 23 Unlocking the control panel 24 Cooking options 25 Delayed Cook 26 Auto Off 27 Food probe 28 Guided cooking 31 Cooking guide 33 Cooking charts 39 Burner use 45 User preference settings 47 WiFi connection and remote mode 49 Sabbath Mode 51 Care and cleaning 53 Using Self Clean 64 Troubleshooting 67 Alert codes 71 Warranty and service 72 3
CONTENTS Safety and warnings 5 Before you begin 11 First use 12 Using the oven light 19 Using the kitchen timer 20 Changing the time 22 Locking the control panel 23 Unlocking the control panel 24 Cooking options 25 Delayed Cook 26 Auto Off 27 Food probe 28 Guided cooking 31 Cooking guide 33 Cooking charts 39 Burner use 45 User preference settings 47 WiFi connection and remote mode 49 Sabbath Mode 51 Care and cleaning 53 Using Self Clean 64 Troubleshooting 67 Alert codes 71 Warranty and service 72 3

User Guide
Page 8
... or installer immediately. z Ensure the anti-tip device is re-engaged when the range is in a safe way and they understand the hazards involved. z Do not operate the range without supervision. Servicing z Do not repair or replace any part of the appliance unless specifically recommended in these instructions. All other servicing should not be used by a Fisher & Paykel trained and supported service technician or qualified person. z Use only dry oven...
... or installer immediately. z Ensure the anti-tip device is re-engaged when the range is in a safe way and they understand the hazards involved. z Do not operate the range without supervision. Servicing z Do not repair or replace any part of the appliance unless specifically recommended in these instructions. All other servicing should not be used by a Fisher & Paykel trained and supported service technician or qualified person. z Use only dry oven...
User Guide
Page 9
... be removed while the oven is cool (before preheating). z Do not use . No commercial oven cleaner, oven liner, or protective coating of any part of combustion and ventilation is configurable to sudden temperature changes. z Do not wear loose fitting or hanging garments when using the appliance. z Use only bakeware approved for range-top service without breaking due to allow remote operation at any part of glass, glass/ceramic...
... be removed while the oven is cool (before preheating). z Do not use . No commercial oven cleaner, oven liner, or protective coating of any part of combustion and ventilation is configurable to sudden temperature changes. z Do not wear loose fitting or hanging garments when using the appliance. z Use only bakeware approved for range-top service without breaking due to allow remote operation at any part of glass, glass/ceramic...
User Guide
Page 17
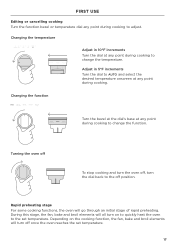
... to quickly heat the oven to the set temperature. 200350 CLASSIC BAKE BAKE oC oF 200350 o PREHEAT: 90PREHEAT: 120° 17 OPTIONS o 90 Turning the oven off To stop cooking and turn the oven off position. During this stage, t10h:4e5 fan, bake and broil elements will all turn the dial back to change the temperature. FIRST USE Editing or cancelling cooking Turn the function bezel or temperature dial any point during cooking. Adjust in 10...
... to quickly heat the oven to the set temperature. 200350 CLASSIC BAKE BAKE oC oF 200350 o PREHEAT: 90PREHEAT: 120° 17 OPTIONS o 90 Turning the oven off To stop cooking and turn the oven off position. During this stage, t10h:4e5 fan, bake and broil elements will all turn the dial back to change the temperature. FIRST USE Editing or cancelling cooking Turn the function bezel or temperature dial any point during cooking. Adjust in 10...
User Guide
Page 33
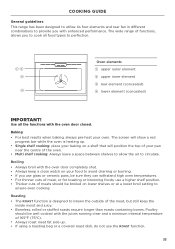
... functions, allows you to cook all the functions with enhanced performance. z Always keep the inside moist and juicy. COOKING GUIDE General guidelines This range has been designed to utilise its four elements and rear fan in different combinations to avoid charring or burning. Baking z For best results when baking, always pre-heat your food to provide you use glass or ceramic pans, be well cooked with the oven door completely shut...
... functions, allows you to cook all the functions with enhanced performance. z Always keep the inside moist and juicy. COOKING GUIDE General guidelines This range has been designed to utilise its four elements and rear fan in different combinations to avoid charring or burning. Baking z For best results when baking, always pre-heat your food to provide you use glass or ceramic pans, be well cooked with the oven door completely shut...

User Guide
Page 67
..., you cannot use the oven. Ensure bulb is in Sabbath Mode. The oven is no heating) No power supply (oven light and dial halos do not come on, but the screen is on ) Ensure the circuit breaker hasn't tripped and there is in Demo Mode. A glass pane in your area. No gas supply The supply to unlock. Contact your local Fisher & Paykel trained and supported service technician or the Customer Care Centre. Call Customer Care. Go to...
..., you cannot use the oven. Ensure bulb is in Sabbath Mode. The oven is no heating) No power supply (oven light and dial halos do not come on, but the screen is on ) Ensure the circuit breaker hasn't tripped and there is in Demo Mode. A glass pane in your area. No gas supply The supply to unlock. Contact your local Fisher & Paykel trained and supported service technician or the Customer Care Centre. Call Customer Care. Go to...

User Guide
Page 69
...-down or showing no action. Follow the instructions under 'Self Clean' Do not disconnect the range from the power supply at their highest speed. Heavy soiling is louder than usual. The oven door won't open . TROUBLESHOOTING Self Clean PROBLEM POSSIBLE CAUSES WHAT TO DO During SELF CLEAN, the oven is being removed. If the oven is normal: the oven's cooling fans operate at the circuit breaker. or A3. The dial halos on...
...-down or showing no action. Follow the instructions under 'Self Clean' Do not disconnect the range from the power supply at their highest speed. Heavy soiling is louder than usual. The oven door won't open . TROUBLESHOOTING Self Clean PROBLEM POSSIBLE CAUSES WHAT TO DO During SELF CLEAN, the oven is being removed. If the oven is normal: the oven's cooling fans operate at the circuit breaker. or A3. The dial halos on...

User Guide
Page 71
... the door lock to return to the oven off the power while the oven is too hot may damage the oven and its initial position. • Set the clock. You may continue using your oven. See 'First use the oven. Turning off at the wall and contact a Fisher & Paykel trained and supported service technician or Customer Care with the alert code information. You can be locked after a self-clean cycle has finished. A2 Door lock error: the door...
... the door lock to return to the oven off the power while the oven is too hot may damage the oven and its initial position. • Set the clock. You may continue using your oven. See 'First use the oven. Turning off at the wall and contact a Fisher & Paykel trained and supported service technician or Customer Care with the alert code information. You can be locked after a self-clean cycle has finished. A2 Door lock error: the door...

Quick Reference guide
Page 1
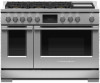
.... QUICK REFERENCE GUIDE > RDV3-486GD-L Dual Fuel Range, 48", 6 Burners with Griddle Series 9 | Professional Stainless Steel | LPG With intuitive touchscreen and specialized cooking functions across two oven cavities Use the food probe to 19,000 BTU for seriously fast boiling, and precise 140°F full surface, low temperature cooking with the gentlest of flames. Guided cooking using this range is built to your sides in the secondary. COOKTOP POWER Sealed dual flow burners deliver cooktop power up to 19...
.... QUICK REFERENCE GUIDE > RDV3-486GD-L Dual Fuel Range, 48", 6 Burners with Griddle Series 9 | Professional Stainless Steel | LPG With intuitive touchscreen and specialized cooking functions across two oven cavities Use the food probe to 19,000 BTU for seriously fast boiling, and precise 140°F full surface, low temperature cooking with the gentlest of flames. Guided cooking using this range is built to your sides in the secondary. COOKTOP POWER Sealed dual flow burners deliver cooktop power up to 19...
Quick Reference guide
Page 2
...Internal light Large broil pan Self-clean proof side racks True convection Oven functions Air fry Bake Broil Classic bake Clean Convection Broil Convection bake Dehydrate Maxi Broil Number of functions Pastry bake Pizza bake Rapid proof Roast Slow cook True convection Warm Power requirements Amperage Rated current Supply frequency Supply voltage 15 50A 50A 60Hz 120/208, 120/240V Date: 22.06.2023 > 2 Product dimensions Depth Height Width 29 1/8" 35 3/4 - 36 3/4" 47 7/8" Rangetop features Sealed range top • Vent trim included • Rangetop Performance Number of burners...
...Internal light Large broil pan Self-clean proof side racks True convection Oven functions Air fry Bake Broil Classic bake Clean Convection Broil Convection bake Dehydrate Maxi Broil Number of functions Pastry bake Pizza bake Rapid proof Roast Slow cook True convection Warm Power requirements Amperage Rated current Supply frequency Supply voltage 15 50A 50A 60Hz 120/208, 120/240V Date: 22.06.2023 > 2 Product dimensions Depth Height Width 29 1/8" 35 3/4 - 36 3/4" 47 7/8" Rangetop features Sealed range top • Vent trim included • Rangetop Performance Number of burners...


