
User Manual
Page 1
All rights reserved. All product names are subject to change without notice. Ti200, Ti300, Ti400, Ti450 Thermal Imagers Users Manual September 2013, Rev. 2, 3/16 © 2013-2016 Fluke Corporation. Specifications are trademarks of their respective companies.
All rights reserved. All product names are subject to change without notice. Ti200, Ti300, Ti400, Ti450 Thermal Imagers Users Manual September 2013, Rev. 2, 3/16 © 2013-2016 Fluke Corporation. Specifications are trademarks of their respective companies.

User Manual
Page 4
Ti200, Ti300, Ti400, Ti450 Users Manual Spot Temperatures 31 Spot Markers 32 Center Box 32 Image Menu 33 Palette 34 IR-Fusion Technology 35 Color Alarms 36 Display Graphics Presentation 37 Image Enhancement (Ti450 38 Logo 40 Distance 40 Zoom (Ti450 41 Camera Menu 42 LaserSharp Auto Focus ...56 Streaming Video (Remote Display 57 Stream Live to a PC 57 Stream Live with Fluke Connect Software 58 Stream Live to an HDMI Device 58 Remote Control (Ti400 and Ti450 59 Maintenance 59 How to Clean the Case 60 Battery Care 60 General Specifications 61 Detailed...
Ti200, Ti300, Ti400, Ti450 Users Manual Spot Temperatures 31 Spot Markers 32 Center Box 32 Image Menu 33 Palette 34 IR-Fusion Technology 35 Color Alarms 36 Display Graphics Presentation 37 Image Enhancement (Ti450 38 Logo 40 Distance 40 Zoom (Ti450 41 Camera Menu 42 LaserSharp Auto Focus ...56 Streaming Video (Remote Display 57 Stream Live to a PC 57 Stream Live with Fluke Connect Software 58 Stream Live to an HDMI Device 58 Remote Control (Ti400 and Ti450 59 Maintenance 59 How to Clean the Case 60 Battery Care 60 General Specifications 61 Detailed...

User Manual
Page 6
..., print, or download the latest manual supplement, visit http://us.fluke.com/usen/support/manuals. 2 Ti200, Ti300, Ti400,Ti450 Users Manual Productivity Features • Voice Annotation • IR-PhotoNotes photo annotations • WiFi connectivity • Streaming video • Remote control and operation (Ti400 and Ti450 only) How to Contact Fluke To contact Fluke, call one of the following telephone...
..., print, or download the latest manual supplement, visit http://us.fluke.com/usen/support/manuals. 2 Ti200, Ti300, Ti400,Ti450 Users Manual Productivity Features • Voice Annotation • IR-PhotoNotes photo annotations • WiFi connectivity • Streaming video • Remote control and operation (Ti400 and Ti450 only) How to Contact Fluke To contact Fluke, call one of the following telephone...

User Manual
Page 8
.... 4 These objects pose a burn hazard. • Do not use the Product if it is damaged. • See emissivity information for actual temperatures. Ti200, Ti300, Ti400,Ti450 Users Manual W Warning To prevent personal injury: • Read all safety information before you use the Product. • Carefully read all instructions. • Use the Product only...
.... 4 These objects pose a burn hazard. • Do not use the Product if it is damaged. • See emissivity information for actual temperatures. Ti200, Ti300, Ti400,Ti450 Users Manual W Warning To prevent personal injury: • Read all safety information before you use the Product. • Carefully read all instructions. • Use the Product only...

User Manual
Page 10
Table 2. Ti200, Ti300, Ti400,Ti450 Users Manual Radio Frequency Data See Imager Information for instructions on the Imager. Accessories Model Description FLK-TI-SBP3 Smart Battery Pack FLK-TI-SBC3B Charging Base/... and allow more applications for PN 4409209. See Figures 2 and 3 for the Imager. To view the Radio Frequency Data Class B Instruction Sheet, visit http://us.fluke.com/usen/support/manuals and search for your infrared inspection work.
Table 2. Ti200, Ti300, Ti400,Ti450 Users Manual Radio Frequency Data See Imager Information for instructions on the Imager. Accessories Model Description FLK-TI-SBP3 Smart Battery Pack FLK-TI-SBC3B Charging Base/... and allow more applications for PN 4409209. See Figures 2 and 3 for the Imager. To view the Radio Frequency Data Class B Instruction Sheet, visit http://us.fluke.com/usen/support/manuals and search for your infrared inspection work.
User Manual
Page 12
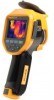
Ti200, Ti300, Ti400,Ti450 Users Manual 2 1 Figure 3. 4X Telephoto Lens Installation Before You Start Carefully unpack the items in the shipment box: • Thermal Imager • AC Power Supply with Universal Adapters • Two-Bay Battery Charge Base • 2 Lithium-ion Smart Batteries • Hard Carrying Case • USB Cable • HDMI Cable • Removable Memory Card [1] • Soft Transport Bag • Adjustable Hand Strap (Left-hand or Right-hand use) • Info Pack with Safety Information [2] hie09.eps 8
Ti200, Ti300, Ti400,Ti450 Users Manual 2 1 Figure 3. 4X Telephoto Lens Installation Before You Start Carefully unpack the items in the shipment box: • Thermal Imager • AC Power Supply with Universal Adapters • Two-Bay Battery Charge Base • 2 Lithium-ion Smart Batteries • Hard Carrying Case • USB Cable • HDMI Cable • Removable Memory Card [1] • Soft Transport Bag • Adjustable Hand Strap (Left-hand or Right-hand use) • Info Pack with Safety Information [2] hie09.eps 8
User Manual
Page 14
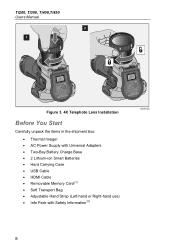
... not flash. 3. Keep the Imager attached to show that the Imager is in hot or cold areas. Do not charge in process. Ti200, Ti300, Ti400,Ti450 Users Manual On-Imager AC Power Socket 1. Disconnect ac power adapter when the smart battery is disabled automatically. 10 Connect the ac power adapter into an AC...
... not flash. 3. Keep the Imager attached to show that the Imager is in hot or cold areas. Do not charge in process. Ti200, Ti300, Ti400,Ti450 Users Manual On-Imager AC Power Socket 1. Disconnect ac power adapter when the smart battery is disabled automatically. 10 Connect the ac power adapter into an AC...
User Manual
Page 16
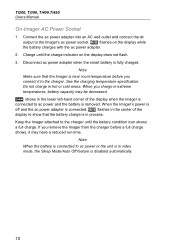
Ti200, Ti300, Ti400,Ti450 Users Manual Download Firmware 1. Note Some Imagers have both A and Micro B connector jacks. To use the Micro B jack on the Imager. Connect the USB A connector end of ... installs the device driver for use with the Imager and appears on the Imager. 2. Enable the Radio In countries with the radios disabled. Go to Fluke Connect on the SmartView software toolbar menu. 3. SmartView software recognizes the connection with the Imager. Once the firmware is available, SmartView software prompts you to...
Ti200, Ti300, Ti400,Ti450 Users Manual Download Firmware 1. Note Some Imagers have both A and Micro B connector jacks. To use the Micro B jack on the Imager. Connect the USB A connector end of ... installs the device driver for use with the Imager and appears on the Imager. 2. Enable the Radio In countries with the radios disabled. Go to Fluke Connect on the SmartView software toolbar menu. 3. SmartView software recognizes the connection with the Imager. Once the firmware is available, SmartView software prompts you to...

User Manual
Page 18
... in Extreme Conditions Storage and/or continual operation of the Imager in 3-5 minutes, it is always best to wait a minimum of operation. Ti200, Ti300, Ti400,Ti450 Users Manual Turn On and Off the Imager To turn on or turn off the Imager, push and hold + for more adjustment time can be required. If...
... in Extreme Conditions Storage and/or continual operation of the Imager in 3-5 minutes, it is always best to wait a minimum of operation. Ti200, Ti300, Ti400,Ti450 Users Manual Turn On and Off the Imager To turn on or turn off the Imager, push and hold + for more adjustment time can be required. If...

User Manual
Page 20
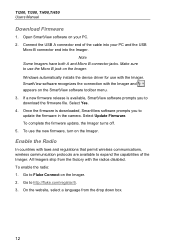
Features and Controls (cont.) Description + Power On/Off Function Buttons (F1, F2, and F3) Arrow Buttons Lithium-ion Smart Battery Hand Strap Manual Focus Control 2-Bay Battery Charging Base AC Power Supply with Universal Adapters 17 16 15 14 18 Ti200 IR FUSION TECHNOLOGY 19 20 21 22 23 24 Connector Cover AC Adapter/Charger Input Terminal USB Storage Device Connection 16 hie06.eps Ti200, Ti300, Ti400,Ti450 Users Manual Item Table 3.
Features and Controls (cont.) Description + Power On/Off Function Buttons (F1, F2, and F3) Arrow Buttons Lithium-ion Smart Battery Hand Strap Manual Focus Control 2-Bay Battery Charging Base AC Power Supply with Universal Adapters 17 16 15 14 18 Ti200 IR FUSION TECHNOLOGY 19 20 21 22 23 24 Connector Cover AC Adapter/Charger Input Terminal USB Storage Device Connection 16 hie06.eps Ti200, Ti300, Ti400,Ti450 Users Manual Item Table 3.
User Manual
Page 22
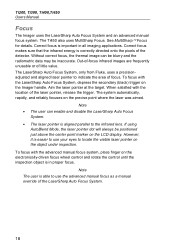
... pixels of the detector. To focus with the location of the LaserSharp Auto Focus System. 18 The LaserSharp Auto Focus System, only from Fluke, uses a precisionadjusted and aligned laser pointer to use your eyes to the infrared lens. Aim the laser pointer at the target. If ... control until the inspection object is able to indicate the area of little value. Ti200, Ti300, Ti400,Ti450 Users Manual Focus The Imager uses the LaserSharp Auto Focus System and an advanced manual focus system. See MultiSharp Focus for details. However, it is important in proper focus. To ...
... pixels of the detector. To focus with the location of the LaserSharp Auto Focus System. 18 The LaserSharp Auto Focus System, only from Fluke, uses a precisionadjusted and aligned laser pointer to use your eyes to the infrared lens. Aim the laser pointer at the target. If ... control until the inspection object is able to indicate the area of little value. Ti200, Ti300, Ti400,Ti450 Users Manual Focus The Imager uses the LaserSharp Auto Focus System and an advanced manual focus system. See MultiSharp Focus for details. However, it is important in proper focus. To ...
User Manual
Page 24
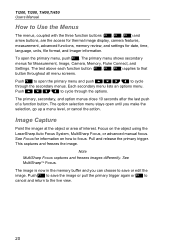
... menu and push to the live view. 20 Note MultiSharp Focus captures and freezes images differently. See Focus for Measurement, Image, Camera, Memory, Fluke Connect, and Settings. Push to focus. See MultiSharp Focus. The image is now in the memory buffer and you make the.... The primary menu shows secondary menus for information on the object using the LaserSharp Auto Focus System, MultiSharp Focus, or advanced manual focus. Pull and release the primary trigger. Ti200, Ti300, Ti400,Ti450 Users Manual How to that button throughout all menu screens.
... menu and push to the live view. 20 Note MultiSharp Focus captures and freezes images differently. See Focus for Measurement, Image, Camera, Memory, Fluke Connect, and Settings. Push to focus. See MultiSharp Focus. The image is now in the memory buffer and you make the.... The primary menu shows secondary menus for information on the object using the LaserSharp Auto Focus System, MultiSharp Focus, or advanced manual focus. Pull and release the primary trigger. Ti200, Ti300, Ti400,Ti450 Users Manual How to that button throughout all menu screens.
User Manual
Page 26
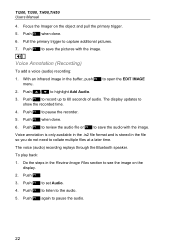
... to listen to set Audio. 4. The display updates to capture additional pictures. 7. Pull the primary trigger to show the recorded time. 4. Ti200, Ti300, Ti400,Ti450 Users Manual 4. i Voice Annotation (Recording) To add a voice (audio) recording: 1. Voice annotation is only available in the .is2 file format and is stored in the file so...
... to listen to set Audio. 4. The display updates to capture additional pictures. 7. Pull the primary trigger to show the recorded time. 4. Ti200, Ti300, Ti400,Ti450 Users Manual 4. i Voice Annotation (Recording) To add a voice (audio) recording: 1. Voice annotation is only available in the .is2 file format and is stored in the file so...
User Manual
Page 28
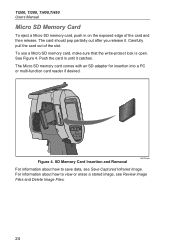
... Card Insertion and Removal hie03.eps For information about how to save data, see Review Image Files and Delete Image Files. 24 Ti200, Ti300, Ti400,Ti450 Users Manual Micro SD Memory Card To eject a Micro SD memory card, push in until it . The Micro SD memory card comes with an SD adapter for...
... Card Insertion and Removal hie03.eps For information about how to save data, see Review Image Files and Delete Image Files. 24 Ti200, Ti300, Ti400,Ti450 Users Manual Micro SD Memory Card To eject a Micro SD memory card, push in until it . The Micro SD memory card comes with an SD adapter for...

User Manual
Page 30
... Push to adjust the span setting. Use / to set the new selection. Ti200, Ti300, Ti400,Ti450 Users Manual Measurement Menu The Measurement Menu has settings for the calculation and display of radiometric temperature measurement data related to Measurement > Set ...level setting. Use / to Measurement > Range. 2. Range Preset measurement ranges and a Full Automatic Range are set the range. In manual mode the Set Level/Span control is active. To select the range: 1. Push to set for more information about the minimum span. ...
... Push to adjust the span setting. Use / to set the new selection. Ti200, Ti300, Ti400,Ti450 Users Manual Measurement Menu The Measurement Menu has settings for the calculation and display of radiometric temperature measurement data related to Measurement > Set ...level setting. Use / to Measurement > Range. 2. Range Preset measurement ranges and a Full Automatic Range are set the range. In manual mode the Set Level/Span control is active. To select the range: 1. Push to set for more information about the minimum span. ...

User Manual
Page 32
... the temperature span. 2. Level and Span Settings hie07.eps Temperature Span for Manual Operation Mode When in manual mode, the span setting contracts or expands in a selected palette in size. 28 In the live manual mode, the arrow buttons are always available to adjust the level and span.... While you adjust the manual span, the scale along the right side of the display shows the thermal span increasing or decreasing in a temperature range within the total range. Ti200, Ti300, Ti400,Ti450 Users Manual Level Total Imager Range Span Figure 5. To adjust the...
... the temperature span. 2. Level and Span Settings hie07.eps Temperature Span for Manual Operation Mode When in manual mode, the span setting contracts or expands in a selected palette in size. 28 In the live manual mode, the arrow buttons are always available to adjust the level and span.... While you adjust the manual span, the scale along the right side of the display shows the thermal span increasing or decreasing in a temperature range within the total range. Ti200, Ti300, Ti400,Ti450 Users Manual Level Total Imager Range Span Figure 5. To adjust the...

User Manual
Page 34
..., you see Emissivity Adjustment. Push / to select the material. To adjust the background temperature: 1. Push to change the value. 3. Ti200, Ti300, Ti400,Ti450 Users Manual Select by Table To select from a list of interest, especially when surface emissivity is low.
..., you see Emissivity Adjustment. Push / to select the material. To adjust the background temperature: 1. Push to change the value. 3. Ti200, Ti300, Ti400,Ti450 Users Manual Select by Table To select from a list of interest, especially when surface emissivity is low.

User Manual
Page 36
... Span mode, the Imager automatically sets the level and span according to different levels within the parameters of the Center Box. 32 Ti200, Ti300, Ti400,Ti450 Users Manual Spot Markers Up to highlight the next marker. Push to set the marker option and go to Done, Next, and Cancel. The zone lets... the user see the Move Marker icon and the labels on the function buttons change the Marker position on the display. To change to the "Move Marker...
... Span mode, the Imager automatically sets the level and span according to different levels within the parameters of the Center Box. 32 Ti200, Ti300, Ti400,Ti450 Users Manual Spot Markers Up to highlight the next marker. Push to set the marker option and go to Done, Next, and Cancel. The zone lets... the user see the Move Marker icon and the labels on the function buttons change the Marker position on the display. To change to the "Move Marker...

User Manual
Page 38
... allow for best presentation of the infrared images on display or captured. Push / to Image > Palette > Standard or Ultra Contrast. 2. Ti200, Ti300, Ti400,Ti450 Users Manual Palette The Palette menu lets you change the false-color presentation of detail. The Ultra Contrast Palettes offer a weighted presentation of colors. Push ...
... allow for best presentation of the infrared images on display or captured. Push / to Image > Palette > Standard or Ultra Contrast. 2. Ti200, Ti300, Ti400,Ti450 Users Manual Palette The Palette menu lets you change the false-color presentation of detail. The Ultra Contrast Palettes offer a weighted presentation of colors. Push ...

User Manual
Page 40
... Depending on objects or areas that are below the set apparent temperature (or set apparent temperature alarm level. Go to view the menu. The user must manually determine and set the new value. 36 Note The Imager does not sense ambient or surface dew point level automatically. Push to Image... Image > Color Alarm. 2. The imager also displays color isotherms, or infrared information, inside or outside of a set a high-temperature color alarm: 1. Ti200, Ti300, Ti400,Ti450 Users Manual When you can use the low-temperature color alarm function as a dew point color alarm...
... Depending on objects or areas that are below the set apparent temperature (or set apparent temperature alarm level. Go to view the menu. The user must manually determine and set the new value. 36 Note The Imager does not sense ambient or surface dew point level automatically. Push to Image... Image > Color Alarm. 2. The imager also displays color isotherms, or infrared information, inside or outside of a set a high-temperature color alarm: 1. Ti200, Ti300, Ti400,Ti450 Users Manual When you can use the low-temperature color alarm function as a dew point color alarm...


