
English Manual.
Page 5
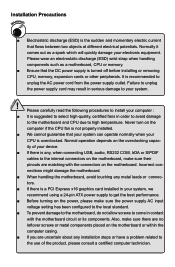
... a motherboard, CPU or memory. ■ Ensure that the DC power supply is a PCI Express x16 graphics card installed in order to avoid damage to the motherboard and CPU due to install your computer : ■ It is the sudden and momentary electric current that your system can operate normally when your system, we recommend using a 24-pin ATX power supply to get the best performance. ■ Before turning on the power...
... a motherboard, CPU or memory. ■ Ensure that the DC power supply is a PCI Express x16 graphics card installed in order to avoid damage to the motherboard and CPU due to install your computer : ■ It is the sudden and momentary electric current that your system can operate normally when your system, we recommend using a 24-pin ATX power supply to get the best performance. ■ Before turning on the power...

English Manual.
Page 10
...Bundled Software FOX ONE FOX LiveUpdate FOX LOGO FOX DMI Operating System Support for Microsoft® Windows® Vista/XP only Form Factor Micro ATX Form Factor, 9.6 inches x 8.0 inches (24.4cm x 20.3cm) ! 1 1 x VGA port 1 x Parallel port 1 x Serial port 4 x USB 2.0 ports 1 x RJ-45 LAN port 6-channel Audio ports Hardware Monitor System voltage detection CPU/System temperature detection CPU/System fan speed detection CPU/System overheating warning CPU/System fan speed control PCI Express x1 Support 250MB/s (500MB/s concurrent) bandwidth Low power consumption...
...Bundled Software FOX ONE FOX LiveUpdate FOX LOGO FOX DMI Operating System Support for Microsoft® Windows® Vista/XP only Form Factor Micro ATX Form Factor, 9.6 inches x 8.0 inches (24.4cm x 20.3cm) ! 1 1 x VGA port 1 x Parallel port 1 x Serial port 4 x USB 2.0 ports 1 x RJ-45 LAN port 6-channel Audio ports Hardware Monitor System voltage detection CPU/System temperature detection CPU/System fan speed detection CPU/System overheating warning CPU/System fan speed control PCI Express x1 Support 250MB/s (500MB/s concurrent) bandwidth Low power consumption...
English Manual.
Page 19
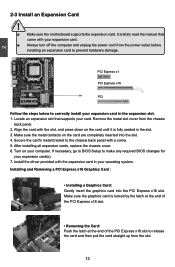
... graphics card into the slot. 4. 2 CAUTION 2-3 Install an Expansion Card ! ■ Make sure the motherboard supports the expansion card. PCI Express x1 PCI Express x16 PCI Follow the steps below to correctly install your expansion card in your expansion card. ■ Always turn off the computer and unplug the power cord from the power outlet before installing an expansion card to make any required BIOS changes for your card. After installing all expansion cards, replace the chassis cover. 6. Turn...
... graphics card into the slot. 4. 2 CAUTION 2-3 Install an Expansion Card ! ■ Make sure the motherboard supports the expansion card. PCI Express x1 PCI Express x16 PCI Follow the steps below to correctly install your expansion card in your expansion card. ■ Always turn off the computer and unplug the power cord from the power outlet before installing an expansion card to make any required BIOS changes for your card. After installing all expansion cards, replace the chassis cover. 6. Turn...
English Manual.
Page 21
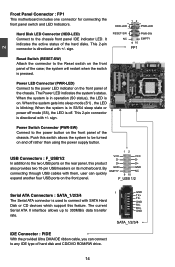
2 Front Panel Connector : FP1 This motherboard includes one connector for connecting the front panel switch and LED Indicators. When the system is in S3/S4 sleep state or power off mode (S5), the LED is off rather than using the power supply button. 12 USB Connectors : F_USB1/2 VCC D- This 2-pin connector is used to any IDE type of hard disk and CD/DVD ROM/RW drive. 14 F_USB 1/2 Serial ATA Connectors : SATA_1/2/3/4 The Serial ATA connector is directional with SATA Hard Disk or CD devices which support this...
2 Front Panel Connector : FP1 This motherboard includes one connector for connecting the front panel switch and LED Indicators. When the system is in S3/S4 sleep state or power off mode (S5), the LED is off rather than using the power supply button. 12 USB Connectors : F_USB1/2 VCC D- This 2-pin connector is used to any IDE type of hard disk and CD/DVD ROM/RW drive. 14 F_USB 1/2 Serial ATA Connectors : SATA_1/2/3/4 The Serial ATA connector is directional with SATA Hard Disk or CD devices which support this...

English Manual.
Page 23
... of the jumper settings. Plug in the power cord to temporarily short them . "Closed" means placing a jumper cap on . 16 Normal 1 2 (Default) 3 CLR_CMOS ■ Disconnect the power cable before adjusting the jumper settings. ■ Do not clear the CMOS while the system is simply labeled as "1". 2. Return the setting to clear CMOS data are : 1. The steps to its original with pins 2-3 closed Clear CMOS Jumper: CLR_CMOS The motherboard uses CMOS RAM to use the various...
... of the jumper settings. Plug in the power cord to temporarily short them . "Closed" means placing a jumper cap on . 16 Normal 1 2 (Default) 3 CLR_CMOS ■ Disconnect the power cable before adjusting the jumper settings. ■ Do not clear the CMOS while the system is simply labeled as "1". 2. Return the setting to clear CMOS data are : 1. The steps to its original with pins 2-3 closed Clear CMOS Jumper: CLR_CMOS The motherboard uses CMOS RAM to use the various...
English Manual.
Page 27
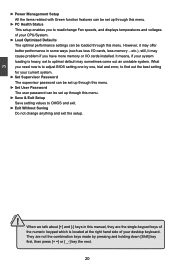
... keys of the numeric keypad which is located at the right hand side of your CPU/System. ► Load Optimized Defaults The optimal performance settings can be set up through this menu. ► Set User Password The user password can be loaded through this menu. ► Save & Exit Setup Save setting values to CMOS and exit. ► Exit Without Saving Do not change Fan speeds, and displays temperatures and voltages of your desktop keyboard. 3 CAUTION ► Power...
... keys of the numeric keypad which is located at the right hand side of your CPU/System. ► Load Optimized Defaults The optimal performance settings can be set up through this menu. ► Set User Password The user password can be loaded through this menu. ► Save & Exit Setup Save setting values to CMOS and exit. ► Exit Without Saving Do not change Fan speeds, and displays temperatures and voltages of your desktop keyboard. 3 CAUTION ► Power...
English Manual.
Page 28
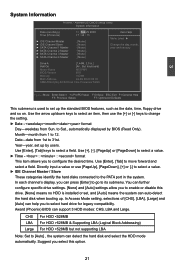
... the hard disk and select the HDD mode automatically. to select hard drive for legacy compatibility. Date-date from Sun. You can auto-detect the hard disk when booting up by BIOS (Read Only). Month-month from 1 to the PATA port in .] Halt On [All , But Keyboard] Model Name M61PMV BIOS Version B10 Memory 1024M MAC Address 04 4B 80 80 80 03 AMD Athlon(tm) 64 X2 Dual Core Processor 5200+ Move Enter:Select...
... the hard disk and select the HDD mode automatically. to select hard drive for legacy compatibility. Date-date from Sun. You can auto-detect the hard disk when booting up by BIOS (Read Only). Month-month from 1 to the PATA port in .] Halt On [All , But Keyboard] Model Name M61PMV BIOS Version B10 Memory 1024M MAC Address 04 4B 80 80 80 03 AMD Athlon(tm) 64 X2 Dual Core Processor 5200+ Move Enter:Select...

English Manual.
Page 30
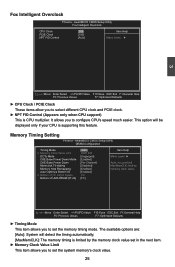
...idling. The CPUNB HT Speed option controls the physical speed of memory group(1.8V). AwardBIOS CMOS Setup Utility Fox Central Control Unit ► Smart BIOS ► Fox Intelligent Overclock ► Memory Timing Setting Memory Voltage K8NB HT Speed K8NB HT Width PCIE Spread Spectrum CPU Spread Spectrum AMD K8 Cool&Quiet Control Super BIOS Protect Auto Detect PCI CIK [Press Enter] Item Help [Press Enter] [Press Enter] Menu Level ► [Default] [Auto] [Auto] [Disabled] [Disabled] [Auto] [Disabled] [Disabled] 3 Move Enter:Select +/-/PU/PD:Value...
...idling. The CPUNB HT Speed option controls the physical speed of memory group(1.8V). AwardBIOS CMOS Setup Utility Fox Central Control Unit ► Smart BIOS ► Fox Intelligent Overclock ► Memory Timing Setting Memory Voltage K8NB HT Speed K8NB HT Width PCIE Spread Spectrum CPU Spread Spectrum AMD K8 Cool&Quiet Control Super BIOS Protect Auto Detect PCI CIK [Press Enter] Item Help [Press Enter] [Press Enter] Menu Level ► [Default] [Auto] [Auto] [Disabled] [Disabled] [Auto] [Disabled] [Disabled] 3 Move Enter:Select +/-/PU/PD:Value...

English Manual.
Page 31
...: Previous Values F7: Optimized Defaults ► Smart Boot Menu When PC starts, if [Enabled] is selected, a Boot Menu will turn off clock of the empty PCI slot to reduce EMI (Electromagnetic Interference). This setting simplifies multiple boot devices user from pressing [Esc] key to enter boot menu. ► Smart Power LED Smart Power LED is used . If [Disabled] is located at the front panel, and it displays POST state by viruses, e.g. System Status Normal No Memory No Display Post Error Message No CPU Fan Power LED Status Always On Continue...
...: Previous Values F7: Optimized Defaults ► Smart Boot Menu When PC starts, if [Enabled] is selected, a Boot Menu will turn off clock of the empty PCI slot to reduce EMI (Electromagnetic Interference). This setting simplifies multiple boot devices user from pressing [Esc] key to enter boot menu. ► Smart Power LED Smart Power LED is used . If [Disabled] is located at the front panel, and it displays POST state by viruses, e.g. System Status Normal No Memory No Display Post Error Message No CPU Fan Power LED Status Always On Continue...
English Manual.
Page 32
... to set the system memory's clock value. 25 The available options are: [Auto]: System will be displayed only if your CPU is CPU multiplier. Fox Intelligent Overclock Phoenix - Memory Timing Setting Phoenix - AwardBIOS CMOS Setup Utility Fox Intelligent Overclock CPU Clock PCIE Clock NPT FID Control [200] Item Help [100] [Auto] Menu Level ► 3 Move Enter:Select +/-/PU/PD:Value F10:Save ESC:Exit F1:General Help F5: Previous Values F7: Optimized Defaults ► CPU Clock / PCIE Clock...
... to set the system memory's clock value. 25 The available options are: [Auto]: System will be displayed only if your CPU is CPU multiplier. Fox Intelligent Overclock Phoenix - Memory Timing Setting Phoenix - AwardBIOS CMOS Setup Utility Fox Intelligent Overclock CPU Clock PCIE Clock NPT FID Control [200] Item Help [100] [Auto] Menu Level ► 3 Move Enter:Select +/-/PU/PD:Value F10:Save ESC:Exit F1:General Help F5: Previous Values F7: Optimized Defaults ► CPU Clock / PCIE Clock...
English Manual.
Page 38
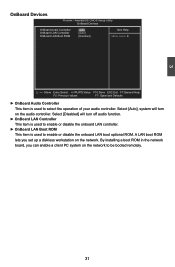
... turn on the network. By installing a boot ROM in the network board, you set up a diskless workstation on the audio controller. AwardBIOS CMOS Setup Utility OnBoard Devices OnBoard Audio Controller OnBoard LAN Controller OnBoard LAN Boot ROM [Auto] Item Help [Auto] [Disabled] Menu Level ► Move Enter:Select +/-/PU/PD:Value F10:Save ESC:Exit F1:General Help F5: Previous Values F7: Optimized Defaults ► OnBoard Audio Controller This item is used to enable or disable the onboard LAN boot optional ROM. 3 OnBoard Devices Phoenix - Select [Disabled...
... turn on the network. By installing a boot ROM in the network board, you set up a diskless workstation on the audio controller. AwardBIOS CMOS Setup Utility OnBoard Devices OnBoard Audio Controller OnBoard LAN Controller OnBoard LAN Boot ROM [Auto] Item Help [Auto] [Disabled] Menu Level ► Move Enter:Select +/-/PU/PD:Value F10:Save ESC:Exit F1:General Help F5: Previous Values F7: Optimized Defaults ► OnBoard Audio Controller This item is used to enable or disable the onboard LAN boot optional ROM. 3 OnBoard Devices Phoenix - Select [Disabled...
English Manual.
Page 39
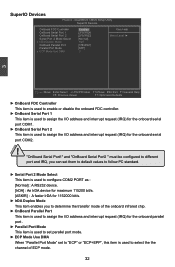
... CMOS Setup Utility SuperIO Devices OnBoard FDC Controller OnBoard Serial Port 1 OnBoard Serial Port 2 Serial Port 2 Mode Select x IrDA Duplex Mode OnBoard Parallel Port Parallel Port Mode x ECP Mode Use DMA [Enabled] Item Help [3F8/IRQ4] [2F8/IRQ3] Menu Level ► [Normal] Half [378/IRQ7] [SPP] 3 3 CAUTION Move Enter:Select +/-/PU/PD:Value F10:Save ESC:Exit F1:General Help F5: Previous Values F7: Optimized Defaults ► OnBoard FDC Controller This item is used to enable or disable the onboard FDC controller. ► OnBoard Serial Port...
... CMOS Setup Utility SuperIO Devices OnBoard FDC Controller OnBoard Serial Port 1 OnBoard Serial Port 2 Serial Port 2 Mode Select x IrDA Duplex Mode OnBoard Parallel Port Parallel Port Mode x ECP Mode Use DMA [Enabled] Item Help [3F8/IRQ4] [2F8/IRQ3] Menu Level ► [Normal] Half [378/IRQ7] [SPP] 3 3 CAUTION Move Enter:Select +/-/PU/PD:Value F10:Save ESC:Exit F1:General Help F5: Previous Values F7: Optimized Defaults ► OnBoard FDC Controller This item is used to enable or disable the onboard FDC controller. ► OnBoard Serial Port...
English Manual.
Page 40
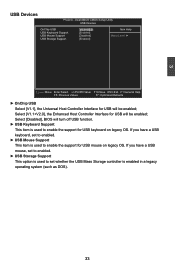
... enabled; 3 USB Devices Phoenix - Select [V1.1+V2.0], the Enhanced Host Controller Interface for USB mouse on legacy OS. If you have a USB keyboard, set whether the USB Mass Storage controller is used to enable the support for USB will be enabled; AwardBIOS CMOS Setup Utility USB Devices OnChip USB USB Keyboard Support USB Mouse Support USB Storage Support [ V1.1+V2.0] [Enabled] [Disabled] [Enabled] Item Help Menu Level ► Move Enter:Select +/-/PU/PD:Value F10:Save ESC:Exit F1:General Help F5: Previous Values F7: Optimized Defaults...
... enabled; 3 USB Devices Phoenix - Select [V1.1+V2.0], the Enhanced Host Controller Interface for USB mouse on legacy OS. If you have a USB keyboard, set whether the USB Mass Storage controller is used to enable the support for USB will be enabled; AwardBIOS CMOS Setup Utility USB Devices OnChip USB USB Keyboard Support USB Mouse Support USB Storage Support [ V1.1+V2.0] [Enabled] [Disabled] [Enabled] Item Help Menu Level ► Move Enter:Select +/-/PU/PD:Value F10:Save ESC:Exit F1:General Help F5: Previous Values F7: Optimized Defaults...

English Manual.
Page 47
... E. Software Utilities Use these options to improve (or overclock) your system. You should install the drivers in order, and you to change your PC screen to guide you how to BIOS. VIA HDA Audio Driver 2. NVIDIA MCP61 Chipset Driver B. FOX LOGO D. NVIDIA MCP61 Chipset Driver B. Microsoft DirectX 9.0 F. FOX LiveUpdate C. Norton Internet Security 40 You can simply put it into your DVD-ROM drive, and the main menu will be displayed on your system setting...
... E. Software Utilities Use these options to improve (or overclock) your system. You should install the drivers in order, and you to change your PC screen to guide you how to BIOS. VIA HDA Audio Driver 2. NVIDIA MCP61 Chipset Driver B. FOX LOGO D. NVIDIA MCP61 Chipset Driver B. Microsoft DirectX 9.0 F. FOX LiveUpdate C. Norton Internet Security 40 You can simply put it into your DVD-ROM drive, and the main menu will be displayed on your system setting...

English Manual.
Page 73
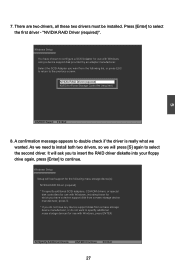
... RAID array in BIOS. 2. A motherboard driver CD. 66 Follow 5-2 to format new RAID array. A DVD-ROM drive. 3. Existing Windows XP (or Vista) system with new RAID built as data storage. A DVD-ROM drive. 2. 5 Creating a Bootable Array - Installing a new Windows XP (or Vista) in BIOS. 3. Follow 5-1 to Install a new Windows Operating System. A floppy drive. 2. What kinds of hardware and software you need here : 1. Use Administrative Tools in Control Panel to set RAID enabled in a brand new RAID system. 1. Two RAID driver diskettes...
... RAID array in BIOS. 2. A motherboard driver CD. 66 Follow 5-2 to format new RAID array. A DVD-ROM drive. 3. Existing Windows XP (or Vista) system with new RAID built as data storage. A DVD-ROM drive. 2. 5 Creating a Bootable Array - Installing a new Windows XP (or Vista) in BIOS. 3. Follow 5-1 to Install a new Windows Operating System. A floppy drive. 2. What kinds of hardware and software you need here : 1. Use Administrative Tools in Control Panel to set RAID enabled in a brand new RAID system. 1. Two RAID driver diskettes...
English Manual.
Page 97
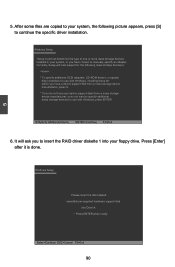
... to continue the specific driver installation. Windows Setup Setup could not determine the type of one or more mass storage devices installed in your system, the following mass storage device(s): * To specify additional SCSI adapters, CD-ROM drivers, or special disk controllers for use with Windows, press ENTER. 5 5. S=Specify Additional Device ENTER=Continue F3=Exit 6. After some files are copied to your system, or you have any device support disks from a mass storage device manufacturer, or do...
... to continue the specific driver installation. Windows Setup Setup could not determine the type of one or more mass storage devices installed in your system, the following mass storage device(s): * To specify additional SCSI adapters, CD-ROM drivers, or special disk controllers for use with Windows, press ENTER. 5 5. S=Specify Additional Device ENTER=Continue F3=Exit 6. After some files are copied to your system, or you have any device support disks from a mass storage device manufacturer, or do...

English Manual.
Page 98
... to insert the RAID driver diskette into your floppy drive again, press [Enter] to install both two drivers, so we wanted. "NVIDIA RAID Driver (required)". As we need to continue. Windows Setup Setup will load support for the following mass storage device(s): NVIDIA RAID Driver (required) * To specify additional SCSI adapters, CD-ROM drivers, or special disk controllers for use with Windows, including those for use with Windows, press ENTER. Press [Enter] to the previous screen. Select the SCSI...
... to insert the RAID driver diskette into your floppy drive again, press [Enter] to install both two drivers, so we wanted. "NVIDIA RAID Driver (required)". As we need to continue. Windows Setup Setup will load support for the following mass storage device(s): NVIDIA RAID Driver (required) * To specify additional SCSI adapters, CD-ROM drivers, or special disk controllers for use with Windows, including those for use with Windows, press ENTER. Press [Enter] to the previous screen. Select the SCSI...

RAID Manual.
Page 7
... for use . 4. Installing a new Windows XP (or Vista) in Control Panel to build a new RAID array in your current Windows XP system. 4. What kinds of hardware and software you need here : 1. Creating a Non-Bootable Array - Follow 5-5 to go through the processes to format new RAID array. A DVD-ROM drive. 2. Several SATA hard disks. 4. Run setup program to set RAID enabled in BIOS. 2. What kinds of hardware and software you need here : 1. A motherboard driver...
... for use . 4. Installing a new Windows XP (or Vista) in Control Panel to build a new RAID array in your current Windows XP system. 4. What kinds of hardware and software you need here : 1. Creating a Non-Bootable Array - Follow 5-5 to go through the processes to format new RAID array. A DVD-ROM drive. 2. Several SATA hard disks. 4. Run setup program to set RAID enabled in BIOS. 2. What kinds of hardware and software you need here : 1. A motherboard driver...
RAID Manual.
Page 31
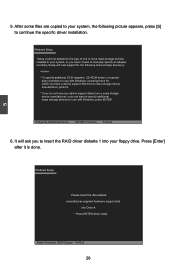
... the RAID driver diskette 1 into Drive A: * Press ENTER when ready Enter=Continue ESC=Cancel F3=Exit 26 After some files are copied to your system, or you to continue the specific driver installation. Windows Setup Setup could not determine the type of one or more mass storage devices installed in your system, the following mass storage device(s): * To specify additional SCSI adapters, CD-ROM drivers, or special disk controllers for use with Windows, including...
... the RAID driver diskette 1 into Drive A: * Press ENTER when ready Enter=Continue ESC=Cancel F3=Exit 26 After some files are copied to your system, or you to continue the specific driver installation. Windows Setup Setup could not determine the type of one or more mass storage devices installed in your system, the following mass storage device(s): * To specify additional SCSI adapters, CD-ROM drivers, or special disk controllers for use with Windows, including...
RAID Manual.
Page 32
... installed. Windows Setup You have any device support disks from a mass storage device manufacturer, or do not want from the following mass storage device(s): NVIDIA RAID Driver (required) * To specify additional SCSI adapters, CD-ROM drivers, or special disk controllers for use with Windows, including those for which you have a device support disk from a mass storage device manufacturer, press S. * If you to insert the RAID driver diskette into your floppy drive again, press [Enter] to configure a SCSI Adapter for use...
... installed. Windows Setup You have any device support disks from a mass storage device manufacturer, or do not want from the following mass storage device(s): NVIDIA RAID Driver (required) * To specify additional SCSI adapters, CD-ROM drivers, or special disk controllers for use with Windows, including those for which you have a device support disk from a mass storage device manufacturer, press S. * If you to insert the RAID driver diskette into your floppy drive again, press [Enter] to configure a SCSI Adapter for use...


