User manual
Page 5
... your system. ! Incorrect connections might damage the motherboard. ■ When handling the motherboard, avoid touching any , when connecting USB, audio, 1394a, RS232 COM, IrDA or S/PDIF cables to your electronic equipment. Normal operation depends on the motherboard. It is a PCI Express x16 graphics card installed in your system, we recommend using a 24-pin ATX power supply to get the best performance. ■ Before turning on the power, please make sure...
... your system. ! Incorrect connections might damage the motherboard. ■ When handling the motherboard, avoid touching any , when connecting USB, audio, 1394a, RS232 COM, IrDA or S/PDIF cables to your electronic equipment. Normal operation depends on the motherboard. It is a PCI Express x16 graphics card installed in your system, we recommend using a 24-pin ATX power supply to get the best performance. ■ Before turning on the power, please make sure...

User manual
Page 9
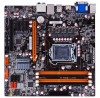
... power connector 3 x SATA 2.0 connectors 2 x SATA 3.0 connectors 1 x mSATA connector 2 x USB 2.0 headers (supporting 4 x USB devices) 1 x USB 3.0 header (supporting 2 x USB devices) 1 x CPU fan header 1 x 4 pin System fan header 1 x 3 pin System fan header 1 x Front panel header (Continued on the next page) 2 Support Jack-Sensing function Z75 chipset: - Support USB 3.0 protocol up to 4 x USB 3.0 ports (2 rear panel ports, 1 onboard USB head ers supporting 2 extra ports) - 1-1 Product Specification 1 CPU Chipset Memory Expansion Slots Storage LAN Audio USB Onboard Button and LED...
... power connector 3 x SATA 2.0 connectors 2 x SATA 3.0 connectors 1 x mSATA connector 2 x USB 2.0 headers (supporting 4 x USB devices) 1 x USB 3.0 header (supporting 2 x USB devices) 1 x CPU fan header 1 x 4 pin System fan header 1 x 3 pin System fan header 1 x Front panel header (Continued on the next page) 2 Support Jack-Sensing function Z75 chipset: - Support USB 3.0 protocol up to 4 x USB 3.0 ports (2 rear panel ports, 1 onboard USB head ers supporting 2 extra ports) - 1-1 Product Specification 1 CPU Chipset Memory Expansion Slots Storage LAN Audio USB Onboard Button and LED...
User manual
Page 20
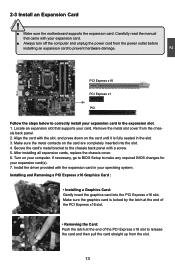
... BIOS changes for your card. If necessary, go to BIOS Setup to correctly install your computer. Locate an expansion slot that came with your operating system. Remove the metal slot cover from the slot. 13 Secure the card's metal bracket to prevent hardware damage. Align the card with a screw. 5. After installing all expansion cards, replace the chassis cover. 6. Installing and Removing a PCI Express x16 Graphics Card : • Installing a Graphics Card: Gently insert the graphics card into the slot. 4. Install the driver...
... BIOS changes for your card. If necessary, go to BIOS Setup to correctly install your computer. Locate an expansion slot that came with your operating system. Remove the metal slot cover from the slot. 13 Secure the card's metal bracket to prevent hardware damage. Align the card with a screw. 5. After installing all expansion cards, replace the chassis cover. 6. Installing and Removing a PCI Express x16 Graphics Card : • Installing a Graphics Card: Gently insert the graphics card into the slot. 4. Install the driver...
User manual
Page 27
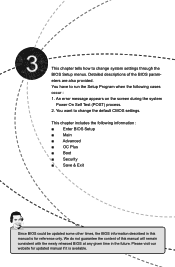
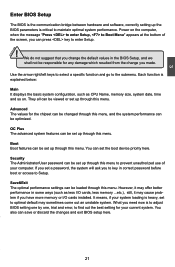
... information Enter BIOS Setup ■ Main ■ Advanced ■ OC Plus ■ Boot ■ Security ■ Save & Exit Since BIOS could be updated some other times, the BIOS information described in the future. Please visit our website for updated manual if it is for reference only. You want to change system settings through the BIOS Setup menus. This chapter tells how to change the default CMOS settings. We...
... information Enter BIOS Setup ■ Main ■ Advanced ■ OC Plus ■ Boot ■ Security ■ Save & Exit Since BIOS could be updated some other times, the BIOS information described in the future. Please visit our website for updated manual if it is for reference only. You want to change system settings through the BIOS Setup menus. This chapter tells how to change the default CMOS settings. We...
User manual
Page 28
... hardware and software, correctly setting up through this menu. Use the arrow right/left keys to select a specific function and go to maintain optimal system performance. Security The Administrator/User password can press key to Setup. You can save or discard the changes and exit BIOS setup here. 21 We do not suggest that you to key in some ways (such as CPU Name, memory size, system...
... hardware and software, correctly setting up through this menu. Use the arrow right/left keys to select a specific function and go to maintain optimal system performance. Security The Administrator/User password can press key to Setup. You can save or discard the changes and exit BIOS setup here. 21 We do not suggest that you to key in some ways (such as CPU Name, memory size, system...
User manual
Page 30
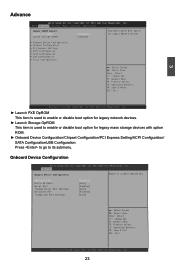
... item is used to enable or disable boot option for legacy network devices. ► Launch Storage OpROM This item is used to its submenu. LAN Controller Azalia HD Audio Serial Port Change Serial Port Settings CIR Controller Change CIR Port Settings [Enabled] [Auto] [Enabled] [Auto] [Enabled] [Auto] → ←: Select Screen ↑ ↓: Select Item Enter: Select +/-: Change Opt. Advance Aptio Setup Utility - F1: General Help F2: Previous Values F3: Optimized Defaults F4: Save & Reset ESC: Exit 3 Version 2.14.1219. Onboard Device Configuration Aptio Setup Utility - F1...
... item is used to enable or disable boot option for legacy network devices. ► Launch Storage OpROM This item is used to its submenu. LAN Controller Azalia HD Audio Serial Port Change Serial Port Settings CIR Controller Change CIR Port Settings [Enabled] [Auto] [Enabled] [Auto] [Enabled] [Auto] → ←: Select Screen ↑ ↓: Select Item Enter: Select +/-: Change Opt. Advance Aptio Setup Utility - F1: General Help F2: Previous Values F3: Optimized Defaults F4: Save & Reset ESC: Exit 3 Version 2.14.1219. Onboard Device Configuration Aptio Setup Utility - F1...
User manual
Page 31
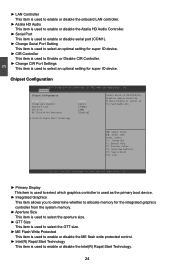
... Rapid Start Technology → ←: Select Screen ↑ ↓: Select Item Enter: Select +/-: Change Opt. Chipset Configuration Aptio Setup Utility - C opyright (C) 2011 American Megatrends, Inc. Advanced Chipset Configuration Primary Display Integrated Graphics Aperture Size GTT Size ME Flash Write Protected [Auto] [Auto] [256MB] [2MB] [Enabled] Select which graphics controller is used as the primary boot device. ► Integrated Graphics This item allows you to determine whether to allocate memory for the integrated graphics controller from the system memory. ►...
... Rapid Start Technology → ←: Select Screen ↑ ↓: Select Item Enter: Select +/-: Change Opt. Chipset Configuration Aptio Setup Utility - C opyright (C) 2011 American Megatrends, Inc. Advanced Chipset Configuration Primary Display Integrated Graphics Aperture Size GTT Size ME Flash Write Protected [Auto] [Auto] [256MB] [2MB] [Enabled] Select which graphics controller is used as the primary boot device. ► Integrated Graphics This item allows you to determine whether to allocate memory for the integrated graphics controller from the system memory. ►...
User manual
Page 32
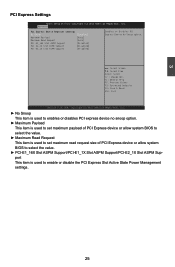
...-E1_1X Slot ASPM Support/PCI-E2_1X Slot ASPM Sup- Advanced PCI Express Device Register Settings No Snoop [Enabled] Maximum Payload [Auto] Maximum Read Request [Auto] PCI-E1_16X Slot ASPM Support [Disabled] PCI-E1_1X Slot ASPM Support [Disabled] PCI-E2_1X Slot ASPM Support [Disabled] Enables or Disables PCI Express Device No Snoop option. → ←: Select Screen ↑ ↓: Select Item Enter: Select +/-: Change Opt. C opyright (C) 2011 American Megatrends, Inc. port This item is used to set maximum read request size of PCI Express device or allow system BIOS...
...-E1_1X Slot ASPM Support/PCI-E2_1X Slot ASPM Sup- Advanced PCI Express Device Register Settings No Snoop [Enabled] Maximum Payload [Auto] Maximum Read Request [Auto] PCI-E1_16X Slot ASPM Support [Disabled] PCI-E1_1X Slot ASPM Support [Disabled] PCI-E2_1X Slot ASPM Support [Disabled] Enables or Disables PCI Express Device No Snoop option. → ←: Select Screen ↑ ↓: Select Item Enter: Select +/-: Change Opt. C opyright (C) 2011 American Megatrends, Inc. port This item is used to set maximum read request size of PCI Express device or allow system BIOS...
User manual
Page 33
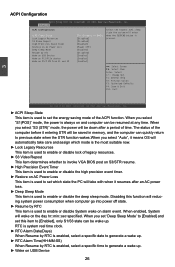
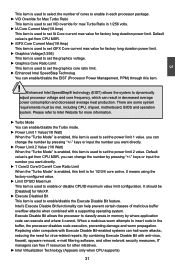
... Enter: Select +/-: Change Opt. Advanced ACPI Configuration ACPI Sleep State Lock Legacy Resources S3 Video Repost High Precision Event Timer Restore on the day hr::min::sec specified. When enabled, System will be resumed at any time. ACPI Configuration Aptio Setup Utility - When you select "S3 (STR)" mode, the power will wake on AC Power Loss Deep Sleep Mode Resume by RTC is enabled, select a specific date to [Enabled] and set the energy saving mode...
... Enter: Select +/-: Change Opt. Advanced ACPI Configuration ACPI Sleep State Lock Legacy Resources S3 Video Repost High Precision Event Timer Restore on the day hr::min::sec specified. When enabled, System will be resumed at any time. ACPI Configuration Aptio Setup Utility - When you select "S3 (STR)" mode, the power will wake on AC Power Loss Deep Sleep Mode Resume by RTC is enabled, select a specific date to [Enabled] and set the energy saving mode...
User manual
Page 34
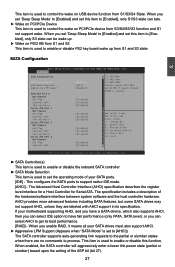
... a Host Controller for Serial ATA. Enabled onboard SATA RAID option ROM if Launch Storage OpROM is set this item to support native IDE mode. [AHCI] - When you set 'Deep Sleep Mode' to [Enabled] and set to [AHCI]) The SATA controller supports auto-generating link requests to get its specification. The specification includes a description of the ASP bit (bit 27). 27 When you enable RAID, it means all your SATA drives must also support AHCI. ► Aggressive LPM Support (Appears when "SATA Mode" is enabled. → ←: Select Screen ↑...
... a Host Controller for Serial ATA. Enabled onboard SATA RAID option ROM if Launch Storage OpROM is set this item to support native IDE mode. [AHCI] - When you set 'Deep Sleep Mode' to [Enabled] and set to [AHCI]) The SATA controller supports auto-generating link requests to get its specification. The specification includes a description of the ASP bit (bit 27). 27 When you enable RAID, it means all your SATA drives must also support AHCI. ► Aggressive LPM Support (Appears when "SATA Mode" is enabled. → ←: Select Screen ↑...

User manual
Page 35
... "SATA Mode" is set to [AHCI]) This item is used to OS initialization. This value is loaded by XHCI driver. ► EHCI Hand-off This is used to enabled. [Enabled]: This option will enable the legacy USB support. [Disabled]: This option will disable the legacy support if no USB devices are connected. ► Legacy USB 3.0 Support This item is used to enable or disable legacy USB 3.0(XHCI) controller support. ► XHCI Hand-off This is set to [RAID]/[AHCI) The hot plug function allows for device detection without power...
... "SATA Mode" is set to [AHCI]) This item is used to OS initialization. This value is loaded by XHCI driver. ► EHCI Hand-off This is used to enabled. [Enabled]: This option will enable the legacy USB support. [Disabled]: This option will disable the legacy support if no USB devices are connected. ► Legacy USB 3.0 Support This item is used to enable or disable legacy USB 3.0(XHCI) controller support. ► XHCI Hand-off This is set to [RAID]/[AHCI) The hot plug function allows for device detection without power...
User manual
Page 37
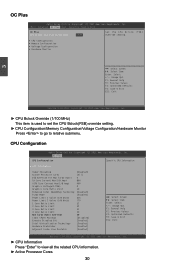
... setting. ► CPU Configuration/Memory Configuration/Voltage Configuration/Hardware Monitor Press to go to view all the related CPU information. ► Active Processor Cores 30 CPU Configuration Aptio Setup Utility - F1: General Help F2: Previous Values F3: Optimized Defaults F4: Save & Exit ESC: Exit Version 2.14.1219. C opyright (C) 2011 American Megatrends, Inc. Copyright (C) 2011 American Megatrends, Inc. ► CPU Information Press "Enter" to relative submenu. OC Plus CPU Configuration Specific CPU Information ▶ CPU...
... setting. ► CPU Configuration/Memory Configuration/Voltage Configuration/Hardware Monitor Press to go to view all the related CPU information. ► Active Processor Cores 30 CPU Configuration Aptio Setup Utility - F1: General Help F2: Previous Values F3: Optimized Defaults F4: Save & Exit ESC: Exit Version 2.14.1219. C opyright (C) 2011 American Megatrends, Inc. Copyright (C) 2011 American Megatrends, Inc. ► CPU Information Press "Enter" to relative submenu. OC Plus CPU Configuration Specific CPU Information ▶ CPU...
User manual
Page 38
... limit configuration. Intel's Execute Disable Bit functionality can enable/disable the Turbo mode. ► Power Limit 1 Value(1/8 Watt) When the "Turbo Mode" is enabled, this item is used to set the power limit 2 value. By combining Execute Disable Bit with a supporting operating system. Default value is get from CPU MSR. ► iGFX Core Current Max(1/8 Amp) This item is used to set iGFX Core current max value for factory long duration power limit. ► Graphics Voltage(1/256...
... limit configuration. Intel's Execute Disable Bit functionality can enable/disable the Turbo mode. ► Power Limit 1 Value(1/8 Watt) When the "Turbo Mode" is enabled, this item is used to set the power limit 2 value. By combining Execute Disable Bit with a supporting operating system. Default value is get from CPU MSR. ► iGFX Core Current Max(1/8 Amp) This item is used to set iGFX Core current max value for factory long duration power limit. ► Graphics Voltage(1/256...
User manual
Page 42
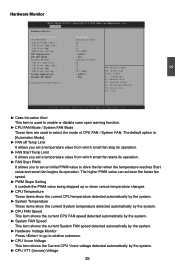
... value to drive the fan when the temperature reaches Start value and smart fan begins its operation. The default option is used to enable or disable case open warning function. ► CPU FAN Mode / System FAN Mode These item are used to relative submenu. ► CPU Vcore Voltage This item shows the Current CPU Vcore voltage detected automatically by the system. ► Hardware Voltage Monitor Press to go to select the mode of CPU FAN / System FAN. C opyright...
... value to drive the fan when the temperature reaches Start value and smart fan begins its operation. The default option is used to enable or disable case open warning function. ► CPU FAN Mode / System FAN Mode These item are used to relative submenu. ► CPU Vcore Voltage This item shows the Current CPU Vcore voltage detected automatically by the system. ► Hardware Voltage Monitor Press to go to select the mode of CPU FAN / System FAN. C opyright...

User manual
Page 49
... Foxconn's Show Utilities Show Drivers Browse CD View the User's Manual Website Choose the items you want to install, or you can click on your system. Driver Use these options to install it into your DVD-ROM drive, and the main menu will be displayed on each individual driver to Install 42 You must click "Intel Chipset Driver" to install all the drivers for your PC screen to guide you how to install. 1. 4 Install driver and utility This motherboard...
... Foxconn's Show Utilities Show Drivers Browse CD View the User's Manual Website Choose the items you want to install, or you can click on your system. Driver Use these options to install it into your DVD-ROM drive, and the main menu will be displayed on each individual driver to Install 42 You must click "Intel Chipset Driver" to install all the drivers for your PC screen to guide you how to install. 1. 4 Install driver and utility This motherboard...
User manual
Page 79
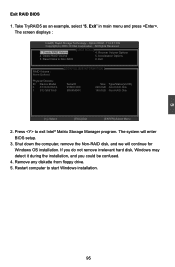
... to display the hard disks list for this RAID0 system. Press to indicate the drive selected. Press key to "Disks" item. It then goes to finish the selection. A lAl Rll iRgihgthstsReRseesrevrevde.d. [ CREATE VOLUME MENU ] Name: TryRAID0 RAID Level: RAID0(Stripe) [ SELECT DISKS ] Port Drive Model Serial # ►0 Hit achi HD S721 616PLA PVF9 04Z21 G2JZM 1 ST380811AS 5PS1TAGW ►2 SSAMSUNGG HHDD116611HHJJ SS00VV33JJ99AAPPAA3300552244 3 ST380815AS 5RW1CA37 Size Status...
... to display the hard disks list for this RAID0 system. Press to indicate the drive selected. Press key to "Disks" item. It then goes to finish the selection. A lAl Rll iRgihgthstsReRseesrevrevde.d. [ CREATE VOLUME MENU ] Name: TryRAID0 RAID Level: RAID0(Stripe) [ SELECT DISKS ] Port Drive Model Serial # ►0 Hit achi HD S721 616PLA PVF9 04Z21 G2JZM 1 ST380811AS 5PS1TAGW ►2 SSAMSUNGG HHDD116611HHJJ SS00VV33JJ99AAPPAA3300552244 3 ST380815AS 5RW1CA37 Size Status...

User manual
Page 92
... DISKS ] Port Drive Model Serial # 00 HHiittaa cchhii HHDD SS77221166 1166PPLLAA PPVVFF99 0044ZZ2211G G22JJZZMM 1 ST380811AS 5PS1TAGW 2 SAMSUNG HD161HJ S0V3J9APA30524 3 ST380815AS 5RW1CA37 Size Status 114499..00GGBB NNoonn--RRAAIIDD DDiisskk 74.5GB Non-RAID Disk 149.0GB Non-RAID Disk 74.5GB Non-RAID Disk Select 3 to 6 disks to use in creating the volume. [↑↓]-Prev/Next [SPACE]-SelectDisk [ENTER]-Done Change [TAB]-Next [ESC]-Previous Menu [ENTER]-Select...
... DISKS ] Port Drive Model Serial # 00 HHiittaa cchhii HHDD SS77221166 1166PPLLAA PPVVFF99 0044ZZ2211G G22JJZZMM 1 ST380811AS 5PS1TAGW 2 SAMSUNG HD161HJ S0V3J9APA30524 3 ST380815AS 5RW1CA37 Size Status 114499..00GGBB NNoonn--RRAAIIDD DDiisskk 74.5GB Non-RAID Disk 149.0GB Non-RAID Disk 74.5GB Non-RAID Disk Select 3 to 6 disks to use in creating the volume. [↑↓]-Prev/Next [SPACE]-SelectDisk [ENTER]-Done Change [TAB]-Next [ESC]-Previous Menu [ENTER]-Select...
User manual
Page 102
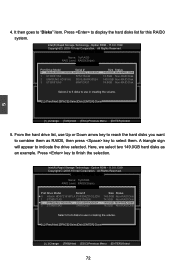
...-RAID 5. Reset Disks to start Windows installation. 5 95 Remove any diskette from floppy drive. 5. The screen displays : Intel(R) Rapid Storage Technology - Create RAID Volume [ MAIN MENU ] 4. Press to exit Intel® Matrix Storage Manager program. The system will continue for Windows OS installation. Delete RAID Volume 3. If you do not remove irrelevant hard disk, Windows may detect it during the installation, and you could be confused. 4. Shut down the computer, remove the Non-RAID disk, and we will enter BIOS setup...
...-RAID 5. Reset Disks to start Windows installation. 5 95 Remove any diskette from floppy drive. 5. The screen displays : Intel(R) Rapid Storage Technology - Create RAID Volume [ MAIN MENU ] 4. Press to exit Intel® Matrix Storage Manager program. The system will continue for Windows OS installation. Delete RAID Volume 3. If you do not remove irrelevant hard disk, Windows may detect it during the installation, and you could be confused. 4. Shut down the computer, remove the Non-RAID disk, and we will enter BIOS setup...

User manual
Page 104
... storage device manufacturer, or do not have chosen to continue the specific driver installation. It will load support for the following picture appears, press to manually specify an adapter. Windows Setup Setup could not determine the type of one or more mass storage devices installed in your system, the following mass storage device(s): * To specify additional SCSI adapters, CD-ROM drivers, or special disk controllers for which you floppy drive. S=Specify Additional Device ENTER=Continue...
... storage device manufacturer, or do not have chosen to continue the specific driver installation. It will load support for the following picture appears, press to manually specify an adapter. Windows Setup Setup could not determine the type of one or more mass storage devices installed in your system, the following mass storage device(s): * To specify additional SCSI adapters, CD-ROM drivers, or special disk controllers for which you floppy drive. S=Specify Additional Device ENTER=Continue...
User manual
Page 106
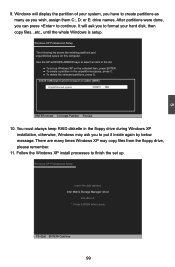
... a partition in the floppy drive during Windows XP installation, otherwise, Windows may copy files from the floppy drive, please remember. 11. Use the UP ad DOWN ARROW keys to continue. It will display the partition of your hard disk, then copy files...etc., until the whole Windows is setup. Windows XP Professional Setup Insert the disk labeled: Intel Matrix Storage Manager driver into drive A: * Press ENTER when ready F3=Quit ENTER=Continue 99 There...
... a partition in the floppy drive during Windows XP installation, otherwise, Windows may copy files from the floppy drive, please remember. 11. Use the UP ad DOWN ARROW keys to continue. It will display the partition of your hard disk, then copy files...etc., until the whole Windows is setup. Windows XP Professional Setup Insert the disk labeled: Intel Matrix Storage Manager driver into drive A: * Press ENTER when ready F3=Quit ENTER=Continue 99 There...


