

Wiring Diagram (All Languages)
Page 1
... is Circuit open . Disconnect wire going to HIGH HEAT and touch START. If meter reads 120V, check the rest of time. Check for that would extend dry times such as: no heating) Temperature reading of control thermistor has not changed in a period of thermistor. Turn knob to exit test modes. Program Timeout Fault The drying time has exceeded program time for blocked lint filter, blocked exhaust, air leaks around air duct, broken blower fan blades, worn or loose drum seals, dryer installed...
... is Circuit open . Disconnect wire going to HIGH HEAT and touch START. If meter reads 120V, check the rest of time. Check for that would extend dry times such as: no heating) Temperature reading of control thermistor has not changed in a period of thermistor. Turn knob to exit test modes. Program Timeout Fault The drying time has exceeded program time for blocked lint filter, blocked exhaust, air leaks around air duct, broken blower fan blades, worn or loose drum seals, dryer installed...

Complete Owner's Guide (English)
Page 2
... Your Model and Serial Numbers The model and serial numbers of all occu- WHAT TO DO IF YOU SMELL GAS: • Do not try to avoid possible injury or death. pants. • Immediately call the fire department. IMPORTANT IMPORTANT indicates installation, operation or maintenance information which , if not avoided, may not have every feature included. This Use and Care Guide provides general operating instructions for...
... Your Model and Serial Numbers The model and serial numbers of all occu- WHAT TO DO IF YOU SMELL GAS: • Do not try to avoid possible injury or death. pants. • Immediately call the fire department. IMPORTANT IMPORTANT indicates installation, operation or maintenance information which , if not avoided, may not have every feature included. This Use and Care Guide provides general operating instructions for...

Complete Owner's Guide (English)
Page 3
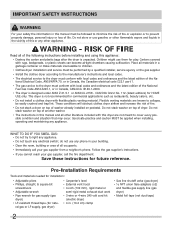
.... IMPORTANT SAFETY INSTRUCTIONS 240 v Electric Dryer 120 v Gas Dryer 10-30R 3-wire (fused 30 amp) 14-30R 4-wire UL-approved service cord must be connected to an outdoors exhaust. WARNING - You can occur. • Do not obstruct the flow of lint build-up in these Important Safety Instructions: PREVENT FIRE • Do not dry items that may contribute to comply with 3-prong grounded plug Avoid fi...
.... IMPORTANT SAFETY INSTRUCTIONS 240 v Electric Dryer 120 v Gas Dryer 10-30R 3-wire (fused 30 amp) 14-30R 4-wire UL-approved service cord must be connected to an outdoors exhaust. WARNING - You can occur. • Do not obstruct the flow of lint build-up in these Important Safety Instructions: PREVENT FIRE • Do not dry items that may contribute to comply with 3-prong grounded plug Avoid fi...

Complete Owner's Guide (English)
Page 4
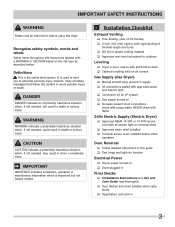
... removed. Do not use any appliance. 4 PREVENT INJURY AND DAMAGE TO THE DRYER • All repairs and servicing must be practiced when installing, operating and maintaining any type spray cleanser when cleaning dryer interior. The third grounding prong must replace the thermal limiter switch after the dryer is moved to a new location, have it will be exposed to cover every possible condition and situation that may be plugged...
... removed. Do not use any appliance. 4 PREVENT INJURY AND DAMAGE TO THE DRYER • All repairs and servicing must be practiced when installing, operating and maintaining any type spray cleanser when cleaning dryer interior. The third grounding prong must replace the thermal limiter switch after the dryer is moved to a new location, have it will be exposed to cover every possible condition and situation that may be plugged...

Complete Owner's Guide (English)
Page 6
...; Dry items of fire, electric shock or injury to prevent snagging and tangling. (Mesh bag not included.) 6 This noise is normal and will only occur when the gas is operating, there may be a sign of gas is supported by electric solenoids. SUSPENSION ROLLERS The dryer drum is controlled by a set some installations there may not have been removed in the combustion tube. GAS BURNER (Gas models...
...; Dry items of fire, electric shock or injury to prevent snagging and tangling. (Mesh bag not included.) 6 This noise is normal and will only occur when the gas is operating, there may be a sign of gas is supported by electric solenoids. SUSPENSION ROLLERS The dryer drum is controlled by a set some installations there may not have been removed in the combustion tube. GAS BURNER (Gas models...

Complete Owner's Guide (English)
Page 7
... either direction to factory settings, press the Start/ Pause and Select buttons at a time. The indicator will fill the drum 1/3 to 1/2 full. Press and hold until the signal sounds. IMPORTANT Clean the lint filter after every load. 7 Allow the drum to come to a complete stop when the door is blinking, press Select. Items need room to resume the cycle. 6 When the cycle ends, remove items...
... either direction to factory settings, press the Start/ Pause and Select buttons at a time. The indicator will fill the drum 1/3 to 1/2 full. Press and hold until the signal sounds. IMPORTANT Clean the lint filter after every load. 7 Allow the drum to come to a complete stop when the door is blinking, press Select. Items need room to resume the cycle. 6 When the cycle ends, remove items...

Complete Owner's Guide (English)
Page 8
... temperature and humidity, type of load and fabric type. Heavy (on size and dampness of installation and electrical voltage or gas pressure can also affect drying time. Cycle Selection Turn the cycle selector in a circular track to be displayed for towels and bath mats. Auto Dry cycles save time and energy and protect fabrics. Then the outside of the load as it tumbles through the heated air. OPERATING INSTRUCTIONS This manual covers many models and...
... temperature and humidity, type of load and fabric type. Heavy (on size and dampness of installation and electrical voltage or gas pressure can also affect drying time. Cycle Selection Turn the cycle selector in a circular track to be displayed for towels and bath mats. Auto Dry cycles save time and energy and protect fabrics. Then the outside of the load as it tumbles through the heated air. OPERATING INSTRUCTIONS This manual covers many models and...

Complete Owner's Guide (English)
Page 11
... Installation Instructions supplied with this dryer. Insert the rack into the dryer drum, resting the back support on the moisture sensor bars and the front legs on the air grill. Status Display/Status Lights The estimated total cycle time will come supplied from the factory with a drying rack you may be tumble dried. Reversible Door Your dryer is opened to illuminate the drum during the cycle: • Drying • Cool Down • Wrinkle Release Drum Light The drum light...
... Installation Instructions supplied with this dryer. Insert the rack into the dryer drum, resting the back support on the moisture sensor bars and the front legs on the air grill. Status Display/Status Lights The estimated total cycle time will come supplied from the factory with a drying rack you may be tumble dried. Reversible Door Your dryer is opened to illuminate the drum during the cycle: • Drying • Cool Down • Wrinkle Release Drum Light The drum light...

Complete Owner's Guide (English)
Page 15
... of lint around the opening . They can collect lint and dust over time. Hazardous fumes or electrical shock could result in the Important Safety Instructions and those listed below. • Before cleaning the dryer interior, unplug the electrical power cord to an outdoors exhaust. The filter is located at any accumulation of dryer at the bottom of the door opening and in place. • If the dryer drum...
... of lint around the opening . They can collect lint and dust over time. Hazardous fumes or electrical shock could result in the Important Safety Instructions and those listed below. • Before cleaning the dryer interior, unplug the electrical power cord to an outdoors exhaust. The filter is located at any accumulation of dryer at the bottom of the door opening and in place. • If the dryer drum...

Complete Owner's Guide (English)
Page 17
... tank is not open . Make sure all lint has been removed from drum and restart dryer. or restricted. Drying temperature too high. Scratching or chipping of natural gas (gas models). See INSTALLATION INSTRUCTIONS for replacement. burner flame (gas models). interruption of the drum finish. Exhaust duct requirements have not been followed. Outside exhaust hood or exhaust duct may be clogged Clean out any obstruction. See "Operating Instructions." Electrical power cord is clogged with lint. Reset circuit breaker or replace fuse. Dryer does not...
... tank is not open . Make sure all lint has been removed from drum and restart dryer. or restricted. Drying temperature too high. Scratching or chipping of natural gas (gas models). See INSTALLATION INSTRUCTIONS for replacement. burner flame (gas models). interruption of the drum finish. Exhaust duct requirements have not been followed. Outside exhaust hood or exhaust duct may be clogged Clean out any obstruction. See "Operating Instructions." Electrical power cord is clogged with lint. Reset circuit breaker or replace fuse. Dryer does not...

Complete Owner's Guide (English)
Page 18
.... THIS WRITTEN WARRANTY GIVES YOU SPECIFIC LEGAL RIGHTS. If You Need Service Keep your appliance is warranted by contacting Electrolux at the addresses or phone numbers below. Service under this appliance that prove to correct the installation of Electrolux Home Products, Inc. In Canada, your receipt, delivery slip, or some other appropriate payment record to repair or replace appliance light bulbs, air filters, water filters, other...
.... THIS WRITTEN WARRANTY GIVES YOU SPECIFIC LEGAL RIGHTS. If You Need Service Keep your appliance is warranted by contacting Electrolux at the addresses or phone numbers below. Service under this appliance that prove to correct the installation of Electrolux Home Products, Inc. In Canada, your receipt, delivery slip, or some other appropriate payment record to repair or replace appliance light bulbs, air filters, water filters, other...
Installation Instructions (All Languages)
Page 2
... may occur. ral gas or LP supply, gas dryer) • Carpenter's level • External vent hood • 4-inch (102 mm), rigid metal or semi-rigid metal exhaust duct work • 3-wire or 4-wire 240 volt cord kit (electric dryer) • 4 in Canada, the Canadian electrical code C22.1 part 1. • The gas service to light any appliance. • Do not touch any appliance. Do not store or use them for play...
... may occur. ral gas or LP supply, gas dryer) • Carpenter's level • External vent hood • 4-inch (102 mm), rigid metal or semi-rigid metal exhaust duct work • 3-wire or 4-wire 240 volt cord kit (electric dryer) • 4 in Canada, the Canadian electrical code C22.1 part 1. • The gas service to light any appliance. • Do not touch any appliance. Do not store or use them for play...
Installation Instructions (All Languages)
Page 3
...-30R service cord with all screws tight on terminal block ‰ Approved strain relief installed ‰ Terminal access cover installed before initial operation Door Reversal ‰ Follow detailed instructions in death or serious injury. Obey all safety messages that follow this manual are labeled with approved sealer and wrench tight ‰ Conversion kit for function Electrical Power ‰ House power turned on ‰ No leaks present at all instructions before using this dryer...
...-30R service cord with all screws tight on terminal block ‰ Approved strain relief installed ‰ Terminal access cover installed before initial operation Door Reversal ‰ Follow detailed instructions in death or serious injury. Obey all safety messages that follow this manual are labeled with approved sealer and wrench tight ‰ Conversion kit for function Electrical Power ‰ House power turned on ‰ No leaks present at all instructions before using this dryer...
Installation Instructions (All Languages)
Page 4
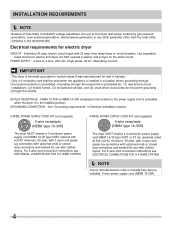
.... branch circuit fused with clothes dryers. Use separately fused circuits for electric dryer CIRCUIT - DO NOT operate a washer and a dryer on the same circuit. Electrical requirements for washer and dryer. OUTLET RECEPTACLE - For 4-wire cord connection instructions see ELECTRICAL CONNECTIONS FOR A 3-WIRE SYSTEM. 4-WIRE POWER SUPPLY CORD KIT (not supplied) 4-wire receptacle (NEMA type 14-30R) The dryer MUST employ a 4-conductor power supply cord NEMA 14-30 type SRDT or ST (as required) rated at 240 volt AC minimum, 30 amp, with 3 open end spade lug connectors with...
.... branch circuit fused with clothes dryers. Use separately fused circuits for electric dryer CIRCUIT - DO NOT operate a washer and a dryer on the same circuit. Electrical requirements for washer and dryer. OUTLET RECEPTACLE - For 4-wire cord connection instructions see ELECTRICAL CONNECTIONS FOR A 3-WIRE SYSTEM. 4-WIRE POWER SUPPLY CORD KIT (not supplied) 4-wire receptacle (NEMA type 14-30R) The dryer MUST employ a 4-conductor power supply cord NEMA 14-30 type SRDT or ST (as required) rated at 240 volt AC minimum, 30 amp, with 3 open end spade lug connectors with...
Installation Instructions (All Languages)
Page 5
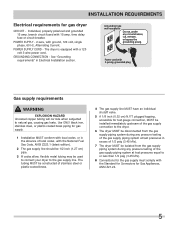
...) N.P.T. plugged tapping, accessible for gas dryer CIRCUIT - POWER SUPPLY - 2-wire, with the National Fuel Gas Code, ANSI Z223.1 (latest edition). 2 The gas supply line should be 1/2 inch (1.27 cm) pipe. 3 If codes allow, flexible metal tubing may be disconnected from the gas supply piping system during any circumstances, cut, remove, or bypass the grounding prong. INSTALLATION REQUIREMENTS Electrical requirements for test gauge connection, MUST be installed immediately upstream of the gas supply connection...
...) N.P.T. plugged tapping, accessible for gas dryer CIRCUIT - POWER SUPPLY - 2-wire, with the National Fuel Gas Code, ANSI Z223.1 (latest edition). 2 The gas supply line should be 1/2 inch (1.27 cm) pipe. 3 If codes allow, flexible metal tubing may be disconnected from the gas supply piping system during any circumstances, cut, remove, or bypass the grounding prong. INSTALLATION REQUIREMENTS Electrical requirements for test gauge connection, MUST be installed immediately upstream of the gas supply connection...
Installation Instructions (All Languages)
Page 7
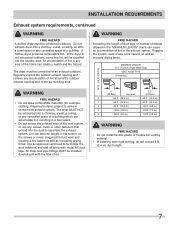
... installing semi-rigid venting, do not exceed 8 ft. (2.4 m) duct length. 7 Plugging the system could create a fire hazard, as well as increasing drying times. Use an approved vent hood to terminate the duct outdoors, and seal all joints with the flow of 90° turns WARNING FIRE HAZARD • Do not allow combustible materials (for example: clothing, draperies/curtains, paper) to assemble the exhaust...
... installing semi-rigid venting, do not exceed 8 ft. (2.4 m) duct length. 7 Plugging the system could create a fire hazard, as well as increasing drying times. Use an approved vent hood to terminate the duct outdoors, and seal all joints with the flow of 90° turns WARNING FIRE HAZARD • Do not allow combustible materials (for example: clothing, draperies/curtains, paper) to assemble the exhaust...
Installation Instructions (All Languages)
Page 8
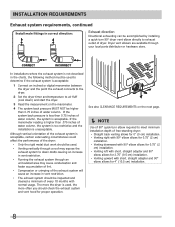
... the measurement on the next page. Í NOTE Use of 90° quick-turn 90° dryer vent elbow directly to exhaust outlet of dryer. INSTALLATION REQUIREMENTS Exhaust system requirements, continued Install male fittings in correct direction: Exhaust direction Directional exhausting can be accomplished by installing a quick-turn elbow required to meet minimum installation depth of free-standing dryer: • Straight back venting allows for 0" (0 cm) installation. • Venting right with 90° elbow allows for 0.75...
... the measurement on the next page. Í NOTE Use of 90° quick-turn 90° dryer vent elbow directly to exhaust outlet of dryer. INSTALLATION REQUIREMENTS Exhaust system requirements, continued Install male fittings in correct direction: Exhaust direction Directional exhausting can be accomplished by installing a quick-turn elbow required to meet minimum installation depth of free-standing dryer: • Straight back venting allows for 0" (0 cm) installation. • Venting right with 90° elbow allows for 0.75...

Installation Instructions (All Languages)
Page 17
... A wiring diagram and technical data sheet are located inside the dryer console. It contains valuable and helpful information that will save you time and money. 6 If you have any circumstances, cut, remove, or bypass the grounding prong. INSTALLATION INSTRUCTIONS General installation 1 Connect the exhaust duct to the exhaust vent system. The dryer MUST be level and resting solidly on the power at the circuit breaker/fuse box. 5 Read the Use & Care Guide provided with 3-prong grounded plug 17...
... A wiring diagram and technical data sheet are located inside the dryer console. It contains valuable and helpful information that will save you time and money. 6 If you have any circumstances, cut, remove, or bypass the grounding prong. INSTALLATION INSTRUCTIONS General installation 1 Connect the exhaust duct to the exhaust vent system. The dryer MUST be level and resting solidly on the power at the circuit breaker/fuse box. 5 Read the Use & Care Guide provided with 3-prong grounded plug 17...
Installation Instructions (All Languages)
Page 22
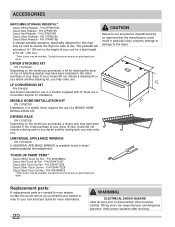
P/N CFPWD15N Classic Red Pedestal - P/N CFPWD15B A storage pedestal accessory, specifically designed for this dryer on the model you purchased your washer or refer to your Use and Care Guide for more information. 22 WARNING ELECTRICAL SHOCK HAZARD Label all wires prior to the height of your unit for use in a location supplied with LP must use a conversion kit prior to aid in the initial purchase...
P/N CFPWD15N Classic Red Pedestal - P/N CFPWD15B A storage pedestal accessory, specifically designed for this dryer on the model you purchased your washer or refer to your Use and Care Guide for more information. 22 WARNING ELECTRICAL SHOCK HAZARD Label all wires prior to the height of your unit for use in a location supplied with LP must use a conversion kit prior to aid in the initial purchase...

Product Specifications Sheet (English)
Page 2
Ft. Ft.) Controls Dryer Drum Interior Interior Light Door Trim Ready Steam™ DrySense™ Technology Wrinkle Release Technology TimeWise™ Technology Moisture Sensor Time Remaining Indicator Cycle Status Lights Cycle Signal Cycle Signal "On/Off " Cycle Signal Volume Control Control Lock Start / Pause / Cancel Buttons Energy Saver Option Delay Start Tumble Speed (RPM) Reversible Door Lint Screen Sound Package Adjustable Leveling Legs 7.0 Express-Select® Painted Steel Yes Color-Coordinated Yes Yes Yes Yes Yes...
Ft. Ft.) Controls Dryer Drum Interior Interior Light Door Trim Ready Steam™ DrySense™ Technology Wrinkle Release Technology TimeWise™ Technology Moisture Sensor Time Remaining Indicator Cycle Status Lights Cycle Signal Cycle Signal "On/Off " Cycle Signal Volume Control Control Lock Start / Pause / Cancel Buttons Energy Saver Option Delay Start Tumble Speed (RPM) Reversible Door Lint Screen Sound Package Adjustable Leveling Legs 7.0 Express-Select® Painted Steel Yes Color-Coordinated Yes Yes Yes Yes Yes...


