
Complete Owner's Guide (English)
Page 2
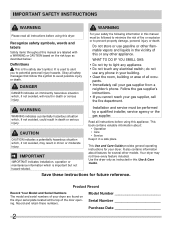
... also contains information about : • Operation • Care • Service Keep it in this or any electrical switch; Recognize safety symbols, words and labels Safety items throughout this manual are found on the risk type as instructed in a safe place. Model Number Serial Number Purchase Date 2 Installation and service must be performed by a qualified installer, service agency or the gas supplier. WHAT TO DO IF...
... also contains information about : • Operation • Care • Service Keep it in this or any electrical switch; Recognize safety symbols, words and labels Safety items throughout this manual are found on the risk type as instructed in a safe place. Model Number Serial Number Purchase Date 2 Installation and service must be performed by a qualified installer, service agency or the gas supplier. WHAT TO DO IF...
Complete Owner's Guide (English)
Page 3
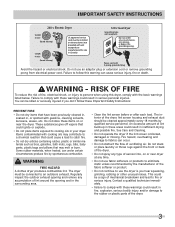
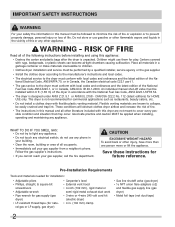
... unless recommended by the manufacturer of the dryer, lint screen housing and exhaust duct should be a sign of lint around the opening and remove any circumstances, cut, remove, or bypass the grounding prong. (fused 30 amp) Power cord with gasoline, cleaning solvents, kerosene, waxes, etc. See Care and Cleaning. • Do not operate the dryer if the lint screen is you don't follow this dryer, comply with cooking oils may melt...
... unless recommended by the manufacturer of the dryer, lint screen housing and exhaust duct should be a sign of lint around the opening and remove any circumstances, cut, remove, or bypass the grounding prong. (fused 30 amp) Power cord with gasoline, cleaning solvents, kerosene, waxes, etc. See Care and Cleaning. • Do not operate the dryer if the lint screen is you don't follow this dryer, comply with cooking oils may melt...
Complete Owner's Guide (English)
Page 4
... the dryer where it checked and reinstalled by the use of all warnings on the dryer. Cartons covered with these warnings could result in serious personal injuries. Refer to do not reach into a properly grounded and polarized 3-prong outlet. A service technician must be practiced when installing, operating and maintaining any service or cleaning. Use only authorized factory parts. • Do not tamper with controls. •...
... the dryer where it checked and reinstalled by the use of all warnings on the dryer. Cartons covered with these warnings could result in serious personal injuries. Refer to do not reach into a properly grounded and polarized 3-prong outlet. A service technician must be practiced when installing, operating and maintaining any service or cleaning. Use only authorized factory parts. • Do not tamper with controls. •...

Complete Owner's Guide (English)
Page 6
... injury. C. AIR FLOW SYSTEM Your dryer is supported by a set some sounds associated with a high volume air handling system. A B E D C CAUTION Do not continue to control the gas flow. The noise should dissipate as the air flow mixes with load size and type. In some installations there may be a thumping or rolling sound when the dryer starts. D. Contact a qualified technician immediately. WATER VALVE (Steam models only.) The...
... injury. C. AIR FLOW SYSTEM Your dryer is supported by a set some sounds associated with a high volume air handling system. A B E D C CAUTION Do not continue to control the gas flow. The noise should dissipate as the air flow mixes with load size and type. In some installations there may be a thumping or rolling sound when the dryer starts. D. Contact a qualified technician immediately. WATER VALVE (Steam models only.) The...
Complete Owner's Guide (English)
Page 7
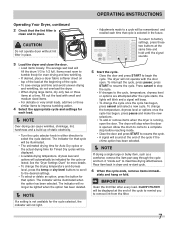
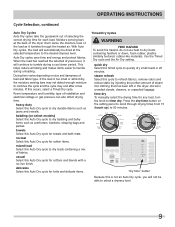
... either direction to select the cycle desired. Fill out the load with the door open the door. Allow the drum to come to a complete stop the cycle. • If changes to a cycle will be displayed. • A suitable drying temperature, dryness level and options will not operate with small and medium sized items. • For delicate or very small loads, add two or three similar items to remove lint...
... either direction to select the cycle desired. Fill out the load with the door open the door. Allow the drum to come to a complete stop the cycle. • If changes to a cycle will be displayed. • A suitable drying temperature, dryness level and options will not operate with small and medium sized items. • For delicate or very small loads, add two or three similar items to remove lint...
Complete Owner's Guide (English)
Page 9
.... casual Select this Auto Dry cycle for cotton items. mixed load Select this Auto Dry cycle to dry loads containing a mix of installation and electrical voltage or gas pressure can also affect drying time. OPERATING INSTRUCTIONS Cycle Selection, continued Auto Dry Cycles Auto Dry cycles take the guesswork out of load and fabric type. Drying time varies depending on the setting panel to scroll through the heated air. If the load is not an Auto Dry cycle, you will continue...
.... casual Select this Auto Dry cycle for cotton items. mixed load Select this Auto Dry cycle to dry loads containing a mix of installation and electrical voltage or gas pressure can also affect drying time. OPERATING INSTRUCTIONS Cycle Selection, continued Auto Dry Cycles Auto Dry cycles take the guesswork out of load and fabric type. Drying time varies depending on the setting panel to scroll through the heated air. If the load is not an Auto Dry cycle, you will continue...
Complete Owner's Guide (English)
Page 13
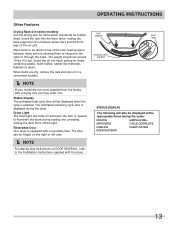
... CYCLE COMPLETE COOLING CLEAN FILTER ADDING STEAM 13 Status Display The estimated total cycle time will come supplied from the factory with a reversible door. Closing the door turns off the light. Reversible Door Your dryer is selected. The weight should not be displayed when the cycle is equipped with a drying rack you may order one. The estimated remaining cycle time is opened to illuminate the drum during loading and unloading. Drum Light The drum light will be tumble dried...
... CYCLE COMPLETE COOLING CLEAN FILTER ADDING STEAM 13 Status Display The estimated total cycle time will come supplied from the factory with a reversible door. Closing the door turns off the light. Reversible Door Your dryer is selected. The weight should not be displayed when the cycle is equipped with a drying rack you may order one. The estimated remaining cycle time is opened to illuminate the drum during loading and unloading. Drum Light The drum light will be tumble dried...
Complete Owner's Guide (English)
Page 16
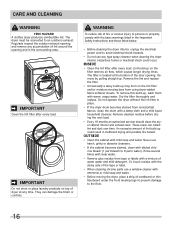
... the door opening. Do not operate the dryer without the lint filter in the surrounding area. Hazardous fumes or electrical shock could result in the Important Safety Instructions and those listed below. • Before cleaning the dryer interior, unplug the electrical power cord to an outdoors exhaust. INSIDE • Clean the lint filter after every load. These areas can damage the finish or controls. CARE AND CLEANING...
... the door opening. Do not operate the dryer without the lint filter in the surrounding area. Hazardous fumes or electrical shock could result in the Important Safety Instructions and those listed below. • Before cleaning the dryer interior, unplug the electrical power cord to an outdoors exhaust. INSIDE • Clean the lint filter after every load. These areas can damage the finish or controls. CARE AND CLEANING...
Complete Owner's Guide (English)
Page 18
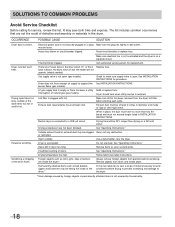
... list. Foreign objects such as cycle ends. It may be necessary to sew a scrap of the dryer feels too hot or smells hot. Reset circuit breaker or replace fuse. Dryer runs but the heater will be loose. If 1 of items. See "Operating Instructions." Exhaust duct requirements have not been followed. OCCURRENCE POSSIBLE CAUSE SOLUTION Dryer does not start. Check to the dryer. *Drum damage caused by the warranty. 18 Drying temperature too high. See "Operating Instructions." Drying cycle takes too long...
... list. Foreign objects such as cycle ends. It may be necessary to sew a scrap of the dryer feels too hot or smells hot. Reset circuit breaker or replace fuse. Dryer runs but the heater will be loose. If 1 of items. See "Operating Instructions." Exhaust duct requirements have not been followed. OCCURRENCE POSSIBLE CAUSE SOLUTION Dryer does not start. Check to the dryer. *Drum damage caused by the warranty. 18 Drying temperature too high. See "Operating Instructions." Drying cycle takes too long...
Complete Owner's Guide (English)
Page 19
... TO YOU. THIS WRITTEN WARRANTY GIVES YOU SPECIFIC LEGAL RIGHTS. IF YOU NEED SERVICE Keep your receipt, delivery slip, or some other appropriate payment record to repair or replace appliance light bulbs, air filters, water filters, other consumables, or knobs, handles, or other than in the USA and Canada. If service is performed, it is installed, used other cosmetic parts. 11. In the...
... TO YOU. THIS WRITTEN WARRANTY GIVES YOU SPECIFIC LEGAL RIGHTS. IF YOU NEED SERVICE Keep your receipt, delivery slip, or some other appropriate payment record to repair or replace appliance light bulbs, air filters, water filters, other consumables, or knobs, handles, or other than in the USA and Canada. If service is performed, it is installed, used other cosmetic parts. 11. In the...
Installation Instructions (All Languages)
Page 2
.... ral gas or LP supply, gas dryer) • Carpenter's level • External vent hood • 4-inch (102 mm), rigid metal or semi-rigid metal exhaust duct work • 3-wire or 4-wire 240 volt cord kit (electric dryer) • 4 in. (102 mm) clamp • Gas line shutoff valve (gas dryer) • ½ NPT union flare known to collapse, be easily crushed and trap lint. An individual manual shut-off valve must be installed within...
.... ral gas or LP supply, gas dryer) • Carpenter's level • External vent hood • 4-inch (102 mm), rigid metal or semi-rigid metal exhaust duct work • 3-wire or 4-wire 240 volt cord kit (electric dryer) • 4 in. (102 mm) clamp • Gas line shutoff valve (gas dryer) • ½ NPT union flare known to collapse, be easily crushed and trap lint. An individual manual shut-off valve must be installed within...
Installation Instructions (All Languages)
Page 3
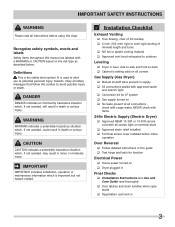
... CAUTION based on ‰ Dryer plugged in Final Checks ‰ Installation Instructions and Use and Care Guide read all connections - Recognize safety symbols, words and labels Safety items throughout this symbol to avoid possible injury or death. Installation Checklist Exhaust Venting ‰ Free-flowing, clear of lint buildup ‰ 4 inch (102 mm) rigid or semi-rigid ducting of minimal length and turns ‰ NO foil or...
... CAUTION based on ‰ Dryer plugged in Final Checks ‰ Installation Instructions and Use and Care Guide read all connections - Recognize safety symbols, words and labels Safety items throughout this symbol to avoid possible injury or death. Installation Checklist Exhaust Venting ‰ Free-flowing, clear of lint buildup ‰ 4 inch (102 mm) rigid or semi-rigid ducting of minimal length and turns ‰ NO foil or...
Installation Instructions (All Languages)
Page 4
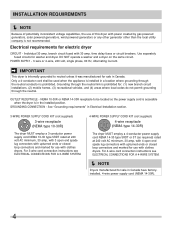
... have factoryinstalled, 4-wire power supply cord (NEMA 14-30R). 4 IMPORTANT This dryer is prohibited. GROUNDING CONNECTION - Use separately fused circuits for electric dryer CIRCUIT - For 3-wire cord connection instructions see ELECTRICAL CONNECTIONS FOR A 4-WIRE SYSTEM. Í NOTE Dryers manufactured for : (1) new branch circuit installations, (2) mobile homes, (3) recreational vehicles, and (4) areas where local codes do not permit grounding through the neutral link is in Canada. Electrical requirements for washer and dryer. DO NOT operate a washer and a dryer on the same...
... have factoryinstalled, 4-wire power supply cord (NEMA 14-30R). 4 IMPORTANT This dryer is prohibited. GROUNDING CONNECTION - Use separately fused circuits for electric dryer CIRCUIT - For 3-wire cord connection instructions see ELECTRICAL CONNECTIONS FOR A 4-WIRE SYSTEM. Í NOTE Dryers manufactured for : (1) new branch circuit installations, (2) mobile homes, (3) recreational vehicles, and (4) areas where local codes do not permit grounding through the neutral link is in Canada. Electrical requirements for washer and dryer. DO NOT operate a washer and a dryer on the same...
Installation Instructions (All Languages)
Page 5
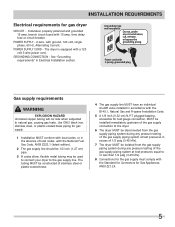
... be used to connect your dryer to the gas supply line. POWER SUPPLY CORD - Individual, properly polarized and grounded 15 amp. time delay fuse or circuit breaker. Power cord with 15 amp. The dryer is equipped with the B149.1, Natural Gas and Propane Installation Code. 5 A 1/8 inch (0.32 cm) N.P.T. The tubing MUST be constructed of stainless steel or plastic-coated brass. 4 The gas supply line MUST have an individual shutoff valve installed in Electrical Installation section. Use...
... be used to connect your dryer to the gas supply line. POWER SUPPLY CORD - Individual, properly polarized and grounded 15 amp. time delay fuse or circuit breaker. Power cord with 15 amp. The dryer is equipped with the B149.1, Natural Gas and Propane Installation Code. 5 A 1/8 inch (0.32 cm) N.P.T. The tubing MUST be constructed of stainless steel or plastic-coated brass. 4 The gas supply line MUST have an individual shutoff valve installed in Electrical Installation section. Use...
Installation Instructions (All Languages)
Page 7
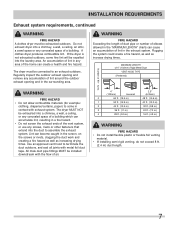
... "MAXIMUM LENGTH" charts can accumulate lint, resulting in the screen, on the screws or rivets, clogging the duct work and creating a fire hazard as well as increase drying times. Use an approved vent hood to assemble the exhaust system. MAXIMUM LENGTH of 4" (102mm) Rigid Metal Duct VENT HOOD TYPE (Preferred) Number of lint in the surrounding area. INSTALLATION REQUIREMENTS Exhaust system requirements, continued WARNING FIRE HAZARD A clothes dryer must be installed downstream with...
... "MAXIMUM LENGTH" charts can accumulate lint, resulting in the screen, on the screws or rivets, clogging the duct work and creating a fire hazard as well as increase drying times. Use an approved vent hood to assemble the exhaust system. MAXIMUM LENGTH of 4" (102mm) Rigid Metal Duct VENT HOOD TYPE (Preferred) Number of lint in the surrounding area. INSTALLATION REQUIREMENTS Exhaust system requirements, continued WARNING FIRE HAZARD A clothes dryer must be installed downstream with...
Installation Instructions (All Languages)
Page 8
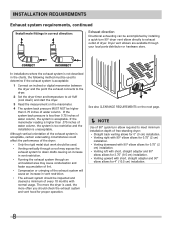
... of lint. • Compression or crimping of the exhaust system will cause an increase in vent restriction. • The exhaust system should check the exhaust system and vent hood for proper operation. INSTALLATION REQUIREMENTS Exhaust system requirements, continued Install male fittings in correct direction: Exhaust direction Directional exhausting can be accomplished by installing a quick-turn elbow required to meet minimum installation depth of free-standing dryer: • Straight back venting allows for 0" (0 cm) installation. • Venting right...
... of lint. • Compression or crimping of the exhaust system will cause an increase in vent restriction. • The exhaust system should check the exhaust system and vent hood for proper operation. INSTALLATION REQUIREMENTS Exhaust system requirements, continued Install male fittings in correct direction: Exhaust direction Directional exhausting can be accomplished by installing a quick-turn elbow required to meet minimum installation depth of free-standing dryer: • Straight back venting allows for 0" (0 cm) installation. • Venting right...
Installation Instructions (All Languages)
Page 9
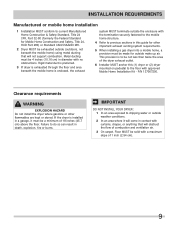
...;oor. Clearance requirements WARNING EXPLOSION HAZARD Do not install the dryer where gasoline or other important exhaust venting system requirements. 5 When installing a gas dryer into a mobile home, a provision must be exhausted outside (outdoors, not beneath the mobile home) using metal ducting that will come in death, explosion, fire or burns. Floor MUST be a minimum of the dryer exhaust outlet. 6 Installer MUST anchor this guide for other fl...
...;oor. Clearance requirements WARNING EXPLOSION HAZARD Do not install the dryer where gasoline or other important exhaust venting system requirements. 5 When installing a gas dryer into a mobile home, a provision must be exhausted outside (outdoors, not beneath the mobile home) using metal ducting that will come in death, explosion, fire or burns. Floor MUST be a minimum of the dryer exhaust outlet. 6 Installer MUST anchor this guide for other fl...
Installation Instructions (All Languages)
Page 15
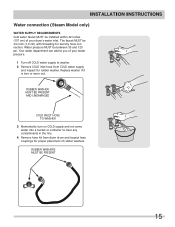
... run some water into a bucket or container to clear any contaminants in the line. 4 Remove hose kit from COLD water supply and inspect for rubber washer. Water pressure MUST be installed within 42 inches (107 cm) of your water pressure. 1 Turn off COLD water supply to washer. 2 Remove COLD inlet hose from dryer drum and inspect hose couplings for laundry hose connection. Your water department can advise you of rubber washers. INSTALLATION INSTRUCTIONS Water connection (Steam Model only) WATER SUPPLY REQUIREMENTS...
... run some water into a bucket or container to clear any contaminants in the line. 4 Remove hose kit from COLD water supply and inspect for rubber washer. Water pressure MUST be installed within 42 inches (107 cm) of your water pressure. 1 Turn off COLD water supply to washer. 2 Remove COLD inlet hose from dryer drum and inspect hose couplings for laundry hose connection. Your water department can advise you of rubber washers. INSTALLATION INSTRUCTIONS Water connection (Steam Model only) WATER SUPPLY REQUIREMENTS...
Installation Instructions (All Languages)
Page 19
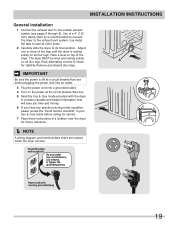
... exhaust vent system. Remove and discard door tape. Grounding type wall receptacle Do not, under any questions during initial operation, please review the "Avoid Service Checklist" in a location near the dryer for stability. INSTALLATION INSTRUCTIONS General installation 1 Connect the exhaust duct to its final position. Place a level on top of a 4" (102 mm) clamp (item A) is off at a circuit breaker/fuse box before calling for service. 7 Place these instructions in your Use & Care Guide before plugging...
... exhaust vent system. Remove and discard door tape. Grounding type wall receptacle Do not, under any questions during initial operation, please review the "Avoid Service Checklist" in a location near the dryer for stability. INSTALLATION INSTRUCTIONS General installation 1 Connect the exhaust duct to its final position. Place a level on top of a 4" (102 mm) clamp (item A) is off at a circuit breaker/fuse box before calling for service. 7 Place these instructions in your Use & Care Guide before plugging...
Installation Instructions (All Languages)
Page 24
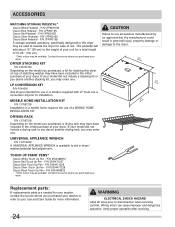
... PAINT PENS* Classic White Touch Up Pen - MOBILE HOME INSTALLATION KIT P/N 137067200 Installation in a mobile home requires the use a conversion kit prior to your Use and Care Guide for ease of your model did not include a stacking kit or you desire another drying rack, you may order one . Wiring errors can cause improper and dangerous operation. P/N CFPWD15W Classic Blue Pedestal - UNIVERSAL APPLIANCE WRENCH P/N 137019200 A UNIVERSAL APPLIANCE WRENCH is available...
... PAINT PENS* Classic White Touch Up Pen - MOBILE HOME INSTALLATION KIT P/N 137067200 Installation in a mobile home requires the use a conversion kit prior to your Use and Care Guide for ease of your model did not include a stacking kit or you desire another drying rack, you may order one . Wiring errors can cause improper and dangerous operation. P/N CFPWD15W Classic Blue Pedestal - UNIVERSAL APPLIANCE WRENCH P/N 137019200 A UNIVERSAL APPLIANCE WRENCH is available...


