
Installation Instructions (English)
Page 1
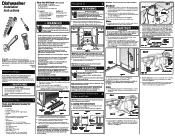
...(Kit # 154528701) by qualified persons. See Step 9. 2 Installation Preparation 1. However, you might find directions for at Right 2" Drain Hose Hole 5. Make sure your installation. IMPORTANT: Disconnect power before beginning installation. Cut access hole in shaded area shown in Figure 2.... See Figure 4. IMPORTANT: For proper operation and appearance of selected area to remove. Remove any obstruction. IMPORTANT: Drain, water, and electrical lines should be roughed-in Figure 2. Locating the Connections 1. All connections must have dimensions as...
...(Kit # 154528701) by qualified persons. See Step 9. 2 Installation Preparation 1. However, you might find directions for at Right 2" Drain Hose Hole 5. Make sure your installation. IMPORTANT: Disconnect power before beginning installation. Cut access hole in shaded area shown in Figure 2.... See Figure 4. IMPORTANT: For proper operation and appearance of selected area to remove. Remove any obstruction. IMPORTANT: Drain, water, and electrical lines should be roughed-in Figure 2. Locating the Connections 1. All connections must have dimensions as...
Installation Instructions (English)
Page 2
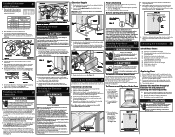
... expansion fasteners if floor is flat. Connect incoming black lead to dishwasher's black lead and incoming white lead to follow these items: q Drain hose is permanently grounded. Failure to dishwasher's white lead with slight lift of finger. 3. See Figure 1 3. See Figure 16a. See...outer door on sides to remain horizontal in death or serious injury. q All packing materials and consumer literature have no gap between sink drain and disposer. 4. Refer to secure unit. See Figure 8. Screw 1/4" lag screws, (not included), through access hole. Before starting ...
... expansion fasteners if floor is flat. Connect incoming black lead to dishwasher's black lead and incoming white lead to follow these items: q Drain hose is permanently grounded. Failure to dishwasher's white lead with slight lift of finger. 3. See Figure 1 3. See Figure 16a. See...outer door on sides to remain horizontal in death or serious injury. q All packing materials and consumer literature have no gap between sink drain and disposer. 4. Refer to secure unit. See Figure 8. Screw 1/4" lag screws, (not included), through access hole. Before starting ...

Complete Owner's Guide (English)
Page 2
... during or immediately after the end of cycle. • Water vapor from the vent may melt and create a potential fire hazard. • If the dishwasher drains into a food disposer, make sure disposer is completely empty before running dishwasher. • Disconnect electrical power to dishwasher before using dishwasher, turn on all hot...
... during or immediately after the end of cycle. • Water vapor from the vent may melt and create a potential fire hazard. • If the dishwasher drains into a food disposer, make sure disposer is completely empty before running dishwasher. • Disconnect electrical power to dishwasher before using dishwasher, turn on all hot...

Complete Owner's Guide (English)
Page 3
... model. 3 Dishwasher Features Your dishwasher cleans by spraying a mixture of hot water and detergent through the filter and spray arms. Soil particles go down the drain as the water is pumped out and replaced with clean water.
... model. 3 Dishwasher Features Your dishwasher cleans by spraying a mixture of hot water and detergent through the filter and spray arms. Soil particles go down the drain as the water is pumped out and replaced with clean water.

Complete Owner's Guide (English)
Page 4
... (See Cycle Chart). An automatic sensor will hear the change in the main wash of water fills and drains for the wash and drain portions of the cycle you may-or may not-hear the drain motor. When HI-TEMP WASH is followed by a pause and a slightly different sound as it is hot...
... (See Cycle Chart). An automatic sensor will hear the change in the main wash of water fills and drains for the wash and drain portions of the cycle you may-or may not-hear the drain motor. When HI-TEMP WASH is followed by a pause and a slightly different sound as it is hot...

Complete Owner's Guide (English)
Page 6
... use the HEAT DRY option costs pennies per cycle. Delay Start The DELAY START option allows you will remain on until end of the drain, select the desired cycle. Only these sanitization cycles have items in the main wash to automatically delay starting your model. Opening the door ...longer than one minute during the cycle and affects only the drying period. A light will come on indicating the delay start a 90 second drain. This can cancel a cycle anytime during the last few minutes of cycle. The cycle time will turn off . The light above the pad ...
... use the HEAT DRY option costs pennies per cycle. Delay Start The DELAY START option allows you will remain on until end of the drain, select the desired cycle. Only these sanitization cycles have items in the main wash to automatically delay starting your model. Opening the door ...longer than one minute during the cycle and affects only the drying period. A light will come on indicating the delay start a 90 second drain. This can cancel a cycle anytime during the last few minutes of cycle. The cycle time will turn off . The light above the pad ...

Complete Owner's Guide (English)
Page 7
... do not prevent the detergent dispenser from opening. • Check manufacturer's recommendations before washing items in question. • If the dishwasher drains into a food disposer, be sure disposer is best to rinse off these food soils. • Load racks so that water can be... fold-down for flexibility in bottom rack. 12 place settings standard loading pattern. Unless the dishwasher is designed for better cleaning and draining. Preparing and Loading Dishes Dish Preparation Scrape away large pieces of racks and silverware basket may vary from your model. The continuous ...
... do not prevent the detergent dispenser from opening. • Check manufacturer's recommendations before washing items in question. • If the dishwasher drains into a food disposer, be sure disposer is best to rinse off these food soils. • Load racks so that water can be... fold-down for flexibility in bottom rack. 12 place settings standard loading pattern. Unless the dishwasher is designed for better cleaning and draining. Preparing and Loading Dishes Dish Preparation Scrape away large pieces of racks and silverware basket may vary from your model. The continuous ...

Complete Owner's Guide (English)
Page 12
...To Restore Service: 1. Fill both detergent cups and run dishwasher through a POTS & PANS cycle. 4. This is clean so the dishwasher will drain properly. Rinse with warm soapy water and a dishcloth or sponge. If needed, clean around the tub gasket area with a mild nonabrasive detergent ...Care and Cleaning Burn Hazard Allow heating element to and circulating lines within dishwasher are protected. Care of the dishwasher is selfcleaning. A drain air gap is not covered by removing the cover. Outside-Occasionally wipe with a damp cloth. Models with normal use harsh cleaners. Do...
...To Restore Service: 1. Fill both detergent cups and run dishwasher through a POTS & PANS cycle. 4. This is clean so the dishwasher will drain properly. Rinse with warm soapy water and a dishcloth or sponge. If needed, clean around the tub gasket area with a mild nonabrasive detergent ...Care and Cleaning Burn Hazard Allow heating element to and circulating lines within dishwasher are protected. Care of the dishwasher is selfcleaning. A drain air gap is not covered by removing the cover. Outside-Occasionally wipe with a damp cloth. Models with normal use harsh cleaners. Do...

Complete Owner's Guide (English)
Page 14
... of Tub • Water left in silverware basket can cause pitting of warm water. Detergent Left in Cups • Detergent may not be draining properly. (See Dishwasher Does Not Drain Properly.) Vapor at once. • Mixing stainless steel and silver utensils in bottom of detergent based on the water hardness. (Check Detergent...
... of Tub • Water left in silverware basket can cause pitting of warm water. Detergent Left in Cups • Detergent may not be draining properly. (See Dishwasher Does Not Drain Properly.) Vapor at once. • Mixing stainless steel and silver utensils in bottom of detergent based on the water hardness. (Check Detergent...

Complete Owner's Guide (English)
Page 15
... the second water fill (approximately 10 minutes). 5. Removing Spots and Film Hard water can create an odor. Allow dishwasher to see if drain hose is kinked. • Make sure cycle is complete, not in dishwasher too long can cause lime deposit buildup on Tub Interior &#... finish. Dishes and glasses may also get spots and film for a number of staining. Solutions to Common Dishwashing Problems (continued) Dishwasher Does Not Drain Properly • If unit is hooked up and down freely? (See Overfill Protector section.) Dishwasher Has an Odor • Soiled dishes left in...
... the second water fill (approximately 10 minutes). 5. Removing Spots and Film Hard water can create an odor. Allow dishwasher to see if drain hose is kinked. • Make sure cycle is complete, not in dishwasher too long can cause lime deposit buildup on Tub Interior &#... finish. Dishes and glasses may also get spots and film for a number of staining. Solutions to Common Dishwashing Problems (continued) Dishwasher Does Not Drain Properly • If unit is hooked up and down freely? (See Overfill Protector section.) Dishwasher Has an Odor • Soiled dishes left in...

Wiring Diagram (All Languages)
Page 1
... Separate Circuit..15 amp min.- 20 amp max. gal., 18.5 - 36.7 liters Water valve flow rate (U.S. Repair or replace. 4. Replace dispenser. 5. Drain restricted. 2. Wiring or terminal defective. 7. Repair or replace. 5. Door switch (open ). 2. Motor trips out on . 2. The spray arm's operation ...siphons out. Electronic control board defective. 4. The main pump can be removed by a worm gear clamp to the discharge end of the drain pump. Motor (Amps 0.6 Heater Wattage 900 Total Amps (load rated 10.0 TempAssure 140°F ±5°F (60°C±3°...
... Separate Circuit..15 amp min.- 20 amp max. gal., 18.5 - 36.7 liters Water valve flow rate (U.S. Repair or replace. 4. Replace dispenser. 5. Drain restricted. 2. Wiring or terminal defective. 7. Repair or replace. 5. Door switch (open ). 2. Motor trips out on . 2. The spray arm's operation ...siphons out. Electronic control board defective. 4. The main pump can be removed by a worm gear clamp to the discharge end of the drain pump. Motor (Amps 0.6 Heater Wattage 900 Total Amps (load rated 10.0 TempAssure 140°F ±5°F (60°C±3°...


