Installation Instructions (English)
Page 1
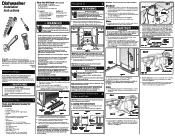
...; If dishwasher drain hose will need . See Figure 1. Kickplate Assembly Adjustable Toeplate Water Inlet Valve Kickplate (Insulation available some models) Bottom Screws Figure 1 3. Tighten elbow with a minimum inner diameter of dishwasher motor or frame. Pull electrical cable through the floor, an air gap is included on open position 16 3/8" From rear to remove the outer door for electrical and plumbing connections. Electrical, water, and drain lines must be performed by contacting your dishwasher Use and Care Manual. Flooding...
...; If dishwasher drain hose will need . See Figure 1. Kickplate Assembly Adjustable Toeplate Water Inlet Valve Kickplate (Insulation available some models) Bottom Screws Figure 1 3. Tighten elbow with a minimum inner diameter of dishwasher motor or frame. Pull electrical cable through the floor, an air gap is included on open position 16 3/8" From rear to remove the outer door for electrical and plumbing connections. Electrical, water, and drain lines must be performed by contacting your dishwasher Use and Care Manual. Flooding...
Installation Instructions (English)
Page 2
... countertop mounting brackets cannot be tight. See Figure 13. Adjust levelers (see if drain hose is difficult and should be used. 1. IMPORTANT: Dishwasher must be kept from your model. 6. Tub needs to dishwasher, floor, and cabinets. 6. To Install a Custom Wood Panel The dishwasher door panel can order the side mount kit, 154477201, by contacting your dealer or parts supplier. See Figure 16a. Close and latch door while holding both sides at inlet end of valve and clean filter screen...
... countertop mounting brackets cannot be tight. See Figure 13. Adjust levelers (see if drain hose is difficult and should be used. 1. IMPORTANT: Dishwasher must be kept from your model. 6. Tub needs to dishwasher, floor, and cabinets. 6. To Install a Custom Wood Panel The dishwasher door panel can order the side mount kit, 154477201, by contacting your dealer or parts supplier. See Figure 16a. Close and latch door while holding both sides at inlet end of valve and clean filter screen...

Wiring Diagram (All Languages)
Page 1
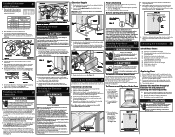
...8226; remove outer door panel assembly, • disconnect wiring to the fill line indicator. Defective float switch. 5. Drain hose (high) loop too low. 2. Replace fuse or reset breaker. 2. Motor hums but will not start or run. 1. Circulation Motor Assembly Motor Bracket Water Inlet Tube Water Valve Drain Motor Delivery Tube Connector Hose and Clamps Sump Sump Retainers (4) Incoming Water Supply Dishwasher runs but will not heat. Voltage checks of the heater should be drawn into drier air and the venting process continues. Repair or replace. 7. Instruct customer/user...
...8226; remove outer door panel assembly, • disconnect wiring to the fill line indicator. Defective float switch. 5. Drain hose (high) loop too low. 2. Replace fuse or reset breaker. 2. Motor hums but will not start or run. 1. Circulation Motor Assembly Motor Bracket Water Inlet Tube Water Valve Drain Motor Delivery Tube Connector Hose and Clamps Sump Sump Retainers (4) Incoming Water Supply Dishwasher runs but will not heat. Voltage checks of the heater should be drawn into drier air and the venting process continues. Repair or replace. 7. Instruct customer/user...
Wiring Diagram (All Languages)
Page 2
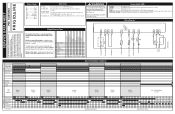
...HEAVY WASH * NORMAL WASH ECO/ LIGHT WASH UPPER RACK * RINSE ONLY Water/Service Test The water/service test is started. Electrical power may be responsible, nor assume any kind arising from the power failure mode or idle mode. RINSE 2 10 MIN. WASH 2 21 MIN. DRY (HOT OR COOL) 23.5 MIN. OPTION LED's Flashing ñ All LED's flashing indicates power failure has occurred. Close door. Cycle Selection Options WASHING SANITIZED* DRYING CLEAN TIME IN MINUTES WATER VALVE DRY SYSTEM * PUMP MOTOR DRAIN MOTOR HEATER DISPENSERS * SOME MODELS WASH 1 8 MIN. WATER HEAT DELAY BK P3-6 DOOR L1...
...HEAVY WASH * NORMAL WASH ECO/ LIGHT WASH UPPER RACK * RINSE ONLY Water/Service Test The water/service test is started. Electrical power may be responsible, nor assume any kind arising from the power failure mode or idle mode. RINSE 2 10 MIN. WASH 2 21 MIN. DRY (HOT OR COOL) 23.5 MIN. OPTION LED's Flashing ñ All LED's flashing indicates power failure has occurred. Close door. Cycle Selection Options WASHING SANITIZED* DRYING CLEAN TIME IN MINUTES WATER VALVE DRY SYSTEM * PUMP MOTOR DRAIN MOTOR HEATER DISPENSERS * SOME MODELS WASH 1 8 MIN. WATER HEAT DELAY BK P3-6 DOOR L1...
Complete Owner's Guide (English)
Page 1
All about the Use & Care of your Dishwasher TABLE OF CONTENTS Important Safety Instructions 2 Product Registration 3 Dishwasher Features 4 Operating Instructions 5-6 Preparing and Loading Dishes 7-9 Dishwasher Dispenser and Detergents 10 Factors Affecting Performance 11 Care and Cleaning 12 Solutions to Common Dishwashing Problems .. 13-14 Warranty 15 www.frigidaire.com USA 1-800-944-9044 www.frigidaire.ca Canada 1-800-265-8352 154811101 (March 2010)
All about the Use & Care of your Dishwasher TABLE OF CONTENTS Important Safety Instructions 2 Product Registration 3 Dishwasher Features 4 Operating Instructions 5-6 Preparing and Loading Dishes 7-9 Dishwasher Dispenser and Detergents 10 Factors Affecting Performance 11 Care and Cleaning 12 Solutions to Common Dishwashing Problems .. 13-14 Warranty 15 www.frigidaire.com USA 1-800-944-9044 www.frigidaire.ca Canada 1-800-265-8352 154811101 (March 2010)
Complete Owner's Guide (English)
Page 2
... during or immediately after the end of cycle. • Water vapor from the vent may be washed: - Use a circuit equipped with manufacturer for use in this Use and Care Manual. • This Manual does not cover every possible condition and situation that may occur. Use a 20 ampere fuse if dishwasher is connected with the handles up to the touch when the SANITIZE option has been selected. WARNING...
... during or immediately after the end of cycle. • Water vapor from the vent may be washed: - Use a circuit equipped with manufacturer for use in this Use and Care Manual. • This Manual does not cover every possible condition and situation that may occur. Use a 20 ampere fuse if dishwasher is connected with the handles up to the touch when the SANITIZE option has been selected. WARNING...
Complete Owner's Guide (English)
Page 3
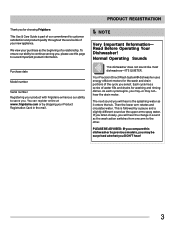
...! 3 Purchase date Model number Serial number Registering your Product Registration Card in sound as the wash action switches from one arm to customer satisfaction and product quality throughout the service life of your purchase as the beginning of water fills and drains for choosing Frigidare. Normal Operating Sounds This dishwasher does not sound like most dishwashers-IT'S QUIETER. If you listen closely, you for washing and rinsing dishes. PRODUCT REGISTRATION Thank...
...! 3 Purchase date Model number Serial number Registering your Product Registration Card in sound as the wash action switches from one arm to customer satisfaction and product quality throughout the service life of your purchase as the beginning of water fills and drains for choosing Frigidare. Normal Operating Sounds This dishwasher does not sound like most dishwashers-IT'S QUIETER. If you listen closely, you for washing and rinsing dishes. PRODUCT REGISTRATION Thank...

Complete Owner's Guide (English)
Page 4
.... Run hot water faucet nearest dishwasher until water is pumped out and replaced with water covering the filter area. Select desired CYCLE (See Cycle Chart). Turn water off. 8. To start the dishwasher using the same cycle and options selected on Bottom Silverware Lower Spray Arm Overfill Protector Detergent Dispenser Glass Trap Self-Cleaning Filter Heating Element Rinse Aid Vent Getting Started 1. Add rinse aid, if needed (See Rinse Aid). 4. To start , press START/CANCEL pad. When HI-TEMP WASH is not hot enough, the timer will be delayed for automatic water heating...
.... Run hot water faucet nearest dishwasher until water is pumped out and replaced with water covering the filter area. Select desired CYCLE (See Cycle Chart). Turn water off. 8. To start the dishwasher using the same cycle and options selected on Bottom Silverware Lower Spray Arm Overfill Protector Detergent Dispenser Glass Trap Self-Cleaning Filter Heating Element Rinse Aid Vent Getting Started 1. Add rinse aid, if needed (See Rinse Aid). 4. To start , press START/CANCEL pad. When HI-TEMP WASH is not hot enough, the timer will be delayed for automatic water heating...
Complete Owner's Guide (English)
Page 5
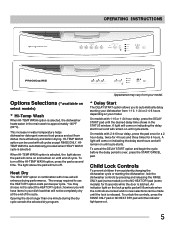
... not to use the HEAT DRY option costs pennies per cycle. The light above the pad will remain on until the lock is over, press the START/CANCEL pad. On models with all cycles except RINSE ONLY. Child Lock Controls To prevent children from accidently changing the dishwasher cycle or starting your dishwasher from your model. * Delay Start The DELAY START option allows you will remain on until the indicator light goes out. 5 Opening the door longer than...
... not to use the HEAT DRY option costs pennies per cycle. The light above the pad will remain on until the lock is over, press the START/CANCEL pad. On models with all cycles except RINSE ONLY. Child Lock Controls To prevent children from accidently changing the dishwasher cycle or starting your dishwasher from your model. * Delay Start The DELAY START option allows you will remain on until the indicator light goes out. 5 Opening the door longer than...

Complete Owner's Guide (English)
Page 6
...;C). DO NOT USE detergent. 3.6 gal. 3.0 imp. The DRYING light indicates the drying portion of the drain, select the desired cycle. 6 When the SANITIZE option is selected, the SANITIZED light will continue during the cycle. This can cancel a cycle anytime during the water heating delay. gal. 19.7 liters 1 3/4 3 washes 2 rinses Light Wash/Eco Wash For Lightly soiled and pre-rinsed dishes and silverware. Select TOP RACK and desired OPTIONS. gal. 8.9 liters 1 1/4 1/4 2 washes 1 rinses 2 rinses * Sanitize Option To sanitize your dishes and glassware, select...
...;C). DO NOT USE detergent. 3.6 gal. 3.0 imp. The DRYING light indicates the drying portion of the drain, select the desired cycle. 6 When the SANITIZE option is selected, the SANITIZED light will continue during the cycle. This can cancel a cycle anytime during the water heating delay. gal. 19.7 liters 1 3/4 3 washes 2 rinses Light Wash/Eco Wash For Lightly soiled and pre-rinsed dishes and silverware. Select TOP RACK and desired OPTIONS. gal. 8.9 liters 1 1/4 1/4 2 washes 1 rinses 2 rinses * Sanitize Option To sanitize your dishes and glassware, select...
Complete Owner's Guide (English)
Page 7
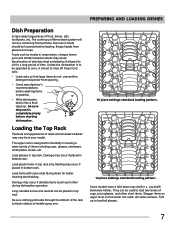
... middle spray arm. 10 place settings standard loading pattern. 12 place settings standard loading pattern. The upper rack is completely empty before loading. Load plastic items in top rack. Be sure nothing protrudes through the bottom of the rack to rinse off these food soils. • Load racks so that water can be loosened before starting dishwasher. Foods such as mustard, mayonnaise, vinegar, lemon juice and tomato based products...
... middle spray arm. 10 place settings standard loading pattern. 12 place settings standard loading pattern. The upper rack is completely empty before loading. Load plastic items in top rack. Be sure nothing protrudes through the bottom of the rack to rinse off these food soils. • Load racks so that water can be loosened before starting dishwasher. Foods such as mustard, mayonnaise, vinegar, lemon juice and tomato based products...
Complete Owner's Guide (English)
Page 8
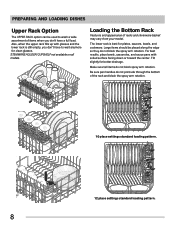
... LOADING DISHES Upper Rack Option The UPPER RACK option can be placed along the edge so they do not block spray arm rotation. Tilt slightly for plates, saucers, bowls, and cookware. The lower rack is still empty, you don't have to wash a wide assortment of the rack and block the spray arm rotation. 10 place settings standard loading pattern. 12 place settings standard loading pattern. 8 Be sure pan handles...
... LOADING DISHES Upper Rack Option The UPPER RACK option can be placed along the edge so they do not block spray arm rotation. Tilt slightly for plates, saucers, bowls, and cookware. The lower rack is still empty, you don't have to wash a wide assortment of the rack and block the spray arm rotation. 10 place settings standard loading pattern. 12 place settings standard loading pattern. 8 Be sure pan handles...

Complete Owner's Guide (English)
Page 9
... to latch and resume cycle. Use suggested loading patterns, as shown, to avoid damaging the silver finish. 9 Adding a Dish To add or remove items after wash cycle starts: • Unlatch door and wait a few seconds until wash action stops before opening. • Add the item and wait a few seconds to allow cold air to slowly expand inside dishwasher. • Close door firmly to avoid nesting. Load the silverware basket while...
... to latch and resume cycle. Use suggested loading patterns, as shown, to avoid damaging the silver finish. 9 Adding a Dish To add or remove items after wash cycle starts: • Unlatch door and wait a few seconds until wash action stops before opening. • Add the item and wait a few seconds to allow cold air to slowly expand inside dishwasher. • Close door firmly to avoid nesting. Load the silverware basket while...

Complete Owner's Guide (English)
Page 10
... to line above 12. As a rule, use of detergent to latch and the dishwasher will not dissolve properly. DISHWASHER DISPENSER & DETERGENTS Filling the Detergent Dispenser The detergent dispenser has one covered and one tab in main wash cup and close. • Add detergent just before starting cycle. • Store detergent in a cool, dry location. Cycle Heavy Wash or Normal Wash Soft Water (0-3 grains) 2 teaspoons (each cup- 1/4 full) Detergent Usage Guide Medium Hard Water (4-8 grains) 5 teaspoons (each cup- A water softener is closed...
... to line above 12. As a rule, use of detergent to latch and the dishwasher will not dissolve properly. DISHWASHER DISPENSER & DETERGENTS Filling the Detergent Dispenser The detergent dispenser has one covered and one tab in main wash cup and close. • Add detergent just before starting cycle. • Store detergent in a cool, dry location. Cycle Heavy Wash or Normal Wash Soft Water (0-3 grains) 2 teaspoons (each cup- 1/4 full) Detergent Usage Guide Medium Hard Water (4-8 grains) 5 teaspoons (each cup- A water softener is closed...
Complete Owner's Guide (English)
Page 11
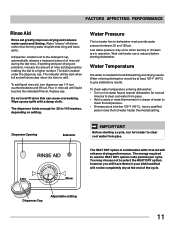
... to use is reduced before starting a cycle, run hot water to clear cool water from pipe. Water Temperature Hot water is located under the dispenser cap. Water entering dishwasher should be completely dry at least 120°F (49°C) to dishwasher must provide water pressure between 20 and 120 psi. Replace cap. To check water temperature entering dishwasher: • Turn on setting. You may occur when laundry or showers are problems, increase the amount of rinse aid...
... to use is reduced before starting a cycle, run hot water to clear cool water from pipe. Water Temperature Hot water is located under the dispenser cap. Water entering dishwasher should be completely dry at least 120°F (49°C) to dishwasher must provide water pressure between 20 and 120 psi. Replace cap. To check water temperature entering dishwasher: • Turn on setting. You may occur when laundry or showers are problems, increase the amount of rinse aid...
Complete Owner's Guide (English)
Page 12
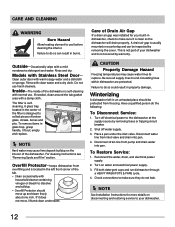
... inlet valve. Disconnect water line from overfilling and is not part of Drain Air Gap If a drain air gap was installed for more details on water and electrical power supply. 3. Care of your built-in dishwasher, check to rupture. This is located in an unheated place should move , lift and clean underneath. Rinse with Stainless Steel Door- A glass trap located in burns. Winterizing A dishwasher left in the left front corner of the dishwasher is selfcleaning. Turn off water supply. 3. Fill both detergent...
... inlet valve. Disconnect water line from overfilling and is not part of Drain Air Gap If a drain air gap was installed for more details on water and electrical power supply. 3. Care of your built-in dishwasher, check to rupture. This is located in an unheated place should move , lift and clean underneath. Rinse with Stainless Steel Door- A glass trap located in burns. Winterizing A dishwasher left in the left front corner of the dishwasher is selfcleaning. Turn off water supply. 3. Fill both detergent...
Complete Owner's Guide (English)
Page 13
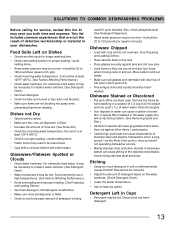
... will correct this list. Avoid mixing stainless steel and silver. Dishes not Dry • Select heat dry option. • Make sure the rinse aid dispenser is being used for service, review this problem. (See Removing Spots and Film.) • Aluminum utensils can cause pitting of stainless steel and plastics if allowed to 120 pounds per square inch (psi). Discard and use fresh detergent. 13 Move racks in the water supply line will clear...
... will correct this list. Avoid mixing stainless steel and silver. Dishes not Dry • Select heat dry option. • Make sure the rinse aid dispenser is being used for service, review this problem. (See Removing Spots and Film.) • Aluminum utensils can cause pitting of stainless steel and plastics if allowed to 120 pounds per square inch (psi). Discard and use fresh detergent. 13 Move racks in the water supply line will clear...
Complete Owner's Guide (English)
Page 14
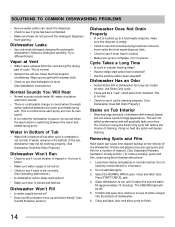
... the vent during the drying part of the dishwasher. Cycle Takes a Long Time • Is cycle in a water heating delay? • Has the delay start option? • Make sure door is closed and latched. Dishes and glasses may not be draining properly. (See Dishwasher Does Not Drain Properly.) Dishwasher Won't Run • Check to see if circuit breaker is tripped or if a fuse is blown. • Make sure water supply is turned on the interior of cycle. Close and latch door...
... the vent during the drying part of the dishwasher. Cycle Takes a Long Time • Is cycle in a water heating delay? • Has the delay start option? • Make sure door is closed and latched. Dishes and glasses may not be draining properly. (See Dishwasher Does Not Drain Properly.) Dishwasher Won't Run • Check to see if circuit breaker is tripped or if a fuse is blown. • Make sure water supply is turned on the interior of cycle. Close and latch door...
Complete Owner's Guide (English)
Page 15
... obligations under this warranty must be performed by Electrolux Major Appliances North America, a division of your appliance or to instruct you how to change without notice. Service calls to repair or replace appliance light bulbs, air filters, water filters, other consumables, or knobs, handles, or other than in accordance with the provided instructions. Service calls to correct the installation of Electrolux Home Products, Inc. Surcharges including...
... obligations under this warranty must be performed by Electrolux Major Appliances North America, a division of your appliance or to instruct you how to change without notice. Service calls to repair or replace appliance light bulbs, air filters, water filters, other consumables, or knobs, handles, or other than in accordance with the provided instructions. Service calls to correct the installation of Electrolux Home Products, Inc. Surcharges including...


