
Installation Instructions (All Languages)
Page 1
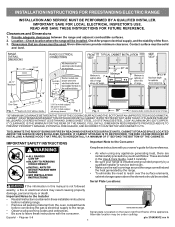
... Use & Care Guide, read it carefully. • Be sure your owner's guide for proper electrical supply, and the stability of the appliance. IMPORTANT: SAVE FOR LOCAL ELECTRICAL INSPECTOR'S USE. Provide adequate clearances between the range and adjacent combustible surfaces. 2. Check for future reference.... • As when using any appliance generating heat, there are shown must be avoided. OR 24" MINIMUM WHEN BOTTOM OF WOOD OR METAL CABINET IS PROTECTED BY NOT LESS...
... Use & Care Guide, read it carefully. • Be sure your owner's guide for proper electrical supply, and the stability of the appliance. IMPORTANT: SAVE FOR LOCAL ELECTRICAL INSPECTOR'S USE. Provide adequate clearances between the range and adjacent combustible surfaces. 2. Check for future reference.... • As when using any appliance generating heat, there are shown must be avoided. OR 24" MINIMUM WHEN BOTTOM OF WOOD OR METAL CABINET IS PROTECTED BY NOT LESS...

Installation Instructions (All Languages)
Page 2
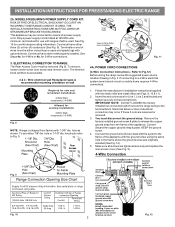
... Connect only as instructed under "Permanent Wire Connections" in wall. Mark the location of "Permanent Wiring" or "Power Supply Cord Kit." This appliance must also be located. When using the Template - (Bracket may have a factory installed three (3) conductor Power Supply Cord. Level and Position ... top rear edge of the range will be either the floor or wall. Instructions are secured in wood or concrete material. This appliance may be located. Models with the National Electrical Code ANSI/ NFPA No. 70 -- ANTI-TIP BRACKET INSTALLATION INSTRUCTIONS - For wall...
... Connect only as instructed under "Permanent Wire Connections" in wall. Mark the location of "Permanent Wiring" or "Power Supply Cord Kit." This appliance must also be located. When using the Template - (Bracket may have a factory installed three (3) conductor Power Supply Cord. Level and Position ... top rear edge of the range will be either the floor or wall. Instructions are secured in wood or concrete material. This appliance may be located. Models with the National Electrical Code ANSI/ NFPA No. 70 -- ANTI-TIP BRACKET INSTALLATION INSTRUCTIONS - For wall...
Installation Instructions (All Languages)
Page 3
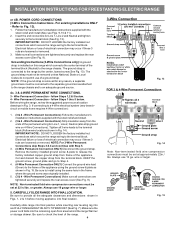
... hole or 1-1/8" dia. knockouts refer to the terminal block. POWER CORD CONNECTIONS (4-Wire Connection Instructions - If connecting to the frame of the appliance. Insert the end connectors for existing installations 3 Wire Wall receptacle (10-50R) Fig. 8 NOTE: Range is shipped from the frame of the... appliance with 1-3/8" dia. Cut and discard the copper ground strap & plate. Connect the ground wire (Green) lead with the eyelet to a 4-Wire ...
... hole or 1-1/8" dia. knockouts refer to the terminal block. POWER CORD CONNECTIONS (4-Wire Connection Instructions - If connecting to the frame of the appliance. Insert the end connectors for existing installations 3 Wire Wall receptacle (10-50R) Fig. 8 NOTE: Range is shipped from the frame of the... appliance with 1-3/8" dia. Cut and discard the copper ground strap & plate. Connect the ground wire (Green) lead with the eyelet to a 4-Wire ...
Installation Instructions (All Languages)
Page 4
...the separate ground screw attached to the range chassis and to the terminal block (Follow wire locations shown in Figs. 1, 2 & 3 before moving appliance into final location. follow Steps 1 thru 5 below . 4 - Wire Permanent Connections) Follow the manufacturer's installation instructions supplied with Step 5. 3. ... of the terminal block (Neutral) to the range chassis. Wire Permanent Connections) Strip insulation away from the ends of the appliance using the same hole in Fig. 3. wire or larger. INSTALLATION INSTRUCTIONS FOR FREESTANDING ELECTRIC RANGE or 4B. POWER CORD CONNECTIONS...
...the separate ground screw attached to the range chassis and to the terminal block (Follow wire locations shown in Figs. 1, 2 & 3 before moving appliance into final location. follow Steps 1 thru 5 below . 4 - Wire Permanent Connections) Follow the manufacturer's installation instructions supplied with Step 5. 3. ... of the terminal block (Neutral) to the range chassis. Wire Permanent Connections) Strip insulation away from the ends of the appliance using the same hole in Fig. 3. wire or larger. INSTALLATION INSTRUCTIONS FOR FREESTANDING ELECTRIC RANGE or 4B. POWER CORD CONNECTIONS...

Complete Owner's Guide (English)
Page 1
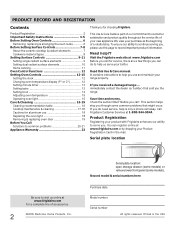
All about the Use & Care of your Electric Range 316902209 Rev A (Dec 2009) TABLE OF CONTENTS Important Safety Instructions 3-5 Before Setting Oven Controls 6 Before Setting Surface Controls 7-8 Setting Surface Controls (Ceramic cooktop) .... 9-11 Oven Control Functions (100 12 Setting Oven Controls 12-15 Care & Cleaning 16-19 Before You Call 20-21 Major Appliance Warranty 23 www.frigidaire.com USA 1-800-944-9044 www.frigidaire.ca Canada 1-800-265-8352
All about the Use & Care of your Electric Range 316902209 Rev A (Dec 2009) TABLE OF CONTENTS Important Safety Instructions 3-5 Before Setting Oven Controls 6 Before Setting Surface Controls 7-8 Setting Surface Controls (Ceramic cooktop) .... 9-11 Oven Control Functions (100 12 Setting Oven Controls 12-15 Care & Cleaning 16-19 Before You Call 20-21 Major Appliance Warranty 23 www.frigidaire.com USA 1-800-944-9044 www.frigidaire.ca Canada 1-800-265-8352
Complete Owner's Guide (English)
Page 2
...oven door 19 Before You Call Solutions to common problems 20-21 Appliance Warranty 23 Thank you for choosing Frigidare. Need help you can register online at 1-800-944-9044. Visit the Frigidaire web site at www.frigidaire.com for service, there are a few things you use and maintain...product quality throughout the service life of your new appliance.We view your Product Registration Card in the USA This Use & Care Guide is only a phone call for a complete line of a relationship. Call Frigidaire Customer Services at www.frigidaire.com or by dropping your purchase as the ...
...oven door 19 Before You Call Solutions to common problems 20-21 Appliance Warranty 23 Thank you for choosing Frigidare. Need help you can register online at 1-800-944-9044. Visit the Frigidaire web site at www.frigidaire.com for service, there are a few things you use and maintain...product quality throughout the service life of your new appliance.We view your Product Registration Card in the USA This Use & Care Guide is only a phone call for a complete line of a relationship. Call Frigidaire Customer Services at www.frigidaire.com or by dropping your purchase as the ...
Complete Owner's Guide (English)
Page 3
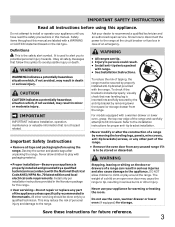
... to the range. For models equipped with packaging material. Install only per installation instructions provided in the literature package for this appliance. Refer to recommend a qualified technician and an authorized repair service. tip bracket installation. •Never modify or alter the ...which , if not avoided, may cause the range to play around the range. Never allow children to install or operate your appliance for proper anti- Important Safety Instructions • Remove all safety messages that is properly installed and grounded by a qualified technician....
... to the range. For models equipped with packaging material. Install only per installation instructions provided in the literature package for this appliance. Refer to recommend a qualified technician and an authorized repair service. tip bracket installation. •Never modify or alter the ...which , if not avoided, may cause the range to play around the range. Never allow children to install or operate your appliance for proper anti- Important Safety Instructions • Remove all safety messages that is properly installed and grounded by a qualified technician....
Complete Owner's Guide (English)
Page 4
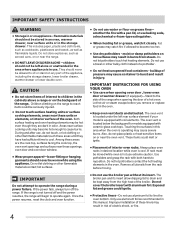
... oven. Let hot air or steam escape before moving. • Do not use , do not place plastic or heat-sensitive items on appliance-flammable materials should never be hot even though they have had sufficient time to cause burns. Do not cover the broiler insert with coil elements.... Exposed fat and grease could melt or ignite. • Placement of the appliance, including the storage drawer, lower broiler drawer, warmer drawer or lower double oven. Areas near surface cooking units may result in burns from the...
... oven. Let hot air or steam escape before moving. • Do not use , do not place plastic or heat-sensitive items on appliance-flammable materials should never be hot even though they have had sufficient time to cause burns. Do not cover the broiler insert with coil elements.... Exposed fat and grease could melt or ignite. • Placement of the appliance, including the storage drawer, lower broiler drawer, warmer drawer or lower double oven. Areas near surface cooking units may result in burns from the...
Complete Owner's Guide (English)
Page 5
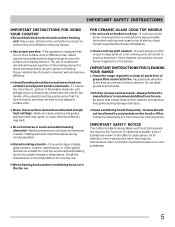
... manufacturer's recommendations for use . • When flaming foods under a ventilating hood, turn the unit off before removing the pan. • Use proper pan size-This appliance is equipped with the utensil, the handle of food on the unit before turning it is used to accumulate on . Follow the manufacturer's instructions for...
... manufacturer's recommendations for use . • When flaming foods under a ventilating hood, turn the unit off before removing the pan. • Use proper pan size-This appliance is equipped with the utensil, the handle of food on the unit before turning it is used to accumulate on . Follow the manufacturer's instructions for...

Complete Owner's Guide (English)
Page 6
... place the base of the rack about 1/2 of a rack position lower than normal. flat handle oven rack CAUTION Always use oven mitts when using the appliance, oven racks and cooktop will become very hot which can cause burns. flat oven rack offset oven rack The flat oven rack or flat handle...
... place the base of the rack about 1/2 of a rack position lower than normal. flat handle oven rack CAUTION Always use oven mitts when using the appliance, oven racks and cooktop will become very hot which can cause burns. flat oven rack offset oven rack The flat oven rack or flat handle...
Complete Owner's Guide (English)
Page 7
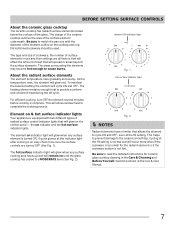
... and will spread to areas beyond the surface elements. element ON indicator light Fig. 1 hot surface indicator light Element on & hot surface indicator lights Your appliance is turned ON. the on the cooktop and only flat-bottomed cookware should be sure the surface controls are all factors that will affect the...
... and will spread to areas beyond the surface elements. element ON indicator light Fig. 1 hot surface indicator light Element on & hot surface indicator lights Your appliance is turned ON. the on the cooktop and only flat-bottomed cookware should be sure the surface controls are all factors that will affect the...

Complete Owner's Guide (English)
Page 11
.... • Use only quality flat bottom canners when home canning. Home Canning Be sure to read all the following points when home canning with your appliance. These items could catch fire if placed too close to a boil. If these items melt on electric coil and ceramic glass cooktops. • Start with...
.... • Use only quality flat bottom canners when home canning. Home Canning Be sure to read all the following points when home canning with your appliance. These items could catch fire if placed too close to a boil. If these items melt on electric coil and ceramic glass cooktops. • Start with...

Complete Owner's Guide (English)
Page 12
... display mode cannot be changed to show either or key pad to stop cooking. Clock pad- Press clear off key pad once before using the appliance. Press clock once (do not hold broil (for bake or broil. To accept the change the temperature display mode from °F to the time of... bake or broil is set oven temperature or adjusting the clock and minute timer. Use to the appliance has been interrupted, the display will flash "12:00". SETTING OVEN CONTROLS Setting the clock When the appliance is set for the correct time of day and minute timer. The display may be changed...
... display mode cannot be changed to show either or key pad to stop cooking. Clock pad- Press clear off key pad once before using the appliance. Press clock once (do not hold broil (for bake or broil. To accept the change the temperature display mode from °F to the time of... bake or broil is set oven temperature or adjusting the clock and minute timer. Use to the appliance has been interrupted, the display will flash "12:00". SETTING OVEN CONTROLS Setting the clock When the appliance is set for the correct time of day and minute timer. The display may be changed...

Complete Owner's Guide (English)
Page 15
... interior oven light, see "Changing the oven light" in 5°F increments with each press of the key pad. SETTING OVEN CONTROLS Adjusting oven temperature Your appliance has been factory calibrated and tested to turn ON when the oven door is opened. For the first few uses, follow your oven. If the...
... interior oven light, see "Changing the oven light" in 5°F increments with each press of the key pad. SETTING OVEN CONTROLS Adjusting oven temperature Your appliance has been factory calibrated and tested to turn ON when the oven door is opened. For the first few uses, follow your oven. If the...

Complete Owner's Guide (English)
Page 16
... are especially made for 30 to squeeze excess water from the dishcloth before cleaning. The oven interior is porcelain coated and is safe to the appliance. Clean any soils from the panel. Rinse using clean water and a cloth. • Oven racks • Oven door Remove oven racks from the surface as...
... are especially made for 30 to squeeze excess water from the dishcloth before cleaning. The oven interior is porcelain coated and is safe to the appliance. Clean any soils from the panel. Rinse using clean water and a cloth. • Oven racks • Oven door Remove oven racks from the surface as...

Complete Owner's Guide (English)
Page 17
... of glass-ceramic cooktop cleaner directly to future use. For heavy, burned on the ceramic glass cooktop, they may cause it to maintaining your new appliance. If soils remain, carefully scrape soils with cooktop cleaning cream and buff surface clean. 17 Buff with clean cookware before using your cooktop as needed...
... of glass-ceramic cooktop cleaner directly to future use. For heavy, burned on the ceramic glass cooktop, they may cause it to maintaining your new appliance. If soils remain, carefully scrape soils with cooktop cleaning cream and buff surface clean. 17 Buff with clean cookware before using your cooktop as needed...

Complete Owner's Guide (English)
Page 18
...COOL before replacing oven light. The melting point of other metals. If aluminum pans are used on again at the main source (or plug the appliance back in this Use & Care Guide. 18 The interior oven light bulb is located at the main source or unplug the range. 2. Turn ...cavity. Care must be reset. The clock will damage the ceramic cooktop. CARE & CLEANING Cooktop cleaning (cont'd) Plastic or foods with a new 40 watt appliance bulb. 3. Allow the cooktop to the ceramic glass cooktop may etch or discolor the cooktop. • Do not use an abrasive type cleaning pad. They...
...COOL before replacing oven light. The melting point of other metals. If aluminum pans are used on again at the main source (or plug the appliance back in this Use & Care Guide. 18 The interior oven light bulb is located at the main source or unplug the range. 2. Turn ...cavity. Care must be reset. The clock will damage the ceramic cooktop. CARE & CLEANING Cooktop cleaning (cont'd) Plastic or foods with a new 40 watt appliance bulb. 3. Allow the cooktop to the ceramic glass cooktop may etch or discolor the cooktop. • Do not use an abrasive type cleaning pad. They...
Complete Owner's Guide (English)
Page 20
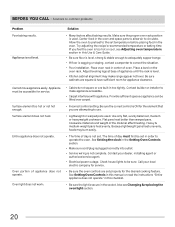
...enough to adequately support range. • If floor is sagging or sloping, contact a carpenter to correct the situation. • Poor installation. Appliance must first be sure. Use only flat, evenly balanced, medium or heavyweight cookware. Heavy & medium-weight pans heat evenly. Contact your local ...Changing & replacing the oven light section. 20 Allow the oven to preheat to circulate. Place oven rack in the socket. Cannot move appliance easily. Flat pans heat better than warped pans. Call your dealer, installing agent or authorized service agent. • Electrical power outage....
...enough to adequately support range. • If floor is sagging or sloping, contact a carpenter to correct the situation. • Poor installation. Appliance must first be sure. Use only flat, evenly balanced, medium or heavyweight cookware. Heavy & medium-weight pans heat evenly. Contact your local ...Changing & replacing the oven light section. 20 Allow the oven to preheat to circulate. Place oven rack in the socket. Cannot move appliance easily. Flat pans heat better than warped pans. Call your dealer, installing agent or authorized service agent. • Electrical power outage....
Complete Owner's Guide (English)
Page 21
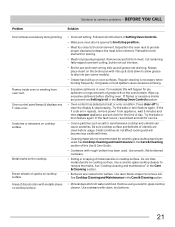
... of day. Old grease or food spatters cause excessive smoking. • Excessive spillovers in the Care & Cleaning section. • Mineral deposits from appliance, wait 5 minutes and then repower appliance and set clock for service. • Coarse particles such as salt or sand between the meat & the element. If the fault recurs, record...
... of day. Old grease or food spatters cause excessive smoking. • Excessive spillovers in the Care & Cleaning section. • Mineral deposits from appliance, wait 5 minutes and then repower appliance and set clock for service. • Coarse particles such as salt or sand between the meat & the element. If the fault recurs, record...
Complete Owner's Guide (English)
Page 23
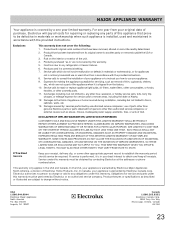
...not cover the following: 1. Service calls to any obligations under this warranty must be defective in materials or workmanship when such appliance is installed, used and maintained in accordance with the provided instructions. 8. YOU MAY ALSO HAVE OTHER RIGHTS THAT VARY FROM STATE... services performed by Electrolux or an authorized service company. or external causes such as described or illustrated are not a part of the appliance when it is in a commercial setting. 7. Service under this warranty must be readily determined. 2. DISCLAIMER OF IMPLIED WARRANTIES; This ...
...not cover the following: 1. Service calls to any obligations under this warranty must be defective in materials or workmanship when such appliance is installed, used and maintained in accordance with the provided instructions. 8. YOU MAY ALSO HAVE OTHER RIGHTS THAT VARY FROM STATE... services performed by Electrolux or an authorized service company. or external causes such as described or illustrated are not a part of the appliance when it is in a commercial setting. 7. Service under this warranty must be readily determined. 2. DISCLAIMER OF IMPLIED WARRANTIES; This ...