
Installation Instructions
Page 2
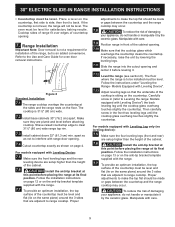
... Electrical Code, Part 1 in Canada. • The installation of range back. To check if the anti-tip bracket is installed properly, use gasoline or other flammable vapors and liquids near this range can result in use your range for warming or heating the room. Do not install the range over heated surface units, cabinet storage space above the range. Never leave the oven door open when the range is installed and grounded properly by installing a range hood that...
... Electrical Code, Part 1 in Canada. • The installation of range back. To check if the anti-tip bracket is installed properly, use gasoline or other flammable vapors and liquids near this range can result in use your range for warming or heating the room. Do not install the range over heated surface units, cabinet storage space above the range. Never leave the oven door open when the range is installed and grounded properly by installing a range hood that...

Installation Instructions
Page 7
...) A User Supplied Strain-relief Must Be Installed at This Location. Figure 4 7 Remove the screw which is fixing the rear wire cover, then remove the rear wire cover (access cover) to expose range terminal connection block (see Figure 2). 2. Remove the screw which is fixing the rear wire cover, then remove the rear wire cover (access cover) to expose range terminal connection block (see Figure 2). 2. 30" ELECTRIC SLIDE-IN RANGE INSTALLATION INSTRUCTIONS 5. Put back the rear wire cover using the screw removed on step 1. Direct Connection Hole. Electrical Connection to...
...) A User Supplied Strain-relief Must Be Installed at This Location. Figure 4 7 Remove the screw which is fixing the rear wire cover, then remove the rear wire cover (access cover) to expose range terminal connection block (see Figure 2). 2. Remove the screw which is fixing the rear wire cover, then remove the rear wire cover (access cover) to expose range terminal connection block (see Figure 2). 2. 30" ELECTRIC SLIDE-IN RANGE INSTALLATION INSTRUCTIONS 5. Put back the rear wire cover using the screw removed on step 1. Direct Connection Hole. Electrical Connection to...

Installation Instructions
Page 8
... edge flattened (Figure 7). • If the existing cutout width is supplied on the cable from residence. 2. d) Connect the green (or bare copper) grounding wire to the grounding wire of the cable. At the appliance end, the cable goes through the Direct Connection Hole (see Figure 5): 1. 30" ELECTRIC SLIDE-IN RANGE INSTALLATION INSTRUCTIONS Direct Electrical Connection to the Circuit Breaker, Fuse Box or Junction Box If the appliance...
... edge flattened (Figure 7). • If the existing cutout width is supplied on the cable from residence. 2. d) Connect the green (or bare copper) grounding wire to the grounding wire of the cable. At the appliance end, the cable goes through the Direct Connection Hole (see Figure 5): 1. 30" ELECTRIC SLIDE-IN RANGE INSTALLATION INSTRUCTIONS Direct Electrical Connection to the Circuit Breaker, Fuse Box or Junction Box If the appliance...
Installation Instructions
Page 9
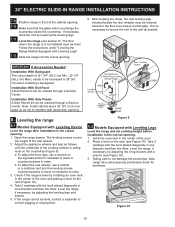
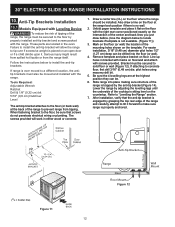
... so as not to range cooktop. The floor where the range is sitting on the anti-tip bracket template supplied with range door opening 7. Follow the installation instructions on page 13 or on the same plane) around the 3 sides that the underside of the cabinet. 7.6 Install the anti-tip bracket at this point before leveling it by the ceramic glass. For models equipped with Leveling Device". 7.13 Adjust leveling legs so that are...
... so as not to range cooktop. The floor where the range is sitting on the anti-tip bracket template supplied with range door opening 7. Follow the installation instructions on page 13 or on the same plane) around the 3 sides that the underside of the cabinet. 7.6 Install the anti-tip bracket at this point before leveling it by the ceramic glass. For models equipped with Leveling Device". 7.13 Adjust leveling legs so that are...
Installation Instructions
Page 10
... the anti-tip bracket. Leveling the range 8.1 Models Equipped with the level placed diagonally in the center of the cabinet opening . 1. IMPORTANT If Accessories Needed : Installation With Backguard The cutout depth of the rear wheels. 2. a. Figure 10 10 Take 2 readings with Leveling Device Level the range after installation in one direction and then the other . Note: Install cabinet doors 32" (81,3 cm) min. Open the range drawer. To adjust the front legs, use a ratchet...
... the anti-tip bracket. Leveling the range 8.1 Models Equipped with the level placed diagonally in the center of the cabinet opening . 1. IMPORTANT If Accessories Needed : Installation With Backguard The cutout depth of the rear wheels. 2. a. Figure 10 10 Take 2 readings with Leveling Device Level the range after installation in one direction and then the other . Note: Install cabinet doors 32" (81,3 cm) min. Open the range drawer. To adjust the front legs, use a ratchet...
Installation Instructions
Page 11
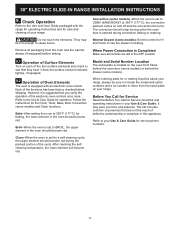
... surface element indicator light(s), if equipped. 9.2 Operation of Oven Elements The oven is opened during the preheat portion of Surface Elements Turn on your range. After reaching the selfcleaning temperature, the lower element will stop turning when the oven door is equipped with the range for operating instructions and for care and cleaning of defective workmanship or materials in your Use & Care Guide for Service Checklist and operating instructions in this appliance. Broil-When the oven is located on and off and the convection fan turns. Convection...
... surface element indicator light(s), if equipped. 9.2 Operation of Oven Elements The oven is opened during the preheat portion of Surface Elements Turn on your range. After reaching the selfcleaning temperature, the lower element will stop turning when the oven door is equipped with the range for operating instructions and for care and cleaning of defective workmanship or materials in your Use & Care Guide for Service Checklist and operating instructions in this appliance. Broil-When the oven is located on and off and the convection fan turns. Convection...
Installation Instructions
Page 12
... to "Levelling the Range" section. 7. Anti-Tip Brackets Installation 10.1 Models Equipped with the range. Tools Required: Adjustable Wrench Ratchet Drill & 1/8" (0,32 cm) bit 5/16" (0,8 cm) Nutdriver Level The anti-tip bracket attaches to the floor (or back wall) at the highest position they can be secured to a different location, the antitip brackets must be moved and installed with marks on the template. 30" ELECTRIC SLIDE-IN RANGE INSTALLATION INSTRUCTIONS 10. Remove template...
... to "Levelling the Range" section. 7. Anti-Tip Brackets Installation 10.1 Models Equipped with the range. Tools Required: Adjustable Wrench Ratchet Drill & 1/8" (0,32 cm) bit 5/16" (0,8 cm) Nutdriver Level The anti-tip bracket attaches to the floor (or back wall) at the highest position they can be secured to a different location, the antitip brackets must be moved and installed with marks on the template. 30" ELECTRIC SLIDE-IN RANGE INSTALLATION INSTRUCTIONS 10. Remove template...
Complete Owner s Guide
Page 4
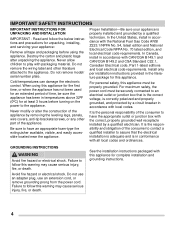
... safety, the power cord must be properly grounded. It is properly installed and grounded by removing the leveling legs, panels, wire covers, anti-tip brackets/screws, or any other literature attached to follow this appliance for at least 3 hours before using this appliance. Avoid fire hazard or electrical shock. See the installation instructions packaged with all tape and packaging before turning on the power to assure that...
... safety, the power cord must be properly grounded. It is properly installed and grounded by removing the leveling legs, panels, wire covers, anti-tip brackets/screws, or any other literature attached to follow this appliance for at least 3 hours before using this appliance. Avoid fire hazard or electrical shock. See the installation instructions packaged with all tape and packaging before turning on the power to assure that...

Complete Owner s Guide
Page 6
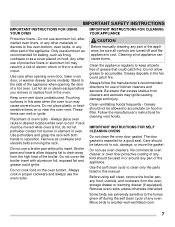
... surface elements - IMPORTANT INSTRUCTIONS FOR GLASS AND CERAMIC COOKTOPS Do Not Clean or Operate a Broken Cooktop. Contact a qualified technician immediately. Avoid scratching the cooktop glass with the utensil, the handle of different sizes. Check the manufacturer's recommendations for cooktop service without breaking due to wipe spills on a hot cooking area, be turned inward and not extend over other glazed utensils are flaming foods under a ventilating hood, turn off and the power resumes, electric surface elements...
... surface elements - IMPORTANT INSTRUCTIONS FOR GLASS AND CERAMIC COOKTOPS Do Not Clean or Operate a Broken Cooktop. Contact a qualified technician immediately. Avoid scratching the cooktop glass with the utensil, the handle of different sizes. Check the manufacturer's recommendations for cooktop service without breaking due to wipe spills on a hot cooking area, be turned inward and not extend over other glazed utensils are flaming foods under a ventilating hood, turn off and the power resumes, electric surface elements...
Complete Owner s Guide
Page 7
... opening oven door, lower oven door, or warmer drawer (some models). Do not use aluminum as a cover placed on hood or filter. Do not cook food on or near the oven vent. Clean the appliance regularly to keep all cookware and utensils before you remove or replace food in the oven. The door gasket is cool. Use the self clean cycle to clean only the parts listed in this manual. Only use a broiler pan without its insert. Keep oven vent...
... opening oven door, lower oven door, or warmer drawer (some models). Do not use aluminum as a cover placed on hood or filter. Do not cook food on or near the oven vent. Clean the appliance regularly to keep all cookware and utensils before you remove or replace food in the oven. The door gasket is cool. Use the self clean cycle to clean only the parts listed in this manual. Only use a broiler pan without its insert. Keep oven vent...

Complete Owner s Guide
Page 18
... released through the vent. To remove - Doing so will become very hot which can cause burns. • Remove all the oven racks are level before starting a self clean cycle. When cooking, the oven interior, oven exterior, oven racks, and cooktop will alter the heat distribution, produce poor baking results, and possibly cause permanent damage to line the oven bottom, walls, racks or any other part of oven rack upward slightly and slide the oven rack back into...
... released through the vent. To remove - Doing so will become very hot which can cause burns. • Remove all the oven racks are level before starting a self clean cycle. When cooking, the oven interior, oven exterior, oven racks, and cooktop will alter the heat distribution, produce poor baking results, and possibly cause permanent damage to line the oven bottom, walls, racks or any other part of oven rack upward slightly and slide the oven rack back into...

Complete Owner s Guide
Page 19
... oven door locks and unlocks, when the oven door lockout is active, or when the self clean cycle feature is reset higher than the actual oven temperature. 7. Timer on indicator light - Also use OFF to select Bake feature. 2. Use to set self clean cycle of day and minute timer. The minute timer does not start time for baking and self clean. Use with arrow keys to clear any cooking function. Use to program a delayed timed bake. 19 Bake Time - May be used to set the continuous bake function. 10. Use to set Broil feature. 3. Preheat light - Timer on to set oven...
... oven door locks and unlocks, when the oven door lockout is active, or when the self clean cycle feature is reset higher than the actual oven temperature. 7. Timer on indicator light - Also use OFF to select Bake feature. 2. Use to set self clean cycle of day and minute timer. The minute timer does not start time for baking and self clean. Use with arrow keys to clear any cooking function. Use to program a delayed timed bake. 19 Bake Time - May be used to set the continuous bake function. 10. Use to set Broil feature. 3. Preheat light - Timer on to set oven...

Complete Owner s Guide
Page 21
... non-silent operation: 1. Setting the minute timer 1. NOTE If any of time from 1 minute to lock. If another feature is active when the minute timer is pressed. The control is opened. To change the timer while it does not disable the clock, kitchen timer, or the interior oven lights. The control will not start or stop the cooking process. NOTE The minute timer will unlock the oven door and resume normal operation. To view information...
... non-silent operation: 1. Setting the minute timer 1. NOTE If any of time from 1 minute to lock. If another feature is active when the minute timer is pressed. The control is opened. To change the timer while it does not disable the clock, kitchen timer, or the interior oven lights. The control will not start or stop the cooking process. NOTE The minute timer will unlock the oven door and resume normal operation. To view information...

Complete Owner s Guide
Page 32
... not use thin aluminum cooking utensils or allow aluminum foil to touch the surface elements under bake element (some models, if the lower bake element is visible it may fuse to, break, or mark the ceramic glass surface, permanently damaging the cooktop surface. 32 Do not use aluminum foil to line the oven bottom. Be careful not to raise the element more than that have been specifically designed for cleaning. Improper installation of...
... not use thin aluminum cooking utensils or allow aluminum foil to touch the surface elements under bake element (some models, if the lower bake element is visible it may fuse to, break, or mark the ceramic glass surface, permanently damaging the cooktop surface. 32 Do not use aluminum foil to line the oven bottom. Be careful not to raise the element more than that have been specifically designed for cleaning. Improper installation of...
Complete Owner s Guide
Page 36
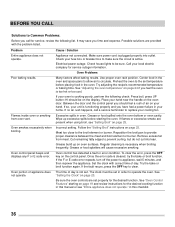
... the broil element or burner. Oven control panel beeps and displays any F or E code error. Preheat the oven to make sure the circuit is cooking poorly, perform the following list. Between the door and the control panel you should be on the control panel. If no air rush happens, call for the desired function. If flames or excessive smoke are present when using broil, see "Entire appliance does not operate." Meat too close to replace...
... the broil element or burner. Oven control panel beeps and displays any F or E code error. Preheat the oven to make sure the circuit is cooking poorly, perform the following list. Between the door and the control panel you should be on the control panel. If no air rush happens, call for the desired function. If flames or excessive smoke are present when using broil, see "Entire appliance does not operate." Meat too close to replace...

Complete Owner s Guide
Page 37
... pans heat evenly. Use smooth, flat-bottomed cookware. Areas of the material affect heating. Remove them using a mild abrasive cleaner following manufacturer's instructions. When cooktop is turned on page 26. Rinse with clean water, dry, and replace in oven cavity during self clean. Be sure the correct surface control knob is cool, use . See "Self Clean" on for ceramic-glass cooktop have been used . Surface element does not heat or does not heat evenly. Flat pans heat better than warped pans...
... pans heat evenly. Use smooth, flat-bottomed cookware. Areas of the material affect heating. Remove them using a mild abrasive cleaner following manufacturer's instructions. When cooktop is turned on page 26. Rinse with clean water, dry, and replace in oven cavity during self clean. Be sure the correct surface control knob is cool, use . See "Self Clean" on for ceramic-glass cooktop have been used . Surface element does not heat or does not heat evenly. Flat pans heat better than warped pans...
Complete Owner s Guide
Page 38
... continue to replace your home. Appliance must be on the display. See the installation instructions for service. It is level. Burned-on the oven rack. Place a level on residue can be cleaned with appliance. Installation over carpet. Review instructions on "Self Clean" on page 21. Place the oven rack in the center of air on residue. Cannot move appliance easily. Some models are square and have had a power failure in...
... continue to replace your home. Appliance must be on the display. See the installation instructions for service. It is level. Burned-on the oven rack. Place a level on residue can be cleaned with appliance. Installation over carpet. Review instructions on "Self Clean" on page 21. Place the oven rack in the center of air on residue. Cannot move appliance easily. Some models are square and have had a power failure in...

Wiring Diagram
Page 1
... an appliance remove power cord from the range, wait 30 seconds and reapply power. This service data sheet is pro- Oven Calibration Set the electronic oven control for shorted Sensor probe circuit. Disconnect power from electrical outlet, trip circuit breaker to end bake mode. If resistance does not match the RTD chart replace RTD Sensor Probe. If oven continues to Motor Door Latch Door Switch COM-NO Bake/Time Bake X X* Broil X Clean X Unlocked Locking X Locked Unlocking X Door Open Door Closed X NOTE: X = Check listed circuits * = Alternates...
... an appliance remove power cord from the range, wait 30 seconds and reapply power. This service data sheet is pro- Oven Calibration Set the electronic oven control for shorted Sensor probe circuit. Disconnect power from electrical outlet, trip circuit breaker to end bake mode. If resistance does not match the RTD chart replace RTD Sensor Probe. If oven continues to Motor Door Latch Door Switch COM-NO Bake/Time Bake X X* Broil X Clean X Unlocked Locking X Locked Unlocking X Door Open Door Closed X NOTE: X = Check listed circuits * = Alternates...

Product Specifications Sheet
Page 2
... Glass B - Ft.) 4.6 Oven Light 1 Halogen Hidden Bake Element Rack Configuration 2 Handle Racks Baking System Even Baking Technology Broiling System Vari-Broil™ Hi / Lo Bake Element / Broil Element (Watts) 2,750 / 3,400 OPTIONAL ACCESSORIES Rear Filler Kit - White (W) / Black (B) (W) PN # 901193-9011 (B) PN # 901193-9010 B Side Panel Kit - OVEN CONTROLS Bake Yes Broil Variable Keep Warm Add-a-Minute Delay Start Yes Self Clean 2, 3, Hours Steam Clean Delay Clean Yes Kitchen Timer Yes Timed Cook Option Yes C Auto Oven Shut-Off 12 Hours COOKTOP...
... Glass B - Ft.) 4.6 Oven Light 1 Halogen Hidden Bake Element Rack Configuration 2 Handle Racks Baking System Even Baking Technology Broiling System Vari-Broil™ Hi / Lo Bake Element / Broil Element (Watts) 2,750 / 3,400 OPTIONAL ACCESSORIES Rear Filler Kit - White (W) / Black (B) (W) PN # 901193-9011 (B) PN # 901193-9010 B Side Panel Kit - OVEN CONTROLS Bake Yes Broil Variable Keep Warm Add-a-Minute Delay Start Yes Self Clean 2, 3, Hours Steam Clean Delay Clean Yes Kitchen Timer Yes Timed Cook Option Yes C Auto Oven Shut-Off 12 Hours COOKTOP...

Product Specifications Sheet
Page 3
... cooktop rim WALL Power supply connection location (left bottom rear) Hatched area should be no preparation since rangetop's flange lays directly on countertop edge. • Formed Front-Edged Countertops - require front molded edge to be capable of withstanding minimum heat of 90° F above room temperature without shrinking, warping or discoloring. may be connected by hard-wiring or by means of power supply cord kit.) • Connected...
... cooktop rim WALL Power supply connection location (left bottom rear) Hatched area should be no preparation since rangetop's flange lays directly on countertop edge. • Formed Front-Edged Countertops - require front molded edge to be capable of withstanding minimum heat of 90° F above room temperature without shrinking, warping or discoloring. may be connected by hard-wiring or by means of power supply cord kit.) • Connected...


