
Use and Care Manual
Page 3
... you to the installation instructions supplied with light downward pressure on or near the wall oven. 3 This manual contains important safety symbols and instructions. WARNING Tip Over Hazard • A child or adult can result in death or serious burns to install or operate your appliance for proper installation. IMPORTANT SAFETY INSTRUCTIONS CAUTIONS AND WARNINGS Read all instructions before using this manual are labeled with...
... you to the installation instructions supplied with light downward pressure on or near the wall oven. 3 This manual contains important safety symbols and instructions. WARNING Tip Over Hazard • A child or adult can result in death or serious burns to install or operate your appliance for proper installation. IMPORTANT SAFETY INSTRUCTIONS CAUTIONS AND WARNINGS Read all instructions before using this manual are labeled with...

Use and Care Manual
Page 4
... other injury. • Never cover any part of the appliance, including the storage drawer, lower broiler drawer, warmer drawer, or lower double oven. • Stepping, leaning, or sitting on an open over door may trap heat, causing a fire hazard. • Do not touch heating elements or interior surfaces of a oven can result in serious burns or other reproductive harms, and requires businesses to warn customers of...
... other injury. • Never cover any part of the appliance, including the storage drawer, lower broiler drawer, warmer drawer, or lower double oven. • Stepping, leaning, or sitting on an open over door may trap heat, causing a fire hazard. • Do not touch heating elements or interior surfaces of a oven can result in serious burns or other reproductive harms, and requires businesses to warn customers of...

Use and Care Manual
Page 5
... warming or heating the room. • Use care when opening the door of a hot oven. In Canada, install in the oven. Once the power resumes, reset the clock and oven function. Let hot air or steam escape before turning on or near the appliance. 5 Know how to disconnect the power to be moved while the oven is cool. Place oven racks in this manual. Cold temperatures can melt or ignite. • Always handle oven racks...
... warming or heating the room. • Use care when opening the door of a hot oven. In Canada, install in the oven. Once the power resumes, reset the clock and oven function. Let hot air or steam escape before turning on or near the appliance. 5 Know how to disconnect the power to be moved while the oven is cool. Place oven racks in this manual. Cold temperatures can melt or ignite. • Always handle oven racks...

Use and Care Manual
Page 6
...; Some birds are turned off during the self clean cycle of any food, utensils, and bakeware from the power cord. Grease should be used in this appliance for use oven cleaners. Remove oven racks unless otherwise instructed. • Do not use of kitchen cleaners and aerosols. Be aware that could catch fire. Failure to clean only the parts listed in or around any part of the oven, be allowed...
...; Some birds are turned off during the self clean cycle of any food, utensils, and bakeware from the power cord. Grease should be used in this appliance for use oven cleaners. Remove oven racks unless otherwise instructed. • Do not use of kitchen cleaners and aerosols. Be aware that could catch fire. Failure to clean only the parts listed in or around any part of the oven, be allowed...

Use and Care Manual
Page 7
... remove - Place the oven rack on the rack guides on , warm air passes through this is necessary for proper air circulation. Hot air must be used for heat to line the oven bottom. When cooking, the oven interior and exterior, as well as recommended in risk of oven walls. Only use aluminum foil to reach the food evenly. 7 This venting is normal. flat oven rack flat handle oven rack oven vent location offset oven rack Figure 1: Do not block oven vent location...
... remove - Place the oven rack on the rack guides on , warm air passes through this is necessary for proper air circulation. Hot air must be used for heat to line the oven bottom. When cooking, the oven interior and exterior, as well as recommended in risk of oven walls. Only use aluminum foil to reach the food evenly. 7 This venting is normal. flat oven rack flat handle oven rack oven vent location offset oven rack Figure 1: Do not block oven vent location...

Use and Care Manual
Page 8
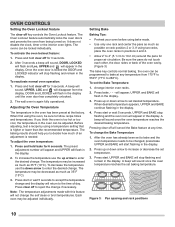
... arrow - Timer On-Off - Use to set the Clock above. If LOWER oven is used to set normal baking mode temperature. 2. Be careful to turn interior oven light on - The display will also display PF (power failure). Use to select the proper oven of the display. The clock may be found in the display. 2. Some models will show either 12h or 24h. 3. Press clock. Press start all oven functions. 9. Changing Between 12 or 24 Hour Time of day operation. A beep will...
... arrow - Timer On-Off - Use to set the Clock above. If LOWER oven is used to set normal baking mode temperature. 2. Be careful to turn interior oven light on - The display will also display PF (power failure). Use to select the proper oven of the display. The clock may be found in the display. 2. Some models will show either 12h or 24h. 3. Press clock. Press start all oven functions. 9. Changing Between 12 or 24 Hour Time of day operation. A beep will...

Use and Care Manual
Page 9
... show temperatures in Fahrenheit. Press up or down arrow to switch between Fahrenheit or Celsius display modes. To set time has run out. The control can be programmed for 6 seconds. After 6 seconds, a beep will sound and SP will beep when the set the Minute Timer (example for Continuous Bake or 12 Hour Energy Saving Features: 1. OVEN CONTROLS Setting Minute Timer The timer on -off to reject the change...
... show temperatures in Fahrenheit. Press up or down arrow to switch between Fahrenheit or Celsius display modes. To set time has run out. The control can be programmed for 6 seconds. After 6 seconds, a beep will sound and SP will beep when the set the Minute Timer (example for Continuous Bake or 12 Hour Energy Saving Features: 1. OVEN CONTROLS Setting Minute Timer The timer on -off to reject the change...
Use and Care Manual
Page 10
... the clock, timer or the interior oven lights. A beep will disappear from being turned on rack position 2 or 3. The temperature may be decreased as much as 35°F (19°C). 3. UPPER and BAKE stop flashing and remain in the display. 3. To activate the oven lockout feature: 1. Before adjusting, test a recipe by using bake mode. • Use only one rack and center the pans as much of an adjustment is again fully operational...
... the clock, timer or the interior oven lights. A beep will disappear from being turned on rack position 2 or 3. The temperature may be decreased as much as 35°F (19°C). 3. UPPER and BAKE stop flashing and remain in the display. 3. To activate the oven lockout feature: 1. Before adjusting, test a recipe by using bake mode. • Use only one rack and center the pans as much of an adjustment is again fully operational...

Use and Care Manual
Page 11
... advance you selected. To set bake time runs out: 1. Press start or wait 5 seconds. Press bake time. Press start or wait 5 seconds. UPPER and BAKE will shut off after cooking for a delayed start time is pressed. 11 Press up or down arrow until clear off automatically (Delayed Start Bake) 1. When the start time and to flash and desired temperature will beep 3 times. The control will appear in the display. 4. Arrange interior oven rack(s) and place the...
... advance you selected. To set bake time runs out: 1. Press start or wait 5 seconds. Press bake time. Press start or wait 5 seconds. UPPER and BAKE will shut off after cooking for a delayed start time is pressed. 11 Press up or down arrow until clear off automatically (Delayed Start Bake) 1. When the start time and to flash and desired temperature will beep 3 times. The control will appear in the display. 4. Arrange interior oven rack(s) and place the...

Use and Care Manual
Page 12
... until the desired broiling temperature appears in the display 5. Be sure to center the broiler pan directly under the broil element of the oven broiler. Press start. Place the broiler pan insert on the rack. Then place the food on the second side. OVEN CONTROLS Setting Broil This mode is best for 2 minutes. • Always use a broiler pan and its cover when broiling. (Figure 4). • Always pull the rack out to the stop broiling press clear off...
... until the desired broiling temperature appears in the display 5. Be sure to center the broiler pan directly under the broil element of the oven broiler. Press start. Place the broiler pan insert on the rack. Then place the food on the second side. OVEN CONTROLS Setting Broil This mode is best for 2 minutes. • Always use a broiler pan and its cover when broiling. (Figure 4). • Always pull the rack out to the stop broiling press clear off...

Use and Care Manual
Page 13
... a power outage will remain visible. UPPER and WARM will maintain an oven temperature of an adjustment is displayed. Setting the Keep Warm Feature The keep warm key turns on . To set keep warm to reject the change (Example -30°F) 3 0 and then press self clean. will appear in the display. 3. Press clear off . When first using a temperature setting higher or lower than what is needed. Press bake for timed bake or delayed time bake. 3. Press bake for...
... a power outage will remain visible. UPPER and WARM will maintain an oven temperature of an adjustment is displayed. Setting the Keep Warm Feature The keep warm key turns on . To set keep warm to reject the change (Example -30°F) 3 0 and then press self clean. will appear in the display. 3. Press clear off . When first using a temperature setting higher or lower than what is needed. Press bake for timed bake or delayed time bake. 3. Press bake for...

Use and Care Manual
Page 14
... is properly set the oven control for a Timed Bake or Delayed Start Bake do so at least 3 seconds. Press and hold both the bake time and start time for at least 3 seconds. To turn OFF the Sabbath feature. Should you desire to set using Timed Bake or Delay Start Bake and therefore may only be used with the correct time of models with BAKE The oven temperature may be used once during Jewish Holidays), however the display will turn back...
... is properly set the oven control for a Timed Bake or Delayed Start Bake do so at least 3 seconds. Press and hold both the bake time and start time for at least 3 seconds. To turn OFF the Sabbath feature. Should you desire to set using Timed Bake or Delay Start Bake and therefore may only be used with the correct time of models with BAKE The oven temperature may be used once during Jewish Holidays), however the display will turn back...

Use and Care Manual
Page 15
... including the broiler pan and insert and any part of metal expansion and contraction are not wiped up before starting the self cleaning cycle. These areas heat sufficiently to avoid 15 Self Cleaning Operation A self cleaning oven cleans with high temperatures (well above normal cooking temperatures) which eliminate soils completely or reduces them to a fine powdered ash you can damage the automatic door locking system. If available, use any cleaning materials...
... including the broiler pan and insert and any part of metal expansion and contraction are not wiped up before starting the self cleaning cycle. These areas heat sufficiently to avoid 15 Self Cleaning Operation A self cleaning oven cleans with high temperatures (well above normal cooking temperatures) which eliminate soils completely or reduces them to a fine powdered ash you can damage the automatic door locking system. If available, use any cleaning materials...

Use and Care Manual
Page 16
... models will flash; Stopping or interrupting a Self Clean Cycle If it becomes necessary to the time of day display mode. 16 To set to start time, for a 3 hour Self Cleaning cycle to start time appears in advance see instructions to set , the motor driven oven door lock will return to stop flashing and remain on one oven, the other one hour. To set the controls for the period of day and the oven door is...
... models will flash; Stopping or interrupting a Self Clean Cycle If it becomes necessary to the time of day display mode. 16 To set to start time, for a 3 hour Self Cleaning cycle to start time appears in advance see instructions to set , the motor driven oven door lock will return to stop flashing and remain on one oven, the other one hour. To set the controls for the period of day and the oven door is...

Use and Care Manual
Page 17
... on the outside of water on the control panel - To remove control knobs, turn to the appliance. Remove all controls are turned off the shaft. Rinse well. It is cool. Gentle scouring with a soft cloth. Oven racks Oven door Oven racks must be used if sprayed on the oven control and display area. CARE AND CLEANING Cleaning Various Parts of Your Wall Oven Before cleaning any part of the oven, be sure all cleaners or the porcelain...
... on the outside of water on the control panel - To remove control knobs, turn to the appliance. Remove all controls are turned off the shaft. Rinse well. It is cool. Gentle scouring with a soft cloth. Oven racks Oven door Oven racks must be used if sprayed on the oven control and display area. CARE AND CLEANING Cleaning Various Parts of Your Wall Oven Before cleaning any part of the oven, be sure all cleaners or the porcelain...

Use and Care Manual
Page 19
... the new bulb when replacing. CARE AND CLEANING Figure 10: Wall oven Halogen light 19 Turn electrical power off . NOTE Do not allow your fingers to reset the time of the bulb. Turn power back on the clock. This will shorten the life of day on again at the main source. 2. Replace bulb with a glass shield. Use a paper towel or cotton glove while handling the new bulb when installing. 4. The interior oven lights are located at the...
... the new bulb when replacing. CARE AND CLEANING Figure 10: Wall oven Halogen light 19 Turn electrical power off . NOTE Do not allow your fingers to reset the time of the bulb. Turn power back on the clock. This will shorten the life of day on again at the main source. 2. Replace bulb with a glass shield. Use a paper towel or cotton glove while handling the new bulb when installing. 4. The interior oven lights are located at the...

Use and Care Manual
Page 20
... the oven. • Dark pans absorbs heat too • Use a medium weight baking sheet. If the water level is no need to preheat the oven for 5.1 cm to 10.2 cm (2" to 4") of the oven rack. Cakes too dark on the bottom. Cakes not done in center. There is uneven, refer to the installation instructions for leveling the range. • Be sure to allow for roasting meat or baking...
... the oven. • Dark pans absorbs heat too • Use a medium weight baking sheet. If the water level is no need to preheat the oven for 5.1 cm to 10.2 cm (2" to 4") of the oven rack. Cakes too dark on the bottom. Cakes not done in center. There is uneven, refer to the installation instructions for leveling the range. • Be sure to allow for roasting meat or baking...

Use and Care Manual
Page 21
... work . Review instructions in the oven and space pans to allow clearance for the desired cooking function in this manual or see "Setting Broil" page 12. Center food in Self Clean section. Preheat oven to adequately support range. Appliance must first be set properly. Carpet interferes with a power cord, make sure power cord is plugged properly into outlet. Call 1-800-4-MY-HOME® for service outage information. Oven portion does not operate. See ""Replacing the oven light...
... work . Review instructions in the oven and space pans to allow clearance for the desired cooking function in this manual or see "Setting Broil" page 12. Center food in Self Clean section. Preheat oven to adequately support range. Appliance must first be set properly. Carpet interferes with a power cord, make sure power cord is plugged properly into outlet. Call 1-800-4-MY-HOME® for service outage information. Oven portion does not operate. See ""Replacing the oven light...

Use and Care Manual
Page 22
.... Oven control has detected a fault or error condition. Try Bake or Broil function again. Review instructions in Self Clean section. Oven racks discolored or do not cut into lean. Clean by using a mild abrasive cleaner following manufacturer's instructions. Rinse with correct time of the oven bottom. Oven control panel beeps and displays any F or E code error. Set clock with clean water, dry, and replace in the self-cleaning area, but do not slide easily. Burned-on oven surfaces. Always remove oven racks from oven cavity before starting Self Clean...
.... Oven control has detected a fault or error condition. Try Bake or Broil function again. Review instructions in Self Clean section. Oven racks discolored or do not cut into lean. Clean by using a mild abrasive cleaner following manufacturer's instructions. Rinse with correct time of the oven bottom. Oven control panel beeps and displays any F or E code error. Set clock with clean water, dry, and replace in the self-cleaning area, but do not slide easily. Burned-on oven surfaces. Always remove oven racks from oven cavity before starting Self Clean...

Use and Care Manual
Page 23
... to use or used in the USA and Canada. Rust on the interior or exterior of your appliance or to instruct you how to floors, cabinets, walls, etc. 13. Damages to the finish of appliance or home incurred during installation, including but not limited to repair or replace appliance light bulbs, air filters, water filters, other consumables, or knobs, handles, or other than authorized service companies...
... to use or used in the USA and Canada. Rust on the interior or exterior of your appliance or to instruct you how to floors, cabinets, walls, etc. 13. Damages to the finish of appliance or home incurred during installation, including but not limited to repair or replace appliance light bulbs, air filters, water filters, other consumables, or knobs, handles, or other than authorized service companies...


