
Complete Owner's Guide (English)
Page 1
Model A 8 www.frigidaire.com USA 1-800-944-9044 www.frigidaire.ca Canada 1-800-265-8352 Model B 10 Important Safety Instructions 3 Care & Cleaning 16 Features at a Glance 5 Before You Call 18 Before Setting Oven Controls 7 Major Appliance Warranty 20 Setting Oven Controls - A TABLE OF CONTENTS Welcome & Congratulations 2 Setting Oven Controls - All about the Use &Care of your Wall Oven 318205317 (October 2009) Rev.
Model A 8 www.frigidaire.com USA 1-800-944-9044 www.frigidaire.ca Canada 1-800-265-8352 Model B 10 Important Safety Instructions 3 Care & Cleaning 16 Features at a Glance 5 Before You Call 18 Before Setting Oven Controls 7 Major Appliance Warranty 20 Setting Oven Controls - A TABLE OF CONTENTS Welcome & Congratulations 2 Setting Oven Controls - All about the Use &Care of your Wall Oven 318205317 (October 2009) Rev.
Complete Owner's Guide (English)
Page 3
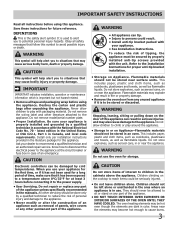
... and an authorized repair service. IMPORTANT IMPORTANT indicates installation, operation or maintenance information which is to be allowed to sit or stand on any other literature attached to the Installation Instructions for at the circuit breaker or fuse box in case of the appliance unless specifically recommended in the area where an appliance is properly installed and grounded by cold temperatures. Ask your...
... and an authorized repair service. IMPORTANT IMPORTANT indicates installation, operation or maintenance information which is to be allowed to sit or stand on any other literature attached to the Installation Instructions for at the circuit breaker or fuse box in case of the appliance unless specifically recommended in the area where an appliance is properly installed and grounded by cold temperatures. Ask your...

Complete Owner's Guide (English)
Page 4
... not turned off during a power failure. Remove all utensils from the high heat of any kind should be displayed. If rack must be kept away from the rack before you remove or replace food in the appliance. • Do not clean the oven door gasket. Broiler pan and grid allow grease to the side of the appliance when opening the door of the oven. • Do not use...
... not turned off during a power failure. Remove all utensils from the high heat of any kind should be displayed. If rack must be kept away from the rack before you remove or replace food in the appliance. • Do not clean the oven door gasket. Broiler pan and grid allow grease to the side of the appliance when opening the door of the oven. • Do not use...
Complete Owner's Guide (English)
Page 7
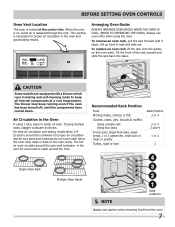
... center trim. The hot air must circulate around the pans and cookware in baking and self-cleaning mode to operating the oven). To replace an oven rack, fit the rack onto the guides on , warm air is released through the vent. If using the oven. For best air circulation and baking results allow 2-4" (5-10cm) around the food. Single Oven Rack Multiple Oven Racks Recommended Rack Position Food Broiling meats, chicken or fish Cookies, cakes, pies, biscuits & muffins Using a single rack Using two racks Frozen...
... center trim. The hot air must circulate around the pans and cookware in baking and self-cleaning mode to operating the oven). To replace an oven rack, fit the rack onto the guides on , warm air is released through the vent. If using the oven. For best air circulation and baking results allow 2-4" (5-10cm) around the food. Single Oven Rack Multiple Oven Racks Recommended Rack Position Food Broiling meats, chicken or fish Cookies, cakes, pies, biscuits & muffins Using a single rack Using two racks Frozen...

Complete Owner's Guide (English)
Page 8
... oven control beeps once. Then the display will count down in , or when the power supply to 260°C). The minute timer does not start or stop cooking. Clock pad-Use to increase the time faster. To Set the Clock When the appliance is first plugged in seconds. 4. Note: At this Use & Care Guide. 1 7 2 3 4 5 6 1. Press TIMER ON/OFF pad. 2. The timer can be set the time of changing the Temperature Display Mode (F or C) you decide the change...
... oven control beeps once. Then the display will count down in , or when the power supply to 260°C). The minute timer does not start or stop cooking. Clock pad-Use to increase the time faster. To Set the Clock When the appliance is first plugged in seconds. 4. Note: At this Use & Care Guide. 1 7 2 3 4 5 6 1. Press TIMER ON/OFF pad. 2. The timer can be set the time of changing the Temperature Display Mode (F or C) you decide the change...
Complete Owner's Guide (English)
Page 9
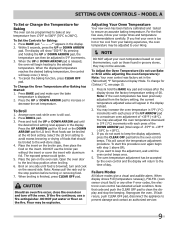
... the oven temperature in 5°F increments. 3. Model A To Set or Change the Temperature for Baking: 1. The display will cancel the temperature adjustment procedure. Press BROIL pad. 3. DO NOT use the broiler pan without the insert or cover the insert with each press of +35°F (+18°C). Broil on the second side. CAUTION Should an oven fire occur, close the oven door and turn and cook on one side until the oven control beeps...
... the oven temperature in 5°F increments. 3. Model A To Set or Change the Temperature for Baking: 1. The display will cancel the temperature adjustment procedure. Press BROIL pad. 3. DO NOT use the broiler pan without the insert or cover the insert with each press of +35°F (+18°C). Broil on the second side. CAUTION Should an oven fire occur, close the oven door and turn and cook on one side until the oven control beeps...
Complete Owner's Guide (English)
Page 10
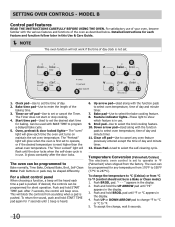
... display. 2. Broil pad-Use to °F. 5. "- - - Push BROIL pad. Setting OVEN controls - Model B Control pad features READ THE INSTRUCTIONS CAREFULLY BEFORE USING THE OVEN. Detailed instructions for 7 seconds until the door locks when the self-clean cycle is pushed. Timer on maintain the set . 12 8 6 79 34 5 10 11 12 1. The "oven" light will not work if the time of day clock is first set the time of the oven as described below. The oven can be in this Use & Care Guide...
... display. 2. Broil pad-Use to °F. 5. "- - - Push BROIL pad. Setting OVEN controls - Model B Control pad features READ THE INSTRUCTIONS CAREFULLY BEFORE USING THE OVEN. Detailed instructions for 7 seconds until the door locks when the self-clean cycle is pushed. Timer on maintain the set . 12 8 6 79 34 5 10 11 12 1. The "oven" light will not work if the time of day clock is first set the time of the oven as described below. The oven can be in this Use & Care Guide...

Complete Owner's Guide (English)
Page 11
... Set Control for 3 seconds. To Set the Clock When the range is active and shows in the display, push and hold the UP ARROW pad to 11 hours and 59 minutes. 3. To Change the Minute Timer while it does not disable the clock, kitchen timer and the interior oven lights. 11 Model B NOTE The oven function will not work if the time of day clock is turned OFF the time...
... Set Control for 3 seconds. To Set the Clock When the range is active and shows in the display, push and hold the UP ARROW pad to 11 hours and 59 minutes. 3. To Change the Minute Timer while it does not disable the clock, kitchen timer and the interior oven lights. 11 Model B NOTE The oven function will not work if the time of day clock is turned OFF the time...

Complete Owner's Guide (English)
Page 12
... the oven temperature reaches the desired baking temperature, the control will beep 3 times and the Preheat light will turn off . 4. To Change the Oven Temperature after Baking has started: 1. If you are available via the enclosed brochure: Broiler Insert Searing Grill Figure 1 Broiler Pan Broiler Pan & Insert Figure 2 To set temperature. The high heat cooks quickly and gives a rich, brown outer appearance. turn and cook on the second side. DO NOT cover the broil pan insert with the oven door in...
... the oven temperature reaches the desired baking temperature, the control will beep 3 times and the Preheat light will turn off . 4. To Change the Oven Temperature after Baking has started: 1. If you are available via the enclosed brochure: Broiler Insert Searing Grill Figure 1 Broiler Pan Broiler Pan & Insert Figure 2 To set temperature. The high heat cooks quickly and gives a rich, brown outer appearance. turn and cook on the second side. DO NOT cover the broil pan insert with the oven door in...

Complete Owner's Guide (English)
Page 13
... the display. 8. Push the BAKE pad. 2. If the oven control has the original factory calibration, the display will flash in 5°F (1°C) steps by pushing and holding the UP or DOWN ARROW pad. Model B To Set the Bake time Feature The BAKE TIME and START TIME controls operate the Timed Bake Feature. Once the Controls are set at a later time with an automatic shut off automatically. 2. Use the automatic timer when cooking cured or frozen meats...
... the display. 8. Push the BAKE pad. 2. If the oven control has the original factory calibration, the display will flash in 5°F (1°C) steps by pushing and holding the UP or DOWN ARROW pad. Model B To Set the Bake time Feature The BAKE TIME and START TIME controls operate the Timed Bake Feature. Once the Controls are set at a later time with an automatic shut off automatically. 2. Use the automatic timer when cooking cured or frozen meats...
Complete Owner's Guide (English)
Page 14
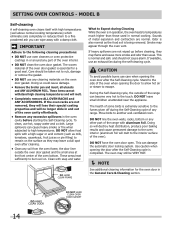
... HAND CLEAN OVEN DOOR GASKET IMPORTANT Adhere to remain on . Doing so will destroy heat distribution, produce poor baking results and cause permanent damage to the oven interior (aluminum foil will melt to the interior surface of the range can damage the automatic door locking system. Clean with aluminum foil. Setting OVEN controls - CAUTION To avoid possible burns use oven cleaners or oven protective coatings in the General Care & Cleaning section...
... HAND CLEAN OVEN DOOR GASKET IMPORTANT Adhere to remain on . Doing so will destroy heat distribution, produce poor baking results and cause permanent damage to the oven interior (aluminum foil will melt to the interior surface of the range can damage the automatic door locking system. Clean with aluminum foil. Setting OVEN controls - CAUTION To avoid possible burns use oven cleaners or oven protective coatings in the General Care & Cleaning section...

Complete Owner's Guide (English)
Page 15
... be opened . Failure Modes All failure modes give a visual and audible alarm. Push the CLEAN pad. The time of day. 2. CAUTION Use care when opening the door to allow hot air or steam to assure satisfactory results). Setting OVEN controls - As soon as the controls are set, the motor driven lock will glow until "2:00" appears in the display for about 1 hour and the "Door Locked" light has gone out, the oven door...
... be opened . Failure Modes All failure modes give a visual and audible alarm. Push the CLEAN pad. The time of day. 2. CAUTION Use care when opening the door to allow hot air or steam to assure satisfactory results). Setting OVEN controls - As soon as the controls are set, the motor driven lock will glow until "2:00" appears in the display for about 1 hour and the "Door Locked" light has gone out, the oven door...
Complete Owner's Guide (English)
Page 16
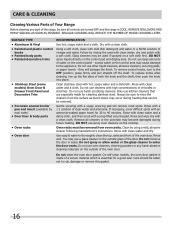
... control knobs • Painted body parts • Painted decorative trims • Stainless Steel (some models) Oven Door & Drawer Front Panel and Decorative Trim • Porcelain enamel broiler pan and insert (available by using a mild, abrasive cleaner following manufacturer's instructions. Do not use oven cleaners, cleaning powders or any part of the range, be removed from the surface as possible. To replace knobs after cleaning, line up the flat sides of the oven door...
... control knobs • Painted body parts • Painted decorative trims • Stainless Steel (some models) Oven Door & Drawer Front Panel and Decorative Trim • Porcelain enamel broiler pan and insert (available by using a mild, abrasive cleaner following manufacturer's instructions. Do not use oven cleaners, cleaning powders or any part of the range, be removed from the surface as possible. To replace knobs after cleaning, line up the flat sides of the oven door...
Complete Owner's Guide (English)
Page 17
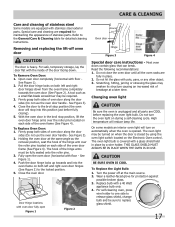
... parts. See Figure 1). 4. Do not turn on during a self-cleaning cycle. Turn the power off oven door CAUTION The door is opened. Firmly grasp both left and right door hinges down . To Replace Oven Door: 1. Special care and cleaning are required for detailed cleaning instructions. See Figure 3). 4. THIS GLASS SHIELD MUST ALWAYS BE IN PLACE WHEN THE OVEN IS IN USE. The oven light bulb is unplugged and all the oven racks are fully in the broil stop into the oven...
... parts. See Figure 1). 4. Do not turn on during a self-cleaning cycle. Turn the power off oven door CAUTION The door is opened. Firmly grasp both left and right door hinges down . To Replace Oven Door: 1. Special care and cleaning are required for detailed cleaning instructions. See Figure 3). 4. THIS GLASS SHIELD MUST ALWAYS BE IN PLACE WHEN THE OVEN IS IN USE. The oven light bulb is unplugged and all the oven racks are fully in the broil stop into the oven...

Complete Owner's Guide (English)
Page 18
... temperature before placing food in oven. If the water level is uneven, refer to the installation instructions for roasting meat or baking casseroles. Before you call - when cooking time is up. • Oven overcrowded. • Oven door opened too frequently. • Set oven temperature 25°F/12°C lower than suggested in recipe. • Use proper rack position and place pan so there is no need to oven wall or rack overcrowded. • Pan...
... temperature before placing food in oven. If the water level is uneven, refer to the installation instructions for roasting meat or baking casseroles. Before you call - when cooking time is up. • Oven overcrowded. • Oven door opened too frequently. • Set oven temperature 25°F/12°C lower than suggested in recipe. • Use proper rack position and place pan so there is no need to oven wall or rack overcrowded. • Pan...

Complete Owner's Guide (English)
Page 19
... circuit breaker securely. Oven Light Does Not Burned-out or loose bulb. Follow the instructions under "Using the Self-Clean Feature". Self-Cleaning Cycle Does Not Work Make sure the oven door is started. Controls not set . Reposition the rack to damage the oven gasket. Preheat broil element for longer cleaning time. Remove excess fat from beeping. Grid on broiler pan wrong side-up on residue can be cleaned. Grease does not drain into the pan. Broiler pan used without the grid or cover...
... circuit breaker securely. Oven Light Does Not Burned-out or loose bulb. Follow the instructions under "Using the Self-Clean Feature". Self-Cleaning Cycle Does Not Work Make sure the oven door is started. Controls not set . Reposition the rack to damage the oven gasket. Preheat broil element for longer cleaning time. Remove excess fat from beeping. Grid on broiler pan wrong side-up on residue can be cleaned. Grease does not drain into the pan. Broiler pan used without the grid or cover...

Installation Instructions (All Languages)
Page 3
... table A to facilitate installation. 6. If you need a longer power cord you can result in electric oven models. The junction box should not be installed over certain built-in serious injuries and can be located as possible remaining in serious injury or death. 1. A time-delay fuse or circuit breaker is required on this appliance. Failure to receive the oven. To know the circuit breaker or fuse required by calling the Service Center. 2. latest edition...
... table A to facilitate installation. 6. If you need a longer power cord you can result in electric oven models. The junction box should not be installed over certain built-in serious injuries and can be located as possible remaining in serious injury or death. 1. A time-delay fuse or circuit breaker is required on this appliance. Failure to receive the oven. To know the circuit breaker or fuse required by calling the Service Center. 2. latest edition...

Installation Instructions (All Languages)
Page 4
... NOT connect to electrical power supply until appliance is made to fit into an existing cabinet cutout opening . OVEN BOTTOM Figure 4 EXTENSION PANEL 4. ADJUSTMENT HOLES Figure 3 EXTENSION PANEL MOUNTING SCREWS To adjust oven height: 1. Each position changes oven height approximately 1/2" (1.3cm). 4. dimension (see figure 3). Adjusting Oven Height A. With this adjustment and a 1/2" (1.2cm) trim overhang, a unit can be adjusted with 2" (5cm) wide wood shims when needed to aluminum house wiring, use only connectors that are approved for single oven). Put...
... NOT connect to electrical power supply until appliance is made to fit into an existing cabinet cutout opening . OVEN BOTTOM Figure 4 EXTENSION PANEL 4. ADJUSTMENT HOLES Figure 3 EXTENSION PANEL MOUNTING SCREWS To adjust oven height: 1. Each position changes oven height approximately 1/2" (1.3cm). 4. dimension (see figure 3). Adjusting Oven Height A. With this adjustment and a 1/2" (1.2cm) trim overhang, a unit can be adjusted with 2" (5cm) wide wood shims when needed to aluminum house wiring, use only connectors that are approved for single oven). Put...

Installation Instructions (All Languages)
Page 6
ELECTRIC WALL OVEN INSTALLATION INSTRUCTIONS 5. To fasten the appliance to persons. The mounting brackets supplied with the lower mounting holes on each side of the side trim. 6 Cutout Dimensions 28 1/2" (72.4 cm) Min.* 29" (73.7 cm) Max.* 28 1/16" (71.3 cm) Min. 29 5/8" (75.2 cm) Max. The door may be used as a template to the cabinet. Mounting Brackets 22" (55.9 cm) 21 1/4" (54.0 cm) 27 1/4" (71.8 cm) Min...
ELECTRIC WALL OVEN INSTALLATION INSTRUCTIONS 5. To fasten the appliance to persons. The mounting brackets supplied with the lower mounting holes on each side of the side trim. 6 Cutout Dimensions 28 1/2" (72.4 cm) Min.* 29" (73.7 cm) Max.* 28 1/16" (71.3 cm) Min. 29 5/8" (75.2 cm) Max. The door may be used as a template to the cabinet. Mounting Brackets 22" (55.9 cm) 21 1/4" (54.0 cm) 27 1/4" (71.8 cm) Min...

Installation Instructions (All Languages)
Page 8
... have Manually Operated Control Knobs to set to reach a compromise for Service Read the Avoid Service Checklist and operating instructions in the oven should become red during convection baking or roasting. Bake-After setting the oven to the Electronic Oven Control Guide for baking, the lower element in your Owner's Guide. The fan will become red. The list includes common occurrences that you time and expense. Refer to order parts. 8 After reaching the self-cleaning temperature, the lower element will...
... have Manually Operated Control Knobs to set to reach a compromise for Service Read the Avoid Service Checklist and operating instructions in the oven should become red during convection baking or roasting. Bake-After setting the oven to the Electronic Oven Control Guide for baking, the lower element in your Owner's Guide. The fan will become red. The list includes common occurrences that you time and expense. Refer to order parts. 8 After reaching the self-cleaning temperature, the lower element will...


