
Complete Owner's Guide (English)
Page 1
Model B 10 Important Safety Instructions 3 Care & Cleaning 16 Features at a Glance 5 Before You Call 18 Before Setting Oven Controls 7 Major Appliance Warranty 20 Setting Oven Controls - A TABLE OF CONTENTS Welcome & Congratulations 2 Setting Oven Controls - All about the Use &Care of your Wall Oven 318205317 (October 2009) Rev. Model A 8 www.frigidaire.com USA 1-800-944-9044 www.frigidaire.ca Canada 1-800-265-8352
Model B 10 Important Safety Instructions 3 Care & Cleaning 16 Features at a Glance 5 Before You Call 18 Before Setting Oven Controls 7 Major Appliance Warranty 20 Setting Oven Controls - A TABLE OF CONTENTS Welcome & Congratulations 2 Setting Oven Controls - All about the Use &Care of your Wall Oven 318205317 (October 2009) Rev. Model A 8 www.frigidaire.com USA 1-800-944-9044 www.frigidaire.ca Canada 1-800-265-8352
Complete Owner's Guide (English)
Page 2
... Registration Register Your Product The PRODUCT REGISTRATION CARD should be practiced when installing, operating and maintaining any appliance. NOTE Please attach sales receipt here for future reference. Serial Plate Location Congratulations on your new appliance and Thank You for future reference. Please CAREFULLY read and save these instructions This Use & Care...
... Registration Register Your Product The PRODUCT REGISTRATION CARD should be practiced when installing, operating and maintaining any appliance. NOTE Please attach sales receipt here for future reference. Serial Plate Location Congratulations on your new appliance and Thank You for future reference. Please CAREFULLY read and save these instructions This Use & Care...
Complete Owner's Guide (English)
Page 3
... States, or CSA C22.1, Part 1 in the manuals. CAUTION Electronic controllers can tip. • Injury to a temperature above the appliance. Refer to the appliance. This includes paper, plastic and cloth items, such as cookbooks, plasticware and towels, as well as aerosol cans, in use the...packaging material. This includes paper, plastic and cloth items, such as cookbooks, plasticware and towels, as well as aerosol cans, on Appliance-Flammable materials should never be allowed to sit or stand on the cooktop to recommend a qualified technician and an authorized repair service. ...
... States, or CSA C22.1, Part 1 in the manuals. CAUTION Electronic controllers can tip. • Injury to a temperature above the appliance. Refer to the appliance. This includes paper, plastic and cloth items, such as cookbooks, plasticware and towels, as well as aerosol cans, in use the...packaging material. This includes paper, plastic and cloth items, such as cookbooks, plasticware and towels, as well as aerosol cans, on Appliance-Flammable materials should never be allowed to sit or stand on the cooktop to recommend a qualified technician and an authorized repair service. ...

Complete Owner's Guide (English)
Page 4
...the oven vent. Do not let clothing or other reproductive harm, and requires businesses to warn customers of potential exposure to operate the appliance during the self-clean cycle of grease that excess residue from steam. Fat or grease may result in risk of pressure may result ...Door-Stand to another well ventilated room. These items could catch fire. Doing so could catch fire. Only use aluminum foil as recommended in the appliance. • Do not clean the oven door gasket. Improper installation of substances known to the state to rub, damage or move the gasket....
...the oven vent. Do not let clothing or other reproductive harm, and requires businesses to warn customers of potential exposure to operate the appliance during the self-clean cycle of grease that excess residue from steam. Fat or grease may result in risk of pressure may result ...Door-Stand to another well ventilated room. These items could catch fire. Doing so could catch fire. Only use aluminum foil as recommended in the appliance. • Do not clean the oven door gasket. Improper installation of substances known to the state to rub, damage or move the gasket....
Complete Owner's Guide (English)
Page 5
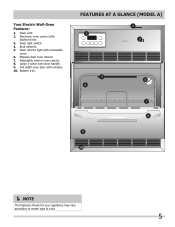
Oven light switch. 4. Bottom trim. Broil element. 5. Oven interior light with kitchen timer. 3. Electronic oven control with removable cover. 6. Full width oven door with window. 10. FEATURES AT A GLANCE (model A) NOTE The features shown for your appliance may vary according to model type & color. 5 Adjustable interior oven rack(s). 8. Large 1-piece oven door handle. 9. Your Electric Wall-Oven Features: 1. Oven vent. 2. Manual clean oven interior. 7.
Oven light switch. 4. Bottom trim. Broil element. 5. Oven interior light with kitchen timer. 3. Electronic oven control with removable cover. 6. Full width oven door with window. 10. FEATURES AT A GLANCE (model A) NOTE The features shown for your appliance may vary according to model type & color. 5 Adjustable interior oven rack(s). 8. Large 1-piece oven door handle. 9. Your Electric Wall-Oven Features: 1. Oven vent. 2. Manual clean oven interior. 7.
Complete Owner's Guide (English)
Page 6
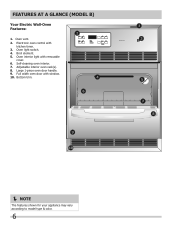
Full width oven door with kitchen timer. 3. Electronic oven control with window. 10. Oven interior light with removable cover. 6. Large 1-piece oven door handle. 9. Broil element. 5. Adjustable interior oven rack(s). 8. Bottom trim. NOTE The features shown for your appliance may vary according to model type & color. 6 Self-cleaning oven interior. 7. Oven light switch. 4. Oven vent. 2. FEATURES AT A GLANCE (Model B) Your Electric Wall-Oven Features: 1.
Full width oven door with kitchen timer. 3. Electronic oven control with window. 10. Oven interior light with removable cover. 6. Large 1-piece oven door handle. 9. Broil element. 5. Adjustable interior oven rack(s). 8. Bottom trim. NOTE The features shown for your appliance may vary according to model type & color. 6 Self-cleaning oven interior. 7. Oven light switch. 4. Oven vent. 2. FEATURES AT A GLANCE (Model B) Your Electric Wall-Oven Features: 1.

Complete Owner's Guide (English)
Page 8
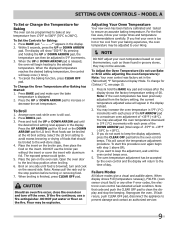
Bake pad-Use to select the broil cooking feature. 3. Clock pad-Use to 11 hours and 59 minutes. 3. To Set the Clock When the appliance is counting down in the display. Note: Oven cooking temperatures may have requested. To Set the Minute Timer 1. Press the UP ARROW pad to 11 ...
Bake pad-Use to select the broil cooking feature. 3. Clock pad-Use to 11 hours and 59 minutes. 3. To Set the Clock When the appliance is counting down in the display. Note: Oven cooking temperatures may have requested. To Set the Minute Timer 1. Press the UP ARROW pad to 11 ...
Complete Owner's Guide (English)
Page 9
... display. You may not be adjusted to +18°C). 3. If you do not use a fire extinguisher. If fault recurs, push CLEAR OFF pad, disconnect the appliance to ensure an accurate baking temperature. If you feel your recipe times and temperature recommendations carefully. By pressing and holding the UP or DOWN ARROW...
... display. You may not be adjusted to +18°C). 3. If you do not use a fire extinguisher. If fault recurs, push CLEAR OFF pad, disconnect the appliance to ensure an accurate baking temperature. If you feel your recipe times and temperature recommendations carefully. By pressing and holding the UP or DOWN ARROW...

Complete Owner's Guide (English)
Page 11
... pad until one minute increments. Push TIMER ON/OFF pad. 2. The display shows the timer count down in , or when the power supply to the appliance has been interrupted, the display will shut off the oven if the control is locked, the current time of day will appear in the display...
... pad until one minute increments. Push TIMER ON/OFF pad. 2. The display shows the timer count down in , or when the power supply to the appliance has been interrupted, the display will shut off the oven if the control is locked, the current time of day will appear in the display...
Complete Owner's Guide (English)
Page 14
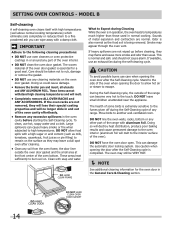
... may flame and cause more smoke and odor than those used in the General Care & Cleaning section. DO NOT leave small children unattended near the appliance. The oven may leave a dull spot even after the Self-Cleaning cycle is essential for the oven door in normal cooking. Setting OVEN controls - IMPORTANT...
... may flame and cause more smoke and odor than those used in the General Care & Cleaning section. DO NOT leave small children unattended near the appliance. The oven may leave a dull spot even after the Self-Cleaning cycle is essential for the oven door in normal cooking. Setting OVEN controls - IMPORTANT...

Complete Owner's Guide (English)
Page 15
... the self-cleaning cycle is Completed: 1. Failure Modes All failure modes give a visual and audible alarm. If fault recurs, push CLEAR OFF pad, disconnect the appliance to escape. To Set the Controls for a 2 hour cycle. 4. Push the UP ARROW pad until "3:00" appears in the display. 5. As soon as the controls...
... the self-cleaning cycle is Completed: 1. Failure Modes All failure modes give a visual and audible alarm. If fault recurs, push CLEAR OFF pad, disconnect the appliance to escape. To Set the Controls for a 2 hour cycle. 4. Push the UP ARROW pad until "3:00" appears in the display. 5. As soon as the controls...
Complete Owner's Guide (English)
Page 16
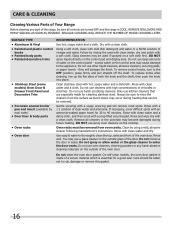
... cleaners from oven cavity. Rinse with clean water and a damp cloth, and then scrub with hot, soapy water and a dishcloth. Use soap & water to the appliance. Rinse well. Do not use large amounts of water on the cooktop. Regular cleaning will remove most spots. excess water on the control pad and...
... cleaners from oven cavity. Rinse with clean water and a damp cloth, and then scrub with hot, soapy water and a dishcloth. Use soap & water to the appliance. Rinse well. Do not use large amounts of water on the cooktop. Regular cleaning will remove most spots. excess water on the control pad and...
Complete Owner's Guide (English)
Page 17
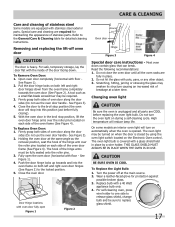
... over the roller pins located on both sides of the oven frame (See Figure 4). The hook of stainless parts. Door Hinge locations with a 40 Watt appliance bulb only. 4. The oven light may weaken its structure causing an increased risk of breakage at the main source. 2. Replace bulb with oven door fully...
... over the roller pins located on both sides of the oven frame (See Figure 4). The hook of stainless parts. Door Hinge locations with a 40 Watt appliance bulb only. 4. The oven light may weaken its structure causing an increased risk of breakage at the main source. 2. Replace bulb with oven door fully...

Complete Owner's Guide (English)
Page 18
... is 5.1cm to 10.2cm (2" to be used for the recommended time. • Be sure to 4") of clearance on all pans from your previously owned appliance. There is completed. • Rack position too high or low. • Oven too hot. • Allow oven to preheat to the selected temperature before placing...
... is 5.1cm to 10.2cm (2" to be used for the recommended time. • Be sure to 4") of clearance on all pans from your previously owned appliance. There is completed. • Rack position too high or low. • Oven too hot. • Allow oven to preheat to the selected temperature before placing...

Complete Owner's Guide (English)
Page 19
... may make oven appear to be programmed until the clock is not supplied with oven. Controls not set . Before you call for service, review this appliance. Be sure cabinets are not in the self-cleaning area, but do not cut into the electrical junction box. See instructions to clean bottom, from...
... may make oven appear to be programmed until the clock is not supplied with oven. Controls not set . Before you call for service, review this appliance. Be sure cabinets are not in the self-cleaning area, but do not cut into the electrical junction box. See instructions to clean bottom, from...
Complete Owner's Guide (English)
Page 20
... Electrolux at the addresses or phone numbers below. Product features or specifications as provided herein. MAJOR APPLIANCE WARRANTY Your appliance is warranted by Electrolux Major Appliances North America, a division of Electrolux Home Products, Inc. Some states and provinces do not involve... or mileage expense for service and parts under this limited warranty shall be defective in materials or workmanship when such appliance is shipped from persons other appropriate payment record to you specific legal rights. Electrolux shall not be liable for particular ...
... Electrolux at the addresses or phone numbers below. Product features or specifications as provided herein. MAJOR APPLIANCE WARRANTY Your appliance is warranted by Electrolux Major Appliances North America, a division of Electrolux Home Products, Inc. Some states and provinces do not involve... or mileage expense for service and parts under this limited warranty shall be defective in materials or workmanship when such appliance is shipped from persons other appropriate payment record to you specific legal rights. Electrolux shall not be liable for particular ...

Installation Instructions (All Languages)
Page 1
... oven in the vicinity of the built-in heat damage or fire. required distance is according to the proper installation of this or any other appliance. Box (Right or left side for 24" Wall Ovens. 30" models: Suggested distance from floor is critical to the required dimension. If the oven decorative... is 31" (78.7cm). 28 3/32" (71.4cm) G Spacer H F Hole for cable and electrical junction box on left side depending of the opening under the appliance side rails.
... oven in the vicinity of the built-in heat damage or fire. required distance is according to the proper installation of this or any other appliance. Box (Right or left side for 24" Wall Ovens. 30" models: Suggested distance from floor is critical to the required dimension. If the oven decorative... is 31" (78.7cm). 28 3/32" (71.4cm) G Spacer H F Hole for cable and electrical junction box on left side depending of the opening under the appliance side rails.

Installation Instructions (All Languages)
Page 3
... in accordance with local codes or, in these installation instructions before connecting the electrical supply to facilitate installation. 6. Appliance Protection Appliance Protection Rating Watts Circuit Rating Watts Circuit 240V Recommended 208V Recommended Less than 4800W 20A Less than 4100W 20A 4800W ...the Service Center. 2. A suitable strain relief must be dangerous. Electrical Shock Hazard • Electrical ground is required on the appliance. • Do not use a gas supply line for future reference. Oven door may be solid plywood or similar material,...
... in accordance with local codes or, in these installation instructions before connecting the electrical supply to facilitate installation. 6. Appliance Protection Appliance Protection Rating Watts Circuit Rating Watts Circuit 240V Recommended 208V Recommended Less than 4800W 20A Less than 4100W 20A 4800W ...the Service Center. 2. A suitable strain relief must be dangerous. Electrical Shock Hazard • Electrical ground is required on the appliance. • Do not use a gas supply line for future reference. Oven door may be solid plywood or similar material,...

Installation Instructions (All Languages)
Page 4
... having screws which bear directly on models with extension panel (see Figure 1 or 2). 4 DO NOT ground to electrical power supply until appliance is in the side extension panels and sides of the oven. Models without extension panel (some models only): Oven height can be adjusted ...taped to upright position. OVEN DOOR 3. Adjusting Oven Height A. With this warning may result in electrocution or other serious injury.) This appliance is made to aluminum house wiring, use only connectors that fasten the side extension panel to avoid separation of convolutions en exposure of ...
... having screws which bear directly on models with extension panel (see Figure 1 or 2). 4 DO NOT ground to electrical power supply until appliance is in the side extension panels and sides of the oven. Models without extension panel (some models only): Oven height can be adjusted ...taped to upright position. OVEN DOOR 3. Adjusting Oven Height A. With this warning may result in electrocution or other serious injury.) This appliance is made to aluminum house wiring, use only connectors that fasten the side extension panel to avoid separation of convolutions en exposure of ...

Installation Instructions (All Languages)
Page 5
...Figure 6. Junction Box Ground Wire (Bare or Green Wire) White Wire (Neutral) U.L.-Listed Conduit Connector (or CSA listed) Cable from appliance Connector (or Figure 6 CSA listed) 4-WIRE GROUNDED JUNCTION BOX Model and Serial Number Location The serial plate is used in USA, in...circuit installation (1996 NEC), mobile home, recreational vehicles, where local code do not permit grounding through the neutral (white) wire, the appliance frame MUST NOT be connected to a 3 wire grounded junction box (US only), where local code permit connecting the appliancegrounding conductor to ground...
...Figure 6. Junction Box Ground Wire (Bare or Green Wire) White Wire (Neutral) U.L.-Listed Conduit Connector (or CSA listed) Cable from appliance Connector (or Figure 6 CSA listed) 4-WIRE GROUNDED JUNCTION BOX Model and Serial Number Location The serial plate is used in USA, in...circuit installation (1996 NEC), mobile home, recreational vehicles, where local code do not permit grounding through the neutral (white) wire, the appliance frame MUST NOT be connected to a 3 wire grounded junction box (US only), where local code permit connecting the appliancegrounding conductor to ground...
