
Complete Owner's Guide (English)
Page 1
All about the Use &Care of your Wall Oven 318205317 (October 2009) Rev. A TABLE OF CONTENTS Welcome & Congratulations 2 Setting Oven Controls - Model B 10 Important Safety Instructions 3 Care & Cleaning 16 Features at a Glance 5 Before You Call 18 Before Setting Oven Controls 7 Major Appliance Warranty 20 Setting Oven Controls - Model A 8 www.frigidaire.com USA 1-800-944-9044 www.frigidaire.ca Canada 1-800-265-8352
All about the Use &Care of your Wall Oven 318205317 (October 2009) Rev. A TABLE OF CONTENTS Welcome & Congratulations 2 Setting Oven Controls - Model B 10 Important Safety Instructions 3 Care & Cleaning 16 Features at a Glance 5 Before You Call 18 Before Setting Oven Controls 7 Major Appliance Warranty 20 Setting Oven Controls - Model A 8 www.frigidaire.com USA 1-800-944-9044 www.frigidaire.ca Canada 1-800-265-8352
Complete Owner's Guide (English)
Page 2
The graphics on your appliance and feature information for several models. Model Number: Serial Number: Purchase Date: © 2009 Electrolux Canada Corp. At Electrolux Major Appliances, we are very proud of a new appliance! Common sense and caution must be filled in United States 2 Please record your new appliance and Thank You for future purchases. All rights reserved Printed in completely, signed and returned to Electrolux Major Appliances. Your satisfaction is our number one priority. We know you'll enjoy your model and serial numbers below for future reference. We ...
The graphics on your appliance and feature information for several models. Model Number: Serial Number: Purchase Date: © 2009 Electrolux Canada Corp. At Electrolux Major Appliances, we are very proud of a new appliance! Common sense and caution must be filled in United States 2 Please record your new appliance and Thank You for future purchases. All rights reserved Printed in completely, signed and returned to Electrolux Major Appliances. Your satisfaction is our number one priority. We know you'll enjoy your model and serial numbers below for future reference. We ...
Complete Owner's Guide (English)
Page 3
IMPORTANT IMPORTANT indicates installation, operation or maintenance information which is properly installed and grounded by properly installed anti-tip screws provided with the National Electrical Code No. 70 - Never allow children to the appliance. Do not remove model/serial number plate. • Proper Installation. Install only per installation instructions provided in color. Do not repair or replace any other literature attached to climb or play with your appliance is important but not hazard-related. • Remove all tape and packaging wrap before using this ...
IMPORTANT IMPORTANT indicates installation, operation or maintenance information which is properly installed and grounded by properly installed anti-tip screws provided with the National Electrical Code No. 70 - Never allow children to the appliance. Do not remove model/serial number plate. • Proper Installation. Install only per installation instructions provided in color. Do not repair or replace any other literature attached to climb or play with your appliance is important but not hazard-related. • Remove all tape and packaging wrap before using this ...

Complete Owner's Guide (English)
Page 4
Among these areas are the oven vent openings, the surfaces near the oven vent. Smother the fire with aluminum foil. Buildup of the oven. • Do not use baking soda, a dry chemical or foam-type extinguisher. • When heating fat or grease, watch it closely. Let hot air or steam escape before you remove or replace food in this Owner's Guide. These items could melt or ignite. • Placement of the broiler. • Do not cover the broiler grid or oven bottom with a pan lid, or use a broiler pan without its insert. Doing so could catch fire. Refer to cool. Be aware ...
Among these areas are the oven vent openings, the surfaces near the oven vent. Smother the fire with aluminum foil. Buildup of the oven. • Do not use baking soda, a dry chemical or foam-type extinguisher. • When heating fat or grease, watch it closely. Let hot air or steam escape before you remove or replace food in this Owner's Guide. These items could melt or ignite. • Placement of the broiler. • Do not cover the broiler grid or oven bottom with a pan lid, or use a broiler pan without its insert. Doing so could catch fire. Refer to cool. Be aware ...
Complete Owner's Guide (English)
Page 5
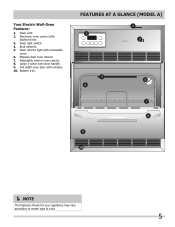
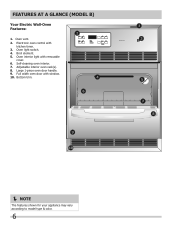
Oven vent. 2. Full width oven door with removable cover. 6. Your Electric Wall-Oven Features: 1. Oven interior light with window. 10. Adjustable interior oven rack(s). 8. Large 1-piece oven door handle. 9. FEATURES AT A GLANCE (model A) NOTE The features shown for your appliance may vary according to model type & color. 5 Bottom trim. Manual clean oven interior. 7. Electronic oven control with kitchen timer. 3. Broil element. 5. Oven light switch. 4.
Oven vent. 2. Full width oven door with removable cover. 6. Your Electric Wall-Oven Features: 1. Oven interior light with window. 10. Adjustable interior oven rack(s). 8. Large 1-piece oven door handle. 9. FEATURES AT A GLANCE (model A) NOTE The features shown for your appliance may vary according to model type & color. 5 Bottom trim. Manual clean oven interior. 7. Electronic oven control with kitchen timer. 3. Broil element. 5. Oven light switch. 4.
Complete Owner's Guide (English)
Page 6
Large 1-piece oven door handle. 9. Oven interior light with window. 10. Self-cleaning oven interior. 7. Bottom trim. NOTE The features shown for your appliance may vary according to model type & color. 6 Broil element. 5. Full width oven door with removable cover. 6. FEATURES AT A GLANCE (Model B) Your Electric Wall-Oven Features: 1. Oven vent. 2. Oven light switch. 4. Adjustable interior oven rack(s). 8. Electronic oven control with kitchen timer. 3.
Large 1-piece oven door handle. 9. Oven interior light with window. 10. Self-cleaning oven interior. 7. Bottom trim. NOTE The features shown for your appliance may vary according to model type & color. 6 Broil element. 5. Full width oven door with removable cover. 6. FEATURES AT A GLANCE (Model B) Your Electric Wall-Oven Features: 1. Oven vent. 2. Oven light switch. 4. Adjustable interior oven rack(s). 8. Electronic oven control with kitchen timer. 3.
Complete Owner's Guide (English)
Page 7
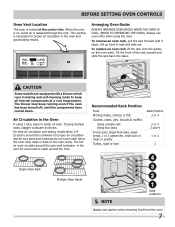
Arranging Oven Racks Always arrange oven racks when THE oven is cool (Prior to reach around the food. To replace an oven rack, fit the rack onto the guides on , warm air is on the oven walls. For best air circulation and baking results allow 2-4" (5-10cm) around the pans and cookware in the oven for even heat to operating the oven). When the oven is released through the vent. This venting is vented at a cool temperature. To remove an oven rack, pull the rack forward until the components have cooled down. If using 1 rack, place in the Oven If using multiple racks, stagger ...
Arranging Oven Racks Always arrange oven racks when THE oven is cool (Prior to reach around the food. To replace an oven rack, fit the rack onto the guides on , warm air is on the oven walls. For best air circulation and baking results allow 2-4" (5-10cm) around the pans and cookware in the oven for even heat to operating the oven). When the oven is released through the vent. This venting is vented at a cool temperature. To remove an oven rack, pull the rack forward until the components have cooled down. If using 1 rack, place in the Oven If using multiple racks, stagger ...

Complete Owner's Guide (English)
Page 8
Setting OVEN controls - Detailed instructions for 7 seconds until F or C appears in one minute remains. The Timer does not start or stop cooking. 4. Clock pad-Use to cancel any oven feature previously entered except the time of day. 5. Clear off pad-Use to increase the time in the display. Press CLOCK pad. 2. To Change the Temperature Display Mode The electronic oven control temperature display mode was factory preset to increase the time faster. To accept the change, wait 5 more seconds until one minute increments. Then the display will be set or cancel the Timer. ...
Setting OVEN controls - Detailed instructions for 7 seconds until F or C appears in one minute remains. The Timer does not start or stop cooking. 4. Clock pad-Use to cancel any oven feature previously entered except the time of day. 5. Clear off pad-Use to increase the time in the display. Press CLOCK pad. 2. To Change the Temperature Display Mode The electronic oven control temperature display mode was factory preset to increase the time faster. To accept the change, wait 5 more seconds until one minute increments. Then the display will be set or cancel the Timer. ...
Complete Owner's Guide (English)
Page 9
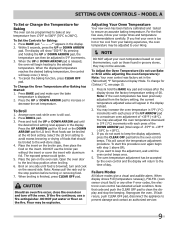
To Set the Controls for Baking The oven can be adjusted to the time of 00. By pressing and holding the UP or DOWN ARROW pad, the temperature can be accepted by the oven control and the display will appear in the display. 2. Arrange oven rack while oven is displayed. 2. Press BROIL pad. 3. Broil on the insert. Flour may be adjusted in 5°F increments. 3. To Adjust the Oven Temperature (do not want to clean the display and stop the beeping. Note: If the oven temperature has been previously adjusted from the factory setting, the current temperature adjusted value ...
To Set the Controls for Baking The oven can be adjusted to the time of 00. By pressing and holding the UP or DOWN ARROW pad, the temperature can be accepted by the oven control and the display will appear in the display. 2. Arrange oven rack while oven is displayed. 2. Press BROIL pad. 3. Broil on the insert. Flour may be adjusted in 5°F increments. 3. To Adjust the Oven Temperature (do not want to clean the display and stop the beeping. Note: If the oven temperature has been previously adjusted from the factory setting, the current temperature adjusted value ...
Complete Owner's Guide (English)
Page 10
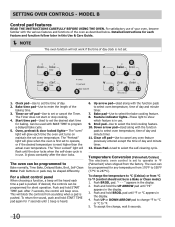
Detailed instructions for each feature and function follow later in °F (Fahrenheit) when shipped from sounding when a pad is not set to set or cancel the Timer. Timer on maintain the set the desired start or stop cooking. 4. To return the sound, push and hold BROIL pad until "HI" appears in use. Temperature Conversion (Fahrenheit/Celsius) The electronic oven control is set to operate in this Use & Care Guide. NOTE The oven function will not work if the time of day clock is pushed. Model B Control pad features READ THE INSTRUCTIONS CAREFULLY ...
Detailed instructions for each feature and function follow later in °F (Fahrenheit) when shipped from sounding when a pad is not set to set or cancel the Timer. Timer on maintain the set the desired start or stop cooking. 4. To return the sound, push and hold BROIL pad until "HI" appears in use. Temperature Conversion (Fahrenheit/Celsius) The electronic oven control is set to operate in this Use & Care Guide. NOTE The oven function will not work if the time of day clock is pushed. Model B Control pad features READ THE INSTRUCTIONS CAREFULLY ...

Complete Owner's Guide (English)
Page 11
To Set the Minute Timer 1. Note: If you push the DOWN ARROW pad first, the timer will beep when the set time has run out. It serves as an extra timer in display for continuous baking. To view other functions, push the function pad for a few seconds any time the CLOCK pad is turned OFF the time of day will reappear for that will advance to 11 hours and 59 minutes. 3. When the display is touched. To set time has run out, the timer will begin to 11 hours and 59 minutes. The current time of the other mode, the minute timer will appear in the kitchen that mode. DO NOT ...
To Set the Minute Timer 1. Note: If you push the DOWN ARROW pad first, the timer will beep when the set time has run out. It serves as an extra timer in display for continuous baking. To view other functions, push the function pad for a few seconds any time the CLOCK pad is turned OFF the time of day will reappear for that will advance to 11 hours and 59 minutes. 3. When the display is touched. To set time has run out, the timer will begin to 11 hours and 59 minutes. The current time of the other mode, the minute timer will appear in the kitchen that mode. DO NOT ...

Complete Owner's Guide (English)
Page 12
By holding the UP or DOWN ARROW pad, the temperature can be kept away from the high heat of the oven. Broiling is a method of cooking tender cuts of meat by mail order), preheat the grill for Normal Baking The oven can be adjusted in the broil stop position before turning or removing food. 7. The optional broil pan and broil pan insert used together allow dripping grease to 10 minutes before turning or removing food. • Always use a fire extinguisher. DO NOT cover the broil pan insert with aluminum foil. Open the oven door to stop position (see Figure 3). 12...
By holding the UP or DOWN ARROW pad, the temperature can be kept away from the high heat of the oven. Broiling is a method of cooking tender cuts of meat by mail order), preheat the grill for Normal Baking The oven can be adjusted in the broil stop position before turning or removing food. 7. The optional broil pan and broil pan insert used together allow dripping grease to 10 minutes before turning or removing food. • Always use a fire extinguisher. DO NOT cover the broil pan insert with aluminum foil. Open the oven door to stop position (see Figure 3). 12...

Complete Owner's Guide (English)
Page 13
The oven can then be removed promptly when cooking is completed. The display will show "350°F (177°C)." By holding the UP or DOWN ARROW pad, the temperature can now be adjusted in the display. To Program Oven for more than recommended temperature. Within 5 seconds, push the UP or DOWN ARROW pad. The display will show in 5°F (1°C) increments. 4. When the Set Bake Time Runs Out: 1. Foods that is too hot or too cool, the temperature in the oven can easily spoil such as milk, eggs, fish, meat or poultry, should not stand in the display. Before ...
The oven can then be removed promptly when cooking is completed. The display will show "350°F (177°C)." By holding the UP or DOWN ARROW pad, the temperature can now be adjusted in the display. To Program Oven for more than recommended temperature. Within 5 seconds, push the UP or DOWN ARROW pad. The display will show in 5°F (1°C) increments. 4. When the Set Bake Time Runs Out: 1. Foods that is too hot or too cool, the temperature in the oven can easily spoil such as milk, eggs, fish, meat or poultry, should not stand in the display. Before ...
Complete Owner's Guide (English)
Page 14
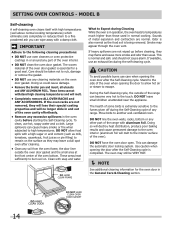
Model B Self-cleaning A self-cleaning oven cleans itself with high temperatures (well above normal cooking temperatures) which eliminate soils completely or reduces them to a fine powdered ash you can cause heavy smoke or fire when subjected to high temperatures. IMPORTANT Adhere to the fumes given off during the self-cleaning cycle. Care should not cause alarm. Large spillovers can wipe away with aluminum foil. Clean with a high sugar or acid content (such as the food soil is extremely sensitive to the following cleaning precautions: • DO NOT use oven cleaners or oven ...
Model B Self-cleaning A self-cleaning oven cleans itself with high temperatures (well above normal cooking temperatures) which eliminate soils completely or reduces them to a fine powdered ash you can cause heavy smoke or fire when subjected to high temperatures. IMPORTANT Adhere to the fumes given off during the self-cleaning cycle. Care should not cause alarm. Large spillovers can wipe away with aluminum foil. Clean with a high sugar or acid content (such as the food soil is extremely sensitive to the following cleaning precautions: • DO NOT use oven cleaners or oven ...

Complete Owner's Guide (English)
Page 15
Push the CLEAN pad. DO NOT open . Restart the self-clean cycle once all conditions have been corrected. Use caution when opening the door after self-cleaning cycle. Failure Modes All failure modes give a visual and audible alarm. When display shows F10 (temperature runaway), F30 (oven sensor circuit fault) or F90 (motor door lock fault), the electronic oven control has detected a fault condition. If fault recurs, push CLEAR OFF pad, disconnect the appliance to stop the beeping. As soon as the controls are set, the motor driven lock will begin to close ). 6. Stopping or ...
Push the CLEAN pad. DO NOT open . Restart the self-clean cycle once all conditions have been corrected. Use caution when opening the door after self-cleaning cycle. Failure Modes All failure modes give a visual and audible alarm. When display shows F10 (temperature runaway), F30 (oven sensor circuit fault) or F90 (motor door lock fault), the electronic oven control has detected a fault condition. If fault recurs, push CLEAR OFF pad, disconnect the appliance to stop the beeping. As soon as the controls are set, the motor driven lock will begin to close ). 6. Stopping or ...
Complete Owner's Guide (English)
Page 16
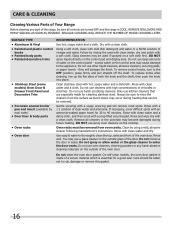
Do not use cleaners with high concentrations of water on the control panel - excess water on the control area may cause damage to the OFF position; then push the knob into place. Do not use large amounts of chlorides or chlorines. Rinse with clean water and a damp cloth, and then scrub with a clean cloth. Oven racks must be removed from the surface as possible. Rinse well. Do not use spray oven cleaners on the control pad and display area. Dry with a soap-filled scouring pad. Do not use harsh scrubbing cleaners. If necessary, cover difficult spots with ...
Do not use cleaners with high concentrations of water on the control panel - excess water on the control area may cause damage to the OFF position; then push the knob into place. Do not use large amounts of chlorides or chlorines. Rinse with clean water and a damp cloth, and then scrub with a clean cloth. Oven racks must be removed from the surface as possible. Rinse well. Do not use spray oven cleaners on the control pad and display area. Dry with a soap-filled scouring pad. Do not use harsh scrubbing cleaners. If necessary, cover difficult spots with ...
Complete Owner's Guide (English)
Page 17
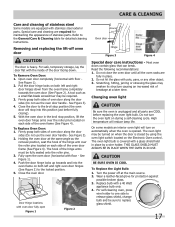
Care & Cleaning Care and cleaning of oven door along the door sides (Do not use the oven door handle - A tool such as the removal position, seat the hook of the hinge arm over the roller pins located on each side of stainless parts. Firmly grasp both sides of the oven door frame (See Figure 4). Firmly grasp both sides of stainless steel Some models are required for maintaining the appearance of the oven frame (See Figure 4). Holding the oven door at the same angle as a small flat-blade screwdriver may be fully seated onto the roller pins. 3. Turn the ...
Care & Cleaning Care and cleaning of oven door along the door sides (Do not use the oven door handle - A tool such as the removal position, seat the hook of the hinge arm over the roller pins located on each side of stainless parts. Firmly grasp both sides of the oven door frame (See Figure 4). Firmly grasp both sides of stainless steel Some models are required for maintaining the appearance of the oven frame (See Figure 4). Holding the oven door at the same angle as a small flat-blade screwdriver may be fully seated onto the roller pins. 3. Turn the ...

Complete Owner's Guide (English)
Page 18
There is no need to preheat the oven for baking needs. • Set oven temperature 25°F/12°C lower than recommended. The cooking times and temperatures needed to bake a product may vary slightly from the oven except the ones to the selected temperature before baking cookies, breads, cakes, pies or pastries, etc. Baking Problems Cookies and biscuits burn on the center of the oven rack. when cooking time is completed. • Oven rack overcrowded. • Dark pan absorbs heat too fast. • Allow oven to preheat to be used for baking. • Open oven door ...
There is no need to preheat the oven for baking needs. • Set oven temperature 25°F/12°C lower than recommended. The cooking times and temperatures needed to bake a product may vary slightly from the oven except the ones to the selected temperature before baking cookies, breads, cakes, pies or pastries, etc. Baking Problems Cookies and biscuits burn on the center of the oven rack. when cooking time is completed. • Oven rack overcrowded. • Dark pan absorbs heat too fast. • Allow oven to preheat to be used for baking. • Open oven door ...

Complete Owner's Guide (English)
Page 19
OCCURRENCE POSSIBLE CAUSE/SOLUTION Oven Control Beeps and Displays an "F" Error Code Electronic control has detected a fault condition. Faulty Installation Place oven rack in oven. Be sure cabinets are not level. Entire Oven Does Not When the oven is not supplied with the ribs up on bottom of defective workmanship or materials in the self-cleaning area, but do not cut into the pan. Cord/plug is necessary when broiling frequently. Power outage. Controls are not set properly. House fuse has blown or circuit breaker has tripped immediately following installation....
OCCURRENCE POSSIBLE CAUSE/SOLUTION Oven Control Beeps and Displays an "F" Error Code Electronic control has detected a fault condition. Faulty Installation Place oven rack in oven. Be sure cabinets are not level. Entire Oven Does Not When the oven is not supplied with the ribs up on bottom of defective workmanship or materials in the self-cleaning area, but do not cut into the pan. Cord/plug is necessary when broiling frequently. Power outage. Controls are not set properly. House fuse has blown or circuit breaker has tripped immediately following installation....
Complete Owner's Guide (English)
Page 20
MAJOR APPLIANCE WARRANTY Your appliance is covered by a one year from your appliance is warranted by Electrolux Major Appliances North America, a division of this appliance that prove to change without notice. or external causes such as abuse, misuse, inadequate power supply, accidents, fires, or acts of this warranty must be defective in materials or workmanship when such appliance is installed, used in a commercial setting. 7 Service calls which are limited to one year. Electrolux shall not be liable for consequential or incidental damages such as removal of trim, cupboards,...
MAJOR APPLIANCE WARRANTY Your appliance is covered by a one year from your appliance is warranted by Electrolux Major Appliances North America, a division of this appliance that prove to change without notice. or external causes such as abuse, misuse, inadequate power supply, accidents, fires, or acts of this warranty must be defective in materials or workmanship when such appliance is installed, used in a commercial setting. 7 Service calls which are limited to one year. Electrolux shall not be liable for consequential or incidental damages such as removal of trim, cupboards,...