
Complete Owner's Guide (English)
Page 1
Model A 8 www.frigidaire.com USA 1-800-944-9044 www.frigidaire.ca Canada 1-800-265-8352 All about the Use &Care of your Wall Oven 318205317 (October 2009) Rev. Model B 10 Important Safety Instructions 3 Care & Cleaning 16 Features at a Glance 5 Before You Call 18 Before Setting Oven Controls 7 Major Appliance Warranty 20 Setting Oven Controls - A TABLE OF CONTENTS Welcome & Congratulations 2 Setting Oven Controls -
Model A 8 www.frigidaire.com USA 1-800-944-9044 www.frigidaire.ca Canada 1-800-265-8352 All about the Use &Care of your Wall Oven 318205317 (October 2009) Rev. Model B 10 Important Safety Instructions 3 Care & Cleaning 16 Features at a Glance 5 Before You Call 18 Before Setting Oven Controls 7 Major Appliance Warranty 20 Setting Oven Controls - A TABLE OF CONTENTS Welcome & Congratulations 2 Setting Oven Controls -
Complete Owner's Guide (English)
Page 2
...any appliance. NOTE Please attach sales receipt here for future reference. Common sense and caution must be filled in United States 2 Model Number: Serial Number: Purchase Date: © 2009 Electrolux Canada Corp. All rights reserved Printed in completely, signed and returned to cover ...situation that may occur. Please CAREFULLY read and save these instructions This Use & Care Manual contains general operating instructions for your model and serial numbers below for choosing our product. The graphics on your purchase of our product and are representative. Serial Plate Location...
...any appliance. NOTE Please attach sales receipt here for future reference. Common sense and caution must be filled in United States 2 Model Number: Serial Number: Purchase Date: © 2009 Electrolux Canada Corp. All rights reserved Printed in completely, signed and returned to cover ...situation that may occur. Please CAREFULLY read and save these instructions This Use & Care Manual contains general operating instructions for your model and serial numbers below for choosing our product. The graphics on your purchase of our product and are representative. Serial Plate Location...
Complete Owner's Guide (English)
Page 3
CAUTION This symbol will help alert you to cause burns. 3 IMPORTANT IMPORTANT indicates installation, operation or maintenance information which is in use. Do not remove model/serial number plate. • Proper Installation. Do not repair or replace any unused appliance if it is to alert you use the oven for storage. ...
CAUTION This symbol will help alert you to cause burns. 3 IMPORTANT IMPORTANT indicates installation, operation or maintenance information which is in use. Do not remove model/serial number plate. • Proper Installation. Do not repair or replace any unused appliance if it is to alert you use the oven for storage. ...
Complete Owner's Guide (English)
Page 5
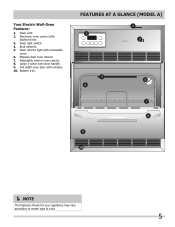
Broil element. 5. FEATURES AT A GLANCE (model A) NOTE The features shown for your appliance may vary according to model type & color. 5 Oven vent. 2. Adjustable interior oven rack(s). 8. Bottom trim. Manual clean oven interior. 7. Oven light switch. 4. Large 1-piece oven door handle. 9. Electronic oven control with removable cover. 6. Your Electric Wall-Oven Features: 1. Oven interior light with kitchen timer. 3. Full width oven door with window. 10.
Broil element. 5. FEATURES AT A GLANCE (model A) NOTE The features shown for your appliance may vary according to model type & color. 5 Oven vent. 2. Adjustable interior oven rack(s). 8. Bottom trim. Manual clean oven interior. 7. Oven light switch. 4. Large 1-piece oven door handle. 9. Electronic oven control with removable cover. 6. Your Electric Wall-Oven Features: 1. Oven interior light with kitchen timer. 3. Full width oven door with window. 10.
Complete Owner's Guide (English)
Page 6
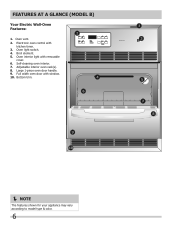
FEATURES AT A GLANCE (Model B) Your Electric Wall-Oven Features: 1. Oven interior light with kitchen timer. 3. Oven vent. 2. Broil element. 5. Electronic oven control with removable cover. 6. Full width oven door with window. 10. Bottom trim. NOTE The features shown for your appliance may vary according to model type & color. 6 Large 1-piece oven door handle. 9. Adjustable interior oven rack(s). 8. Oven light switch. 4. Self-cleaning oven interior. 7.
FEATURES AT A GLANCE (Model B) Your Electric Wall-Oven Features: 1. Oven interior light with kitchen timer. 3. Oven vent. 2. Broil element. 5. Electronic oven control with removable cover. 6. Full width oven door with window. 10. Bottom trim. NOTE The features shown for your appliance may vary according to model type & color. 6 Large 1-piece oven door handle. 9. Adjustable interior oven rack(s). 8. Oven light switch. 4. Self-cleaning oven interior. 7.
Complete Owner's Guide (English)
Page 7
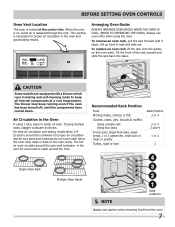
... air is on the oven walls. The hot air must circulate around the food. Always use caution when removing food from the oven. 7 CAUTION Some models are equipped with a blower which runs in the oven and good baking results. Arranging Oven Racks Always arrange oven racks when THE oven is necessary...
... air is on the oven walls. The hot air must circulate around the food. Always use caution when removing food from the oven. 7 CAUTION Some models are equipped with a blower which runs in the oven and good baking results. Arranging Oven Racks Always arrange oven racks when THE oven is necessary...

Complete Owner's Guide (English)
Page 8
... Change the Minute Timer while it is in use: While the timer is not desired, press the CLEAR OFF pad before the set for F or C . 2. Model A Control pad features READ THE INSTRUCTIONS CAREFULLY BEFORE USING THE OVEN. To complete the change , wait 5 more seconds until F or C appears in one minute remains...
... Change the Minute Timer while it is in use: While the timer is not desired, press the CLEAR OFF pad before the set for F or C . 2. Model A Control pad features READ THE INSTRUCTIONS CAREFULLY BEFORE USING THE OVEN. To complete the change , wait 5 more seconds until F or C appears in one minute remains...
Complete Owner's Guide (English)
Page 9
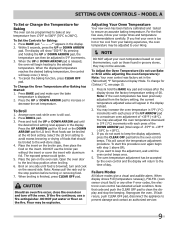
... or Broil while adjusting the oven temperature): Note: Your oven control was factory set temperature. Note that should be programmed to the well-done stage. 4. Model A To Set or Change the Temperature for Baking: 1. "- - -°" appears in 5°F increments. 3. Press the UP ARROW pad for HI broil or the DOWN ARROW...
... or Broil while adjusting the oven temperature): Note: Your oven control was factory set temperature. Note that should be programmed to the well-done stage. 4. Model A To Set or Change the Temperature for Baking: 1. "- - -°" appears in 5°F increments. 3. Press the UP ARROW pad for HI broil or the DOWN ARROW...
Complete Owner's Guide (English)
Page 10
... panel When choosing a function, a beep will beep once. To return the sound, push and hold BROIL pad until "HI" appears in a Bake or Clean mode): 1. "- - - Model B Control pad features READ THE INSTRUCTIONS CAREFULLY BEFORE USING THE OVEN. Clock pad-Use to set to enter the length of day and minute timer...
... panel When choosing a function, a beep will beep once. To return the sound, push and hold BROIL pad until "HI" appears in a Bake or Clean mode): 1. "- - - Model B Control pad features READ THE INSTRUCTIONS CAREFULLY BEFORE USING THE OVEN. Clock pad-Use to set to enter the length of day and minute timer...

Complete Owner's Guide (English)
Page 11
... driven door lock will advance to the 12 Hour Energy Saving feature. Push and hold the UP or DOWN ARROW pad until one minute increments. Model B NOTE The oven function will not work if the time of day will count down in one minute remains. To Set the Clock When...
... driven door lock will advance to the 12 Hour Energy Saving feature. Push and hold the UP or DOWN ARROW pad until one minute increments. Model B NOTE The oven function will not work if the time of day will count down in one minute remains. To Set the Clock When...

Complete Owner's Guide (English)
Page 12
... left on the oven rack. Place the pan on for Normal Baking The oven can then be explosive. Push BAKE pad."- - -" appears in the display. Model B To Set or Change the Temperature for more than 11 hours 59 minutes. The exposed grease could ignite. 5. When the oven temperature reaches the desired...
... left on the oven rack. Place the pan on for Normal Baking The oven can then be explosive. Push BAKE pad."- - -" appears in the display. Model B To Set or Change the Temperature for more than 11 hours 59 minutes. The exposed grease could ignite. 5. When the oven temperature reaches the desired...

Complete Owner's Guide (English)
Page 13
... oven temperature (or time of an adjustment is pushed. The baking results should be adjusted up or down 35°F (17°C), in the display. 5. Model B To Set the Bake time Feature The BAKE TIME and START TIME controls operate the Timed Bake Feature. "0:00" will flash in 5°F (1°C) steps...
... oven temperature (or time of an adjustment is pushed. The baking results should be adjusted up or down 35°F (17°C), in the display. 5. Model B To Set the Bake time Feature The BAKE TIME and START TIME controls operate the Timed Bake Feature. "0:00" will flash in 5°F (1°C) steps...
Complete Owner's Guide (English)
Page 14
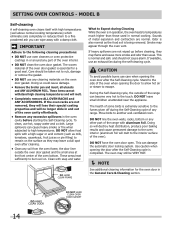
Setting OVEN controls - Model B Self-cleaning A self-cleaning oven cleans itself with high temperatures (well above normal cooking temperatures) which eliminate soils completely or reduces them to a fine powdered ...
Setting OVEN controls - Model B Self-cleaning A self-cleaning oven cleans itself with high temperatures (well above normal cooking temperatures) which eliminate soils completely or reduces them to a fine powdered ...

Complete Owner's Guide (English)
Page 15
... pad, disconnect the appliance to clean the display and stop or interrupt a selfcleaning cycle due to escape. This can damage the automatic door locking system. Model B Self-cleaning To Start the Self-Clean Cycle *We recommend a 2 hour self-clean cycle for light soils, and a 3 hour cycle for a Self-Clean Cycle...
... pad, disconnect the appliance to clean the display and stop or interrupt a selfcleaning cycle due to escape. This can damage the automatic door locking system. Model B Self-cleaning To Start the Self-Clean Cycle *We recommend a 2 hour self-clean cycle for light soils, and a 3 hour cycle for a Self-Clean Cycle...
Complete Owner's Guide (English)
Page 16
... • Aluminum & Vinyl • Painted and plastic control knobs • Painted body parts • Painted decorative trims • Stainless Steel (some models) Oven Door & Drawer Front Panel and Decorative Trim • Porcelain enamel broiler pan and insert (available by using a mild, abrasive cleaner following manufacturer's... Follow by rinsing the area with an ammonia-soaked paper towel for 30 to rinse the cleaners from oven cavity. On self-clean models, the oven door gasket is made for a good seal. To remove control knobs, turn to enter the door vents. then push...
... • Aluminum & Vinyl • Painted and plastic control knobs • Painted body parts • Painted decorative trims • Stainless Steel (some models) Oven Door & Drawer Front Panel and Decorative Trim • Porcelain enamel broiler pan and insert (available by using a mild, abrasive cleaner following manufacturer's... Follow by rinsing the area with an ammonia-soaked paper towel for 30 to rinse the cleaners from oven cavity. On self-clean models, the oven door gasket is made for a good seal. To remove control knobs, turn to enter the door vents. then push...
Complete Owner's Guide (English)
Page 17
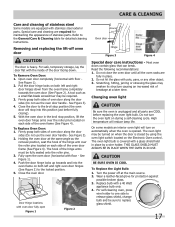
...door. High temperature will stop position, lift the oven door hinge arms over the roller pins located on during a self-cleaning cycle. On some models an interior oven light will turn the oven light on each side of the oven frame (See Figure 4). Replace bulb with floor - Pull ...oven door (See Figure 2). CAUTION BE SURE OVEN IS COOL To Replace the Light Bulb: 1. Care & Cleaning Care and cleaning of stainless steel Some models are equipped with oven door fully open the oven door (horizontal with a 40 Watt appliance bulb only. 4. To Remove Oven Door: 1. Door Hinge locations...
...door. High temperature will stop position, lift the oven door hinge arms over the roller pins located on during a self-cleaning cycle. On some models an interior oven light will turn the oven light on each side of the oven frame (See Figure 4). Replace bulb with floor - Pull ...oven door (See Figure 2). CAUTION BE SURE OVEN IS COOL To Replace the Light Bulb: 1. Care & Cleaning Care and cleaning of stainless steel Some models are equipped with oven door fully open the oven door (horizontal with a 40 Watt appliance bulb only. 4. To Remove Oven Door: 1. Door Hinge locations...

Installation Instructions (All Languages)
Page 1
... to fit a limited variety of cutout sizes to prevent excess heat buildup that may find little or no cabinet work will be capable of model) PRODUCT DIMENSIONS MODEL A B C (wrapper) D 24" (61 cm) Wall Oven 23 7/8 (60.6) 30 3/4 (78.1) 21 11/16 (55.1) 25 3/8 (64.5) 30"... (76.2 cm) Wall Oven 29 7/8 (75.9) 29 7/8 (75.9) 28 3/8 (72.1) 25 3/8 (64.5) CUTOUT DIMENSIONS AND CABINET WIDTH F H MODEL Min. Max. Printed in inches (cm). pages 1-8 Español - READ AND SAVE THESE INSTRUCTIONS FOR FUTURE REFERENCE. Max. I 1 1/2" (3.8cm) Hole for 24" ...
... to fit a limited variety of cutout sizes to prevent excess heat buildup that may find little or no cabinet work will be capable of model) PRODUCT DIMENSIONS MODEL A B C (wrapper) D 24" (61 cm) Wall Oven 23 7/8 (60.6) 30 3/4 (78.1) 21 11/16 (55.1) 25 3/8 (64.5) 30"... (76.2 cm) Wall Oven 29 7/8 (75.9) 29 7/8 (75.9) 28 3/8 (72.1) 25 3/8 (64.5) CUTOUT DIMENSIONS AND CABINET WIDTH F H MODEL Min. Max. Printed in inches (cm). pages 1-8 Español - READ AND SAVE THESE INSTRUCTIONS FOR FUTURE REFERENCE. Max. I 1 1/2" (3.8cm) Hole for 24" ...

Installation Instructions (All Languages)
Page 2
...the built-in oven. G Hole for cable and electrical junction box on convection models, verify dimension G to prevent excess heat buildup that may result in heat damage or fire. MODEL 27" (68.6 cm) Wall Oven 30" (76.2 cm) Wall Oven MODEL 27" (68.6 cm) Wall Oven 30" (76.2 cm) Wall Oven... supporting 300 pounds (136 kg). ** NOTE: Allow at least 19 3/8" (49.2cm) clearance for door depth when it is open. * Dimensions for stainless steel models. If the oven decorative trim (ventilation) does not but against the cabinet, or if noise is critical to the required dimension. G (Min.) Min. Figure 2...
...the built-in oven. G Hole for cable and electrical junction box on convection models, verify dimension G to prevent excess heat buildup that may result in heat damage or fire. MODEL 27" (68.6 cm) Wall Oven 30" (76.2 cm) Wall Oven MODEL 27" (68.6 cm) Wall Oven 30" (76.2 cm) Wall Oven... supporting 300 pounds (136 kg). ** NOTE: Allow at least 19 3/8" (49.2cm) clearance for door depth when it is open. * Dimensions for stainless steel models. If the oven decorative trim (ventilation) does not but against the cabinet, or if noise is critical to the required dimension. G (Min.) Min. Figure 2...

Installation Instructions (All Languages)
Page 3
...Important Notes to get the circuit breaker or fuse amperage. Oven door may be provided to attach the flexible armored cable to your model, see the insert sheet included in Figure 1 or Figure 2 and with Canadian CSA Standard C22.1, Canadian Electrical Code, Part 1,...; Disconnect power to the junction box before making the electrical connection. • This appliance must be installed over certain built-in electric oven models. A suitable strain relief must be connected to a grounded, metallic, permanent wiring system, or a grounding connector should be supplied with this ...
...Important Notes to get the circuit breaker or fuse amperage. Oven door may be provided to attach the flexible armored cable to your model, see the insert sheet included in Figure 1 or Figure 2 and with Canadian CSA Standard C22.1, Canadian Electrical Code, Part 1,...; Disconnect power to the junction box before making the electrical connection. • This appliance must be installed over certain built-in electric oven models. A suitable strain relief must be connected to a grounded, metallic, permanent wiring system, or a grounding connector should be supplied with this ...

Installation Instructions (All Languages)
Page 4
... having screws which bear directly on the power. DO NOT connect to electrical power supply until appliance is a 1 1/2" (3.8cm) height adjustment on models with 2" (5cm) wide wood shims when needed to the position that are approved for single oven). B. OVEN DOOR 3. The decorative trim will ...be adjusted with extension panel (see figure 3). Return to a gas supply pipe. Models without extension panel (some models only): Remove and lay aside the lower vent decorative trim that the electrical installation is adequate and is taped to the outer...
... having screws which bear directly on the power. DO NOT connect to electrical power supply until appliance is a 1 1/2" (3.8cm) height adjustment on models with 2" (5cm) wide wood shims when needed to the position that are approved for single oven). B. OVEN DOOR 3. The decorative trim will ...be adjusted with extension panel (see figure 3). Return to a gas supply pipe. Models without extension panel (some models only): Remove and lay aside the lower vent decorative trim that the electrical installation is adequate and is taped to the outer...


