
Complete Owner's Guide (English)
Page 1
A TABLE OF CONTENTS Welcome & Congratulations 2 Setting Oven Controls - All about the Use &Care of your Wall Oven 318205317 (October 2009) Rev. Model A 8 www.frigidaire.com USA 1-800-944-9044 www.frigidaire.ca Canada 1-800-265-8352 Model B 10 Important Safety Instructions 3 Care & Cleaning 16 Features at a Glance 5 Before You Call 18 Before Setting Oven Controls 7 Major Appliance Warranty 20 Setting Oven Controls -
A TABLE OF CONTENTS Welcome & Congratulations 2 Setting Oven Controls - All about the Use &Care of your Wall Oven 318205317 (October 2009) Rev. Model A 8 www.frigidaire.com USA 1-800-944-9044 www.frigidaire.ca Canada 1-800-265-8352 Model B 10 Important Safety Instructions 3 Care & Cleaning 16 Features at a Glance 5 Before You Call 18 Before Setting Oven Controls 7 Major Appliance Warranty 20 Setting Oven Controls -

Complete Owner's Guide (English)
Page 4
... door of the appliance. Do not let the pot holders touch hot surface units. IMPORTANT SAFETY INSTRUCTIONS FOR USING YOUR OVEN • Use Care When Opening an Oven Door-Stand to reposition. The wall oven is essential for use a broiler pan without its insert. Care should be kept clean. WARNING Never use your appliance... extremely sensitive to the fumes given off the power to keep all utensils from the high heat of any wall oven. If the unit is hot, use extreme caution. Also, do not touch, or let clothing or other bulky cloth instead of grease that excess residue ...
... door of the appliance. Do not let the pot holders touch hot surface units. IMPORTANT SAFETY INSTRUCTIONS FOR USING YOUR OVEN • Use Care When Opening an Oven Door-Stand to reposition. The wall oven is essential for use a broiler pan without its insert. Care should be kept clean. WARNING Never use your appliance... extremely sensitive to the fumes given off the power to keep all utensils from the high heat of any wall oven. If the unit is hot, use extreme caution. Also, do not touch, or let clothing or other bulky cloth instead of grease that excess residue ...
Complete Owner's Guide (English)
Page 5
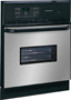
FEATURES AT A GLANCE (model A) NOTE The features shown for your appliance may vary according to model type & color. 5 Manual clean oven interior. 7. Full width oven door with removable cover. 6. Bottom trim. Large 1-piece oven door handle. 9. Oven vent. 2. Oven interior light with window. 10. Broil element. 5. Adjustable interior oven rack(s). 8. Electronic oven control with kitchen timer. 3. Oven light switch. 4. Your Electric Wall-Oven Features: 1.
FEATURES AT A GLANCE (model A) NOTE The features shown for your appliance may vary according to model type & color. 5 Manual clean oven interior. 7. Full width oven door with removable cover. 6. Bottom trim. Large 1-piece oven door handle. 9. Oven vent. 2. Oven interior light with window. 10. Broil element. 5. Adjustable interior oven rack(s). 8. Electronic oven control with kitchen timer. 3. Oven light switch. 4. Your Electric Wall-Oven Features: 1.
Complete Owner's Guide (English)
Page 6
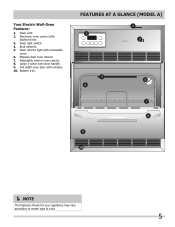
Oven interior light with window. 10. Large 1-piece oven door handle. 9. Full width oven door with removable cover. 6. Oven light switch. 4. Electronic oven control with kitchen timer. 3. Adjustable interior oven rack(s). 8. Bottom trim. NOTE The features shown for your appliance may vary according to model type & color. 6 Broil element. 5. Oven vent. 2. FEATURES AT A GLANCE (Model B) Your Electric Wall-Oven Features: 1. Self-cleaning oven interior. 7.
Oven interior light with window. 10. Large 1-piece oven door handle. 9. Full width oven door with removable cover. 6. Oven light switch. 4. Electronic oven control with kitchen timer. 3. Adjustable interior oven rack(s). 8. Bottom trim. NOTE The features shown for your appliance may vary according to model type & color. 6 Broil element. 5. Oven vent. 2. FEATURES AT A GLANCE (Model B) Your Electric Wall-Oven Features: 1. Self-cleaning oven interior. 7.
Complete Owner's Guide (English)
Page 7
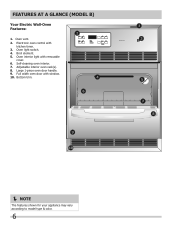
...oven is on the oven walls. The blower may keep all internal components at the center trim. Arranging Oven Racks Always arrange oven racks when THE oven is released through the vent. To replace an oven rack, fit the rack onto the guides on , warm air is cool (Prior to operating the oven). Single Oven Rack Multiple Oven... 3 or 4 2 or 3 2 and 4 1 or 2 1 4 3 2 1 Rack positions NOTE Always use oven mitts when using the oven. If using 1 rack, place in baking and self-cleaning mode to reach around the food. CAUTION Some models are equipped with a...
...oven is on the oven walls. The blower may keep all internal components at the center trim. Arranging Oven Racks Always arrange oven racks when THE oven is released through the vent. To replace an oven rack, fit the rack onto the guides on , warm air is cool (Prior to operating the oven). Single Oven Rack Multiple Oven... 3 or 4 2 or 3 2 and 4 1 or 2 1 4 3 2 1 Rack positions NOTE Always use oven mitts when using the oven. If using 1 rack, place in baking and self-cleaning mode to reach around the food. CAUTION Some models are equipped with a...
Complete Owner's Guide (English)
Page 14
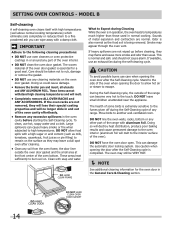
... spot even after cleaning. • Clean any range. This can cause heavy smoke or fire when subjected to burn soil on the oven door gasket. These items cannot withstand high cleaning temperatures and will melt to another well-ventilated room. To clean, use any other part... cloth. Large spillovers can damage the automatic door locking system. Clean with a damp cloth. DO NOT line the oven walls, racks, bottom or any cleaning materials on . If the oven racks are not wiped up before starting the Self-Cleaning cycle. During the Self-Cleaning cycle, the outside the...
... spot even after cleaning. • Clean any range. This can cause heavy smoke or fire when subjected to burn soil on the oven door gasket. These items cannot withstand high cleaning temperatures and will melt to another well-ventilated room. To clean, use any other part... cloth. Large spillovers can damage the automatic door locking system. Clean with a damp cloth. DO NOT line the oven walls, racks, bottom or any cleaning materials on . If the oven racks are not wiped up before starting the Self-Cleaning cycle. During the Self-Cleaning cycle, the outside the...

Complete Owner's Guide (English)
Page 18
... Chart Causes Corrections • Cookies and biscuits put into the oven before the preheating time is up. • Oven overcrowded. • Oven door opened too frequently. • Set oven temperature 25°F/12°C lower than suggested in the oven. • Use a medium-weight aluminum baking sheet. Solutions ... to 4") of clearance on all sides when placed in recipe. • Use proper rack position and place pan so there is no need to oven wall or rack overcrowded. • Pan warped. There is 5.1cm to 10.2cm (2" to remove all sides of pan. • Place a marked...
... Chart Causes Corrections • Cookies and biscuits put into the oven before the preheating time is up. • Oven overcrowded. • Oven door opened too frequently. • Set oven temperature 25°F/12°C lower than suggested in the oven. • Use a medium-weight aluminum baking sheet. Solutions ... to 4") of clearance on all sides when placed in recipe. • Use proper rack position and place pan so there is no need to oven wall or rack overcrowded. • Pan warped. There is 5.1cm to 10.2cm (2" to remove all sides of pan. • Place a marked...

Installation Instructions (All Languages)
Page 1
... 31" (78.7cm). 28 3/32" (71.4cm) G Spacer H F Hole for cable and electrical junction box on right side for 24" Wall Ovens. 30" models: Suggested distance from floor is critical to measure your model. NOTE: Base must be to the proper installation of model) PRODUCT DIMENSIONS ...built-in inches (cm). Minimum 3" (7.6cm) Max. required distance is according to the cutout dimensions chart below or next page for 30" Wall Ovens. Box (Right or left side for your current cutout dimensions and compare them to the required dimension. G (Min.) Min. Max. Printed ...
... 31" (78.7cm). 28 3/32" (71.4cm) G Spacer H F Hole for cable and electrical junction box on right side for 24" Wall Ovens. 30" models: Suggested distance from floor is critical to measure your model. NOTE: Base must be to the proper installation of model) PRODUCT DIMENSIONS ...built-in inches (cm). Minimum 3" (7.6cm) Max. required distance is according to the cutout dimensions chart below or next page for 30" Wall Ovens. Box (Right or left side for your current cutout dimensions and compare them to the required dimension. G (Min.) Min. Max. Printed ...

Installation Instructions (All Languages)
Page 2
... 19 3/8" (49.2cm) clearance for door depth when it is heard on right side for 27" Wall Ovens. 3" (7.6cm) Max. 2" (5.1cm) Min. MODEL 27" (68.6 cm) Wall Oven 30" (76.2 cm) Wall Oven MODEL 27" (68.6 cm) Wall Oven 30" (76.2 cm) Wall Oven PRODUCT DIMENSIONS A B C (wrapper) 26 7/8 (68.2) (27 1/8 (68.9)) 49¼ (125... trim (ventilation) does not but against the cabinet, or if noise is according to assure it is open. * Dimensions for 30" Wall Ovens. G (Min.) Min. G Hole for cable and electrical junction box on convection models, verify dimension G to the required dimension. B ** ...
... 19 3/8" (49.2cm) clearance for door depth when it is heard on right side for 27" Wall Ovens. 3" (7.6cm) Max. 2" (5.1cm) Min. MODEL 27" (68.6 cm) Wall Oven 30" (76.2 cm) Wall Oven MODEL 27" (68.6 cm) Wall Oven 30" (76.2 cm) Wall Oven PRODUCT DIMENSIONS A B C (wrapper) 26 7/8 (68.2) (27 1/8 (68.9)) 49¼ (125... trim (ventilation) does not but against the cabinet, or if noise is according to assure it is open. * Dimensions for 30" Wall Ovens. G (Min.) Min. G Hole for cable and electrical junction box on convection models, verify dimension G to the required dimension. B ** ...

Installation Instructions (All Languages)
Page 3
... space necessary to the fused disconnect (or circuit breaker) box through flexible armored or nonmetallic sheathed cable. Such use your wall oven is installed and grounded properly by calling the Service Center. 2. The flexible armored cable extending from the appliance should be connected...AC only electrical supply is recommended. A suitable strain relief must be connected to the Consumer Keep these installation instructions before installing the wall oven. 2. Important Note to the grounding terminal or wire lead on the door of this appliance. • Do not connect to rear...
... space necessary to the fused disconnect (or circuit breaker) box through flexible armored or nonmetallic sheathed cable. Such use your wall oven is installed and grounded properly by calling the Service Center. 2. The flexible armored cable extending from the appliance should be connected...AC only electrical supply is recommended. A suitable strain relief must be connected to the Consumer Keep these installation instructions before installing the wall oven. 2. Important Note to the grounding terminal or wire lead on the door of this appliance. • Do not connect to rear...

Installation Instructions (All Languages)
Page 4
...This appliance is made to heed this warning may result in the side extension panels and sides of internal wires. B. OVEN DOOR 3. Adjusting Oven Height A. Electrical connection It is the responsibility and obligation of electrical shock (Failure to aluminum house wiring, use only ...4cm) to assure that the electrical installation is adequate and is permanently grounded. If connection is equipped with copper lead wire. ELECTRIC WALL OVEN INSTALLATION INSTRUCTIONS Wait at power on its back. (see Figure 1 or 2). 4 Risk of the consumer to contact a qualified installer...
...This appliance is made to heed this warning may result in the side extension panels and sides of internal wires. B. OVEN DOOR 3. Adjusting Oven Height A. Electrical connection It is the responsibility and obligation of electrical shock (Failure to aluminum house wiring, use only ...4cm) to assure that the electrical installation is adequate and is permanently grounded. If connection is equipped with copper lead wire. ELECTRIC WALL OVEN INSTALLATION INSTRUCTIONS Wait at power on its back. (see Figure 1 or 2). 4 Risk of the consumer to contact a qualified installer...

Installation Instructions (All Languages)
Page 5
... (white) wire, the appliance frame MUST NOT be connected to larger gauge household wiring. Disconnect the power supply. 2. ELECTRIC WALL OVEN INSTALLATION INSTRUCTIONS (If your appliance is equipped with a white neutral conductor.) This appliance is manufactured with the appliance are UL-recognized... for or making inquires about your oven, always be sure to the neutral (white) wire (US Only) (see figure 5): 1. NOTE TO ELECTRICIAN: The armored cable leads...
... (white) wire, the appliance frame MUST NOT be connected to larger gauge household wiring. Disconnect the power supply. 2. ELECTRIC WALL OVEN INSTALLATION INSTRUCTIONS (If your appliance is equipped with a white neutral conductor.) This appliance is manufactured with the appliance are UL-recognized... for or making inquires about your oven, always be sure to the neutral (white) wire (US Only) (see figure 5): 1. NOTE TO ELECTRICIAN: The armored cable leads...

Installation Instructions (All Languages)
Page 6
...the appliance to locate the appliance mounting screw holes. MOUNTING SCREW DECORATIVE TRIM (VENTILATION) MOUNTING SCREW Figure 7 B. 30", Single and Double Ovens The wall oven can also be used ). The door may be used as a template to the cabinet. The mounting brackets supplied with the lower mounting holes... on the decorative trim (ventilation) (taped to the oven side panel) with the wall oven must be removed to persons. Open the door to remove the screws, located at the upper end of the...
...the appliance to locate the appliance mounting screw holes. MOUNTING SCREW DECORATIVE TRIM (VENTILATION) MOUNTING SCREW Figure 7 B. 30", Single and Double Ovens The wall oven can also be used ). The door may be used as a template to the cabinet. The mounting brackets supplied with the lower mounting holes... on the decorative trim (ventilation) (taped to the oven side panel) with the wall oven must be removed to persons. Open the door to remove the screws, located at the upper end of the...

Installation Instructions (All Languages)
Page 7
... mounting brackets using the 2 screws supplied (#10 x 1 1/4" long). To reduce the risk of personal injury and tipping the wall oven, the wall oven must be capable of the cabinet opening in place using the 2 screws removed earlier from left side filler panel, to route armored... 1/2" (11.4 cm) Max. 36" Min. (91.4 cm) H F Use 3/4" (1.9 cm) plywood, installed on the cabinet and drill 1/8" pilot holes. ELECTRIC WALL OVEN INSTALLATION INSTRUCTIONS 3.Insert the unit into the cabinet opening to 28 1/2" (72.4 cm). Reposition each bracket on two runners, flush with toe plate. If needed...
... mounting brackets using the 2 screws supplied (#10 x 1 1/4" long). To reduce the risk of personal injury and tipping the wall oven, the wall oven must be capable of the cabinet opening in place using the 2 screws removed earlier from left side filler panel, to route armored... 1/2" (11.4 cm) Max. 36" Min. (91.4 cm) H F Use 3/4" (1.9 cm) plywood, installed on the cabinet and drill 1/8" pilot holes. ELECTRIC WALL OVEN INSTALLATION INSTRUCTIONS 3.Insert the unit into the cabinet opening to 28 1/2" (72.4 cm). Reposition each bracket on two runners, flush with toe plate. If needed...

Installation Instructions (All Languages)
Page 8
..., it is opened during the preheat portion of the functions has been factory checked before shipping. Use wood shims under the wall oven to run after the oven has been operating at high temperatures. The fan will turn. Refer to the "Owner's Guide" or to BROIL, the upper...cleaning cycle, the upper element should become red during convection baking or roasting. Please call or write if you have a double cavity wall oven. ELECTRIC WALL OVEN INSTALLATION INSTRUCTIONS 6. If the level indicates that you time and expense. The convection fan will become red. Clean-When the...
..., it is opened during the preheat portion of the functions has been factory checked before shipping. Use wood shims under the wall oven to run after the oven has been operating at high temperatures. The fan will turn. Refer to the "Owner's Guide" or to BROIL, the upper...cleaning cycle, the upper element should become red during convection baking or roasting. Please call or write if you have a double cavity wall oven. ELECTRIC WALL OVEN INSTALLATION INSTRUCTIONS 6. If the level indicates that you time and expense. The convection fan will become red. Clean-When the...

Product Specifications Sheet (English)
Page 2
...: For planning purposes only. Always consult local and national electric codes. Single Electric Wall Frigidaire Baseline OveSninsgle Wall FFEW2425L S Oven 24" Electric Features Oven Control / Timing System Window Exterior Door Finish Handle Design Oven Cleaning System Ready-Select™ Large Stainless Steel Black Self Clean Oven Controls Bake / Broil Convection Conversion Convection Bake / Broil / Roast Quick Bake Convection...
...: For planning purposes only. Always consult local and national electric codes. Single Electric Wall Frigidaire Baseline OveSninsgle Wall FFEW2425L S Oven 24" Electric Features Oven Control / Timing System Window Exterior Door Finish Handle Design Oven Cleaning System Ready-Select™ Large Stainless Steel Black Self Clean Oven Controls Bake / Broil Convection Conversion Convection Bake / Broil / Roast Quick Bake Convection...


