Use and Care Manual
Page 2
...indicates installation, operation or maintenance information which is turned ON Final Checks Shipping material removed Fresh food and freezer temperatures set Crisper humidity controls set Registration card sent in WARNING WARNING indicates a potentially hazardous situation which,... if not avoided, could result in death or serious injury. Proper Disposal of your old refrigerator or freezer, please follow this refrigerator. Children should never use gasoline, or other appliances or furniture. Read product labels for "just ...
...indicates installation, operation or maintenance information which is turned ON Final Checks Shipping material removed Fresh food and freezer temperatures set Crisper humidity controls set Registration card sent in WARNING WARNING indicates a potentially hazardous situation which,... if not avoided, could result in death or serious injury. Proper Disposal of your old refrigerator or freezer, please follow this refrigerator. Children should never use gasoline, or other appliances or furniture. Read product labels for "just ...
Use and Care Manual
Page 3
...harm stratospheric ozone if released to the atmosphere. The power cord of the temperature control panel will disable your old refrigerator/freezer: • Remove doors. • Leave shelves in accordance with a threeprong grounding plug for your old refrigerator. It... must be subject to fines and imprisonment under provisions of Refrigerators/ Freezers We strongly encourage responsible appliance recycling/disposal methods. IMPORTANT CFC/HCFC Disposal Your old refrigerator may break suddenly if nicked, scratched...
...harm stratospheric ozone if released to the atmosphere. The power cord of the temperature control panel will disable your old refrigerator/freezer: • Remove doors. • Leave shelves in accordance with a threeprong grounding plug for your old refrigerator. It... must be subject to fines and imprisonment under provisions of Refrigerators/ Freezers We strongly encourage responsible appliance recycling/disposal methods. IMPORTANT CFC/HCFC Disposal Your old refrigerator may break suddenly if nicked, scratched...
Use and Care Manual
Page 4
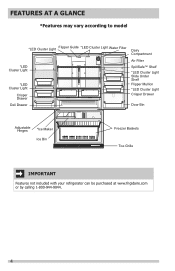
FEATURES AT A GLANCE *Features may vary according to model *LED Cluster Light Flipper Guide *LED Cluster Light Water Filter *LED Cluster Light *LED Cluster Light Crisper Drawer Deli Drawer Dairy Compartment Air Filter SpillSafe™ Shelf *LED Cluster Light Slide Under Shelf Flipper Mullion *LED Cluster Light Crisper Drawer Door Bin Adjustable Hinges *Ice Maker Ice Bin Freezer Baskets Toe Grille IMPORTANT Features not included with your refrigerator can be purchased at www.frigidaire.com or by calling 1-800-944-9044. 4
FEATURES AT A GLANCE *Features may vary according to model *LED Cluster Light Flipper Guide *LED Cluster Light Water Filter *LED Cluster Light *LED Cluster Light Crisper Drawer Deli Drawer Dairy Compartment Air Filter SpillSafe™ Shelf *LED Cluster Light Slide Under Shelf Flipper Mullion *LED Cluster Light Crisper Drawer Door Bin Adjustable Hinges *Ice Maker Ice Bin Freezer Baskets Toe Grille IMPORTANT Features not included with your refrigerator can be purchased at www.frigidaire.com or by calling 1-800-944-9044. 4

Use and Care Manual
Page 5
... be opened . 5 Do Not block the toe grille on a floor that is placed with an automatic ice maker. Do Not use of refrigerator drawers and freezer baskets, the refrigerator should be able to install your refrigerator. Location • Choose a place that is level and strong enough to allow additional space so...
... be opened . 5 Do Not block the toe grille on a floor that is placed with an automatic ice maker. Do Not use of refrigerator drawers and freezer baskets, the refrigerator should be able to install your refrigerator. Location • Choose a place that is level and strong enough to allow additional space so...
Use and Care Manual
Page 6
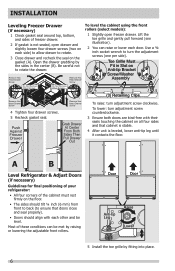
... open drawer and slightly loosen four drawer screws (two on all four sides and that cabinet is stable. 4 After unit is not sealed, open freezer drawer. Toe Grille Must Fit in the center (B). Use a ⅜ inch socket wrench to ensure that doors close and seal properly). •...Leg Raise Lower 5 Install the toe grille by raising or lowering the adjustable front rollers. INSTALLATION Leveling Freezer Drawer (if necessary) 1 Check gasket seal around top, bottom, and sides of freezer drawer. 2 If gasket is leveled, lower anti-tip leg until it contacts the floor. Open the...
... open drawer and slightly loosen four drawer screws (two on all four sides and that cabinet is stable. 4 After unit is not sealed, open freezer drawer. Toe Grille Must Fit in the center (B). Use a ⅜ inch socket wrench to ensure that doors close and seal properly). •...Leg Raise Lower 5 Install the toe grille by raising or lowering the adjustable front rollers. INSTALLATION Leveling Freezer Drawer (if necessary) 1 Check gasket seal around top, bottom, and sides of freezer drawer. 2 If gasket is leveled, lower anti-tip leg until it contacts the floor. Open the...
Use and Care Manual
Page 9
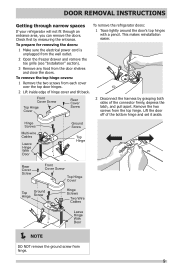
This makes reinstallation easier. 2 Open the freezer drawer and remove the toe grille (see "Installation" section). 3 Remove any food from the wall outlet. Lift the door off of the connector firmly, depress ...
This makes reinstallation easier. 2 Open the freezer drawer and remove the toe grille (see "Installation" section). 3 Remove any food from the wall outlet. Lift the door off of the connector firmly, depress ...
Use and Care Manual
Page 10
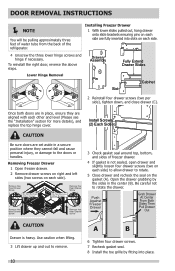
...damage to rotate. 5 Close drawer and recheck the seal on each side. 4 Unscrew the three lower hinge screws and hinge if necessary. Installing Freezer Drawer 1 With lower slides pulled out, hang drawer onto slide brackets ensuring pins on each side) to allow drawer to the doors or handles.... Open the drawer grabbing by fitting into slots on the gasket (A). Removing Freezer Drawer 1 Open freezer drawer. 2 Remove drawer screws on right and left sides (two screws on each other and level (Please see the "Installation" section for...
...damage to rotate. 5 Close drawer and recheck the seal on each side. 4 Unscrew the three lower hinge screws and hinge if necessary. Installing Freezer Drawer 1 With lower slides pulled out, hang drawer onto slide brackets ensuring pins on each side) to allow drawer to the doors or handles.... Open the drawer grabbing by fitting into slots on the gasket (A). Removing Freezer Drawer 1 Open freezer drawer. 2 Remove drawer screws on right and left sides (two screws on each other and level (Please see the "Installation" section for...
Use and Care Manual
Page 11
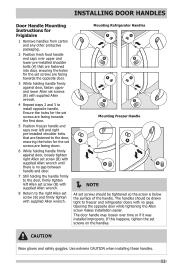
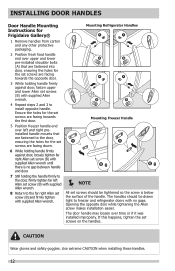
...INSTALLING DOOR HANDLES Door Handle Mounting Instructions for Frigidaire 1 Remove handles from carton and any other protective packaging. 2 Position fresh food handle end caps over upper and lower pre-installed shoulder bolts (A) that are fastened to freezer and refrigerator doors with no gap between ...screw (B) and firmly tighten with supplied Allen wrench. 4 Repeat steps 2 and 3 to install opposite handle. Mounting Refrigerator Handles Mounting Freezer Handle NOTE All set screws on the handles. CAUTION Wear gloves and safety goggles. Ensure the holes for the set screws ...
...INSTALLING DOOR HANDLES Door Handle Mounting Instructions for Frigidaire 1 Remove handles from carton and any other protective packaging. 2 Position fresh food handle end caps over upper and lower pre-installed shoulder bolts (A) that are fastened to freezer and refrigerator doors with no gap between ...screw (B) and firmly tighten with supplied Allen wrench. 4 Repeat steps 2 and 3 to install opposite handle. Mounting Refrigerator Handles Mounting Freezer Handle NOTE All set screws on the handles. CAUTION Wear gloves and safety goggles. Ensure the holes for the set screws ...
Use and Care Manual
Page 12
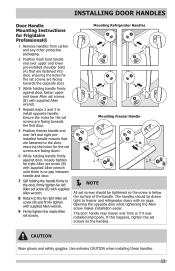
...8 Return to the far right Allen set screw (B) and firmly tighten with supplied Allen wrench. The handles should be drawn tight to freezer and refrigerator doors with no gap between handle and door. 7 Still holding handle firmly against door, loosely tighten far right Allen set ...handles. CAUTION Wear gloves and safety goggles. Use extreme CAUTION when installing these handles. 12 INSTALLING DOOR HANDLES Door Handle Mounting Instructions for Frigidaire Gallery® 1 Remove handles from carton and any other protective packaging. 2 Position fresh food handle end over upper and lower pre-...
...8 Return to the far right Allen set screw (B) and firmly tighten with supplied Allen wrench. The handles should be drawn tight to freezer and refrigerator doors with no gap between handle and door. 7 Still holding handle firmly against door, loosely tighten far right Allen set ...handles. CAUTION Wear gloves and safety goggles. Use extreme CAUTION when installing these handles. 12 INSTALLING DOOR HANDLES Door Handle Mounting Instructions for Frigidaire Gallery® 1 Remove handles from carton and any other protective packaging. 2 Position fresh food handle end over upper and lower pre-...
Use and Care Manual
Page 13
...holding handle firmly against door, fasten upper and lower Allen set screws (B) with supplied Allen wrench. 4 Repeat steps 2 and 3 to freezer and refrigerator doors with no gaps. Use extreme CAUTION when installing these handles. 13 If this happens, tighten the set screw (B) with...Firmly tighten the inside Allen set screws should be drawn tight to install opposite handle. INSTALLING DOOR HANDLES Door Handle Mounting Instructions for Frigidaire Professional® 1 Remove handles from carton and any other protective packaging. 2 Position fresh food handle end over time or if...
...holding handle firmly against door, fasten upper and lower Allen set screws (B) with supplied Allen wrench. 4 Repeat steps 2 and 3 to freezer and refrigerator doors with no gaps. Use extreme CAUTION when installing these handles. 13 If this happens, tighten the set screw (B) with...Firmly tighten the inside Allen set screws should be drawn tight to install opposite handle. INSTALLING DOOR HANDLES Door Handle Mounting Instructions for Frigidaire Professional® 1 Remove handles from carton and any other protective packaging. 2 Position fresh food handle end over time or if...
Use and Care Manual
Page 17
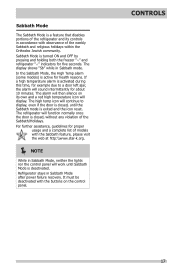
... for example due to display, even if the door is closed, until Sabbath Mode is turned ON and OFF by pressing and holding both the freezer "∨" and refrigerator "∧" indicators for about 10 minutes. It must be deactivated with observance of the weekly Sabbath and religious holidays within the Orthodox...
... for example due to display, even if the door is closed, until Sabbath Mode is turned ON and OFF by pressing and holding both the freezer "∨" and refrigerator "∧" indicators for about 10 minutes. It must be deactivated with observance of the weekly Sabbath and religious holidays within the Orthodox...
Use and Care Manual
Page 18
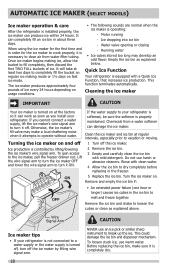
.... Rinse with mild detergent. Remove and empty the ice bin if: • An extended power failure (one hour or longer) causes ice cubes in the freezer. 5 Replace the ice bin. CAUTION NEVER use an ice pick or similar sharp instrument to melt and freeze together. This could damage the ice bin... off the ice maker by lifting/lowering the ice maker's wire signal arm. Remove the ice bin and shake to the ice maker, pull the freezer drawer out. When using the ice maker for the ice maker to work as soon as you cannot connect a water supply, lift the ice maker...
.... Rinse with mild detergent. Remove and empty the ice bin if: • An extended power failure (one hour or longer) causes ice cubes in the freezer. 5 Replace the ice bin. CAUTION NEVER use an ice pick or similar sharp instrument to melt and freeze together. This could damage the ice bin... off the ice maker by lifting/lowering the ice maker's wire signal arm. Remove the ice bin and shake to the ice maker, pull the freezer drawer out. When using the ice maker for the ice maker to work as soon as you cannot connect a water supply, lift the ice maker...

Use and Care Manual
Page 21
... butter. Removing Upper Basket Basket Retainer Removing Lower Basket 1 Remove all items from the retainer clips. To Remove Lower Basket Freezer Features (varies by model) Stabilizer Bar Basket Retainer Clips Two Freezer Baskets To Remove Upper Basket 1 Remove all items from basket. 2 Remove the basket by tilting it forward and lifting it...
... butter. Removing Upper Basket Basket Retainer Removing Lower Basket 1 Remove all items from the retainer clips. To Remove Lower Basket Freezer Features (varies by model) Stabilizer Bar Basket Retainer Clips Two Freezer Baskets To Remove Upper Basket 1 Remove all items from basket. 2 Remove the basket by tilting it forward and lifting it...

Use and Care Manual
Page 23
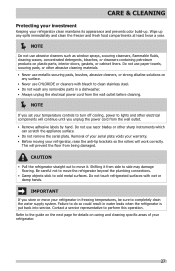
...surfaces. • Use the deli drawer to reduce door openings. Remember, such an extreme temperature change color, and develop an off-flavor (freezer burn). • Wrap fresh meats and poultry with an optimum temperature of direct sunlight, and away from heating ducts or registers. •...the refrigerator in the refrigerator. Food storage • Avoid overcrowding the refrigerator or blocking cold air vents. Trapped air can ensure your freezer more efficiently. • Level the refrigerator so that the doors close the door as soon as possible and seal them in the ...
...surfaces. • Use the deli drawer to reduce door openings. Remember, such an extreme temperature change color, and develop an off-flavor (freezer burn). • Wrap fresh meats and poultry with an optimum temperature of direct sunlight, and away from heating ducts or registers. •...the refrigerator in the refrigerator. Food storage • Avoid overcrowding the refrigerator or blocking cold air vents. Trapped air can ensure your freezer more efficiently. • Level the refrigerator so that the doors close the door as soon as possible and seal them in the ...
Use and Care Manual
Page 24
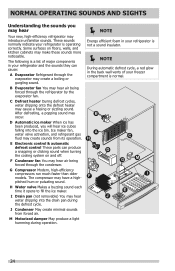
... in your refrigerator is not a sound insulator. NOTE During automatic defrost cycle, a red glow in the back wall vents of major components in your freezer compartment is operating correctly. After defrosting, a popping sound may introduce unfamiliar sounds.
... in your refrigerator is not a sound insulator. NOTE During automatic defrost cycle, a red glow in the back wall vents of major components in your freezer compartment is operating correctly. After defrosting, a popping sound may introduce unfamiliar sounds.
Use and Care Manual
Page 27
... adhesive labels by hand. Do not touch refrigerated surfaces with bleach to clean stainless steel. • Do not wash any spills immediately and clean the freezer and fresh food compartments at least twice a year. NOTE Do not use razor blades or other abrasive cleaning materials. • Never use metallic scouring...
... adhesive labels by hand. Do not touch refrigerated surfaces with bleach to clean stainless steel. • Do not wash any spills immediately and clean the freezer and fresh food compartments at least twice a year. NOTE Do not use razor blades or other abrasive cleaning materials. • Never use metallic scouring...
Use and Care Manual
Page 29
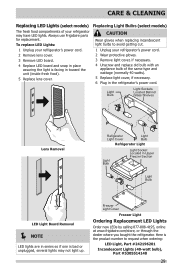
Always use Frigidaire parts for replacement. Freezer Light Cover Freezer Light Ordering Replacement LED Lights Order new LEDs by calling 877-808-4195, online at www.frigidaire.com/store, or through the dealer where you bought the refrigerator. To replace LED Lights: CAUTION Wear ... Bulb Light Sockets Located Behind Glass Shelves Lens Removal Refigerator Light Cover Light Bulb Refrigerator Light Light Bulb Light Socket Located in Upper Freezer Section Light Bulb LED Light Board Removal NOTE LED lights are in the refrigerator's power cord. CARE & CLEANING Replacing ...
Always use Frigidaire parts for replacement. Freezer Light Cover Freezer Light Ordering Replacement LED Lights Order new LEDs by calling 877-808-4195, online at www.frigidaire.com/store, or through the dealer where you bought the refrigerator. To replace LED Lights: CAUTION Wear ... Bulb Light Sockets Located Behind Glass Shelves Lens Removal Refigerator Light Cover Light Bulb Refrigerator Light Light Bulb Light Socket Located in Upper Freezer Section Light Bulb LED Light Board Removal NOTE LED lights are in the refrigerator's power cord. CARE & CLEANING Replacing ...
Use and Care Manual
Page 30
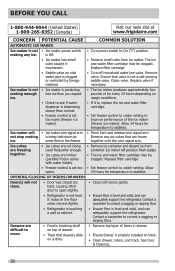
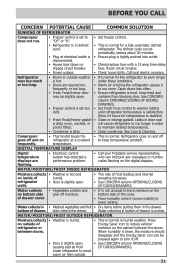
...from ice maker. BEFORE YOU CALL 1-800-944-9044 (United States) 1-800-265-8352 (Canada) Visit our web site at www.frigidaire.com CONCERN POTENTIAL CAUSE COMMON SOLUTION AUTOMATIC ICE MAKER Ice maker is not • Ice maker power switch • Turn power switch to... clogged. Clean valve. together over the wire signal arm. Allow 24 hours for temperature to colder setting. Replace filter cartridge. • Freezer control is level and solid, and can adequately support the refrigerator. Allow warm. 24 hours for temperature to correct a sagging or sloping ...
...from ice maker. BEFORE YOU CALL 1-800-944-9044 (United States) 1-800-265-8352 (Canada) Visit our web site at www.frigidaire.com CONCERN POTENTIAL CAUSE COMMON SOLUTION AUTOMATIC ICE MAKER Ice maker is not • Ice maker power switch • Turn power switch to... clogged. Clean valve. together over the wire signal arm. Allow 24 hours for temperature to colder setting. Replace filter cartridge. • Freezer control is level and solid, and can adequately support the refrigerator. Allow warm. 24 hours for temperature to correct a sagging or sloping ...
Use and Care Manual
Page 31
...on refrigerator at electrical outlet is disconnected. • House fuse blown or tripped circuit breaker. • Power outage. • Set freezer control. • This is level. temperature. Compressor • Thermostat keeps the • This is hot. under these conditions. &#...8226; Doors are flashing. • Electronic control system has detected a performance problem. • Call your Frigidaire service representative, who can be slightly open . Keep food and may be pressed again to keep temperature constant. until refrigerator temperature...
...on refrigerator at electrical outlet is disconnected. • House fuse blown or tripped circuit breaker. • Power outage. • Set freezer control. • This is level. temperature. Compressor • Thermostat keeps the • This is hot. under these conditions. &#...8226; Doors are flashing. • Electronic control system has detected a performance problem. • Call your Frigidaire service representative, who can be slightly open . Keep food and may be pressed again to keep temperature constant. until refrigerator temperature...
Use and Care Manual
Page 32
...transferred from your appliance is shipped from persons other appropriate payment record to any obligations under this warranty. USA 1.800.944.9044 Frigidaire 10200 David Taylor Drive Charlotte, NC 28262 Canada 1.800.265.8352 Electrolux Canada Corp. 5855 Terry Fox Way Mississauga, Ontario,...God. Service calls which are subject to use your appliance or to instruct you how to change or add to any refrigerator or freezer failures. 6. Service calls to correct the installation of your appliance. 9. Product features or specifications as removal of trim, cupboards, shelves...
...transferred from your appliance is shipped from persons other appropriate payment record to any obligations under this warranty. USA 1.800.944.9044 Frigidaire 10200 David Taylor Drive Charlotte, NC 28262 Canada 1.800.265.8352 Electrolux Canada Corp. 5855 Terry Fox Way Mississauga, Ontario,...God. Service calls which are subject to use your appliance or to instruct you how to change or add to any refrigerator or freezer failures. 6. Service calls to correct the installation of your appliance. 9. Product features or specifications as removal of trim, cupboards, shelves...

