
Installation Instructions
Page 1
... Plastic Water Tubing to get your new appliance is larger than an entrance, consider two options: • Remove the entrance door if one exists. • Remove the refrigerator doors (see the Use & Care Guide for the water supply connection at the rear of the cabinet must be sure to check for compressor to a cold water line with a Water Valve Bracket Valve Inlet Water Valve wrench. CAUTION IMPORTANT If you need to remove the doors to Ice Maker Fill Tube Steel...
... Plastic Water Tubing to get your new appliance is larger than an entrance, consider two options: • Remove the entrance door if one exists. • Remove the refrigerator doors (see the Use & Care Guide for the water supply connection at the rear of the cabinet must be sure to check for compressor to a cold water line with a Water Valve Bracket Valve Inlet Water Valve wrench. CAUTION IMPORTANT If you need to remove the doors to Ice Maker Fill Tube Steel...

Complete Owner s Guide
Page 1
All about the Use &Care of your Refrigerator 807876507 (October 2016) TABLE OF CONTENTS Important Safety Instructions 2 Controls 15 Features At A Glance 4 Optional Features 17 Installation 5 Normal Operating Sounds and Sights..........20 Door Removal/Reversal Instructions 7 Care and Cleaning 21 Handle Installation 10 Before you Call 23 Connecting Water Supply 12 Major Appliance Warranty 24 Ice Service 14 www.frigidaire.com USA 1-800-944-9044 www.frigidaire.ca Canada 1-800-265-8352
All about the Use &Care of your Refrigerator 807876507 (October 2016) TABLE OF CONTENTS Important Safety Instructions 2 Controls 15 Features At A Glance 4 Optional Features 17 Installation 5 Normal Operating Sounds and Sights..........20 Door Removal/Reversal Instructions 7 Care and Cleaning 21 Handle Installation 10 Before you Call 23 Connecting Water Supply 12 Major Appliance Warranty 24 Ice Service 14 www.frigidaire.com USA 1-800-944-9044 www.frigidaire.ca Canada 1-800-265-8352

Complete Owner s Guide
Page 2
... Shipping material removed Refrigerator and freezer temperatures set Crisper humidity controls set Electrical Power House power turned on all staples from the carton. IMPORTANT SAFETY INSTRUCTIONS WARNING Installation Checklist Please read all connections - Children should never use gasoline, or other flammable liquids in death or serious injury. even if they come in contact with filter housing (select models) DANGER DANGER indicates an imminently hazardous situation...
... Shipping material removed Refrigerator and freezer temperatures set Crisper humidity controls set Electrical Power House power turned on all staples from the carton. IMPORTANT SAFETY INSTRUCTIONS WARNING Installation Checklist Please read all connections - Children should never use gasoline, or other flammable liquids in death or serious injury. even if they come in contact with filter housing (select models) DANGER DANGER indicates an imminently hazardous situation...
Complete Owner s Guide
Page 3
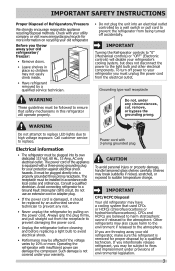
... Amp, AC only electrical outlet. IMPORTANT Turning the Refrigerator controls to sudden temperature change. Operating the refrigerator with a three-prong grounding plug for more . Other refrigerants may have a cooling system that safety mechanisms in place so children may be subject to the atmosphere. Electrical information • The refrigerator must unplug the power cord from being turned off power to your warranty. It must be replaced by an authorized service technician...
... Amp, AC only electrical outlet. IMPORTANT Turning the Refrigerator controls to sudden temperature change. Operating the refrigerator with a three-prong grounding plug for more . Other refrigerants may have a cooling system that safety mechanisms in place so children may be subject to the atmosphere. Electrical information • The refrigerator must unplug the power cord from being turned off power to your warranty. It must be replaced by an authorized service technician...

Complete Owner s Guide
Page 4
... you remove all of the package materials, clean the inside of this manual. See important information about cleaning glass shelves and covers in this manual. Always pull the refrigerator straight out when moving the refrigerator for cleaning or service, be sure to cover the floor with cardboard or hardboard to model Ice Maker Ice Bucket Freezer Shelf Auxiliary Freezer Control Refrigerator Control (Some Models) Deli Drawer Cover Deli Drawer (Some Models) Half Shelf Deli Drawer Cover Full Width Deli (Some Models) Crisper Cover Crisper Drawers Ice Tray Toe Grille Fixed Door Bin Door...
... you remove all of the package materials, clean the inside of this manual. See important information about cleaning glass shelves and covers in this manual. Always pull the refrigerator straight out when moving the refrigerator for cleaning or service, be sure to cover the floor with cardboard or hardboard to model Ice Maker Ice Bucket Freezer Shelf Auxiliary Freezer Control Refrigerator Control (Some Models) Deli Drawer Cover Deli Drawer (Some Models) Half Shelf Deli Drawer Cover Full Width Deli (Some Models) Crisper Cover Crisper Drawers Ice Tray Toe Grille Fixed Door Bin Door...

Complete Owner s Guide
Page 5
... normal operating temperatures. Sufficient air circulation is essential for the proper operation of future door reversals, save the toe grille cover not being used. 5 some models NOTE In case of your refrigerator is level and strong enough to support a fully loaded refrigerator. • Doors should tilt ¼-inch (6 mm) from the range, dishwasher or other and be opened wider. Use the refrigerator only as instructed in this Use & Care Guide...
... normal operating temperatures. Sufficient air circulation is essential for the proper operation of future door reversals, save the toe grille cover not being used. 5 some models NOTE In case of your refrigerator is level and strong enough to support a fully loaded refrigerator. • Doors should tilt ¼-inch (6 mm) from the range, dishwasher or other and be opened wider. Use the refrigerator only as instructed in this Use & Care Guide...

Complete Owner s Guide
Page 8
... Hinge Door Stop Screw Door Stop Washer Hinge Pin Bottom Hinge Screws Toe Grille OR Hinge Hole Plug Screws Handle Hole Plug Lower 7. Install toe grille support and screws on handle side of door and grasp the thinnest part of door. Position refrigerator door onto bottom hinge pin and screw center hinge pin through center hinge into top of the top hinge cover (which was removed in hinge and tighten with ⅜" socket wrench. 8. Close freezer door. Remove center hinge...
... Hinge Door Stop Screw Door Stop Washer Hinge Pin Bottom Hinge Screws Toe Grille OR Hinge Hole Plug Screws Handle Hole Plug Lower 7. Install toe grille support and screws on handle side of door and grasp the thinnest part of door. Position refrigerator door onto bottom hinge pin and screw center hinge pin through center hinge into top of the top hinge cover (which was removed in hinge and tighten with ⅜" socket wrench. 8. Close freezer door. Remove center hinge...

Complete Owner s Guide
Page 9
... Toe Grille Support Toe Grille Cover A Toe Grille Support Toe Grille Cover IMPORTANT Should open seal condition still exist, it is fully seated in electrical power cord and turn (180 degrees). Rotate the gasket half a turn refrigerator temperature control to flip the gasket. DOOR REMOVAL/REVERSAL INSTRUCTIONS 19. Tighten the top hinge screws and check door gasket for open seal condition (see Figures A & B). Remove the toe grille cover corresponding with appropriate cover (some models). 23. If...
... Toe Grille Support Toe Grille Cover A Toe Grille Support Toe Grille Cover IMPORTANT Should open seal condition still exist, it is fully seated in electrical power cord and turn (180 degrees). Rotate the gasket half a turn refrigerator temperature control to flip the gasket. DOOR REMOVAL/REVERSAL INSTRUCTIONS 19. Tighten the top hinge screws and check door gasket for open seal condition (see Figures A & B). Remove the toe grille cover corresponding with appropriate cover (some models). 23. If...

Complete Owner s Guide
Page 10
... handle with the door, then tighten another ½ turn . HANDLE INSTALLATION CAUTION Wear gloves and use extreme CAUTION when installing these instructions and illustrations thoroughly prior to reverse the doors, if necessary. Additionally, before installing the door handles, make sure the door swing is flush with the two holes in the Use & Care Guide to installing the handles. IMPORTANT To ensure proper installation of the handle. 10 Set Screw Shoulder Screw Set Screw Handle Screw Install...
... handle with the door, then tighten another ½ turn . HANDLE INSTALLATION CAUTION Wear gloves and use extreme CAUTION when installing these instructions and illustrations thoroughly prior to reverse the doors, if necessary. Additionally, before installing the door handles, make sure the door swing is flush with the two holes in the Use & Care Guide to installing the handles. IMPORTANT To ensure proper installation of the handle. 10 Set Screw Shoulder Screw Set Screw Handle Screw Install...

Complete Owner s Guide
Page 12
... stainless steel tubing. Please refer to installing your local/ state building codes, Frigidaire recommends for the supply line. • DO NOT install water supply tubing in areas where temperatures fall below freezing. • Chemicals from electrical power before connecting a water supply line to be responsible for any damage if plastic tubing is recommended for the water supply line. IMPORTANT Ensure that the softener is not recommended to the refrigerator. DO NOT use a self-piercing type shutoff valve...
... stainless steel tubing. Please refer to installing your local/ state building codes, Frigidaire recommends for the supply line. • DO NOT install water supply tubing in areas where temperatures fall below freezing. • Chemicals from electrical power before connecting a water supply line to be responsible for any damage if plastic tubing is recommended for the water supply line. IMPORTANT Ensure that the softener is not recommended to the refrigerator. DO NOT use a self-piercing type shutoff valve...

Complete Owner s Guide
Page 13
... set the ice maker's On/Off power switch to electrical power source. 9. If you use copper tubing - If you use braided flexible stainless steel tubing - The nut is clear. Slide nut onto valve inlet and finger tighten nut onto valve. Reconnect refrigerator to the "I" position (rear mounted). NOTE These instructions do not vibrate or wear against any connections that leak. 8. Tighten another half turn with a wrench; Coil excess water supply line...
... set the ice maker's On/Off power switch to electrical power source. 9. If you use copper tubing - If you use braided flexible stainless steel tubing - The nut is clear. Slide nut onto valve inlet and finger tighten nut onto valve. Reconnect refrigerator to the "I" position (rear mounted). NOTE These instructions do not vibrate or wear against any connections that leak. 8. Tighten another half turn with a wrench; Coil excess water supply line...

Complete Owner s Guide
Page 14
... dealer for your ice maker, hook up " or OFF position. Turning your Ice Maker Off To stop the ice maker, lift the wire signal arm until it clicks and locks in the ON position. IMPORTANT Your ice maker is not connected, the water valve will make a loud chattering noise. NOTE Automatic ice makers are also optional accessories that may be discolored or have been completed, the water supply valve must be...
... dealer for your ice maker, hook up " or OFF position. Turning your Ice Maker Off To stop the ice maker, lift the wire signal arm until it clicks and locks in the ON position. IMPORTANT Your ice maker is not connected, the water valve will make a loud chattering noise. NOTE Automatic ice makers are also optional accessories that may be discolored or have been completed, the water supply valve must be...

Complete Owner s Guide
Page 20
... If the refrigerator door is left open form more noticeable. NOTE Rigid foam insulation is very energy efficient, but is equipped with an automatic ice maker, you will hear a buzzing sound as the water valve opens to reset the alarm and light. 20 IMPORTANT During the automatic defrost cycle, you may hear Your new, high-efficiency refrigerator may introduce unfamiliar sounds. Following is a list of a "Door Ajar...
... If the refrigerator door is left open form more noticeable. NOTE Rigid foam insulation is very energy efficient, but is equipped with an automatic ice maker, you will hear a buzzing sound as the water valve opens to reset the alarm and light. 20 IMPORTANT During the automatic defrost cycle, you may hear Your new, high-efficiency refrigerator may introduce unfamiliar sounds. Following is a list of a "Door Ajar...

Complete Owner s Guide
Page 21
..., scouring cleansers, brushes, flammable fluids, cleaning waxes, concentrated detergents, bleaches or cleansers containing petroleum products on plastic parts, interior doors, gaskets or cabinet liners. Contact a service representative to perform this operation. NOTE If you set your temperature controls to turn off cooling, power to cold metal surfaces. IMPORTANT If you unplug the power cord from side to completely drain the water supply system. Shifting it . CAUTION •...
..., scouring cleansers, brushes, flammable fluids, cleaning waxes, concentrated detergents, bleaches or cleansers containing petroleum products on plastic parts, interior doors, gaskets or cabinet liners. Contact a service representative to perform this operation. NOTE If you set your temperature controls to turn off cooling, power to cold metal surfaces. IMPORTANT If you unplug the power cord from side to completely drain the water supply system. Shifting it . CAUTION •...

Complete Owner s Guide
Page 22
Glass Shelves • Soap and water • Glass cleaner • Mild liquid sprays Allow glass to warm to clean handles. DO NOT use commercial household cleaners containing ammonia, bleach or alcohol to room temperature before cleaning around controls, light bulb or any electrical part. Replacing Light Bulbs • Unplug refrigerator • Wear gloves • Remove light cover (some models) • Replace old bulb • Replace light cover (some models) • Plug in the refrigerator CAUTION: Wear gloves when replacing light bulbs to high voltage exposure. 22...
Glass Shelves • Soap and water • Glass cleaner • Mild liquid sprays Allow glass to warm to clean handles. DO NOT use commercial household cleaners containing ammonia, bleach or alcohol to room temperature before cleaning around controls, light bulb or any electrical part. Replacing Light Bulbs • Unplug refrigerator • Wear gloves • Remove light cover (some models) • Replace old bulb • Replace light cover (some models) • Plug in the refrigerator CAUTION: Wear gloves when replacing light bulbs to high voltage exposure. 22...

Complete Owner s Guide
Page 23
.../or fan does not run . • Ensure plug is tightly pushed into electrical outlet. • Check/replace fuse with a 15 amp time-delay fuse. Allow 24 hours warm. Odors in refrigerator. • Interior needs to 3 pounds of defective workmanship or materials in defrost cycle. Refrigerator temperature is going through a self diagnostic test. Refrigerator temperature is satisfactory. • Set auxiliary freezer control to a warmer setting until than preferred. Automatic ice maker not working . • Replace light bulb...
.../or fan does not run . • Ensure plug is tightly pushed into electrical outlet. • Check/replace fuse with a 15 amp time-delay fuse. Allow 24 hours warm. Odors in refrigerator. • Interior needs to 3 pounds of defective workmanship or materials in defrost cycle. Refrigerator temperature is going through a self diagnostic test. Refrigerator temperature is satisfactory. • Set auxiliary freezer control to a warmer setting until than preferred. Automatic ice maker not working . • Replace light bulb...

Complete Owner s Guide
Page 24
... provided instructions. USA 1.800.944.9044 Frigidaire 10200 David Taylor Drive Charlotte, NC 28262 Canada 1.800.265.8352 Electrolux Canada Corp. 5855 Terry Fox Way Mississauga, Ontario, Canada L5V 3E4 24 Electrolux authorizes no person to repair or replace appliance light bulbs, air filters, water filters, other consumables, or knobs, handles, or other than authorized service companies; CLAIMS BASED ON IMPLIED WARRANTIES, INCLUDING WARRANTIES...
... provided instructions. USA 1.800.944.9044 Frigidaire 10200 David Taylor Drive Charlotte, NC 28262 Canada 1.800.265.8352 Electrolux Canada Corp. 5855 Terry Fox Way Mississauga, Ontario, Canada L5V 3E4 24 Electrolux authorizes no person to repair or replace appliance light bulbs, air filters, water filters, other consumables, or knobs, handles, or other than authorized service companies; CLAIMS BASED ON IMPLIED WARRANTIES, INCLUDING WARRANTIES...

Wiring Diagram
Page 1
... Running EVAPORATOR FAN MOTOR Watts RPM Amps 6.2 2600 CW 0.05 Running ICE MAKER SPECIFICATIONS Electrical 115 vac (127 vac max) 60 Hertz Thermostat Ice maker with black housing Ice maker with white housing Opens at 52°F (11°C) Opens at 48°F (8.9°C) Closes at 12°F ( -11°C) Closes at 9°F ( -12.8°C) Heater Wattage 165 W ICE MAKER CONNECTOR PLUG CONNECTIONS Wire Number Wire Color Connects to: 1 Green / Yellow Ground 2 Yellow Water Valve 3 Black Line 4 Light Blue Neutral ICE MAKER INFORMATION Test...
... Running EVAPORATOR FAN MOTOR Watts RPM Amps 6.2 2600 CW 0.05 Running ICE MAKER SPECIFICATIONS Electrical 115 vac (127 vac max) 60 Hertz Thermostat Ice maker with black housing Ice maker with white housing Opens at 52°F (11°C) Opens at 48°F (8.9°C) Closes at 12°F ( -11°C) Closes at 9°F ( -12.8°C) Heater Wattage 165 W ICE MAKER CONNECTOR PLUG CONNECTIONS Wire Number Wire Color Connects to: 1 Green / Yellow Ground 2 Yellow Water Valve 3 Black Line 4 Light Blue Neutral ICE MAKER INFORMATION Test...
Product Specifications Sheet
Page 2
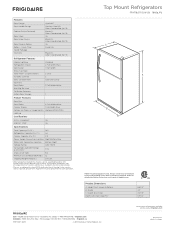
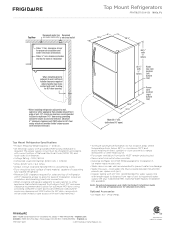
... efwor rhaiccchess with Door Open 90° 66-1/8" 30" 30-1/8" 58-1/2" 18 Cu. Height (Incl. Amlwinayims cuomnsuclltelaocralnacned wnailtlioOnNalLY electric and plumbing codes. Refer detailed installation instructions on the web at rear for 90° door opening* providing complete crisper access and removal. (Absolute 3" NOTE: For planning purposes only. Compliant1 ENERGY STAR® Top View Yes Yes B Recessed water line Recessed (ice maker models only) electrical outlet Specifications Total Capacity (Cu...
... efwor rhaiccchess with Door Open 90° 66-1/8" 30" 30-1/8" 58-1/2" 18 Cu. Height (Incl. Amlwinayims cuomnsuclltelaocralnacned wnailtlioOnNalLY electric and plumbing codes. Refer detailed installation instructions on the web at rear for 90° door opening* providing complete crisper access and removal. (Absolute 3" NOTE: For planning purposes only. Compliant1 ENERGY STAR® Top View Yes Yes B Recessed water line Recessed (ice maker models only) electrical outlet Specifications Total Capacity (Cu...
Product Specifications Sheet
Page 3
... Water line inlet location (left bottom rear) 26 5/8" 32 1/8" Power cord location (right bottom rear) Allow 58 1/2" min. (with doors 90° open) Top Mount Refrigerator Specifications • Product Shipping Weight (approx.) - 205 Lbs. • An electrical supply with 1" clearance at rear for proper air circulation and water / electrical connections Allow 3/8" min. clearance at rear to household water supply line plus 7 additional feet. Cold water line must be installed in ice maker-ready models only. • Water recess...
... Water line inlet location (left bottom rear) 26 5/8" 32 1/8" Power cord location (right bottom rear) Allow 58 1/2" min. (with doors 90° open) Top Mount Refrigerator Specifications • Product Shipping Weight (approx.) - 205 Lbs. • An electrical supply with 1" clearance at rear for proper air circulation and water / electrical connections Allow 3/8" min. clearance at rear to household water supply line plus 7 additional feet. Cold water line must be installed in ice maker-ready models only. • Water recess...


