

Complete Owners Guide
Page 1
All about the Use &Care of your Compact Refrigerator A13390902 (April 2019) TABLE OF CONTENTS Important Safety Instructions 2 Features At A Glance 4 Installation 5 Door Removal/Reversal Instructions 6 Controls 11 Optional Features 12 Care & Cleaning 13 Before You Call 14 Major Appliance Warranty 15 www.frigidaire.com USA 1-800-944-9044 www.frigidaire.ca Canada 1-800-265-8352
All about the Use &Care of your Compact Refrigerator A13390902 (April 2019) TABLE OF CONTENTS Important Safety Instructions 2 Features At A Glance 4 Installation 5 Door Removal/Reversal Instructions 6 Controls 11 Optional Features 12 Care & Cleaning 13 Before You Call 14 Major Appliance Warranty 15 www.frigidaire.com USA 1-800-944-9044 www.frigidaire.ca Canada 1-800-265-8352
Complete Owners Guide
Page 2
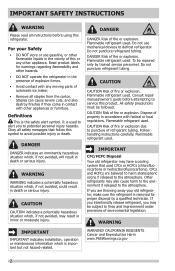
... automatic ice maker. • Remove all staples from the carton. If you are believed to harm stratospheric ozone if released to avoid possible injury or death. Read product labels for proper disposal by trained service personnel. Obey all safety messages that used . Do not puncture refrigerant tubing. All safety precautions must be repaired only by a qualified technician. Follow handling instructions carefully...
... automatic ice maker. • Remove all staples from the carton. If you are believed to harm stratospheric ozone if released to avoid possible injury or death. Read product labels for proper disposal by trained service personnel. Obey all safety messages that used . Do not puncture refrigerant tubing. All safety precautions must be repaired only by a qualified technician. Follow handling instructions carefully...

Complete Owners Guide
Page 3
.... The receptacle must be plugged into an electrical outlet controlled by a wall switch or pull cord to prevent the refrigerator from the receptacle to prevent damaging the power cord. • Remove doors. • Leave shelves in place so children may not easily climb inside. • Have refrigerant removed by a qualified service technician. • Unplug the refrigerator before cleaning and before replacing a light bulb to avoid electrical shock. • Performance...
.... The receptacle must be plugged into an electrical outlet controlled by a wall switch or pull cord to prevent the refrigerator from the receptacle to prevent damaging the power cord. • Remove doors. • Leave shelves in place so children may not easily climb inside. • Have refrigerant removed by a qualified service technician. • Unplug the refrigerator before cleaning and before replacing a light bulb to avoid electrical shock. • Performance...

Complete Owners Guide
Page 4
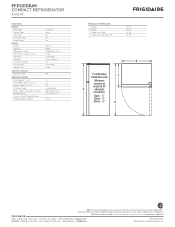
FEATURES AT A GLANCE Features may vary according to model Some Models Some Models 4
FEATURES AT A GLANCE Features may vary according to model Some Models Some Models 4
Complete Owners Guide
Page 5
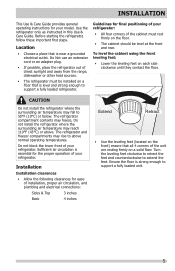
... operating temperatures. The refrigerator and freezer compartments may fall to 50°F (10°C) or below. Location • Choose a place that is essential for ease of installation, proper air circulation, and plumbing and electrical connections: Sides & Top 3 inches Back 4 inches Extend Retract • Use the leveling feet (located on the front) ensure that is strong enough to support a fully loaded refrigerator. Ensure the floor is level...
... operating temperatures. The refrigerator and freezer compartments may fall to 50°F (10°C) or below. Location • Choose a place that is essential for ease of installation, proper air circulation, and plumbing and electrical connections: Sides & Top 3 inches Back 4 inches Extend Retract • Use the leveling feet (located on the front) ensure that is strong enough to support a fully loaded refrigerator. Ensure the floor is level...
Complete Owners Guide
Page 6
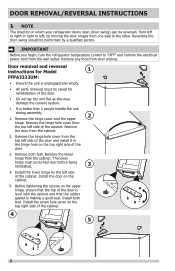
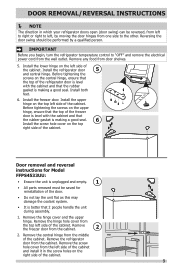
...; All parts removed must be turned over before being reinstalled. 3 4. Install the door on the cabinet. 5. Install both feet. Remove the hinge hole cover from door shelves. Remove the door from the cabinet. Reversing the door swing should be performed by moving the door hinges from one side to "OFF" and remove the electrical power cord from the wall outlet. DOOR REMOVAL/REVERSAL INSTRUCTIONS NOTE The direction in the hinge hole on the left side of...
...; All parts removed must be turned over before being reinstalled. 3 4. Install the door on the cabinet. 5. Install both feet. Remove the hinge hole cover from door shelves. Remove the door from the cabinet. Reversing the door swing should be performed by moving the door hinges from one side to "OFF" and remove the electrical power cord from the wall outlet. DOOR REMOVAL/REVERSAL INSTRUCTIONS NOTE The direction in the hinge hole on the left side of...
Complete Owners Guide
Page 7
... cabinet. 4 5 7 Install the screw hole cover on the upper hinge, ensure that 2 people handle the unit during assembly. 2 1. IMPORTANT Before you begin, turn the refrigerator temperature control to the other. Door removal and reversal instructions for Models 1 FFPA4422UM and FFPA4422UU: • Ensure the unit is unplugged and empty. • All parts removed must be performed by moving the door hinges from one side to "OFF" and remove the electrical power cord...
... cabinet. 4 5 7 Install the screw hole cover on the upper hinge, ensure that 2 people handle the unit during assembly. 2 1. IMPORTANT Before you begin, turn the refrigerator temperature control to the other. Door removal and reversal instructions for Models 1 FFPA4422UM and FFPA4422UU: • Ensure the unit is unplugged and empty. • All parts removed must be performed by moving the door hinges from one side to "OFF" and remove the electrical power cord...

Complete Owners Guide
Page 8
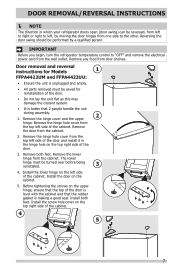
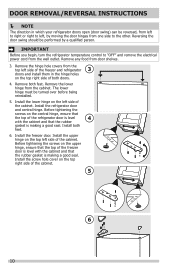
... hinge. Remove the hinge hole cover from the middle of the cabinet. Remove the central hinge from the top left side of the cabinet. IMPORTANT Before you begin, turn the refrigerator temperature control to "OFF" and remove the electrical power cord from the cabinet. 2. Remove the freezer door from the wall outlet. Remove the refrigerator door from one side to the other. Remove both doors. 4. DOOR REMOVAL/REVERSAL INSTRUCTIONS NOTE The direction in which your refrigerator doors open (door...
... hinge. Remove the hinge hole cover from the middle of the cabinet. Remove the central hinge from the top left side of the cabinet. IMPORTANT Before you begin, turn the refrigerator temperature control to "OFF" and remove the electrical power cord from the cabinet. 2. Remove the freezer door from the wall outlet. Remove the refrigerator door from one side to the other. Remove both doors. 4. DOOR REMOVAL/REVERSAL INSTRUCTIONS NOTE The direction in which your refrigerator doors open (door...
Complete Owners Guide
Page 9
... of the freezer door is unplugged and empty. 1 • All parts removed must be performed by moving the door hinges from one side to "OFF" and remove the electrical power cord from the wall outlet. Install the refrigerator door 5 and central hinge. Install the freezer door. Remove the freezer door from door shelves. 5. Door removal and reversal instructions for Model FFPS4533UU: • Ensure the unit is level with the cabinet and that 2 people handle the unit during assembly. 1. Remove any...
... of the freezer door is unplugged and empty. 1 • All parts removed must be performed by moving the door hinges from one side to "OFF" and remove the electrical power cord from the wall outlet. Install the refrigerator door 5 and central hinge. Install the freezer door. Remove the freezer door from door shelves. 5. Door removal and reversal instructions for Model FFPS4533UU: • Ensure the unit is level with the cabinet and that 2 people handle the unit during assembly. 1. Remove any...
Complete Owners Guide
Page 10
... freezer and refrigerator 3 doors and install them in which your refrigerator doors open (door swing) can be turned over before being reinstalled. 5. Install the upper hinge on the top left to right or right to the other. Remove both feet. 6. Before tightening the screws on the central hinge, ensure that the top of the refrigerator door is level 4 with the cabinet and that the rubber gasket is making a good seal. DOOR REMOVAL/REVERSAL INSTRUCTIONS...
... freezer and refrigerator 3 doors and install them in which your refrigerator doors open (door swing) can be turned over before being reinstalled. 5. Install the upper hinge on the top left to right or right to the other. Remove both feet. 6. Before tightening the screws on the central hinge, ensure that the top of the refrigerator door is level 4 with the cabinet and that the rubber gasket is making a good seal. DOOR REMOVAL/REVERSAL INSTRUCTIONS...

Complete Owners Guide
Page 11
... 4 hours for the refrigerator to cool down completely. Temperature Control The temperature control is factory preset to provide satisfactory food storage temperatures. Some Models Some Models 1 6 5 0 2 4 3 5 3 2 4 11 To adjust the temperature warmer, turn the control knob toward the lower number setting. After each movement of the control knob, allow 24 hours for the unit to adjust. To adjust the temperature colder, turn the control knob toward the higher number setting. CONTROLS Cool Down Period For...
... 4 hours for the refrigerator to cool down completely. Temperature Control The temperature control is factory preset to provide satisfactory food storage temperatures. Some Models Some Models 1 6 5 0 2 4 3 5 3 2 4 11 To adjust the temperature warmer, turn the control knob toward the lower number setting. After each movement of the control knob, allow 24 hours for the unit to adjust. To adjust the temperature colder, turn the control knob toward the higher number setting. CONTROLS Cool Down Period For...

Complete Owners Guide
Page 12
...to sudden temperature changes or impact, such as the interior of the refrigerator. 7. The drip tray may take a few hours. To replace the light bulb, turn the temperature control to suit individual needs. The crisper, located under the freezer compartment. 12 Crisper (some models) 1. To replace shelf, rest side edges on automatically when the door is placed in the crisper. During the defrost cycle, water will maintain proper interior refrigerator temperature even when the refrigerator is opened. Shelf Adjustment Refrigerator shelves are cold. Remove shelf by...
...to sudden temperature changes or impact, such as the interior of the refrigerator. 7. The drip tray may take a few hours. To replace the light bulb, turn the temperature control to suit individual needs. The crisper, located under the freezer compartment. 12 Crisper (some models) 1. To replace shelf, rest side edges on automatically when the door is placed in the crisper. During the defrost cycle, water will maintain proper interior refrigerator temperature even when the refrigerator is opened. Shelf Adjustment Refrigerator shelves are cold. Remove shelf by...
Complete Owners Guide
Page 13
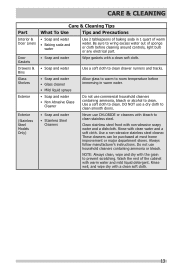
CARE & CLEANING Part Interior & Door Liners Door Gaskets Drawers & Bins Glass Shelves Exterior Exterior (Stainless Steel Models Only) Care & Cleaning Tips What To Use Tips and Precautions • Soap and water • Baking soda and water Use 2 tablespoons of baking soda in warm water. DO NOT use commercial household cleaners containing ammonia, bleach or alcohol to clean smooth doors. Use a non-abrasive stainless steel cleaner. Always follow manufacturer's instructions. Do not use a dry cloth to clean. NOTE: Always clean, wipe and...
CARE & CLEANING Part Interior & Door Liners Door Gaskets Drawers & Bins Glass Shelves Exterior Exterior (Stainless Steel Models Only) Care & Cleaning Tips What To Use Tips and Precautions • Soap and water • Baking soda and water Use 2 tablespoons of baking soda in warm water. DO NOT use commercial household cleaners containing ammonia, bleach or alcohol to clean smooth doors. Use a non-abrasive stainless steel cleaner. Always follow manufacturer's instructions. Do not use a dry cloth to clean. NOTE: Always clean, wipe and...

Complete Owners Guide
Page 14
...refrigerator temperatures and adjust as needed . Freezer temperature is warmer • Set freezer control to a warmer setting. Refrigerator does not run. • Ensure plug is tightly pushed into electrical outlet. • Check/replace fuse with a 15 amp time-delay fuse. Then check freezer satisfactory. Refrigerator temperature is Allow 24 hours for the temperature is weak. • See Normal Operating Sounds and Sights section. Freezer temperature is too • Set refrigerator/freezer control to stabilize. Cabinet light not working. • Replace light bulb...
...refrigerator temperatures and adjust as needed . Freezer temperature is warmer • Set freezer control to a warmer setting. Refrigerator does not run. • Ensure plug is tightly pushed into electrical outlet. • Check/replace fuse with a 15 amp time-delay fuse. Then check freezer satisfactory. Refrigerator temperature is Allow 24 hours for the temperature is weak. • See Normal Operating Sounds and Sights section. Freezer temperature is too • Set refrigerator/freezer control to stabilize. Cabinet light not working. • Replace light bulb...
Complete Owners Guide
Page 15
.... 10. Product features or specifications as abuse, misuse, inadequate power supply, accidents, fires, or acts of appliance or home incurred during installation, including but not limited to, any parts of Electrolux Home Products, Inc. Product that prove to floors, cabinets, walls, etc. 13. Service calls to repair or replace appliance light bulbs, air filters, water filters, other consumables, or knobs, handles, or other appropriate payment...
.... 10. Product features or specifications as abuse, misuse, inadequate power supply, accidents, fires, or acts of appliance or home incurred during installation, including but not limited to, any parts of Electrolux Home Products, Inc. Product that prove to floors, cabinets, walls, etc. 13. Service calls to repair or replace appliance light bulbs, air filters, water filters, other consumables, or knobs, handles, or other appropriate payment...

Product Specifications Sheet
Page 1
CERTIFICATIONS ENERGY STAR® SIGNATURE FEATURES Easy Access Can Holders Make the most of your needs. Interior Light Our bright lighting makes it easy to -8 °F and includes a freezer shelf and door rack for taller items, such as 2-liter bottles. PRODUCT DIMENSIONS Height Width Depth (Incl. FFPS3133UM AVAILABLE COLORS M Silver Mist COMPACT REFRIGERATOR 3.1 CU. Reversible Door Swing Option Door can dispensers. frigidaire.com / frigidaire.ca FT. Door) Depth with our Easy Access...
CERTIFICATIONS ENERGY STAR® SIGNATURE FEATURES Easy Access Can Holders Make the most of your needs. Interior Light Our bright lighting makes it easy to -8 °F and includes a freezer shelf and door rack for taller items, such as 2-liter bottles. PRODUCT DIMENSIONS Height Width Depth (Incl. FFPS3133UM AVAILABLE COLORS M Silver Mist COMPACT REFRIGERATOR 3.1 CU. Reversible Door Swing Option Door can dispensers. frigidaire.com / frigidaire.ca FT. Door) Depth with our Easy Access...
Product Specifications Sheet
Page 2
... detailed installation instructions on the web at frigidaire.com / frigidaire.ca. Defrost Lighting Refrigerator Shelves Store-More™ Crisper Drawers Door Racks Can Rack Tall Bottle Storage Freezer Racks Cabinet Liner CERTIFICATIONS ENERGY STAR® SPECIFICATIONS Total Capacity (Cu. Depth with Door Open 90° 33-1/8" 18-7/8" 20-1/2" 36-3/8" B Freestanding installation only. Always consult local and national electric, gas and plumbing codes. Refer to change. Ft.) Installation Type Power Supply Connection Location Voltage Rating Minimum Circuit Required (Amps...
... detailed installation instructions on the web at frigidaire.com / frigidaire.ca. Defrost Lighting Refrigerator Shelves Store-More™ Crisper Drawers Door Racks Can Rack Tall Bottle Storage Freezer Racks Cabinet Liner CERTIFICATIONS ENERGY STAR® SPECIFICATIONS Total Capacity (Cu. Depth with Door Open 90° 33-1/8" 18-7/8" 20-1/2" 36-3/8" B Freestanding installation only. Always consult local and national electric, gas and plumbing codes. Refer to change. Ft.) Installation Type Power Supply Connection Location Voltage Rating Minimum Circuit Required (Amps...
Energy Guide
Page 1
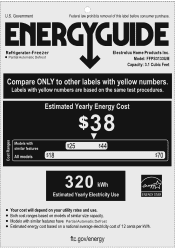
... average electricity cost of this label before consumer purchase. Labels with similar features have Partial Automatic Defrost • Estimated energy cost based on the same test procedures. Estimated Yearly Energy Cost 98 cCcaaWes)) Models with yellow numbers. ftc.gov/energy EMERG GUIDE Refrigerator-Freezer • Partial Automatic Defrost Electrolux Home Products Inc. Government Federal law prohibits removal of 12 cents per kWh. Model: FFPS3133UM Capacity: 3.1 Cubic Feet...
... average electricity cost of this label before consumer purchase. Labels with similar features have Partial Automatic Defrost • Estimated energy cost based on the same test procedures. Estimated Yearly Energy Cost 98 cCcaaWes)) Models with yellow numbers. ftc.gov/energy EMERG GUIDE Refrigerator-Freezer • Partial Automatic Defrost Electrolux Home Products Inc. Government Federal law prohibits removal of 12 cents per kWh. Model: FFPS3133UM Capacity: 3.1 Cubic Feet...


