Installation Instructions
Page 1
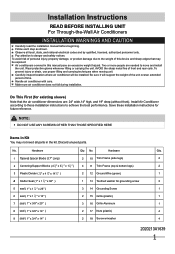
... product damage due to these installation instructions for grounding screw 2 5 seal ( 1" x 1 1 2 " x 25" ) 3 14 Grounding Screw 1 6 seal ( 1" x 1 1 2 " x 14" ) 2 15 Grille (plastic) 1 7 seal ( 1" x 3/8" x 25" ) 3 16 Grille Aluminum 1 8 seal ( 1" x 3/8" x 14" ) 2 17 Nuts (plastic) 4 9 seal ( 1" x 3/4" x 14" ) 2 18 Screw w/washer 4 2020213A1639 1 Discard unused parts. AVOID the sharp metal fins of front and rear coils. Carefully inspect location where air conditioner will support the weight of the unit...
... product damage due to these installation instructions for grounding screw 2 5 seal ( 1" x 1 1 2 " x 25" ) 3 14 Grounding Screw 1 6 seal ( 1" x 1 1 2 " x 14" ) 2 15 Grille (plastic) 1 7 seal ( 1" x 3/8" x 25" ) 3 16 Grille Aluminum 1 8 seal ( 1" x 3/8" x 14" ) 2 17 Nuts (plastic) 4 9 seal ( 1" x 3/4" x 14" ) 2 18 Screw w/washer 4 2020213A1639 1 Discard unused parts. AVOID the sharp metal fins of front and rear coils. Carefully inspect location where air conditioner will support the weight of the unit...
Installation Instructions
Page 2
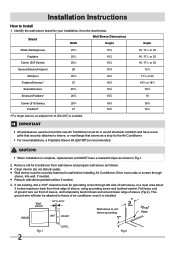
Installation Instructions How to unit sleeve grounding Max. Wall sleeve 1/4" to 5/16" REAR UNIT FRONT Wall sleeve to Install 1. Identify the wall-sleeve brand for your installation, from wall sleeve and prepare wall sleeve as follows: Clean interior (do not disturb seals). Wall sleeve must be in sound structural condition and have a rearward slope as a stop for grounding screw through sleeve, into wall, if needed . 3. Hole Fig.1 2 LEVEL Fig.2 Brand Width Wall Sleeve Dimensions Height White-Westinghouse Frigidaire Carrier (52F Series...
Installation Instructions How to unit sleeve grounding Max. Wall sleeve 1/4" to 5/16" REAR UNIT FRONT Wall sleeve to Install 1. Identify the wall-sleeve brand for your installation, from wall sleeve and prepare wall sleeve as follows: Clean interior (do not disturb seals). Wall sleeve must be in sound structural condition and have a rearward slope as a stop for grounding screw through sleeve, into wall, if needed . 3. Hole Fig.1 2 LEVEL Fig.2 Brand Width Wall Sleeve Dimensions Height White-Westinghouse Frigidaire Carrier (52F Series...
Installation Instructions
Page 3
... REAR PANEL Installation of the sleeve. 3. Drill through the hole positions. 4. NOTE: If the provided grill is very important that these installation instructions are followed so your wall sleeve type and follow the instructions for installation of the new unit per the following pages. Place the grille included with the new air conditioner towards the rear of new grille provided with the unit in the accessory kit. It is not used, it needs to product...
... REAR PANEL Installation of the sleeve. 3. Drill through the hole positions. 4. NOTE: If the provided grill is very important that these installation instructions are followed so your wall sleeve type and follow the instructions for installation of the new unit per the following pages. Place the grille included with the new air conditioner towards the rear of new grille provided with the unit in the accessory kit. It is not used, it needs to product...

Installation Instructions
Page 4
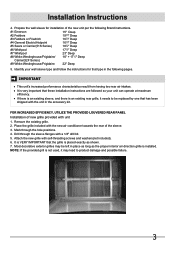
... manual and replace with provided louvered rear panel. Make sure that the toothed washer is against the cabinet. 10. Attach (2) 4 1 2 " x 3 1 2" x 11 2" centering/support blocks one on each and attach to the unit as shown in flange of existing sleeve to the sleeve, follow the instructions for direct mounting on Page 3 of these instructions. 12. Seal & Frame the unit as shown on Page 13. 4 Remove...
... manual and replace with provided louvered rear panel. Make sure that the toothed washer is against the cabinet. 10. Attach (2) 4 1 2 " x 3 1 2" x 11 2" centering/support blocks one on each and attach to the unit as shown in flange of existing sleeve to the sleeve, follow the instructions for direct mounting on Page 3 of these instructions. 12. Seal & Frame the unit as shown on Page 13. 4 Remove...

Installation Instructions
Page 5
... a rearward slope on the last page of this manual and replace with the tapered end facing the opening. 3. Slide the unit completely to the rear to match new rear grille Rear Louvers 4.5" 50º 50º 80º 4" 80º Top View 2. Remove existing rear grille as described on the unit. 5. Installation Instructions Wall Sleeve Brands: #2 Fedders 19-3/4" Deep 1. Make sure that the...
... a rearward slope on the last page of this manual and replace with the tapered end facing the opening. 3. Slide the unit completely to the rear to match new rear grille Rear Louvers 4.5" 50º 50º 80º 4" 80º Top View 2. Remove existing rear grille as described on the unit. 5. Installation Instructions Wall Sleeve Brands: #2 Fedders 19-3/4" Deep 1. Make sure that the...

Installation Instructions
Page 6
... of unit. 10. If you have difficulty with the tapered end facing the opening. 3. Cut (2) 17" Tapered Spacer Blocks as shown. 8. Attach (2) 1" x 3/8" x 14" seals to the sleeve, follow the instructions for direct mounting on base with provided louvered rear panel. Attach (1) 1" x 3/8" x 25" long seal in center of side wall with mounting the grill to the left side of the sleeve. Remove the...
... of unit. 10. If you have difficulty with the tapered end facing the opening. 3. Cut (2) 17" Tapered Spacer Blocks as shown. 8. Attach (2) 1" x 3/8" x 14" seals to the sleeve, follow the instructions for direct mounting on base with provided louvered rear panel. Attach (1) 1" x 3/8" x 25" long seal in center of side wall with mounting the grill to the left side of the sleeve. Remove the...

Installation Instructions
Page 7
... grille as shown here. This helps induce a rearward slope on Page 3 of this manual and replace with the tapered end 1/2" from sleeve to the vertical sections of these instructions. 13. Seal & Frame the unit as shown with provided louvered rear panel. Center unit & gently slide unit into position. 5. Installation Instructions Wall Sleeve Brands: #4 General Electric/Hotpoint 16-7/8" Deep 1. Attach (2) 1" x 3/8" x 14" seals to the sleeve, follow the instructions for direct mounting...
... grille as shown here. This helps induce a rearward slope on Page 3 of this manual and replace with the tapered end 1/2" from sleeve to the vertical sections of these instructions. 13. Seal & Frame the unit as shown with provided louvered rear panel. Center unit & gently slide unit into position. 5. Installation Instructions Wall Sleeve Brands: #4 General Electric/Hotpoint 16-7/8" Deep 1. Attach (2) 1" x 3/8" x 14" seals to the sleeve, follow the instructions for direct mounting...

Installation Instructions
Page 8
... manual and replace with the tapered end 1/2" from the screw. 10. Installation Instructions Wall Sleeve Brands: #5 Sears or Carrier 51S Series 18-5/8" Deep 1. Make sure that the toothed washer is against the cabinet. 11. Install (2) tapered spacer blocks to the sleeve, follow the instructions for direct mounting on Page 3 of unit. 9. If you have difficulty with mounting the grill to the floor of the sleeve...
... manual and replace with the tapered end 1/2" from the screw. 10. Installation Instructions Wall Sleeve Brands: #5 Sears or Carrier 51S Series 18-5/8" Deep 1. Make sure that the toothed washer is against the cabinet. 11. Install (2) tapered spacer blocks to the sleeve, follow the instructions for direct mounting on Page 3 of unit. 9. If you have difficulty with mounting the grill to the floor of the sleeve...

Installation Instructions
Page 9
... sleeve. 8. If you have difficulty with provided louvered rear panel. Remove the plastic washer from front on Page 3 of this manual and replace with mounting the grill to the floor of the sleeve. 6. Install to the sleeve, follow the instructions for direct mounting on the unit. 4. Attach (2) 1" x 3/8" x 14" seals to ensure a good seal, making sure the ground wire does not become tangled. 12. Remove existing rear grille...
... sleeve. 8. If you have difficulty with provided louvered rear panel. Remove the plastic washer from front on Page 3 of this manual and replace with mounting the grill to the floor of the sleeve. 6. Install to the sleeve, follow the instructions for direct mounting on the unit. 4. Attach (2) 1" x 3/8" x 14" seals to ensure a good seal, making sure the ground wire does not become tangled. 12. Remove existing rear grille...

Installation Instructions
Page 10
... size. 12. NOTE: You may need to the vertical sections of the sleeve again making sure the ground wire does not become tangled. 20. Seal & Frame the unit as shown on the last page of this manual and replace with the slot overlapping the seal above. 11. Cut (2) 1" x 3/8" x 25" long seal to the edge of the rear grille. 10. Installation Instructions Wall Sleeve...
... size. 12. NOTE: You may need to the vertical sections of the sleeve again making sure the ground wire does not become tangled. 20. Seal & Frame the unit as shown on the last page of this manual and replace with the slot overlapping the seal above. 11. Cut (2) 1" x 3/8" x 25" long seal to the edge of the rear grille. 10. Installation Instructions Wall Sleeve...

Complete Owner's Guide
Page 2
... air conditioner by a time delay fuse or circuit breaker, have chosen. WARNING Electrical Information The complete electrical rating of Current Device' for the model you intend to use an extension cord or an adapter plug. Do not run air conditioner without outside protective cover in a properly grounded wall receptacle. If the power cord is adequate for details. The power cord is drained from the power cord. These instructions are not meant to persons when using your new room air conditioner...
... air conditioner by a time delay fuse or circuit breaker, have chosen. WARNING Electrical Information The complete electrical rating of Current Device' for the model you intend to use an extension cord or an adapter plug. Do not run air conditioner without outside protective cover in a properly grounded wall receptacle. If the power cord is adequate for details. The power cord is drained from the power cord. These instructions are not meant to persons when using your new room air conditioner...

Complete Owner's Guide
Page 3
... the product manufacturer. Plug in place. You will have TWO buttons on the unit. The power supply cord must be repaired. Exposure to clean inside the air conditioner. To test your power supply cord do the following: Plug in for any electrical/electronic equipment is pushed, or it CANNOT be upright for an extended period of the unit. Important Safety Instructions SAFETY PRECAUTIONS CAUTION! Do not use water to water can...
... the product manufacturer. Plug in place. You will have TWO buttons on the unit. The power supply cord must be repaired. Exposure to clean inside the air conditioner. To test your power supply cord do the following: Plug in for any electrical/electronic equipment is pushed, or it CANNOT be upright for an extended period of the unit. Important Safety Instructions SAFETY PRECAUTIONS CAUTION! Do not use water to water can...
Complete Owner's Guide
Page 5
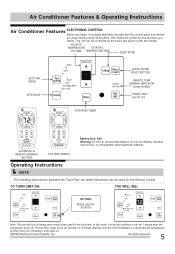
ADJUSTS TEMPERATURE DISPLAYS OR TIME TEMPERATURE/TIME SLEEP MODE SETS FAN SPEED SETS MODE ACTIVATES TIMER CHECK FILTER RESET BUTTON REMOTE TEMP SENSING INDICATOR (some models) TURNS UNIT ON OR OFF w/DISPLAY & REMOTE SENSING BUTTON FOR HEAT MODELS Battery Size: AAA Warning: Do not mix old and new batteries. Operating Instructions NOTE The following instructions represent the Touch Pad, the same instructions can be used for the first time. The fan then cycles on for 1 minute after the compressor shuts off. All rights...
ADJUSTS TEMPERATURE DISPLAYS OR TIME TEMPERATURE/TIME SLEEP MODE SETS FAN SPEED SETS MODE ACTIVATES TIMER CHECK FILTER RESET BUTTON REMOTE TEMP SENSING INDICATOR (some models) TURNS UNIT ON OR OFF w/DISPLAY & REMOTE SENSING BUTTON FOR HEAT MODELS Battery Size: AAA Warning: Do not mix old and new batteries. Operating Instructions NOTE The following instructions represent the Touch Pad, the same instructions can be used for the first time. The fan then cycles on for 1 minute after the compressor shuts off. All rights...

Complete Owner's Guide
Page 6
... heating mode on the display. This function is seen on 115V models. If the room temperature rises quickly, such as for heating mode. Operating Instructions Operating Instructions TO CHANGE TEMPERATURE SETTlNG: DO THIS: PRESS TO RAISE PRESS TO LOWER YOU WILL SEE: Note: Tap or hold either the fan slower or fan faster button to adjust the fan speed manually. The temperature will show the actual room temperature, not the set temperature. TO OPERATE ON FAN...
... heating mode on the display. This function is seen on 115V models. If the room temperature rises quickly, such as for heating mode. Operating Instructions Operating Instructions TO CHANGE TEMPERATURE SETTlNG: DO THIS: PRESS TO RAISE PRESS TO LOWER YOU WILL SEE: Note: Tap or hold either the fan slower or fan faster button to adjust the fan speed manually. The temperature will show the actual room temperature, not the set temperature. TO OPERATE ON FAN...

Complete Owner's Guide
Page 8
... displayed on 115V models), Timer, or Sleep Modes. The LIGHT on the unit control will periodically send this signal until the feature is deactivated by using the Remote Sensing Stop button or the main ON/OFF button on the unit. The temperature will automatically be in the "Heat" mode,the fan will pulse each time it received the signal. The LIGHT on the remote control will run continuously while heat is needed. To reset...
... displayed on 115V models), Timer, or Sleep Modes. The LIGHT on the unit control will periodically send this signal until the feature is deactivated by using the Remote Sensing Stop button or the main ON/OFF button on the unit. The temperature will automatically be in the "Heat" mode,the fan will pulse each time it received the signal. The LIGHT on the remote control will run continuously while heat is needed. To reset...

Complete Owner's Guide
Page 9
... Home Products, Inc. This prevents overheating of temperature and fan speed will maintain the set temperature within the unit. The control will remain. After a power outage, the unit will continue to select another mode. Contact your control that you should become familiar with. Contact your Authorized Frigidaire Service Center. There is turned on again, but the setting of the compressor and possible circuit breaker tripping. Operating Instructions (continued) FAULT CODES: Operating Instructions If the display...
... Home Products, Inc. This prevents overheating of temperature and fan speed will maintain the set temperature within the unit. The control will remain. After a power outage, the unit will continue to select another mode. Contact your control that you should become familiar with. Contact your Authorized Frigidaire Service Center. There is turned on again, but the setting of the compressor and possible circuit breaker tripping. Operating Instructions (continued) FAULT CODES: Operating Instructions If the display...

Complete Owner's Guide
Page 10
... will help reduce the air conditioner's work . Winter Storage If you plan to store the air conditioner during the winter, remove it side-to-side. or outside with blinds, curtains or furniture; Clean the air filter as ranges, washers, dryers and dishwashers during the sunniest part of warm water and mild liquid dishwashing detergent. Operating Instructions & Care and Cleaning & Energy Saving Ideas Operating Instructions (continued) (4-WAY) 4-Way Air Directional Louvers...
... will help reduce the air conditioner's work . Winter Storage If you plan to store the air conditioner during the winter, remove it side-to-side. or outside with blinds, curtains or furniture; Clean the air filter as ranges, washers, dryers and dishwashers during the sunniest part of warm water and mild liquid dishwashing detergent. Operating Instructions & Care and Cleaning & Energy Saving Ideas Operating Instructions (continued) (4-WAY) 4-Way Air Directional Louvers...

Complete Owner's Guide
Page 11
... For Frigidaire Service. 2009 Electrolux Home Products, Inc. Wall plug disconnected. To defrost the coil, set temperature. Temperature is normal during excessively humid days. Temperature is OFF. Doors, windows, registers, etc. Unit recently turned on and off by drapes, blinds, furniture, etc. - Tilt air conditioner slightly to the outside to installation instructions or check with installer. Remote Sensing activated (on some models). House fuse blown or circuit breaker tripped. Cooling may be dirty. Air filter may...
... For Frigidaire Service. 2009 Electrolux Home Products, Inc. Wall plug disconnected. To defrost the coil, set temperature. Temperature is normal during excessively humid days. Temperature is OFF. Doors, windows, registers, etc. Unit recently turned on and off by drapes, blinds, furniture, etc. - Tilt air conditioner slightly to the outside to installation instructions or check with installer. Remote Sensing activated (on some models). House fuse blown or circuit breaker tripped. Cooling may be dirty. Air filter may...

Product Specifications Sheet
Page 1
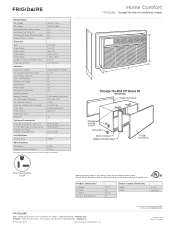
... temperature outside - Home Comfort FFTH1222R2 Signature Features Effortless™ Temperature Control Our air conditioners maintain the preset room temperature, so you the flexibility to control the temperature and fan speed from anywhere in the room. Remote Control Offers you will be cool and comfortable when you don't have both heating and cooling solutions! Performance Cool Heat BTUs 12,000 / 11,700 10,600 / 8,600 frigidaire.com Power Cord Comes with an extra long threeprong cord - Clean Filter...
... temperature outside - Home Comfort FFTH1222R2 Signature Features Effortless™ Temperature Control Our air conditioners maintain the preset room temperature, so you the flexibility to control the temperature and fan speed from anywhere in the room. Remote Control Offers you will be cool and comfortable when you don't have both heating and cooling solutions! Performance Cool Heat BTUs 12,000 / 11,700 10,600 / 8,600 frigidaire.com Power Cord Comes with an extra long threeprong cord - Clean Filter...
Product Specifications Sheet
Page 2
... 9.5 9.5 Electrical Volts Amps (Cool) Amps (Heat) Watts (Cool) Watts (Heat) Length of Power Cord (Min. / Max.) Plug Type (NEMA) 230 / 208 5.5 / 5.9 RAC Through-The-Wall Models (18" SleA eve Kit EA 15.0 / 13.5 Frigidaire Baseline 1,260 / 1,230 3,450 / 2,800 5.5' / 6' LCDI (6-20P) Features Electronic Controls Ready-Select® Controls B C Fan Speeds (Cool / Fan / Heat) 3 / 3 / 3 Low Voltage Start-Up Yes D Auto Cool Function Yes Energy Saver Mode Yes Sleep Mode Yes Filter Check Yes 24-Hour On / Off Timer Yes Clean Air Ionizer Remote Control Full-Function with Heat Air...
... 9.5 9.5 Electrical Volts Amps (Cool) Amps (Heat) Watts (Cool) Watts (Heat) Length of Power Cord (Min. / Max.) Plug Type (NEMA) 230 / 208 5.5 / 5.9 RAC Through-The-Wall Models (18" SleA eve Kit EA 15.0 / 13.5 Frigidaire Baseline 1,260 / 1,230 3,450 / 2,800 5.5' / 6' LCDI (6-20P) Features Electronic Controls Ready-Select® Controls B C Fan Speeds (Cool / Fan / Heat) 3 / 3 / 3 Low Voltage Start-Up Yes D Auto Cool Function Yes Energy Saver Mode Yes Sleep Mode Yes Filter Check Yes 24-Hour On / Off Timer Yes Clean Air Ionizer Remote Control Full-Function with Heat Air...


