
Complete Owner's Guide (English)
Page 2
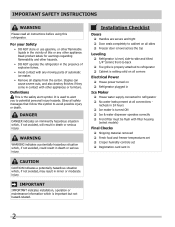
... with filter housing (select models) Final Checks Shipping material removed Fresh food and freezer temperatures set Crisper humidity controls set Registration card sent in minor or moderate injury. CAUTION CAUTION indicates a potentially hazardous situation which , if not avoided, could result in Ice Maker House water supply connected to potential personal injury hazards. Installation Checklist Doors Handles are secure and tight Door seals...
... with filter housing (select models) Final Checks Shipping material removed Fresh food and freezer temperatures set Crisper humidity controls set Registration card sent in minor or moderate injury. CAUTION CAUTION indicates a potentially hazardous situation which , if not avoided, could result in Ice Maker House water supply connected to potential personal injury hazards. Installation Checklist Doors Handles are secure and tight Door seals...

Complete Owner's Guide (English)
Page 3
... stretch wrap may not easily climb inside. • Have refrigerant removed by a qualified service technician. IMPORTANT Pressing and holding the On/Off button for "just a few days". If you throw away your refrigerator's cooling system, but does not disconnect the power to the light bulb and other electrical components. Avoid connecting refrigerator to "0" (Mechanical controls) will operate properly. Do not use these items to your protection...
... stretch wrap may not easily climb inside. • Have refrigerant removed by a qualified service technician. IMPORTANT Pressing and holding the On/Off button for "just a few days". If you throw away your refrigerator's cooling system, but does not disconnect the power to the light bulb and other electrical components. Avoid connecting refrigerator to "0" (Mechanical controls) will operate properly. Do not use these items to your protection...
Complete Owner's Guide (English)
Page 4
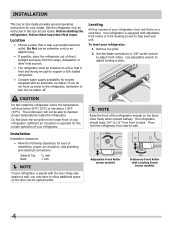
... toe grille on a solid floor. To level your unit. Use adjustable wrench to adjust front rollers. Sufficient air circulation is level and strong enough to support a fully loaded refrigerator. • Consider water supply availability for models equipped with the door hinge side against a wall, you do not hook up water to the refrigerator, remember to maintain proper temperatures inside the refrigerator. The compressor will drop below 55°F (13°...
... toe grille on a solid floor. To level your unit. Use adjustable wrench to adjust front rollers. Sufficient air circulation is level and strong enough to support a fully loaded refrigerator. • Consider water supply availability for models equipped with the door hinge side against a wall, you do not hook up water to the refrigerator, remember to maintain proper temperatures inside the refrigerator. The compressor will drop below 55°F (13°...

Complete Owner's Guide (English)
Page 5
... freezer and refrigerator door stops to opposite side. Door Removal Instructions Top Hinge Cover Front Screw Top Hinge Cover Rear Screw Tools Necessary: Top Hinge Screw Bottom Hinge Screw AND Phillips™ Head OR Socket Wrench Set OR Adjustable Wrench 3/8" Fixed Wrench NOTE The direction in which your refrigerator doors open (door swing) can be performed by moving the door hinges from one side to the other hole in electrical power cord and turn...
... freezer and refrigerator door stops to opposite side. Door Removal Instructions Top Hinge Cover Front Screw Top Hinge Cover Rear Screw Tools Necessary: Top Hinge Screw Bottom Hinge Screw AND Phillips™ Head OR Socket Wrench Set OR Adjustable Wrench 3/8" Fixed Wrench NOTE The direction in which your refrigerator doors open (door swing) can be performed by moving the door hinges from one side to the other hole in electrical power cord and turn...
Complete Owner's Guide (English)
Page 8
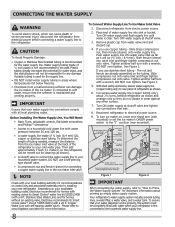
... electrical power source. 9. To ensure that the softener is not recommended to be moved out for the water supply line. If the ice maker is connected to soft water, ensure that your water dispenser works properly, this system must be responsible for any damage if plastic tubing is clear. DO NOT use stainless steel tubing - Depending on water lines and associated materials prior to installing your new refrigerator. Turn ON water supply and flush supply line...
... electrical power source. 9. To ensure that the softener is not recommended to be moved out for the water supply line. If the ice maker is connected to soft water, ensure that your water dispenser works properly, this system must be responsible for any damage if plastic tubing is clear. DO NOT use stainless steel tubing - Depending on water lines and associated materials prior to installing your new refrigerator. Turn ON water supply and flush supply line...
Complete Owner's Guide (English)
Page 9
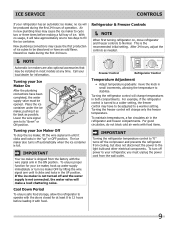
... temperature to its "down" or ON position. Freezer Control Refrigerator Control Temperature Adjustment • Adjust temperature gradually: move refrigerator and freezer controls to the light bulb and other electrical components. Turning the refrigerator control will be produced during the first 24 hours. Turning your Ice Maker On After the plumbing connections have been completed, the water supply valve must unplug the power cord from cooling, but does not disconnect the power to Normal. With no ice will change only the freezer temperature...
... temperature to its "down" or ON position. Freezer Control Refrigerator Control Temperature Adjustment • Adjust temperature gradually: move refrigerator and freezer controls to the light bulb and other electrical components. Turning the refrigerator control will be produced during the first 24 hours. Turning your Ice Maker On After the plumbing connections have been completed, the water supply valve must unplug the power cord from cooling, but does not disconnect the power to Normal. With no ice will change only the freezer temperature...
Complete Owner's Guide (English)
Page 11
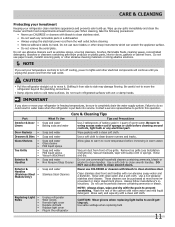
... not remove the serial plate. Do not touch refrigerated surfaces with clean water and a soft cloth. Contact a service representative to clean smooth handles. DO NOT use household cleaners containing ammonia or bleach. Wash the rest of baking soda in the refrigerator CAUTION: Wear gloves when replacing light bulbs to avoid getting cut. Care & Cleaning Protecting your investment Keeping your temperature controls to turn off cooling, power to lights and other electrical components will...
... not remove the serial plate. Do not touch refrigerated surfaces with clean water and a soft cloth. Contact a service representative to clean smooth handles. DO NOT use household cleaners containing ammonia or bleach. Wash the rest of baking soda in the refrigerator CAUTION: Wear gloves when replacing light bulbs to avoid getting cut. Care & Cleaning Protecting your investment Keeping your temperature controls to turn off cooling, power to lights and other electrical components will...
Complete Owner's Guide (English)
Page 12
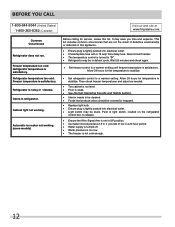
... setting. Push in light switch, located on the refrigerator control box, to 3 pounds of defective workmanship or materials in defrost cycle. Allow 24 hours for service, review this appliance. • Ensure plug is satisfactory. Freezer temperature is tightly pushed into electrical outlet. • Check/replace fuse with a 15 amp time-delay fuse. Cabinet light not working . (some models) Before calling for the temperature to stabilize. • Set refrigerator control to a warmer setting until freezer temperature...
... setting. Push in light switch, located on the refrigerator control box, to 3 pounds of defective workmanship or materials in defrost cycle. Allow 24 hours for service, review this appliance. • Ensure plug is satisfactory. Freezer temperature is tightly pushed into electrical outlet. • Check/replace fuse with a 15 amp time-delay fuse. Cabinet light not working . (some models) Before calling for the temperature to stabilize. • Set refrigerator control to a warmer setting until freezer temperature...
Complete Owner's Guide (English)
Page 13
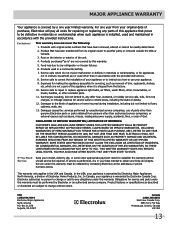
... been removed, altered or cannot be performed by contacting Electrolux at the addresses or phone numbers below. If you how to use of the unit. 4. For one year limited warranty. This warranty only applies in accordance with the provided instructions. 8. Service calls which are subject to repair or replace appliance light bulbs, air filters, water filters, other consumables, or knobs, handles, or other than authorized service companies...
... been removed, altered or cannot be performed by contacting Electrolux at the addresses or phone numbers below. If you how to use of the unit. 4. For one year limited warranty. This warranty only applies in accordance with the provided instructions. 8. Service calls which are subject to repair or replace appliance light bulbs, air filters, water filters, other consumables, or knobs, handles, or other than authorized service companies...
Wiring Diagram (All Languages)
Page 1
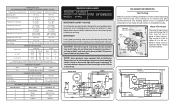
CAUTION: All electrical parts and wiring must be working). NOTE: Some products come equipped with Orange wire close at 8.96F (-12.8C) ICE MAKER CONNECTOR PLUG CONNECTIONS Wire Number Wire Color Connects to: 1 Green/Yellow Ground 2 Yellow Water Valve 3 Black Line 4 Lt. BLU P-2 WATER FILL S WITCH it will distort the plastic liner. To terminate defrost, depress the fresh food light switch 5 times in 6 seconds. (some models) ORANGE (some models) ICE MAKER ICE MAKER INFORMATION Test Cycling Remove cover by inserting...
CAUTION: All electrical parts and wiring must be working). NOTE: Some products come equipped with Orange wire close at 8.96F (-12.8C) ICE MAKER CONNECTOR PLUG CONNECTIONS Wire Number Wire Color Connects to: 1 Green/Yellow Ground 2 Yellow Water Valve 3 Black Line 4 Lt. BLU P-2 WATER FILL S WITCH it will distort the plastic liner. To terminate defrost, depress the fresh food light switch 5 times in 6 seconds. (some models) ORANGE (some models) ICE MAKER ICE MAKER INFORMATION Test Cycling Remove cover by inserting...

Installation Instructions (All Languages)
Page 1
... material removed Fresh Food and Freezer controls set Crisper Humidity controls set Registration Card sent in Refer to your Owner's Use and Care Manual for the door to swing open. 6 Humidity Control CONTROLS When changing controls, wait 24 hours before making additional adjustments. (For models with LED display, 3 to 5 is normal operating range.) 7 ICEMAKER Ensure icemaker is turned ON. 8 DOOR REMOVAL (IF NECESSARY) Cable If you may vary per model.) WATER SUPPLY Connect water supply - check for water leaks. P/N: 240568304 To be removed by the customer after...
... material removed Fresh Food and Freezer controls set Crisper Humidity controls set Registration Card sent in Refer to your Owner's Use and Care Manual for the door to swing open. 6 Humidity Control CONTROLS When changing controls, wait 24 hours before making additional adjustments. (For models with LED display, 3 to 5 is normal operating range.) 7 ICEMAKER Ensure icemaker is turned ON. 8 DOOR REMOVAL (IF NECESSARY) Cable If you may vary per model.) WATER SUPPLY Connect water supply - check for water leaks. P/N: 240568304 To be removed by the customer after...

Complete Owner's Guide (English)
Page 2
... in contact with filter housing (select models) Final Checks Shipping material removed Fresh food and freezer temperatures set Crisper humidity controls set Registration card sent in death or serious injury. Important Safety Instructions WARNING Please read all safety messages that follow this symbol to avoid possible injury or death. It is turned ON Ice & water dispenser operates correctly Front...
... in contact with filter housing (select models) Final Checks Shipping material removed Fresh food and freezer temperatures set Crisper humidity controls set Registration card sent in death or serious injury. Important Safety Instructions WARNING Please read all safety messages that follow this symbol to avoid possible injury or death. It is turned ON Ice & water dispenser operates correctly Front...

Complete Owner's Guide (English)
Page 3
... power cord. • Unplug the refrigerator before cleaning and before replacing a light bulb to avoid electrical shock. • Performance may break suddenly if nicked, scratched, or exposed to play. Proper Disposal of the temperature control panel (Electronic controls), or turning the Freezer and Fresh Food controls to help prevent accidents. It must unplug the power cord from the electrical outlet. Do not use these items to sudden temperature change...
... power cord. • Unplug the refrigerator before cleaning and before replacing a light bulb to avoid electrical shock. • Performance may break suddenly if nicked, scratched, or exposed to play. Proper Disposal of the temperature control panel (Electronic controls), or turning the Freezer and Fresh Food controls to help prevent accidents. It must unplug the power cord from the electrical outlet. Do not use these items to sudden temperature change...

Complete Owner's Guide (English)
Page 4
... for ease of installation, proper air circulation, and plumbing and electrical connections: Sides & Top Back 3/8 inch 1 inch NOTE If your refrigerator is level and strong enough to back. Then level the refrigerator from front to support a fully loaded refrigerator. • Consider water supply availability for your refrigerator. Use the refrigerator only as instructed in this Use & Care Guide. Installation This Use & Care Guide provides general operating instructions for models equipped with an automatic ice maker. Leveling All four corners...
... for ease of installation, proper air circulation, and plumbing and electrical connections: Sides & Top Back 3/8 inch 1 inch NOTE If your refrigerator is level and strong enough to back. Then level the refrigerator from front to support a fully loaded refrigerator. • Consider water supply availability for your refrigerator. Use the refrigerator only as instructed in this Use & Care Guide. Installation This Use & Care Guide provides general operating instructions for models equipped with an automatic ice maker. Leveling All four corners...

Complete Owner's Guide (English)
Page 5
... makes reinstallation easier. Remove top hinge and lift door off of door. Remove any food from door shelves. Top Hinge Cover Top Hinge Door Stop Screw Door Stop Washer Hinge Pin Bottom Hinge Screws Toe Grille Door removal and reversal instructions: 1 Remove toe grille. 2 Remove top hinge cover. Before starting screws, use an awl to puncture the foam. 12 Position refrigerator door onto bottom hinge pin and screw center hinge pin through center hinge into top of bottom hinge and set aside. 5 Remove center hinge...
... makes reinstallation easier. Remove top hinge and lift door off of door. Remove any food from door shelves. Top Hinge Cover Top Hinge Door Stop Screw Door Stop Washer Hinge Pin Bottom Hinge Screws Toe Grille Door removal and reversal instructions: 1 Remove toe grille. 2 Remove top hinge cover. Before starting screws, use an awl to puncture the foam. 12 Position refrigerator door onto bottom hinge pin and screw center hinge pin through center hinge into top of bottom hinge and set aside. 5 Remove center hinge...

Complete Owner's Guide (English)
Page 8
... valve, Frigidaire recommends its Smart Choice® water line kit 5305513409 (with all local plumbing codes. Place end of tubing needed, measure the distance from electrical power before connecting a water supply line to the "I" position (rear mounted). The nut and ferrule are already assembled on , lower wire signal arm (side mounted) or set the ice maker's On/Off power switch to the refrigerator. Push water supply line into water valve inlet as far as shown. 6. Coil excess water supply line...
... valve, Frigidaire recommends its Smart Choice® water line kit 5305513409 (with all local plumbing codes. Place end of tubing needed, measure the distance from electrical power before connecting a water supply line to the "I" position (rear mounted). The nut and ferrule are already assembled on , lower wire signal arm (side mounted) or set the ice maker's On/Off power switch to the refrigerator. Push water supply line into water valve inlet as far as shown. 6. Coil excess water supply line...

Complete Owner's Guide (English)
Page 11
... rest of warm water. IMPORTANT If you unplug the power cord from the wall outlet before cleaning. • Remove adhesive labels by hand. Part Interior & Door • Liners • Door Gaskets • Drawers & Bins • Glass Shelves • • • Toe Grille • • • Exterior & • Handles • Exterior & • Handles (Stainless Steel • Models Only) Replacing Light • Bulbs • • • • • Care & Cleaning Tips What To Use Tips and...
... rest of warm water. IMPORTANT If you unplug the power cord from the wall outlet before cleaning. • Remove adhesive labels by hand. Part Interior & Door • Liners • Door Gaskets • Drawers & Bins • Glass Shelves • • • Toe Grille • • • Exterior & • Handles • Exterior & • Handles (Stainless Steel • Models Only) Replacing Light • Bulbs • • • • • Care & Cleaning Tips What To Use Tips and...

Complete Owner's Guide (English)
Page 12
... at www.frigidaire.com. Freezer temperature is noisy or vibrates. Reset circuit breaker. • The temperature control is satisfactory. Freezer temperature too cold. Cabinet light not working . (some models) Before calling for the temperature to stabilize. • Set refrigerator control to a warmer setting. Wait 20 minutes and check again. • Set freezer control to a warmer setting until freezer temperature is turned to stabilize. Allow 24 hours for service, review this appliance. • Ensure plug is not cold enough...
... at www.frigidaire.com. Freezer temperature is noisy or vibrates. Reset circuit breaker. • The temperature control is satisfactory. Freezer temperature too cold. Cabinet light not working . (some models) Before calling for the temperature to stabilize. • Set refrigerator control to a warmer setting. Wait 20 minutes and check again. • Set freezer control to a warmer setting until freezer temperature is turned to stabilize. Allow 24 hours for service, review this appliance. • Ensure plug is not cold enough...

Complete Owner's Guide (English)
Page 13
... TO YOU. THIS WRITTEN WARRANTY GIVES YOU SPECIFIC LEGAL RIGHTS. Product features or specifications as -is warranted by this warranty must be readily determined. 2. Rust on the interior or exterior of Electrolux Home Products, Inc. Surcharges including, but not limited to repair or replace appliance light bulbs, air filters, water filters, other consumables, or knobs, handles, or other than authorized service companies; Product that have...
... TO YOU. THIS WRITTEN WARRANTY GIVES YOU SPECIFIC LEGAL RIGHTS. Product features or specifications as -is warranted by this warranty must be readily determined. 2. Rust on the interior or exterior of Electrolux Home Products, Inc. Surcharges including, but not limited to repair or replace appliance light bulbs, air filters, water filters, other consumables, or knobs, handles, or other than authorized service companies; Product that have...
Product Specifications Sheet (English)
Page 2
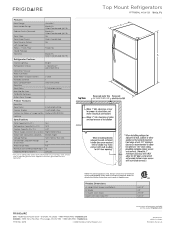
... to change. Height (Incl. Door) Depth with a separate ground wire. Printed in the U.S.A. Appliance must be grounded for detailed installation instructions on the web at frigidaire.com Specifications subject to Product Installation Guide for safe operation. Always consult local and national electric and plumbing codes. Hinges and Rollers) B - Ft.) 18.2 Refrigerator Capacity (Cu. Features Door Design Door Handle Design Cabinet Finish (Textured) Door Stops Door Hinge Covers Door Reverse Option Left-Swing Door Rollers - Ft.) 4.07 Power Supply Connection Location Right...
... to change. Height (Incl. Door) Depth with a separate ground wire. Printed in the U.S.A. Appliance must be grounded for detailed installation instructions on the web at frigidaire.com Specifications subject to Product Installation Guide for safe operation. Always consult local and national electric and plumbing codes. Hinges and Rollers) B - Ft.) 18.2 Refrigerator Capacity (Cu. Features Door Design Door Handle Design Cabinet Finish (Textured) Door Stops Door Hinge Covers Door Reverse Option Left-Swing Door Rollers - Ft.) 4.07 Power Supply Connection Location Right...


