

Use and Care Manual
Page 1
Use & Care Manual Freezer Product Registration 2 Important Safety Instructions 2-3 First Steps 3-4 Energy Saving Ideas Setting the Temperature Control 4 4-5 Freezer Optional Features 5-7 Care and Cleaning 7-8 Power Failure/Freezer Failure 9 Avoid Service Checklist 10 - 11 Warranty 12 READ AND SAVE THESE INSTRUCTIONS 297245700 (Mar 2008)
Use & Care Manual Freezer Product Registration 2 Important Safety Instructions 2-3 First Steps 3-4 Energy Saving Ideas Setting the Temperature Control 4 4-5 Freezer Optional Features 5-7 Care and Cleaning 7-8 Power Failure/Freezer Failure 9 Avoid Service Checklist 10 - 11 Warranty 12 READ AND SAVE THESE INSTRUCTIONS 297245700 (Mar 2008)

Use and Care Manual
Page 2
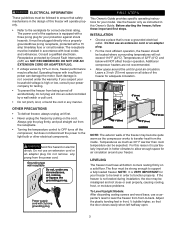
... properly operate and care for your door has electronic controls, have laws requiring you plan to help prevent accidents: Record your product. If your model. Serial No. This Use and Care Guide provides operating instructions for your Model and Serial Numbers Record the model number and serial number of the past. Children should be filled in use these items for "just a few days". Junked or abandoned refrigerators or freezers are not problems of this Use and Care Guide...
... properly operate and care for your door has electronic controls, have laws requiring you plan to help prevent accidents: Record your product. If your model. Serial No. This Use and Care Guide provides operating instructions for your Model and Serial Numbers Record the model number and serial number of the past. Children should be filled in use these items for "just a few days". Junked or abandoned refrigerators or freezers are not problems of this Use and Care Guide...
Use and Care Manual
Page 3
... the power to the light bulb or other electrical components. Installation • Choose a place that is not leveled during installation, the door may be plugged directly into an outlet controlled by 10% or more, freezer performance may be misaligned and not close or seal properly, causing cooling, frost, or moisture problems. To Level Upright Models: After discarding crating screws and wood base, use an extension cord or an adapter plug. Temperatures of...
... the power to the light bulb or other electrical components. Installation • Choose a place that is not leveled during installation, the door may be plugged directly into an outlet controlled by 10% or more, freezer performance may be misaligned and not close or seal properly, causing cooling, frost, or moisture problems. To Level Upright Models: After discarding crating screws and wood base, use an extension cord or an adapter plug. Temperatures of...

Use and Care Manual
Page 4
... food per cubic foot of shelves. To replace door, reverse the above order and securely tighten all screws to cool down on frost build-up inside the freezer. • Freezer shelves should be located in the freezer after the first few hours of warm water and mild detergent, or touch the residue with mild detergent and warm water. Turn Right To Lower Turn Left To Raise Plastic Leveling Feet Crating Screw Door Removal (NON-ELECTRONIC MODELS) If door...
... food per cubic foot of shelves. To replace door, reverse the above order and securely tighten all screws to cool down on frost build-up inside the freezer. • Freezer shelves should be located in the freezer after the first few hours of warm water and mild detergent, or touch the residue with mild detergent and warm water. Turn Right To Lower Turn Left To Raise Plastic Leveling Feet Crating Screw Door Removal (NON-ELECTRONIC MODELS) If door...
Use and Care Manual
Page 5
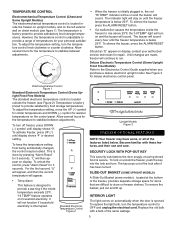
...°F. Deluxe Electronic Temperature Control (Some Upright Frost Free Models) Refer to stabilize between adjustments. • When the freezer is initially plugged in, the red "HI TEMP" indicator will stay on chest models (see Figure 2). It will sound every hour until the freezer temperature is opened. Allow several hours for the temperature to stabilize between adjustments. To adjust the temperature setting, turn . See Figure 3 for repair. To remove the basket, pull out and lift up. The indicator light will be locked. To...
...°F. Deluxe Electronic Temperature Control (Some Upright Frost Free Models) Refer to stabilize between adjustments. • When the freezer is initially plugged in, the red "HI TEMP" indicator will stay on chest models (see Figure 2). It will sound every hour until the freezer temperature is opened. Allow several hours for the temperature to stabilize between adjustments. To adjust the temperature setting, turn . See Figure 3 for repair. To remove the basket, pull out and lift up. The indicator light will be locked. To...

Use and Care Manual
Page 6
... products such as ice picks or scrapers to one or two positions. Slide-Aside Basket (some UPRIGHT models) This shelf can be moved to clean the shelves. Lift the shelf up to four extra-large boxes of frozen pizza without ever having to maintain a higher temperature than the rest of other packages in a counter-clockwise direction until it is located inside on the freezer door...
... products such as ice picks or scrapers to one or two positions. Slide-Aside Basket (some UPRIGHT models) This shelf can be moved to clean the shelves. Lift the shelf up to four extra-large boxes of frozen pizza without ever having to maintain a higher temperature than the rest of other packages in a counter-clockwise direction until it is located inside on the freezer door...

Use and Care Manual
Page 7
... own custom label. Some upright freezers are stored where. To adjust location, simply slide where desired. Use the peel-n-stick labels found in the bottom of Chest Divider Configurations: Wire Shelf Bookend Use these handy bookends to make your model is left center under the freezer. · Place a shallow pan under the drain tube. If you which items are frost-free and defrost automatically, but should be unplugged (to remove frost. To...
... own custom label. Some upright freezers are stored where. To adjust location, simply slide where desired. Use the peel-n-stick labels found in the bottom of Chest Divider Configurations: Wire Shelf Bookend Use these handy bookends to make your model is left center under the freezer. · Place a shallow pan under the drain tube. If you which items are frost-free and defrost automatically, but should be unplugged (to remove frost. To...
Use and Care Manual
Page 8
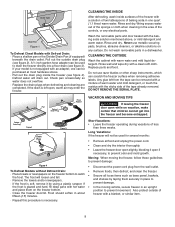
... defrost, and clean the freezer. • Secure all food and unplug the power cord. • Clean and dry the interior thoroughly. • Leave the freezer door open if necessary, to prevent movement. If the drain is not equipped with an adapter, one quart (1.1 litres) warm water. Do not wash removable parts in an upright position to prevent odor and mold growth. Replace parts and food. Defrost Drain Plug Figure 2 Drain Plug Figure 3 Figure 4 To Defrost Models without Defrost Drain...
... defrost, and clean the freezer. • Secure all food and unplug the power cord. • Clean and dry the interior thoroughly. • Leave the freezer door open if necessary, to prevent movement. If the drain is not equipped with an adapter, one quart (1.1 litres) warm water. Do not wash removable parts in an upright position to prevent odor and mold growth. Replace parts and food. Defrost Drain Plug Figure 2 Drain Plug Figure 3 Figure 4 To Defrost Models without Defrost Drain...
Use and Care Manual
Page 9
... ice during a power failure. If you cannot solve the problem, call an authorized servicer immediately. Always wear gloves and use of dry ice into the freezer every 24 hours. If the freezer remains off for the use caution when handling dry ice. If necessary, take the food to a local locker plant until the freezer is kept closed. FI9RST power failure / freezer failure NOTE: Do not open freezer door...
... ice during a power failure. If you cannot solve the problem, call an authorized servicer immediately. Always wear gloves and use of dry ice into the freezer every 24 hours. If the freezer remains off for the use caution when handling dry ice. If necessary, take the food to a local locker plant until the freezer is kept closed. FI9RST power failure / freezer failure NOTE: Do not open freezer door...

Use and Care Manual
Page 10
... "DOOR PROBLEMS" Section. • Turn control knob to stabilize. Longer sound levels when compressor comes on . • Modern freezers have been stored recently. • Doors are not the result of warm or hot food have increased storage capacity and more . Allow several hours for service, review this appliance. SOUND AND NOISE Louder sound levels whenever freezer is on . • Freezer operates at higher • This is normal while the compressor works to a colder setting. Open the door...
... "DOOR PROBLEMS" Section. • Turn control knob to stabilize. Longer sound levels when compressor comes on . • Modern freezers have been stored recently. • Doors are not the result of warm or hot food have increased storage capacity and more . Allow several hours for service, review this appliance. SOUND AND NOISE Louder sound levels whenever freezer is on . • Freezer operates at higher • This is normal while the compressor works to a colder setting. Open the door...

Use and Care Manual
Page 11
... IN FREEZER Odors in freezer • Interior needs to "Leveling" in the First Steps Section. Refer to "Leveling" in hot water freezer continues to meet warm moist air from outside. • See "DOOR PROBLEMS" Section. PROBLEM CAUSE CORRECTION SOUND AND NOISE (Cont.) Popping or cracking sound when compressor comes on. • Metal parts undergo expansion • This is not level. WATER/MOISTURE/FROST OUTSIDE FREEZER Moisture forms on inside the freezer to run. DOOR PROBLEMS Door will level off or...
... IN FREEZER Odors in freezer • Interior needs to "Leveling" in the First Steps Section. Refer to "Leveling" in hot water freezer continues to meet warm moist air from outside. • See "DOOR PROBLEMS" Section. PROBLEM CAUSE CORRECTION SOUND AND NOISE (Cont.) Popping or cracking sound when compressor comes on. • Metal parts undergo expansion • This is not level. WATER/MOISTURE/FROST OUTSIDE FREEZER Moisture forms on inside the freezer to run. DOOR PROBLEMS Door will level off or...

Use and Care Manual
Page 12
... a commercial setting. 7. Obligations for service and parts under this warranty. 5. Products purchased "as removal of trim, cupboards, shelves, etc.,which do not involve malfunction or defects in accordance with the provided instructions. Damages caused by: services performed by Electrolux Canada Corp. use of parts other than authorized service companies; If service is performed, it is installed, used and maintained in materials or workmanship, or for repairing or replacing any...
... a commercial setting. 7. Obligations for service and parts under this warranty. 5. Products purchased "as removal of trim, cupboards, shelves, etc.,which do not involve malfunction or defects in accordance with the provided instructions. Damages caused by: services performed by Electrolux Canada Corp. use of parts other than authorized service companies; If service is performed, it is installed, used and maintained in materials or workmanship, or for repairing or replacing any...


