
Complete Owners Guide
Page 1
useFR&EcEaZErRe Introduction 2 Important Safety information 3 Features 6 Installation 7 Door Removal/Reversal 8 Controls and Settings 12 Storage Features 13 Care and Cleaning 14 Troubleshooting 15 Limited Warranty 16 Frigidaire.com USA 1-800-374-4432 A23381001 (September 2021) Frigidaire.ca Canada 1-800-265-8352
useFR&EcEaZErRe Introduction 2 Important Safety information 3 Features 6 Installation 7 Door Removal/Reversal 8 Controls and Settings 12 Storage Features 13 Care and Cleaning 14 Troubleshooting 15 Limited Warranty 16 Frigidaire.com USA 1-800-374-4432 A23381001 (September 2021) Frigidaire.ca Canada 1-800-265-8352
Complete Owners Guide
Page 2
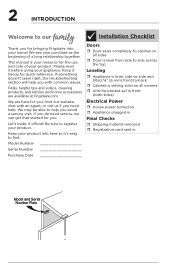
... bringing Frigidaire into your product. If something doesn't seem right, the troubleshooting section will help . Let's make it before using your resource for you need service, we can get that started for quick reference. Model Number Serial Number Purchase Date Installation Checklist Doors ˆ Door seals completely to cabinet on all corners ˆ Anti-tip bracket set in front (both sides) Electrical Power ˆ House power turned on...
... bringing Frigidaire into your product. If something doesn't seem right, the troubleshooting section will help . Let's make it before using your resource for you need service, we can get that started for quick reference. Model Number Serial Number Purchase Date Installation Checklist Doors ˆ Door seals completely to cabinet on all corners ˆ Anti-tip bracket set in front (both sides) Electrical Power ˆ House power turned on...

Complete Owners Guide
Page 3
... accordance with the applicable federal or local regulations. Use only manufacturer-authorized service parts. Follow all safety messages that follow this appliance. WARNING WARNING indicates a potentially hazardous situation which is important but not hazard-related. Follow handling instructions carefully. Do not puncture refrigerant tubing. CAUTION Risk of fire or explosion due to defrost refrigerator. WARNING IMPORTANT IMPORTANT indicates installation, operation or maintenance information which , if not avoided...
... accordance with the applicable federal or local regulations. Use only manufacturer-authorized service parts. Follow all safety messages that follow this appliance. WARNING WARNING indicates a potentially hazardous situation which is important but not hazard-related. Follow handling instructions carefully. Do not puncture refrigerant tubing. CAUTION Risk of fire or explosion due to defrost refrigerator. WARNING IMPORTANT IMPORTANT indicates installation, operation or maintenance information which , if not avoided...
Complete Owners Guide
Page 4
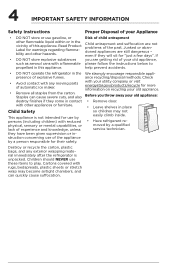
... old appliance: • Remove door. • Leave shelves in contact with reduced physical, sensory or mental capabilities, or lack of your old appliance. Before you are getting rid of experience and knowledge, unless they have been given supervision or instruction concerning use these items to propellant in the vicinity of automatic ice maker. • Remove all staples from...
... old appliance: • Remove door. • Leave shelves in contact with reduced physical, sensory or mental capabilities, or lack of your old appliance. Before you are getting rid of experience and knowledge, unless they have been given supervision or instruction concerning use these items to propellant in the vicinity of automatic ice maker. • Remove all staples from...
Complete Owners Guide
Page 5
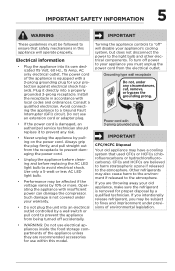
... by pulling on the power cord. Grounding type wall receptacle Do not, under provisions of the appliance is removed for your appliance's cooling system, but does not disconnect the power to the light bulb and other electrical components. Turning the appliance controls to "off power to your old appliance, make sure the refrigerant is equipped with insufficient power can damage the compressor. Other refrigerants may be subject...
... by pulling on the power cord. Grounding type wall receptacle Do not, under provisions of the appliance is removed for your appliance's cooling system, but does not disconnect the power to the light bulb and other electrical components. Turning the appliance controls to "off power to your old appliance, make sure the refrigerant is equipped with insufficient power can damage the compressor. Other refrigerants may be subject...
Complete Owners Guide
Page 6
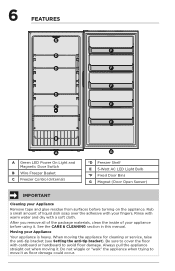
... Remove tape and glue residue from surfaces before using it. Be sure to move it . Moving your appliance before turning on the appliance. Rub a small amount of your Appliance Your appliance is heavy. When moving it as floor damage could occur. 6 FEATURES E F D D F F D F C F B A A Green LED Power On Light and Magnetic Door Switch B Wire Freezer Basket C Freezer Control (Internal) G *D Freezer Shelf E 5-Watt AC LED Light Bulb *F Fixed Door Bins G Magnet (Door Open Sensor) IMPORTANT Cleaning...
... Remove tape and glue residue from surfaces before using it. Be sure to move it . Moving your appliance before turning on the appliance. Rub a small amount of your Appliance Your appliance is heavy. When moving it as floor damage could occur. 6 FEATURES E F D D F F D F C F B A A Green LED Power On Light and Magnetic Door Switch B Wire Freezer Basket C Freezer Control (Internal) G *D Freezer Shelf E 5-Watt AC LED Light Bulb *F Fixed Door Bins G Magnet (Door Open Sensor) IMPORTANT Cleaning...
Complete Owners Guide
Page 7
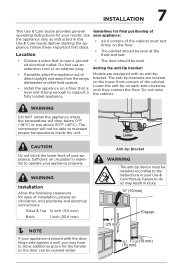
... the handle so the door can be opened wider. Use the appliance only as instructed in this Use & Care Guide. ed electrical outlet. The anti-tip brackets are equipped with the door hinge side against a wall, you may result in injury. ⅜" (10 mm) 1" (25 mm) Freezer ⅜" ⅜" (10 mm) (10 mm) Sufficient air circulation is essential to operate your appliance. Setting the...
... the handle so the door can be opened wider. Use the appliance only as instructed in this Use & Care Guide. ed electrical outlet. The anti-tip brackets are equipped with the door hinge side against a wall, you may result in injury. ⅜" (10 mm) 1" (25 mm) Freezer ⅜" ⅜" (10 mm) (10 mm) Sufficient air circulation is essential to operate your appliance. Setting the...
Complete Owners Guide
Page 8
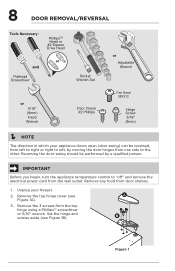
... (see Figure 1B). 8 DOOR REMOVAL/REVERSAL Tools Necessary: PhillipsTM Head or #2 Square Drive Head or and Flathead Screwdriver Socket Wrench Set or 5/16" (8mm) Fixed Wrench Door Closer #2 Phillips or Adjustable Wrench Pan Head MSX12 Hinge Screw 5/16" (8mm) NOTE The direction in which your freezer. 2. IMPORTANT Before you begin, turn the appliance temperature control to the other. Remove the 3 screws from door shelves. 1.
... (see Figure 1B). 8 DOOR REMOVAL/REVERSAL Tools Necessary: PhillipsTM Head or #2 Square Drive Head or and Flathead Screwdriver Socket Wrench Set or 5/16" (8mm) Fixed Wrench Door Closer #2 Phillips or Adjustable Wrench Pan Head MSX12 Hinge Screw 5/16" (8mm) NOTE The direction in which your freezer. 2. IMPORTANT Before you begin, turn the appliance temperature control to the other. Remove the 3 screws from door shelves. 1.
Complete Owners Guide
Page 9
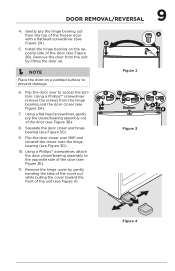
... front of the freezer door with a flathead screwdriver (See Figure 2A). 5. Install the hinge bearing on a padded surface to the opposite side of the door (see Figure 2B). Using a Phillips™ screwdriver remove the screws from the top of the unit (see Figure 3A). 7. Remove the hinge cover by lifting the door up. NOTE Place the door on the opposite...
... front of the freezer door with a flathead screwdriver (See Figure 2A). 5. Install the hinge bearing on a padded surface to the opposite side of the door (see Figure 2B). Using a Phillips™ screwdriver remove the screws from the top of the unit (see Figure 3A). 7. Remove the hinge cover by lifting the door up. NOTE Place the door on the opposite...
Complete Owners Guide
Page 10
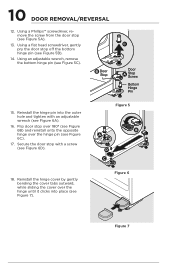
... 6A). 16. Using an adjustable wrench, remove the bottom hinge pin (see Figure 7). B Door Stop C Door A Stop Screw Bottom Hinge Pin 15. Figure 5 B A D C 18. Flip door stop off the bottom hinge pin (see Figure 5A). 13. Secure the door stop (see Figure 5B). 14. Figure 6 Figure 7 Reinstall the hinge cover by gently bending the cover tabs outward, while sliding the cover over the hinge pin (see Figure...
... 6A). 16. Using an adjustable wrench, remove the bottom hinge pin (see Figure 7). B Door Stop C Door A Stop Screw Bottom Hinge Pin 15. Figure 5 B A D C 18. Flip door stop off the bottom hinge pin (see Figure 5A). 13. Secure the door stop (see Figure 5B). 14. Figure 6 Figure 7 Reinstall the hinge cover by gently bending the cover tabs outward, while sliding the cover over the hinge pin (see Figure...
Complete Owners Guide
Page 11
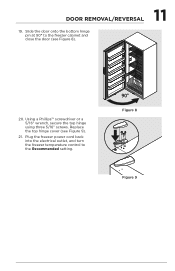
Replace the top hinge cover (see Figure 8). 20. Slide the door onto the bottom hinge pin at 90° to the Recommended setting. 90° Figure 8 Figure 9 Using a Phillips™ screwdriver or a 5/16" wrench, secure the top hinge using three 5/16" screws. 11 DOOR REMOVAL/REVERSAL 19. Plug the freezer power cord back into the electrical outlet, and turn the freezer temperature control to the freezer cabinet and close the door (see Figure 9). 21.
Replace the top hinge cover (see Figure 8). 20. Slide the door onto the bottom hinge pin at 90° to the Recommended setting. 90° Figure 8 Figure 9 Using a Phillips™ screwdriver or a 5/16" wrench, secure the top hinge using three 5/16" screws. 11 DOOR REMOVAL/REVERSAL 19. Plug the freezer power cord back into the electrical outlet, and turn the freezer temperature control to the freezer cabinet and close the door (see Figure 9). 21.
Complete Owners Guide
Page 12
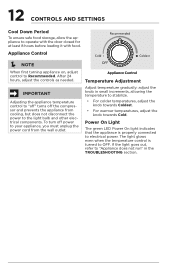
... is turned to electrical power. To turn off the compressor and prevents the appliance from the wall outlet. Appliance Control NOTE When first turning appliance on, adjust control to "Appliance does not run" in small increments, allowing the temperature to operate with the door closed for at least 8 hours before loading it with food. Appliance Control Temperature Adjustment Adjust temperature gradually: adjust the knob in the TROUBLESHOOTING section. 12 CONTROLS AND SETTINGS Cool Down...
... is turned to electrical power. To turn off the compressor and prevents the appliance from the wall outlet. Appliance Control NOTE When first turning appliance on, adjust control to "Appliance does not run" in small increments, allowing the temperature to operate with the door closed for at least 8 hours before loading it with food. Appliance Control Temperature Adjustment Adjust temperature gradually: adjust the knob in the TROUBLESHOOTING section. 12 CONTROLS AND SETTINGS Cool Down...
Complete Owners Guide
Page 13
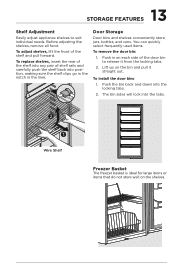
.... Lift up on the shelves. The bin sides will lock into the locking tabs. 2. You can quickly select frequently used items. To remove the door bin: 1. Before adjusting the shelves, remove all food. To adjust shelves, lift the front of shelf rails and carefully push the shelf back into any pair of the shelf and pull forward. To install the door bins: 1. Wire Shelf Freezer Basket The freezer basket is ideal for large items...
.... Lift up on the shelves. The bin sides will lock into the locking tabs. 2. You can quickly select frequently used items. To remove the door bin: 1. Before adjusting the shelves, remove all food. To adjust shelves, lift the front of shelf rails and carefully push the shelf back into any pair of the shelf and pull forward. To install the door bins: 1. Wire Shelf Freezer Basket The freezer basket is ideal for large items...
Complete Owners Guide
Page 14
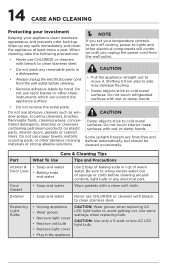
... Part What To Use Tips and Precautions Interior & • Soap and water Door Liner • Baking soda and water Use 2 tbsp of warm water. Door Gasket • Soap and water Wipe gaskets with bleach to clean stainless steel. Use same wattage when replacing bulb. When cleaning, take the following precautions: • Never use CHLORIDE or cleaners with a clean soft cloth. 14 CARE AND CLEANING Protecting your investment Keeping your temperature controls to turn off cooling, power to lights and other electrical...
... Part What To Use Tips and Precautions Interior & • Soap and water Door Liner • Baking soda and water Use 2 tbsp of warm water. Door Gasket • Soap and water Wipe gaskets with bleach to clean stainless steel. Use same wattage when replacing bulb. When cleaning, take the following precautions: • Never use CHLORIDE or cleaners with a clean soft cloth. 14 CARE AND CLEANING Protecting your investment Keeping your temperature controls to turn off cooling, power to lights and other electrical...
Complete Owners Guide
Page 15
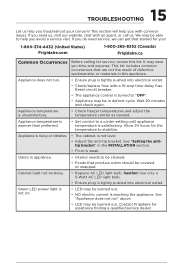
... reaching the appliance. Cabinet light not working. • Replace AC LED light bulb. Appliance temperature is warmer than preferred. • Set control to a colder setting until appliance temperature is not level. • Adjust the anti-tip bracket. Odors in this list. Green LED power light is not on. • LED may be burned out. • NO electric current is turned to be cleaned. • Foods that started for you...
... reaching the appliance. Cabinet light not working. • Replace AC LED light bulb. Appliance temperature is warmer than preferred. • Set control to a colder setting until appliance temperature is not level. • Adjust the anti-tip bracket. Odors in this list. Green LED power light is not on. • LED may be burned out. • NO electric current is turned to be cleaned. • Foods that started for you...

Complete Owners Guide
Page 16
... shipped from its original owner to remote areas, including the state of the unit. 4. Electrolux authorizes no person to establish the warranty period should service be performed by unauthorized service companies; In Canada, your receipt, delivery slip, or some other cosmetic parts. 11. Food loss due to repair or replace appliance light bulbs, air filters, water filters, other consumables, or knobs, handles, or other appropriate payment...
... shipped from its original owner to remote areas, including the state of the unit. 4. Electrolux authorizes no person to establish the warranty period should service be performed by unauthorized service companies; In Canada, your receipt, delivery slip, or some other cosmetic parts. 11. Food loss due to repair or replace appliance light bulbs, air filters, water filters, other consumables, or knobs, handles, or other appropriate payment...

Complete Owners Guide
Page 17
home welcome Our home is your registration card for more information.) Frigidaire.com 1-800-374-4432 Frigidaire.ca 1-800-265-8352 Visit us if you need help with any of these things: owner support accessories service registration (See your home.
home welcome Our home is your registration card for more information.) Frigidaire.com 1-800-374-4432 Frigidaire.ca 1-800-265-8352 Visit us if you need help with any of these things: owner support accessories service registration (See your home.

Product Specifications Sheet
Page 1
... 65 Label Refrigerant Type Warranty - Frigidaire Freezer Automatic Defrost Door Bin Color Frost Free Interior Lighting Shelf Material Number of Baskets / Bins Number of Fixed Door Bins Total Number of Door Bins Number of Adjustable Shelves Total Number of Shelves Controls Door Ajar Alarm High Temp Alarm Power On/Off Sabbath Mode Exterior Door Finish Door Swing Rear Rollers Reversible Door Dimensions and Volume Height With Hinge Width Depth of Cabinet Depth With Door Depth With Door 90° Open Freezer Capacity Electrical Specifications Minimum Circuit Required General Specifications Yes...
... 65 Label Refrigerant Type Warranty - Frigidaire Freezer Automatic Defrost Door Bin Color Frost Free Interior Lighting Shelf Material Number of Baskets / Bins Number of Fixed Door Bins Total Number of Door Bins Number of Adjustable Shelves Total Number of Shelves Controls Door Ajar Alarm High Temp Alarm Power On/Off Sabbath Mode Exterior Door Finish Door Swing Rear Rollers Reversible Door Dimensions and Volume Height With Hinge Width Depth of Cabinet Depth With Door Depth With Door 90° Open Freezer Capacity Electrical Specifications Minimum Circuit Required General Specifications Yes...


