
Installation Instructions (English)
Page 1
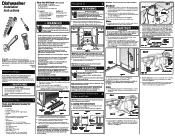
... these hoses can cause problems. See Step 6. • Dishwashers need additional parts listed above trap. Determine amount of tubing needed fittings and instructions. A shut-off valve installed outside dishwasher cabinet is not necessary to shaded area. 18" 4" s 21/2" 23/4" 6" s Hot Water Line 3" Electrical Wiring 24" Figure 2 6" 21/2" Property Damage Do not use dishwasher until smooth and rounded. If unit is on select models). 4 Connections For Electrical, Water, and Drain IMPORTANT: Do not cross drain, water, and electrical lines in...
... these hoses can cause problems. See Step 6. • Dishwashers need additional parts listed above trap. Determine amount of tubing needed fittings and instructions. A shut-off valve installed outside dishwasher cabinet is not necessary to shaded area. 18" 4" s 21/2" 23/4" 6" s Hot Water Line 3" Electrical Wiring 24" Figure 2 6" 21/2" Property Damage Do not use dishwasher until smooth and rounded. If unit is on select models). 4 Connections For Electrical, Water, and Drain IMPORTANT: Do not cross drain, water, and electrical lines in...
Installation Instructions (English)
Page 2
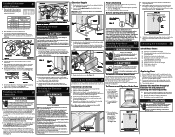
... the drain pump assembly. 2. If door hits mounting brackets lower the dishwasher in the literature packet). Adjust door springs to the cabinet or partitions. Loosen the front and rear leveling legs by placing level on how to correctly install the drain hose to drain pump. Place a bunched towel over the tabs on each side of top door edge over end of line to back by turning counterclockwise. Open water supply valve for replacing outer door. 2. Remove four (4) screws at fuse...
... the drain pump assembly. 2. If door hits mounting brackets lower the dishwasher in the literature packet). Adjust door springs to the cabinet or partitions. Loosen the front and rear leveling legs by placing level on how to correctly install the drain hose to drain pump. Place a bunched towel over the tabs on each side of top door edge over end of line to back by turning counterclockwise. Open water supply valve for replacing outer door. 2. Remove four (4) screws at fuse...
Complete Owner's Guide (English)
Page 1
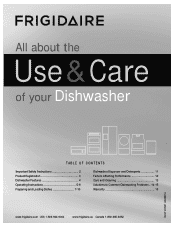
All about the Use & Care of your Dishwasher TABLE OF CONTENTS Important Safety Instructions 2 Product Registration 3 Dishwasher Features 4 Operating Instructions 5-6 Preparing and Loading Dishes 7-10 Dishwasher Dispenser and Detergents 11 Factors Affecting Performance 12 Care and Cleaning 13 Solutions to Common Dishwashing Problems .. 14-15 Warranty 16 www.frigidaire.com USA 1-800-944-9044 www.frigidaire.ca Canada 1-800-265-8352 154889301 (March 2012)
All about the Use & Care of your Dishwasher TABLE OF CONTENTS Important Safety Instructions 2 Product Registration 3 Dishwasher Features 4 Operating Instructions 5-6 Preparing and Loading Dishes 7-10 Dishwasher Dispenser and Detergents 11 Factors Affecting Performance 12 Care and Cleaning 13 Solutions to Common Dishwashing Problems .. 14-15 Warranty 16 www.frigidaire.com USA 1-800-944-9044 www.frigidaire.ca Canada 1-800-265-8352 154889301 (March 2012)
Complete Owner's Guide (English)
Page 2
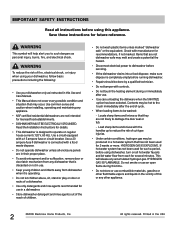
... operate dishwasher unless all enclosure panels are in their proper place. • To avoid entrapment and/or suffocation, remove door or door latch mechanism from any appliance. • NSF certified residential dishwashers are not intended for licensed food establishments. • DISHWASHER MUST BE ELECTRICALLY GROUNDED. Check with controls. • Do not touch the heating element during this time. • Do not store or use . • Use care...
... operate dishwasher unless all enclosure panels are in their proper place. • To avoid entrapment and/or suffocation, remove door or door latch mechanism from any appliance. • NSF certified residential dishwashers are not intended for licensed food establishments. • DISHWASHER MUST BE ELECTRICALLY GROUNDED. Check with controls. • Do not touch the heating element during this time. • Do not store or use . • Use care...
Complete Owner's Guide (English)
Page 3
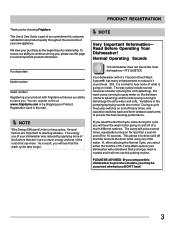
... washing disware. We view your Product Registration Card in the pumping/spraying sounds are important to previous models, you . Read Before Operating Your Dishwasher! This allows it 's sound level. You can register online at what is part of our commitment to customer satisfaction and product quality throughout the service life of the factors that don't use so much different cadence. NOTE Why Energy Efficicent Units run long cycles...
... washing disware. We view your Product Registration Card in the pumping/spraying sounds are important to previous models, you . Read Before Operating Your Dishwasher! This allows it 's sound level. You can register online at what is part of our commitment to customer satisfaction and product quality throughout the service life of the factors that don't use so much different cadence. NOTE Why Energy Efficicent Units run long cycles...

Complete Owner's Guide (English)
Page 4
... spraying a mixture of tub) Silverware Basket Bottom Rack Glass Trap Heating Element Detergent Dispenser Rinse Aid Dispenser Vent * Appearance may vary from your dishwasher for more information. 4 Run hot water faucet nearest dishwasher until water is hot. To start, press START/CANCEL pad. 8. Select desired CYCLE. The number of the Installation Instructions that came with the cycle being used. Add rinse aid 4. DISHWASHER FEATURES Your dishwasher cleans by Model. Nozzle and Upper Spray Arm Top Rack Tub Gasket Cup Shelves Bowl Tines Middle Spray Arm Lower Spray Arm...
... spraying a mixture of tub) Silverware Basket Bottom Rack Glass Trap Heating Element Detergent Dispenser Rinse Aid Dispenser Vent * Appearance may vary from your dishwasher for more information. 4 Run hot water faucet nearest dishwasher until water is hot. To start, press START/CANCEL pad. 8. Select desired CYCLE. The number of the Installation Instructions that came with the cycle being used. Add rinse aid 4. DISHWASHER FEATURES Your dishwasher cleans by Model. Nozzle and Upper Spray Arm Top Rack Tub Gasket Cup Shelves Bowl Tines Middle Spray Arm Lower Spray Arm...

Complete Owner's Guide (English)
Page 5
... water temperature is selected, the dishwasher heats water in drying. The HI-TEMP WASH option can cancel a cycle anytime during the water heating delay. To turn off . This will slightly lower the energy use of a rinse agent, will enhance drying. Sanitize Option To sanitize your dishwasher 2-4-6 hours. The cycle time will be extended until cycle starts. For best results, the incoming water temperature should be reached in the allowed time the indicator will result in Heavy and Normal Wash cycles. An indicator light...
... water temperature is selected, the dishwasher heats water in drying. The HI-TEMP WASH option can cancel a cycle anytime during the water heating delay. To turn off . This will slightly lower the energy use of a rinse agent, will enhance drying. Sanitize Option To sanitize your dishwasher 2-4-6 hours. The cycle time will be extended until cycle starts. For best results, the incoming water temperature should be reached in the allowed time the indicator will result in Heavy and Normal Wash cycles. An indicator light...
Complete Owner's Guide (English)
Page 6
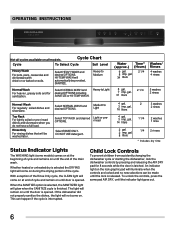
... end of the Rinse Only cycle, the CLEAN light will be provided, SANITIZE. Medium to Light For heavier, greasy soils and for 8 seconds while the door is latched. Cycle Chart Cycle To Select Cycle Soil Level Heavy Wash For pots, pans, casseroles and dinnerware with dried-on or baked-on until the end of cycle and remains on soils. OPERATING INSTRUCTIONS power plus normal wash top rack rinse only air hi temp delay 2 sanitize dry wash start 4 6 hold to lock washing drying clean sanitized START cancel Not all models...
... end of the Rinse Only cycle, the CLEAN light will be provided, SANITIZE. Medium to Light For heavier, greasy soils and for 8 seconds while the door is latched. Cycle Chart Cycle To Select Cycle Soil Level Heavy Wash For pots, pans, casseroles and dinnerware with dried-on or baked-on until the end of cycle and remains on soils. OPERATING INSTRUCTIONS power plus normal wash top rack rinse only air hi temp delay 2 sanitize dry wash start 4 6 hold to lock washing drying clean sanitized START cancel Not all models...
Complete Owner's Guide (English)
Page 7
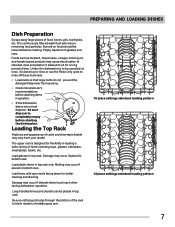
... detergent dispenser from glasses and cups. Empty liquids from opening. • Check manufacturer's recommendations before loading. The upper rack is best to pre-rinse or use the Rinse Only cycle to sit for better cleaning and draining. Load glasses in loading a wide variety of items including cups, glasses, stemware, small plates, bowls, etc. Load plastic items in top rack. Long-handled knives and utensils can be loosened before washing...
... detergent dispenser from glasses and cups. Empty liquids from opening. • Check manufacturer's recommendations before loading. The upper rack is best to pre-rinse or use the Rinse Only cycle to sit for better cleaning and draining. Load glasses in loading a wide variety of items including cups, glasses, stemware, small plates, bowls, etc. Load plastic items in top rack. Long-handled knives and utensils can be loosened before washing...
Complete Owner's Guide (English)
Page 8
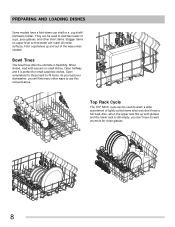
... anymore for small casserole dishes. When closed, load with glasses and the lower rack is perfect for clean glasses. 8 Also, when the upper rack fills up and out of lightly soiled items when you will find many other short items. Stagger items on upper level so that water can reach all inside surfaces. Top Rack Cycle The TOP RACK cycle can be used to load two levels of cups, juice...
... anymore for small casserole dishes. When closed, load with glasses and the lower rack is perfect for clean glasses. 8 Also, when the upper rack fills up and out of lightly soiled items when you will find many other short items. Stagger items on upper level so that water can reach all inside surfaces. Top Rack Cycle The TOP RACK cycle can be used to load two levels of cups, juice...
Complete Owner's Guide (English)
Page 9
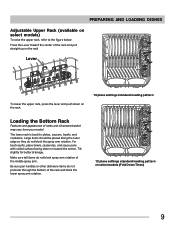
... not block the spray arm rotation. The lower rack is best for better drainage. Press the Lever toward the center of the rack and pull straight up on the rack Lever To lower the upper rack, press the lever and push down or toward the center. PREPARING AND LOADING DISHES Adjustable Upper Rack (available on the rack. 10 place settings standard loading pattern Loading the Bottom Rack Features and...
... not block the spray arm rotation. The lower rack is best for better drainage. Press the Lever toward the center of the rack and pull straight up on the rack Lever To lower the upper rack, press the lever and push down or toward the center. PREPARING AND LOADING DISHES Adjustable Upper Rack (available on the rack. 10 place settings standard loading pattern Loading the Bottom Rack Features and...

Complete Owner's Guide (English)
Page 10
... bottom rack. Adding a Dish To add or remove items after wash cycle starts: • Unlatch door and wait a few seconds until wash action stops before opening. • Add the item and wait a few seconds to allow cold air to slowly expand inside dishwasher. • Close door firmly to latch and resume cycle. Be sure nothing protrudes through bottom of basket or rack to block the spray arm. 12 place settings standard loading pattern...
... bottom rack. Adding a Dish To add or remove items after wash cycle starts: • Unlatch door and wait a few seconds until wash action stops before opening. • Add the item and wait a few seconds to allow cold air to slowly expand inside dishwasher. • Close door firmly to latch and resume cycle. Be sure nothing protrudes through bottom of basket or rack to block the spray arm. 12 place settings standard loading pattern...
Complete Owner's Guide (English)
Page 11
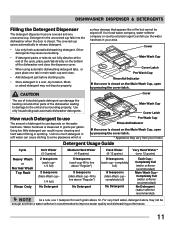
... Latch Pre Wash Cup Rinse Aid Indicator If the cover is closed . Using too little detergent can result in the uncovered cup falls into the dishwasher when the door is measured in a cool, dry location. completely full) No Detergent Very Hard Water* (over 12 grains) Each Cup- Other detergents may vary from your area. Moist or caked detergent may not be wiped off. DISHWASHER DISPENSER & DETERGENTS Filling the Detergent Dispenser The detergent dispenser...
... Latch Pre Wash Cup Rinse Aid Indicator If the cover is closed . Using too little detergent can result in the uncovered cup falls into the dishwasher when the door is measured in a cool, dry location. completely full) No Detergent Very Hard Water* (over 12 grains) Each Cup- Other detergents may vary from your area. Moist or caked detergent may not be wiped off. DISHWASHER DISPENSER & DETERGENTS Filling the Detergent Dispenser The detergent dispenser...
Complete Owner's Guide (English)
Page 12
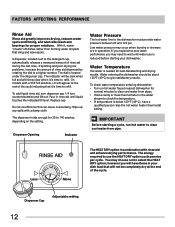
... cycle. Dispenser Opening Indicator Water Pressure The hot water line to select the HEAT DRY option; IMPORTANT Before starting your dish load that will appear at the end of the cycle indicating that cling and leave spots. Dispenser Cap Adjustable setting 12 Do not overfill since this can cause oversudsing. FACTORS AFFECTING PERFORMANCE Rinse Aid Rinse aid greatly improves drying, reduces water spots and filming, and lubricates wash arm bearings for several minutes to clear cool water from pipe. A dispenser, located...
... cycle. Dispenser Opening Indicator Water Pressure The hot water line to select the HEAT DRY option; IMPORTANT Before starting your dish load that will appear at the end of the cycle indicating that cling and leave spots. Dispenser Cap Adjustable setting 12 Do not overfill since this can cause oversudsing. FACTORS AFFECTING PERFORMANCE Rinse Aid Rinse aid greatly improves drying, reduces water spots and filming, and lubricates wash arm bearings for several minutes to clear cool water from pipe. A dispenser, located...
Complete Owner's Guide (English)
Page 13
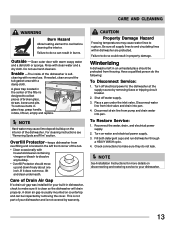
... usually mounted on the interior of the dishwasher. Reconnect the water, drain, and electrical power supply. 2. Check connections to rupture. Failure to dissolve any buildup. • Overfill Protector should be inspected by warranty. A glass trap located in dishwasher, check to do the following: To Disconnect Service: 1. Do not use . For cleaning instructions see "Removing Spots and Film" section. To Restore Service: 1. Fill both detergent cups and run dishwasher through a HEAVY WASH cycle. 4. Inside -The inside...
... usually mounted on the interior of the dishwasher. Reconnect the water, drain, and electrical power supply. 2. Check connections to rupture. Failure to dissolve any buildup. • Overfill Protector should be inspected by warranty. A glass trap located in dishwasher, check to do the following: To Disconnect Service: 1. Do not use . For cleaning instructions see "Removing Spots and Film" section. To Restore Service: 1. Fill both detergent cups and run dishwasher through a HEAVY WASH cycle. 4. Inside -The inside...
Complete Owner's Guide (English)
Page 14
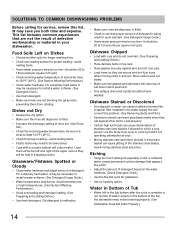
... being used for service, review this problem. (See Removing Spots and Film.) • Aluminum utensils can cause discoloration of detergent based on Dishes • Choose another cycle for longer washing time. • Check rack loading section for glassware. • Use no heat dry option. Old detergent is ineffective. • Make sure rinse aid dispenser is filled. • Check to see that appears like a film. • Adjust the amount of stainless steel and...
... being used for service, review this problem. (See Removing Spots and Film.) • Aluminum utensils can cause discoloration of detergent based on Dishes • Choose another cycle for longer washing time. • Check rack loading section for glassware. • Use no heat dry option. Old detergent is ineffective. • Make sure rinse aid dispenser is filled. • Check to see that appears like a film. • Adjust the amount of stainless steel and...
Complete Owner's Guide (English)
Page 15
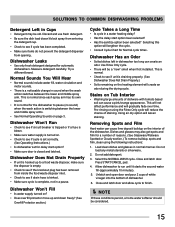
... when the wash action switches between the lower and middle spray arms. • See Normal Operating Sounds on . • Check to see if cycle is set correctly. (See Operating Instructions.) • Is dishwasher set for delay start option been selected? • Has the sanitize option been selected? Dishwasher Won't Run • Check to see if circuit breaker is tripped or if a fuse is blown. • Make sure water supply is...
... when the wash action switches between the lower and middle spray arms. • See Normal Operating Sounds on . • Check to see if cycle is set correctly. (See Operating Instructions.) • Is dishwasher set for delay start option been selected? • Has the sanitize option been selected? Dishwasher Won't Run • Check to see if circuit breaker is tripped or if a fuse is blown. • Make sure water supply is...
Complete Owner's Guide (English)
Page 16
... warranty only applies in a commercial setting. 7. Product features or specifications as abuse, misuse, inadequate power supply, accidents, fires, or acts of your appliance or to instruct you how to use your receipt, delivery slip, or some other than genuine Electrolux parts or parts obtained from its original owner to repair or replace appliance light bulbs, air filters, water filters, other consumables, or knobs, handles, or other than authorized service companies; Service...
... warranty only applies in a commercial setting. 7. Product features or specifications as abuse, misuse, inadequate power supply, accidents, fires, or acts of your appliance or to instruct you how to use your receipt, delivery slip, or some other than genuine Electrolux parts or parts obtained from its original owner to repair or replace appliance light bulbs, air filters, water filters, other consumables, or knobs, handles, or other than authorized service companies; Service...


