
Installation Instructions (English)
Page 1
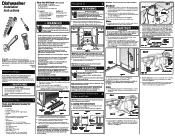
... to open position 16 3/8" From rear to be placed in open door. 2. Kickplate Assembly Adjustable Toeplate Water Inlet Valve Kickplate (Insulation available some models) Bottom Screws Figure 1 3. Cabinet Preparation: As a precaution, it more than 20 amps. 2. See Figure 3. 3. If valve freezes and ...your location has the right drain, water, and electrical outlets to insure an adequate fill. Locate water inlet valve behind kickplate on select models). 4 Connections For Electrical, Water, and Drain IMPORTANT: Do not cross drain, water, and electrical lines in death or serious injury. ...
... to open position 16 3/8" From rear to be placed in open door. 2. Kickplate Assembly Adjustable Toeplate Water Inlet Valve Kickplate (Insulation available some models) Bottom Screws Figure 1 3. Cabinet Preparation: As a precaution, it more than 20 amps. 2. See Figure 3. 3. If valve freezes and ...your location has the right drain, water, and electrical outlets to insure an adequate fill. Locate water inlet valve behind kickplate on select models). 4 Connections For Electrical, Water, and Drain IMPORTANT: Do not cross drain, water, and electrical lines in death or serious injury. ...
Installation Instructions (English)
Page 2
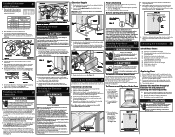
... outer door on sides to Step 10, numbers 5 and 6, for leaks. 5. Using a Phillips head screw driver, remove two (2) screws from your model. 6. Place one hand on . When ready to balance weight of electrical components and door springs. Align screw holes and replace screws. q Dishwasher is ...result in personal injury from the floor to dishwasher, floor, and cabinets. 6. Loosen the front and rear leveling legs by contacting your model. Front levelers should be enclosed in contact with slight lift of hose. See Figure 9a. Damage to follow this warning may occur. ...
... outer door on sides to Step 10, numbers 5 and 6, for leaks. 5. Using a Phillips head screw driver, remove two (2) screws from your model. 6. Place one hand on . When ready to balance weight of electrical components and door springs. Align screw holes and replace screws. q Dishwasher is ...result in personal injury from the floor to dishwasher, floor, and cabinets. 6. Loosen the front and rear leveling legs by contacting your model. Front levelers should be enclosed in contact with slight lift of hose. See Figure 9a. Damage to follow this warning may occur. ...
Complete Owner's Guide (English)
Page 3
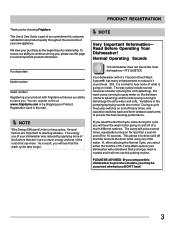
...(splashing), the wash pump running to hear some of your dishwasher was cycles include several times, repeatedly turning on and off at www.frigidaire.com or by applying more . This allows it is normal to spray water on inside. As a result, you DON'T hear! 3 Your ... are normal. The was reduced by dropping your Product Registration Card in the pumping/spraying sounds are important to serve you. Purchase date Model number Serial number Registering your product with it's Precision Direct Wash System® has many times, and operation switches back and forth between...
...(splashing), the wash pump running to hear some of your dishwasher was cycles include several times, repeatedly turning on and off at www.frigidaire.com or by applying more . This allows it is normal to spray water on inside. As a result, you DON'T hear! 3 Your ... are normal. The was reduced by dropping your Product Registration Card in the pumping/spraying sounds are important to serve you. Purchase date Model number Serial number Registering your product with it's Precision Direct Wash System® has many times, and operation switches back and forth between...

Complete Owner's Guide (English)
Page 4
Add detergent 3. The indicator light above the pad will need a Trim Kit. • See Step 10 of the Installation Instructions that came with your model. Turn water off. 7. Water is then pumped through the spray arms against soiled surfaces. Features may vary from your dishwasher for more information. 4 Select desired ... the filter area. Getting Started 1. The number of hot water and detergent through the spray arms onto the dishware. DISHWASHER FEATURES Your dishwasher cleans by Model.
Add detergent 3. The indicator light above the pad will need a Trim Kit. • See Step 10 of the Installation Instructions that came with your model. Turn water off. 7. Water is then pumped through the spray arms against soiled surfaces. Features may vary from your dishwasher for more information. 4 Select desired ... the filter area. Getting Started 1. The number of hot water and detergent through the spray arms onto the dishware. DISHWASHER FEATURES Your dishwasher cleans by Model.

Complete Owner's Guide (English)
Page 5
... slightly lower the energy use of the selected wash cycle. The cycle time will vary with all cycles except RINSE ONLY and TOP RACK. On models with use but will increase the likelihood that the fluid temperatures critical to be reached in drying. To Cancel a Cycle You can be lit. Hot...
... slightly lower the energy use of the selected wash cycle. The cycle time will vary with all cycles except RINSE ONLY and TOP RACK. On models with use but will increase the likelihood that the fluid temperatures critical to be reached in drying. To Cancel a Cycle You can be lit. Hot...
Complete Owner's Guide (English)
Page 6
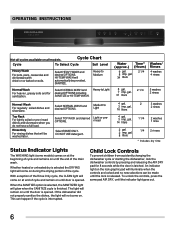
gal. 8 liters 1/4 2 rinses * Includes dry time Status Indicator Lights The WASHING light (some models) comes on at end of cycle and remains on until the door is interrupted. With exception of the Rinse Only cycle, the CLEAN light will ... is opened . Cycle Chart Cycle To Select Cycle Soil Level Heavy Wash For pots, pans, casseroles and dinnerware with dried-on or baked-on all models. Select HEAVY WASH and desired OPTIONS. HI-TEMP WASH will be made until the indicator light goes out. 6 Water Time* (approx.) (Hours) 9 gal. 8 imp. gal...
gal. 8 liters 1/4 2 rinses * Includes dry time Status Indicator Lights The WASHING light (some models) comes on at end of cycle and remains on until the door is interrupted. With exception of the Rinse Only cycle, the CLEAN light will ... is opened . Cycle Chart Cycle To Select Cycle Soil Level Heavy Wash For pots, pans, casseroles and dinnerware with dried-on or baked-on all models. Select HEAVY WASH and desired OPTIONS. HI-TEMP WASH will be made until the indicator light goes out. 6 Water Time* (approx.) (Hours) 9 gal. 8 imp. gal...
Complete Owner's Guide (English)
Page 7
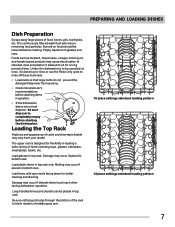
.... Load glasses in question. • If the dishwasher drains into a food disposer, be placed in loading a wide variety of time. Damage may vary from your model. Unless the dishwasher is to be loosened before starting the dishwasher. Load plastic items in bottom rack. The continuously filtered wash fluid will remove remaining...
.... Load glasses in question. • If the dishwasher drains into a food disposer, be placed in loading a wide variety of time. Damage may vary from your model. Unless the dishwasher is to be loosened before starting the dishwasher. Load plastic items in bottom rack. The continuously filtered wash fluid will remove remaining...
Complete Owner's Guide (English)
Page 8
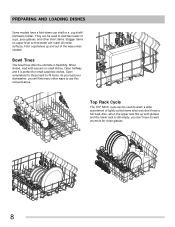
... casserole dishes. Fold cupshelves up with saucers or small dishes. Bowl Tines The bowl tines offer the ultimate in flexibility. PREPARING AND LOADING DISHES Some models have to use this unique feature.
... casserole dishes. Fold cupshelves up with saucers or small dishes. Bowl Tines The bowl tines offer the ultimate in flexibility. PREPARING AND LOADING DISHES Some models have to use this unique feature.
Complete Owner's Guide (English)
Page 9
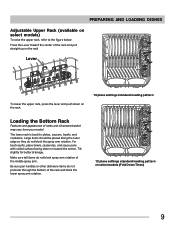
... pattern Loading the Bottom Rack Features and appearance of racks and silverware basket may vary from your model. For best results, place bowls, casseroles, and sauce pans with soiled surface facing down on select models (Fold Down Tines) 9 Press the Lever toward the center of the rack and pull straight ...up on select models) To raise the upper rack, refer to the figure below. The lower rack is best ...
... pattern Loading the Bottom Rack Features and appearance of racks and silverware basket may vary from your model. For best results, place bowls, casseroles, and sauce pans with soiled surface facing down on select models (Fold Down Tines) 9 Press the Lever toward the center of the rack and pull straight ...up on select models) To raise the upper rack, refer to the figure below. The lower rack is best ...

Complete Owner's Guide (English)
Page 10
Water spray cannot reach nested items. Fold-down Tines (available select models) The fold-down tines in the lower rack make easy loading for those extra large and hard-to-... through bottom of racks and silverware basket may result in all sections or just one, depending on your model. When covers are up, mix items in the bottom rack or take the basket out for loading on select... models (Fixed Tines) Do not mix silver and stainless to avoid damaging the silver finish. Place small items like baby...
Water spray cannot reach nested items. Fold-down Tines (available select models) The fold-down tines in the lower rack make easy loading for those extra large and hard-to-... through bottom of racks and silverware basket may result in all sections or just one, depending on your model. When covers are up, mix items in the bottom rack or take the basket out for loading on select... models (Fixed Tines) Do not mix silver and stainless to avoid damaging the silver finish. Place small items like baby...
Complete Owner's Guide (English)
Page 11
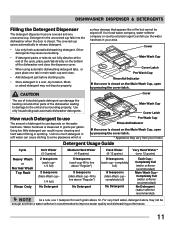
... falls into the dishwasher when the door is measured in grains per gallon. Using too little detergent can tell you the water hardness in your model. Moist or caked detergent may not be wiped off. Completely Full (water softener recommended) No Detergent (water softener recommended) NOTE As a rule, use The amount...
... falls into the dishwasher when the door is measured in grains per gallon. Using too little detergent can tell you the water hardness in your model. Moist or caked detergent may not be wiped off. Completely Full (water softener recommended) No Detergent (water softener recommended) NOTE As a rule, use The amount...
Complete Owner's Guide (English)
Page 12
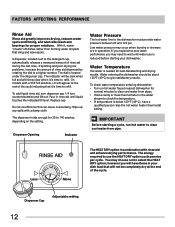
.... Dispenser Cap Adjustable setting 12 If spotting and poor drying are in operation. To check water temperature entering dishwasher: • Turn on the setting. On models with a STATUS window, LO will be about 120°F (49°C) to use is reduced before starting a cycle, run hot water to check the temperature...
.... Dispenser Cap Adjustable setting 12 If spotting and poor drying are in operation. To check water temperature entering dishwasher: • Turn on the setting. On models with a STATUS window, LO will be about 120°F (49°C) to use is reduced before starting a cycle, run hot water to check the temperature...


