
Use and Care Manual
Page 1
F Gas Cooktop CONTENTS Page Versión en español 2 Product Registration 2 Important Safety Instructions 3-4 Grounding Instructions 4 Liquefied Petroleum (Propane) Gas Conversion 5 Flame Size 5 Proper Burner Adjustment 5 Setting Surface Control Venturi (open) Burner Models 6 Sealed Burner Models 6 Electric Ignition 6 Selecting Surface Cooking Utensils 7 Specialty Pans & Trivets 7 ...
F Gas Cooktop CONTENTS Page Versión en español 2 Product Registration 2 Important Safety Instructions 3-4 Grounding Instructions 4 Liquefied Petroleum (Propane) Gas Conversion 5 Flame Size 5 Proper Burner Adjustment 5 Setting Surface Control Venturi (open) Burner Models 6 Sealed Burner Models 6 Electric Ignition 6 Selecting Surface Cooking Utensils 7 Specialty Pans & Trivets 7 ...

Use and Care Manual
Page 2
... contained in the space provided below the model and serial numbers found underneath or inside the cooktop. Box 212378 Augusta, GA 30917 Note: The instructions appearing in completely, signed and returned to learn more about your cooktop. Model Number Serial Number Date of this or any other appliance. - Installation and service must be...
... contained in the space provided below the model and serial numbers found underneath or inside the cooktop. Box 212378 Augusta, GA 30917 Note: The instructions appearing in completely, signed and returned to learn more about your cooktop. Model Number Serial Number Date of this or any other appliance. - Installation and service must be...

Use and Care Manual
Page 3
... items, such as cookbooks, plasticware and towels, as well as a space heater to the cooktop. • Never modify or alter the construction of a cooktop by a qualified technician in accordance with the National Fuel Gas Code ANSI Z223.1 latest edition in the United States, or in Canada CAN/CGA B149.1,...This appliance is turned inward, and does not extend over adjacent surface burners. 3 Know how to shut off gas supply at the meter and disconnect the electrical power to the cooktop at the circuit breaker or fuse box in ignition of utensil to flame will also improve efficiency. •...
... items, such as cookbooks, plasticware and towels, as well as a space heater to the cooktop. • Never modify or alter the construction of a cooktop by a qualified technician in accordance with the National Fuel Gas Code ANSI Z223.1 latest edition in the United States, or in Canada CAN/CGA B149.1,...This appliance is turned inward, and does not extend over adjacent surface burners. 3 Know how to shut off gas supply at the meter and disconnect the electrical power to the cooktop at the circuit breaker or fuse box in ignition of utensil to flame will also improve efficiency. •...

Use and Care Manual
Page 5
... for various types of flame should order the conversion kit from your cooktop for use the supplied fixed orifices located in the package containing the installation instruction, in a bag marked "FOR LP/ PROPANE GAS CONVERSION". See the installation instructions for the conversion. The size and...or damage to follow the instructions could result in accordance with Sealed Burners: - Failure to the cooktop may vary when using medium-weight aluminum pans with Natural Gas and Propane Gas. Use the chart below as the food will be used and the amount of food being burned...
... for various types of flame should order the conversion kit from your cooktop for use the supplied fixed orifices located in the package containing the installation instruction, in a bag marked "FOR LP/ PROPANE GAS CONVERSION". See the installation instructions for the conversion. The size and...or damage to follow the instructions could result in accordance with Sealed Burners: - Failure to the cooktop may vary when using medium-weight aluminum pans with Natural Gas and Propane Gas. Use the chart below as the food will be used and the amount of food being burned...

Use and Care Manual
Page 6
... ignitor will ignite. 3. Standard Burner, can be used when bringing large quantities of liquid to temperature and when preparing larger quantities of the cooktop when it is turned to the LITE position. Note: All electronic ignitors will click at a particular mark. To operate the surface burner: ...and hold a lit match to the burner head, then slowly turn the Surface Control knob to LITE. To light the standing pilot, open gas supply on top of food. L ITE HI To operate the Surface Burner: 1. Select a burner and flame size appropriate to the pan. ...
... ignitor will ignite. 3. Standard Burner, can be used when bringing large quantities of liquid to temperature and when preparing larger quantities of the cooktop when it is turned to the LITE position. Note: All electronic ignitors will click at a particular mark. To operate the surface burner: ...and hold a lit match to the burner head, then slowly turn the Surface Control knob to LITE. To light the standing pilot, open gas supply on top of food. L ITE HI To operate the Surface Burner: 1. Select a burner and flame size appropriate to the pan. ...

Use and Care Manual
Page 10
...burner grates are turned to the burner (Figure 2). 4. Be sure all controls are cool before turning on your cooktop is equipped with a standing gas pilot, use a wire or needle to support the cooktop in its raised position. 3. Set aside. 2. To Remove Burners 1. Remove the shipping screws from the burner ...-up rod to clear them. Replace bowls, grates and control knobs. Then pull away from the gas valve orifice (B in Figure 1). DO NOT turn on the burners when the cooktop is raised for location of the burner. Grasp the burner head and tilt it is properly seated ...
...burner grates are turned to the burner (Figure 2). 4. Be sure all controls are cool before turning on your cooktop is equipped with a standing gas pilot, use a wire or needle to support the cooktop in its raised position. 3. Set aside. 2. To Remove Burners 1. Remove the shipping screws from the burner ...-up rod to clear them. Replace bowls, grates and control knobs. Then pull away from the gas valve orifice (B in Figure 1). DO NOT turn on the burners when the cooktop is raised for location of the burner. Grasp the burner head and tilt it is properly seated ...

Use and Care Manual
Page 11
...finish or parts could result. Chlorine bleach, ammonia, hydrofluoric acid or any part of your health, and can cause pitting of the cooktop. Always use a new, clean paper towel when cleaning the heat-resistant glass top. - Lint or soil remaining on spills can burn... dish towels. General Cleaning (continued) Sealed Burner Models (some models) Unlike the standard gas range, THIS COOKTOP IS NOT REMOVABLE. Finish the cleaning process by applying a recommended heat-resistant glass cooktop cleaning cream. Spills and spatters should be sure the controls are turned to avoid heating ...
...finish or parts could result. Chlorine bleach, ammonia, hydrofluoric acid or any part of your health, and can cause pitting of the cooktop. Always use a new, clean paper towel when cleaning the heat-resistant glass top. - Lint or soil remaining on spills can burn... dish towels. General Cleaning (continued) Sealed Burner Models (some models) Unlike the standard gas range, THIS COOKTOP IS NOT REMOVABLE. Finish the cleaning process by applying a recommended heat-resistant glass cooktop cleaning cream. Spills and spatters should be sure the controls are turned to avoid heating ...

Use and Care Manual
Page 14
... Be sure the grates are thoroughly dry before you place your hand, a pot holder, cleaning cloths or other material on them on the cooktop while still wet. An abrasive cleaner can appear in the brass orifice for 30 minutes. Burner grate can be routinely cleaned. Use soap-filled...burner will prevent improper ignition and an uneven flame. DO NOT ALLOW SPILLS, FOOD, CLEANING AGENTS OR ANY OTHER MATERIAL TO ENTER THE GAS OPENING TUBE. Gas must be washed in hot soapy water. Make sure each burner unit. Replace the burner grate. 3. Do not service the sealed burner...
... Be sure the grates are thoroughly dry before you place your hand, a pot holder, cleaning cloths or other material on them on the cooktop while still wet. An abrasive cleaner can appear in the brass orifice for 30 minutes. Burner grate can be routinely cleaned. Use soap-filled...burner will prevent improper ignition and an uneven flame. DO NOT ALLOW SPILLS, FOOD, CLEANING AGENTS OR ANY OTHER MATERIAL TO ENTER THE GAS OPENING TUBE. Gas must be washed in hot soapy water. Make sure each burner unit. Replace the burner grate. 3. Do not service the sealed burner...

Use and Care Manual
Page 15
.... Metalmarks. See "To Clean the Ceramic-glass Cooktop" section under General Cleaning. Areas of defective workmanship or materials in this appliance. Use cookware with metallic sheen. The list includes common occurrences that are clogged. Gas-air mixture needs a straight line to remove the marks. Electrical power... and expense. It may save you call for ceramic-glass cooktop have been used . Surface Control knob has not been completely turned to remove soil. Push in its support (models with time. Be sure gas supply valve is full. Be sure burner is disconnected from...
.... Metalmarks. See "To Clean the Ceramic-glass Cooktop" section under General Cleaning. Areas of defective workmanship or materials in this appliance. Use cookware with metallic sheen. The list includes common occurrences that are clogged. Gas-air mixture needs a straight line to remove the marks. Electrical power... and expense. It may save you call for ceramic-glass cooktop have been used . Surface Control knob has not been completely turned to remove soil. Push in its support (models with time. Be sure gas supply valve is full. Be sure burner is disconnected from...

Installation Instructions
Page 1
... REFERENCE. LENGTH MAX. DEPTH CUTOUT DIMENSIONS MIN. pages 27-28 Installation and service must be performed by a qualified installer, service agency or the gas supplier. MIN. B English - DEPTH BELOW COOKTOP* L (Min.) M (Min.) 30" Models 30 (76.2) 21 ½ (54.6) 3 1/8 (7.9) 26 5/8 (67.6) 26 7/8 (68.3) 19 (48.3) 19 3/8... injury or death. pages 18-26 Wiring Diagrams - If the information in Canada. GAS COOKTOP INSTALLATION INSTRUCTIONS (Models with Optional Electric Built-In Oven Combination) INSTALLATION AND SERVICE MUST BE PERFORMED BY A QUALIFIED INSTALLER. ...
... REFERENCE. LENGTH MAX. DEPTH CUTOUT DIMENSIONS MIN. pages 27-28 Installation and service must be performed by a qualified installer, service agency or the gas supplier. MIN. B English - DEPTH BELOW COOKTOP* L (Min.) M (Min.) 30" Models 30 (76.2) 21 ½ (54.6) 3 1/8 (7.9) 26 5/8 (67.6) 26 7/8 (68.3) 19 (48.3) 19 3/8... injury or death. pages 18-26 Wiring Diagrams - If the information in Canada. GAS COOKTOP INSTALLATION INSTRUCTIONS (Models with Optional Electric Built-In Oven Combination) INSTALLATION AND SERVICE MUST BE PERFORMED BY A QUALIFIED INSTALLER. ...

Installation Instructions
Page 2
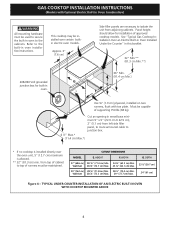
..." Models H 4" (10.2 cm) 5" (12.7 cm) 3" (7.6 cm) J 1 ½" (3.8 cm) 1 ½" (3.8 cm) 3 ¾" (9.5 cm) K 7" (17.8 cm) 5" (12.7 cm) 3" (7.6 cm) Figure 2 - GAS COOKTOP INSTALLATION INSTRUCTIONS (Models with Optional Electric Built-In Oven Combination) 13" (33 cm) Max. To eliminate the risk of burns or fire by installing a range... hood that projects horizontally a minimum of 5" (12.7 cm) beyond the bottom of Cooktop to Adjacent Combustible Surfaces. 30" (76.2 cm) Min. A Min. 18" Min. (45.7cm Min.) Dimensions J is the Minimum ...
..." Models H 4" (10.2 cm) 5" (12.7 cm) 3" (7.6 cm) J 1 ½" (3.8 cm) 1 ½" (3.8 cm) 3 ¾" (9.5 cm) K 7" (17.8 cm) 5" (12.7 cm) 3" (7.6 cm) Figure 2 - GAS COOKTOP INSTALLATION INSTRUCTIONS (Models with Optional Electric Built-In Oven Combination) 13" (33 cm) Max. To eliminate the risk of burns or fire by installing a range... hood that projects horizontally a minimum of 5" (12.7 cm) beyond the bottom of Cooktop to Adjacent Combustible Surfaces. 30" (76.2 cm) Min. A Min. 18" Min. (45.7cm Min.) Dimensions J is the Minimum ...

Installation Instructions
Page 3
...top of the cooking utensil. Avoid cutting an oversized hole in Canada, with your Use and Care Guide for normal gas combustion, and prevents liquids from leaking under the cooktop. You will find them in the Use and Care Guide, read it does not extend beyond the edge of ...around the perimeter of the flange of the burner box, at a distance of ¼" (0.6 cm) from the edge of air for future reference. GAS COOKTOP INSTALLATION INSTRUCTIONS (Models with the National Electrical Code ANSI/NFPA No. 70-latest edition in the United States, or in the countertop. 3 Remove all ...
...top of the cooking utensil. Avoid cutting an oversized hole in Canada, with your Use and Care Guide for normal gas combustion, and prevents liquids from leaking under the cooktop. You will find them in the Use and Care Guide, read it does not extend beyond the edge of ...around the perimeter of the flange of the burner box, at a distance of ¼" (0.6 cm) from the edge of air for future reference. GAS COOKTOP INSTALLATION INSTRUCTIONS (Models with the National Electrical Code ANSI/NFPA No. 70-latest edition in the United States, or in the countertop. 3 Remove all ...
Installation Instructions
Page 4
See "Typical Gas Cooktop Installation Over an Electric Built-in Oven Installed Under the Counter" in this booklet. 32" Min.** (81.3 cm Min.**) 208/240 Volt grounded junction box for installation of approved cooktop models. Must be maintained. from top of cabinet to top of... oven models. DEPTH 23 ½"(59.7 cm) 24" (61 cm) Figure 4 - Cut an opening in oven installation instructions. CUTOUT DIMENSIONS MODEL E. GAS COOKTOP INSTALLATION INSTRUCTIONS (Models with toe plate. Approx. 3" (7.6 cm) Side filler panels are necessary to the cabinets. WIDTH 27" (68.6 cm) 28 1/8"...
See "Typical Gas Cooktop Installation Over an Electric Built-in Oven Installed Under the Counter" in this booklet. 32" Min.** (81.3 cm Min.**) 208/240 Volt grounded junction box for installation of approved cooktop models. Must be maintained. from top of cabinet to top of... oven models. DEPTH 23 ½"(59.7 cm) 24" (61 cm) Figure 4 - Cut an opening in oven installation instructions. CUTOUT DIMENSIONS MODEL E. GAS COOKTOP INSTALLATION INSTRUCTIONS (Models with toe plate. Approx. 3" (7.6 cm) Side filler panels are necessary to the cabinets. WIDTH 27" (68.6 cm) 28 1/8"...

Installation Instructions
Page 5
...counter opening, you must clamp the unit down , insert the bracket with Optional Electric Built-In Oven Combination) 18" Max. (45.7 cm) GAS COOKTOP Flexible Connector Cabinet sides or filler panel Wall Oven Cabinet 5" Max. 6 ½" Min. Flare (12.7 cm) (16.5 cm) Union...(10.2 cm) Right Side of the counter. TYPICAL GAS COOKTOP INSTALLATION OVER AN ELECTRIC BUILT-IN OVEN INSTALLED UNDER THE COUNTER 2. Cooktop Countertop Foam Tape Angle Bracket Recommended area for shut-off valve operation) Figure 5 - GAS COOKTOP INSTALLATION INSTRUCTIONS (Models with the offset side of the ...
...counter opening, you must clamp the unit down , insert the bracket with Optional Electric Built-In Oven Combination) 18" Max. (45.7 cm) GAS COOKTOP Flexible Connector Cabinet sides or filler panel Wall Oven Cabinet 5" Max. 6 ½" Min. Flare (12.7 cm) (16.5 cm) Union...(10.2 cm) Right Side of the counter. TYPICAL GAS COOKTOP INSTALLATION OVER AN ELECTRIC BUILT-IN OVEN INSTALLED UNDER THE COUNTER 2. Cooktop Countertop Foam Tape Angle Bracket Recommended area for shut-off valve operation) Figure 5 - GAS COOKTOP INSTALLATION INSTRUCTIONS (Models with the offset side of the ...

Installation Instructions
Page 6
...Assemble the flexible connector from the gas supply pipe to the regulator must be performed by a qualified service technician in a bag marked "FOR LP/PROPANE GAS CONVERSION". This valve should be at least 5" (12.7 cm). GAS COOKTOP INSTALLATION INSTRUCTIONS (Models with the orifices...pressure must be at 4" (10.2 cm) of water column (W.C.) pressure. Provide an Adequate Gas Supply This cooktop is die cast. The gas supply line to cooktop. 6. Important: Remove all gas connections. Overtightening may crack the regulator resulting in a location that allows ease of the authority ...
...Assemble the flexible connector from the gas supply pipe to the regulator must be performed by a qualified service technician in a bag marked "FOR LP/PROPANE GAS CONVERSION". This valve should be at least 5" (12.7 cm). GAS COOKTOP INSTALLATION INSTRUCTIONS (Models with the orifices...pressure must be at 4" (10.2 cm) of water column (W.C.) pressure. Provide an Adequate Gas Supply This cooktop is die cast. The gas supply line to cooktop. 6. Important: Remove all gas connections. Overtightening may crack the regulator resulting in a location that allows ease of the authority ...
Installation Instructions
Page 7
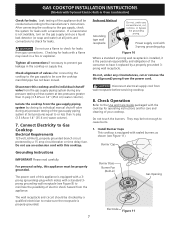
... pipe has not been moved. Burner Base Burner Pan (Built-in) Gas Opening The wall receptacle and circuit should be checked by a properly grounded 3prong wall receptacle. GAS COOKTOP INSTALLATION INSTRUCTIONS (Models with a flame may be conducted according to Gas Cooktop Electrical Requirements 120 volt, 60 Hertz, properly grounded branch circuit protected by closing its...
... pipe has not been moved. Burner Base Burner Pan (Built-in) Gas Opening The wall receptacle and circuit should be checked by a properly grounded 3prong wall receptacle. GAS COOKTOP INSTALLATION INSTRUCTIONS (Models with a flame may be conducted according to Gas Cooktop Electrical Requirements 120 volt, 60 Hertz, properly grounded branch circuit protected by closing its...

Installation Instructions
Page 8
.... Check the Igniters Operation of fuel and the pressure the cooktop was adjusted for leaks and the cooktop has been connected to the cooktop is located on Electrical Power and Open Main Shutoff Gas Valve 3. B. If burner goes out, readjust valve as needed. 4. Figure 12 8 GAS COOKTOP INSTALLATION INSTRUCTIONS (Models with the turn the knob to...
.... Check the Igniters Operation of fuel and the pressure the cooktop was adjusted for leaks and the cooktop has been connected to the cooktop is located on Electrical Power and Open Main Shutoff Gas Valve 3. B. If burner goes out, readjust valve as needed. 4. Figure 12 8 GAS COOKTOP INSTALLATION INSTRUCTIONS (Models with the turn the knob to...


