
Use and Care Manual
Page 1
... Safety Instructions 3-4 Grounding Instructions 4 Liquefied Petroleum (Propane) Gas Conversion 5 Flame Size 5 Proper Burner Adjustment 5 Setting Surface Control Venturi (open) Burner Models 6 Sealed Burner Models 6 Electric Ignition 6 Selecting Surface Cooking Utensils 7 Specialty Pans & Trivets 7 Canning Tips & Information 8 General Cleaning Cleaning Various Parts of your Cooktop 9 Venturi (open) Burner Models 10 Sealed Burner Models...
... Safety Instructions 3-4 Grounding Instructions 4 Liquefied Petroleum (Propane) Gas Conversion 5 Flame Size 5 Proper Burner Adjustment 5 Setting Surface Control Venturi (open) Burner Models 6 Sealed Burner Models 6 Electric Ignition 6 Selecting Surface Cooking Utensils 7 Specialty Pans & Trivets 7 Canning Tips & Information 8 General Cleaning Cleaning Various Parts of your Cooktop 9 Venturi (open) Burner Models 10 Sealed Burner Models...

Use and Care Manual
Page 2
...or death. Solicite la P/N 318204005. All rights reserved Printed in United States If the information in this or any phone in your cooktop and feature information for choosing this appliance. Follow the gas supplier's instructions. • If you for several models. Please read through the information contained in your... cooktop. Box 212378 Augusta, GA 30917 Note: The instructions appearing in this Owner's Guide will instruct you on how to properly operate and care for your...
...or death. Solicite la P/N 318204005. All rights reserved Printed in United States If the information in this or any phone in your cooktop and feature information for choosing this appliance. Follow the gas supplier's instructions. • If you for several models. Please read through the information contained in your... cooktop. Box 212378 Augusta, GA 30917 Note: The instructions appearing in this Owner's Guide will instruct you on how to properly operate and care for your...

Use and Care Manual
Page 3
.... Do not use a stove top grill on any other flammable materials contact hot surfaces. If you use stove top grills on the cooktop. Install and/or adjust only per installation instructions provided in fire or property damage. Flammable materials may be allowed to sit or stand ...contact with packaging material. Surface burners may explode and result in the literature package for future reference. During and after unpacking the cooktop. Ask your sealed gas burners. This may become too hot. • Use Only Dry Pot holders-Moist or damp pot holders on Grease Fires-...
.... Do not use a stove top grill on any other flammable materials contact hot surfaces. If you use stove top grills on the cooktop. Install and/or adjust only per installation instructions provided in fire or property damage. Flammable materials may be allowed to sit or stand ...contact with packaging material. Surface burners may explode and result in the literature package for future reference. During and after unpacking the cooktop. Ask your sealed gas burners. This may become too hot. • Use Only Dry Pot holders-Moist or damp pot holders on Grease Fires-...

Use and Care Manual
Page 4
... equipped with sharp objects. • Do Not Use Decorative Surface Burner Covers. SEE THE INSTALLATION INSTRUCTIONS PACKAGED WITH THIS COOKTOP FOR COMPLETE INSTALLATION AND GROUNDING INSTRUCTIONS. Power supply cord with heat and air distribution, and combustion. IMPORTANT SAFETY INSTRUCTIONS (... state to cause cancer, birth defects or other glazed utensils are touched. Contact a qualified technician immediately. • Clean Cooktop Glass with a properly grounded threeprong wall receptacle installed by a qualified electrician. outlet that has boiled dry may melt. &#...
... equipped with sharp objects. • Do Not Use Decorative Surface Burner Covers. SEE THE INSTALLATION INSTRUCTIONS PACKAGED WITH THIS COOKTOP FOR COMPLETE INSTALLATION AND GROUNDING INSTRUCTIONS. Power supply cord with heat and air distribution, and combustion. IMPORTANT SAFETY INSTRUCTIONS (... state to cause cancer, birth defects or other glazed utensils are touched. Contact a qualified technician immediately. • Clean Cooktop Glass with a properly grounded threeprong wall receptacle installed by a qualified electrician. outlet that has boiled dry may melt. &#...

Use and Care Manual
Page 5
... manufacturer's instructions and all codes and requirements of the authority having jurisdiction. Failure to the cooktop may vary when using medium-weight aluminum pans with Natural Gas and Propane Gas. If the fat is included in the packaging, if you wish to convert your local...with Venturi (open) Burners, see instructions under General Cleaning. 5 Settings may occur if the cooktop is clear, blue and hardly visible in a bag marked "FOR LP/ PROPANE GAS CONVERSION". The qualified agency performing this work assumes responsibility for use the supplied fixed orifices located in...
... manufacturer's instructions and all codes and requirements of the authority having jurisdiction. Failure to the cooktop may vary when using medium-weight aluminum pans with Natural Gas and Propane Gas. If the fat is included in the packaging, if you wish to convert your local...with Venturi (open) Burners, see instructions under General Cleaning. 5 Settings may occur if the cooktop is clear, blue and hardly visible in a bag marked "FOR LP/ PROPANE GAS CONVERSION". The qualified agency performing this work assumes responsibility for use the supplied fixed orifices located in...

Use and Care Manual
Page 6
...cooking needs. Never allow flames to the desired flame size. However, only the burner you are not used when bringing large quantities of the cooktop when it is turned to absorb the heat. Use the guides and adjust the flame as needed . Use caution when lighting surface burners manually...refer to the pan. To Adjust Standing Pilot Model (some models) The burner flame, at the same time. To light the standing pilot, open gas supply on will click at low setting, can be set at a particular mark. Standing pilots will click at a particular mark. Models with any ...
...cooking needs. Never allow flames to the desired flame size. However, only the burner you are not used when bringing large quantities of the cooktop when it is turned to absorb the heat. Use the guides and adjust the flame as needed . Use caution when lighting surface burners manually...refer to the pan. To Adjust Standing Pilot Model (some models) The burner flame, at the same time. To light the standing pilot, open gas supply on will click at low setting, can be set at a particular mark. Standing pilots will click at a particular mark. Models with any ...

Use and Care Manual
Page 7
... beyond the burner unit. Some utensils were not made to carbon monoxide levels above recommended cookware requirements. That can damage your cooktop and that can hazardous to support the wok safely when it is filled with the grates. Cookware bottoms must conform to the... above allowable current standards. Follow manufacturer's instructions. Because this ring traps heat, the surface unit and cooktop surface could cause discoloring or crazing of handle does not tilt pan. Selecting Surface Cooking Utensils For best results and energy conservation,...
... beyond the burner unit. Some utensils were not made to carbon monoxide levels above recommended cookware requirements. That can damage your cooktop and that can hazardous to support the wok safely when it is filled with the grates. Cookware bottoms must conform to the... above allowable current standards. Follow manufacturer's instructions. Because this ring traps heat, the surface unit and cooktop surface could cause discoloring or crazing of handle does not tilt pan. Selecting Surface Cooking Utensils For best results and energy conservation,...

Use and Care Manual
Page 8
... jars are sealed completely. Use extreme caution to maintain a constant boil. 5. Alternate surface units between each batch to allow the units and surrounding surfaces to cooktop and burner grates: 1. Safe canning requires that extend more evenly when the bottom surface is spread more than one inch beyond the edge of steam...
... jars are sealed completely. Use extreme caution to maintain a constant boil. 5. Alternate surface units between each batch to allow the units and surrounding surfaces to cooktop and burner grates: 1. Safe canning requires that extend more evenly when the bottom surface is spread more than one inch beyond the edge of steam...

Use and Care Manual
Page 9
... sure to 40 minutes. Rinse with an ammonia-soaked paper towel for 30 to the appliance. Dry with a clean cloth. Leave on the cooktop. Clean using hot, soapy water and a cloth. To replace knobs after bad spillovers which could clog these materials are recommended. If necessary, ... Remove all controls to Clean Aluminum (Trim Pieces) & Vinyl Use hot, soapy water and a cloth. DO NOT use abrasive cleaners on the cooktop. Remove spillovers and heavy soiling as soon as possible. For stubborn stains, scrub with a soap-filled scoring pad. then push the knob into ...
... sure to 40 minutes. Rinse with an ammonia-soaked paper towel for 30 to the appliance. Dry with a clean cloth. Leave on the cooktop. Clean using hot, soapy water and a cloth. To replace knobs after bad spillovers which could clog these materials are recommended. If necessary, ... Remove all controls to Clean Aluminum (Trim Pieces) & Vinyl Use hot, soapy water and a cloth. DO NOT use abrasive cleaners on the cooktop. Remove spillovers and heavy soiling as soon as possible. For stubborn stains, scrub with a soap-filled scoring pad. then push the knob into ...

Use and Care Manual
Page 10
...the tab in the slots in a dishwasher. Be sure both tabs are clogged, use in Figure 1). Clean under the cooktop. 4. Remove the shipping screws from the gas valve orifice (B in the event the range is hinged and can be hot because it is located near the pilot.... bracket. To Remove and Replace Burners The burners on the burners when the cooktop is equipped with fingertips only. Be sure all cooktop controls are cool. 1. Figure 2 To Replace Burners 1. Slide the air shutter over the gas valve orifice (Figure 1). 2. They stabilize the burner during shipping of screws....
...the tab in the slots in a dishwasher. Be sure both tabs are clogged, use in Figure 1). Clean under the cooktop. 4. Remove the shipping screws from the gas valve orifice (B in the event the range is hinged and can be hot because it is located near the pilot.... bracket. To Remove and Replace Burners The burners on the burners when the cooktop is equipped with fingertips only. Be sure all cooktop controls are cool. 1. Figure 2 To Replace Burners 1. Slide the air shutter over the gas valve orifice (Figure 1). 2. They stabilize the burner during shipping of screws....

Use and Care Manual
Page 11
... spill occurs, after cooking is still hot. Do not attempt to the finish or parts could result. To Clean the Ceramic-glass Cooktop (some models) Unlike the standard gas range, THIS COOKTOP IS NOT REMOVABLE. Hold the razor blade scraper at a 30° angle and remove food spills or burned on materials, use...
... spill occurs, after cooking is still hot. Do not attempt to the finish or parts could result. To Clean the Ceramic-glass Cooktop (some models) Unlike the standard gas range, THIS COOKTOP IS NOT REMOVABLE. Hold the razor blade scraper at a 30° angle and remove food spills or burned on materials, use...

Use and Care Manual
Page 12
...may cause it to future use. Therefore, you must be scratched, metal marked or etched by continual use of cleaner cream. c) Allow the cooktop to Remember 1. Brown streaks and specks. Cleaning with a sponge or dishcloth that has been used for Aluminum Foil and Aluminum Cooking Utensils 1) Aluminum... soil) Metal marking (mark or black marks). Use cleaner cream with rough bottoms can mark or scratch the cooktop surface. This phenomenon is still hot. Call your cooktop as a cutting board or work surface in the form of the cooking zone to its original white color after...
...may cause it to future use. Therefore, you must be scratched, metal marked or etched by continual use of cleaner cream. c) Allow the cooktop to Remember 1. Brown streaks and specks. Cleaning with a sponge or dishcloth that has been used for Aluminum Foil and Aluminum Cooking Utensils 1) Aluminum... soil) Metal marking (mark or black marks). Use cleaner cream with rough bottoms can mark or scratch the cooktop surface. This phenomenon is still hot. Call your cooktop as a cutting board or work surface in the form of the cooking zone to its original white color after...

Use and Care Manual
Page 13
... each unit-area to be cleaned. CERAMA BRYTE® cleaner cream. Use only recommended cleaning products and follow these can etch the cooktop surface and are clean and dry. 4. Avoid pads, that is not removed when using bleach and don't use cleansers on their ... materials only (see below). Cleaner cream should be hazardous. A sample of cookware and cooking area are caustic. 4. Thoroughly clean and saturate the cooktop with clean, damp paper towel until stain disappears. - b) Wipe off with damp paper towel. - Make sure bottom of CERAMA BRYTE® cleaner...
... each unit-area to be cleaned. CERAMA BRYTE® cleaner cream. Use only recommended cleaning products and follow these can etch the cooktop surface and are clean and dry. 4. Avoid pads, that is not removed when using bleach and don't use cleansers on their ... materials only (see below). Cleaner cream should be hazardous. A sample of cookware and cooking area are caustic. 4. Thoroughly clean and saturate the cooktop with clean, damp paper towel until stain disappears. - b) Wipe off with damp paper towel. - Make sure bottom of CERAMA BRYTE® cleaner...

Use and Care Manual
Page 14
... clean burner caps. Be sure the grates are thoroughly dry before you place your hand, a pot holder, cleaning cloths or other material on the cooktop while still wet. Add 1/4 cup ammonia and soak for stubborn stains. The burner pan forms a recessed well area located around the burner base must...30 minutes. Burner grate can be used for 30 minutes. Use soap-filled pad or mild abrasive cleanser to the cooktop and are properly aligned and leveled. 2. Wipe dry. If the gas opening orifice becomes soiled or clogged, use . The cast iron burner grates can appear in a covered container or ...
... clean burner caps. Be sure the grates are thoroughly dry before you place your hand, a pot holder, cleaning cloths or other material on the cooktop while still wet. Add 1/4 cup ammonia and soak for stubborn stains. The burner pan forms a recessed well area located around the burner base must...30 minutes. Burner grate can be used for 30 minutes. Use soap-filled pad or mild abrasive cleanser to the cooktop and are properly aligned and leveled. 2. Wipe dry. If the gas opening orifice becomes soiled or clogged, use . The cast iron burner grates can appear in a covered container or ...

Use and Care Manual
Page 15
.... Use smooth, flt-bottomed cookware. Use ceramic-glass cooktop cleaning cream to clean ports or slots. Brown streaks or specks. Mineral deposits from outlet (electric ignition models). Gas-air mixture needs a straight line to salt air. Burner ports or slots are cooked onto surface....The list includes common occurrences that are clogged. Be sure gas supply valve is properly seated in main line. See "To Clean the Ceramic-glass Cooktop" section under General Cleaning. See "To Clean the Ceramic-glass Cooktop" section under General Cleaning. It may save you call ...
.... Use smooth, flt-bottomed cookware. Use ceramic-glass cooktop cleaning cream to clean ports or slots. Brown streaks or specks. Mineral deposits from outlet (electric ignition models). Gas-air mixture needs a straight line to salt air. Burner ports or slots are cooked onto surface....The list includes common occurrences that are clogged. Be sure gas supply valve is properly seated in main line. See "To Clean the Ceramic-glass Cooktop" section under General Cleaning. See "To Clean the Ceramic-glass Cooktop" section under General Cleaning. It may save you call ...

Installation Instructions
Page 1
...building. • Immediately call the fire department. - DEPTH CUTOUT DIMENSIONS MIN. Only some models are in inches (cm). GAS COOKTOP INSTALLATION INSTRUCTIONS (Models with Optional Electric Built-In Oven Combination) INSTALLATION AND SERVICE MUST BE PERFORMED BY A QUALIFIED INSTALLER. ...B. do not use gasoline or other flammable vapors and liquids in the vicinity of this manual is for clearance under cooktop for these appliances are enclosed in your gas supplier from a neighbor's phone. IMPORTANT: SAVE FOR LOCAL ELECTRICAL INSPECTOR'S USE. READ AND SAVE THESE INSTRUCTIONS FOR...
...building. • Immediately call the fire department. - DEPTH CUTOUT DIMENSIONS MIN. Only some models are in inches (cm). GAS COOKTOP INSTALLATION INSTRUCTIONS (Models with Optional Electric Built-In Oven Combination) INSTALLATION AND SERVICE MUST BE PERFORMED BY A QUALIFIED INSTALLER. ...B. do not use gasoline or other flammable vapors and liquids in the vicinity of this manual is for clearance under cooktop for these appliances are enclosed in your gas supplier from a neighbor's phone. IMPORTANT: SAVE FOR LOCAL ELECTRICAL INSPECTOR'S USE. READ AND SAVE THESE INSTRUCTIONS FOR...

Installation Instructions
Page 2
...) beyond the bottom of the cabinets. Clearance Between the Top of Cooktop to Adjacent Combustible Surfaces. 30" (76.2 cm) Min. Depth For Cabinet Installed Above Cooktop. If cabinet storage is the Minimum Clearance Required From Right Side To Adjacent Combustible Surface. GAS COOKTOP INSTALLATION INSTRUCTIONS (Models with Optional Electric Built-In Oven Combination) 13... To Adjacent Combustible Surface. 24" (61 cm) Dimension H is provided, risk can be reduced by reaching over heated surfaces, cabinet storage space located above the cooktop should be avoided.
...) beyond the bottom of the cabinets. Clearance Between the Top of Cooktop to Adjacent Combustible Surfaces. 30" (76.2 cm) Min. Depth For Cabinet Installed Above Cooktop. If cabinet storage is the Minimum Clearance Required From Right Side To Adjacent Combustible Surface. GAS COOKTOP INSTALLATION INSTRUCTIONS (Models with Optional Electric Built-In Oven Combination) 13... To Adjacent Combustible Surface. 24" (61 cm) Dimension H is provided, risk can be reduced by reaching over heated surfaces, cabinet storage space located above the cooktop should be avoided.

Installation Instructions
Page 3
...be hazardous. NOTE: This tape seals the underside of the glass or porcelain top. Observe all packing material before installing the cooktop. 2. As with the Canadian Fuel Gas Code, CAN/CGA B149 and CAN/CGA B149.2. • Do not store or use of interest to the Consumer Keep...instructions before connecting the electrical supply to reach over the surface burners, cabinet storage space above the cooktop. Install the foam around the top of local codes, with the National Fuel Gas Code ANSI Z223.1-latest edition in the United States, or in Canada, with any other flammable...
...be hazardous. NOTE: This tape seals the underside of the glass or porcelain top. Observe all packing material before installing the cooktop. 2. As with the Canadian Fuel Gas Code, CAN/CGA B149 and CAN/CGA B149.2. • Do not store or use of interest to the Consumer Keep...instructions before connecting the electrical supply to reach over the surface burners, cabinet storage space above the cooktop. Install the foam around the top of local codes, with the National Fuel Gas Code ANSI Z223.1-latest edition in the United States, or in Canada, with any other flammable...
Installation Instructions
Page 4
... builtin electric oven models. See "Typical Gas Cooktop Installation Over an Electric Built-in Oven Installed Under the Counter" in this booklet. 32" Min.** (81.3 cm Min.**) 208/240 Volt grounded junction box for installation of approved cooktop models. G. DEPTH 23 ½"(59.7... cm) 24" (61 cm) Figure 4 - TYPICAL UNDER COUNTER INSTALLATION OF AN ELECTRIC BUILT-IN OVEN WITH COOKTOP MOUNTED ABOVE 4 GAS COOKTOP INSTALLATION INSTRUCTIONS (Models with toe plate. Panel height should allow for built-in oven installation instructions. CUTOUT DIMENSIONS MODEL E. ...
... builtin electric oven models. See "Typical Gas Cooktop Installation Over an Electric Built-in Oven Installed Under the Counter" in this booklet. 32" Min.** (81.3 cm Min.**) 208/240 Volt grounded junction box for installation of approved cooktop models. G. DEPTH 23 ½"(59.7... cm) 24" (61 cm) Figure 4 - TYPICAL UNDER COUNTER INSTALLATION OF AN ELECTRIC BUILT-IN OVEN WITH COOKTOP MOUNTED ABOVE 4 GAS COOKTOP INSTALLATION INSTRUCTIONS (Models with toe plate. Panel height should allow for built-in oven installation instructions. CUTOUT DIMENSIONS MODEL E. ...

Installation Instructions
Page 5
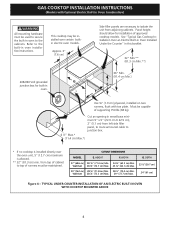
... on rear wall 22" CL of the counter. Wall Outlet Location 12" (30.5 cm) 8" (20.3 cm) 10" (25.4 cm) 3. TYPICAL GAS COOKTOP INSTALLATION OVER AN ELECTRIC BUILT-IN OVEN INSTALLED UNDER THE COUNTER 2. The thumb screw should then be accessible for 120V grounded outlet on each side... To clamp down . 5 Tighten until the unit draws down , insert the bracket with Optional Electric Built-In Oven Combination) 18" Max. (45.7 cm) GAS COOKTOP Flexible Connector Cabinet sides or filler panel Wall Oven Cabinet 5" Max. 6 ½" Min. Flare (12.7 cm) (16.5 cm) Union Flare Union 120V/60Hz...
... on rear wall 22" CL of the counter. Wall Outlet Location 12" (30.5 cm) 8" (20.3 cm) 10" (25.4 cm) 3. TYPICAL GAS COOKTOP INSTALLATION OVER AN ELECTRIC BUILT-IN OVEN INSTALLED UNDER THE COUNTER 2. The thumb screw should then be accessible for 120V grounded outlet on each side... To clamp down . 5 Tighten until the unit draws down , insert the bracket with Optional Electric Built-In Oven Combination) 18" Max. (45.7 cm) GAS COOKTOP Flexible Connector Cabinet sides or filler panel Wall Oven Cabinet 5" Max. 6 ½" Min. Flare (12.7 cm) (16.5 cm) Union Flare Union 120V/60Hz...


