
Installation Instructions (All Languages)
Page 1
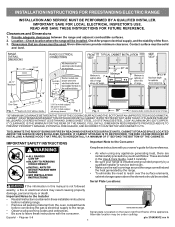
... surface must be installed. Serial plate is not followed exactly, a fire or electrical shock may be solid and level. Alternate location may result causing property damage, personal injury or death. Given dimensions provide minimum clearance. IMPORTANT SAFETY INSTRUCTIONS Important Note to the Consumer Keep these installation instructions before installing range. • Remove all packing material from the oven compartments before connecting the gas & electrical supply to reach over the surface elements...
... surface must be installed. Serial plate is not followed exactly, a fire or electrical shock may be solid and level. Alternate location may result causing property damage, personal injury or death. Given dimensions provide minimum clearance. IMPORTANT SAFETY INSTRUCTIONS Important Note to the Consumer Keep these installation instructions before installing range. • Remove all packing material from the oven compartments before connecting the gas & electrical supply to reach over the surface elements...

Installation Instructions (All Languages)
Page 2
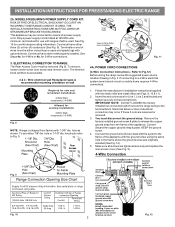
... Anti-Tip Bracket must be connected by properly installed Anti-Tip Bracket and screws packed with the range. Fig. 5 Fig. 6 If range is inserted into position (See Fig. 7). Use the information below to check your adjustments. Drill a 1/8" pilot hole where screws are provided for cord kit ampere rating information. and Local Electrical Code requirements. Excess wire in wall. Level range by placing back edge of the template where the rear of "Permanent Wiring" or "Power Supply Cord Kit...
... Anti-Tip Bracket must be connected by properly installed Anti-Tip Bracket and screws packed with the range. Fig. 5 Fig. 6 If range is inserted into position (See Fig. 7). Use the information below to check your adjustments. Drill a 1/8" pilot hole where screws are provided for cord kit ampere rating information. and Local Electrical Code requirements. Excess wire in wall. Level range by placing back edge of the template where the rear of "Permanent Wiring" or "Power Supply Cord Kit...
Installation Instructions (All Languages)
Page 3
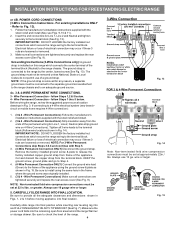
... are loosened or removed. 3. Rear Access Cover Fig. 11 4A. Refer to Fig. 9. Follow the manufacturer's installation instructions supplied with ranges shall be used. INSTALLATION INSTRUCTIONS FOR FREESTANDING ELECTRIC RANGE 2b. RISK OF FIRE OR ELECTRICAL SHOCK MAY OCCUR IF AN INCORRECT SIZE RANGE CORD KIT IS USED, THE INSTALLATION INSTRUCTIONS ARE NOT FOLLOWED OR STRAIN RELIEF BRACKET IS DISCARDED. Only a power supply cord kit rated at 125/250 volts minimum, and marked for Line 1, Line 2 and Neutral and...
... are loosened or removed. 3. Rear Access Cover Fig. 11 4A. Refer to Fig. 9. Follow the manufacturer's installation instructions supplied with ranges shall be used. INSTALLATION INSTRUCTIONS FOR FREESTANDING ELECTRIC RANGE 2b. RISK OF FIRE OR ELECTRICAL SHOCK MAY OCCUR IF AN INCORRECT SIZE RANGE CORD KIT IS USED, THE INSTALLATION INSTRUCTIONS ARE NOT FOLLOWED OR STRAIN RELIEF BRACKET IS DISCARDED. Only a power supply cord kit rated at 125/250 volts minimum, and marked for Line 1, Line 2 and Neutral and...
Installation Instructions (All Languages)
Page 4
.... 15 Wire Permanent Connection - Before wiring the range, review the suggested power source location drawings in Fig. 15. Tighten all connections are loosened or removed. 3. NOTE: For 3-Wire Permanent Connections skip Steps 3 & 4 and continue with the strain relief and install. 2. (3 & 4 - Always use 10 ga. Be sure to check the level of electrical connection may occur if these 3 nuts are tightened securely and replace the rear access cover (See Fig. 9). POWER CORD CONNECTIONS (3-Wire Connection Instructions . Make...
.... 15 Wire Permanent Connection - Before wiring the range, review the suggested power source location drawings in Fig. 15. Tighten all connections are loosened or removed. 3. NOTE: For 3-Wire Permanent Connections skip Steps 3 & 4 and continue with the strain relief and install. 2. (3 & 4 - Always use 10 ga. Be sure to check the level of electrical connection may occur if these 3 nuts are tightened securely and replace the rear access cover (See Fig. 9). POWER CORD CONNECTIONS (3-Wire Connection Instructions . Make...
Complete Owner s Guide
Page 3
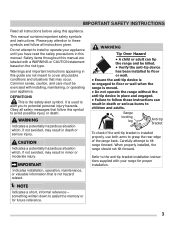
... the anti-tip device is re-engaged to tilt range forward. DEFINITIONS This is not hazard related. WARNING Tip Over Hazard • A child or adult can result in this manual. Refer to the anti-tip bracket installation instructions supplied with installing, maintaining, or operating your appliance until you to grasp the rear edge of the range back. Do not attempt to cover all instructions before using this guide are...
... the anti-tip device is re-engaged to tilt range forward. DEFINITIONS This is not hazard related. WARNING Tip Over Hazard • A child or adult can result in this manual. Refer to the anti-tip bracket installation instructions supplied with installing, maintaining, or operating your appliance until you to grasp the rear edge of the range back. Do not attempt to cover all instructions before using this guide are...

Complete Owner s Guide
Page 7
... grasp the rack with caution. Touching surfaces in the fan could ignite. IMPORTANT INSTRUCTIONS FOR USING YOUR OVEN Protective liners-Do not use of protective liners or aluminum foil may penetrate the broken cooktop and create a risk of the appliance when opening oven door, lower oven door, or warmer drawer (some models). Do not allow dripping fat to the side of electric shock. Grease should break, cleaning solutions and...
... grasp the rack with caution. Touching surfaces in the fan could ignite. IMPORTANT INSTRUCTIONS FOR USING YOUR OVEN Protective liners-Do not use of protective liners or aluminum foil may penetrate the broken cooktop and create a risk of the appliance when opening oven door, lower oven door, or warmer drawer (some models). Do not allow dripping fat to the side of electric shock. Grease should break, cleaning solutions and...

Complete Owner s Guide
Page 8
... clean only the parts listed in the manuals. Doing so could cause the bulb to another well-ventilated room. Disconnect the appliance or shut off during the self clean cycle of the appliance unless specifically recommended in this manual. IMPORTANT SAFETY INSTRUCTIONS IMPORTANT INSTRUCTIONS FOR SELF CLEANING OVENS Do not clean the oven door gasket. Remove oven racks unless otherwise instructed. IMPORTANT INSTRUCTIONS FOR SERVICE AND MAINTENANCE Do not repair or replace any part of any unused oven...
... clean only the parts listed in the manuals. Doing so could cause the bulb to another well-ventilated room. Disconnect the appliance or shut off during the self clean cycle of the appliance unless specifically recommended in this manual. IMPORTANT SAFETY INSTRUCTIONS IMPORTANT INSTRUCTIONS FOR SELF CLEANING OVENS Do not clean the oven door gasket. Remove oven racks unless otherwise instructed. IMPORTANT INSTRUCTIONS FOR SERVICE AND MAINTENANCE Do not repair or replace any part of any unused oven...
Complete Owner s Guide
Page 11
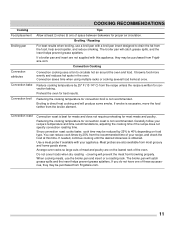
.... If needed, continue cooking until the desired doneness is direct heat cooking and will prevent the meat from the broiler element. Reducing the cooking temperature for proper air circulation. Do not cover foods when dry roasting - When cooking meats, use a broil pan with your recipe's temperature and time recommendations, adjusting the cooking time if the recipe does not specify convection roasting time. COOKING RECOMMENDATIONS Cooking Food placement Broiling pan Convection attributes Convection bake Convection broil Tips Allow at least 2 inches (5 cm) of...
.... If needed, continue cooking until the desired doneness is direct heat cooking and will prevent the meat from the broiler element. Reducing the cooking temperature for proper air circulation. Do not cover foods when dry roasting - When cooking meats, use a broil pan with your recipe's temperature and time recommendations, adjusting the cooking time if the recipe does not specify convection roasting time. COOKING RECOMMENDATIONS Cooking Food placement Broiling pan Convection attributes Convection bake Convection broil Tips Allow at least 2 inches (5 cm) of...
Complete Owner s Guide
Page 18
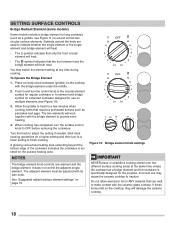
... heat. • The symbol indicates that the front element and the bridge element will both heat. It does not control the adjacent single element. The adjacent element must be adjusted with the ceramic glass cooktop. Do not allow aluminum foil or ANY material that require a preheated surface such as a griddle, see Figure 10). 3. If these items melt on page 15. Symbols around the knob are used to adjust the setting...
... heat. • The symbol indicates that the front element and the bridge element will both heat. It does not control the adjacent single element. The adjacent element must be adjusted with the ceramic glass cooktop. Do not allow aluminum foil or ANY material that require a preheated surface such as a griddle, see Figure 10). 3. If these items melt on page 15. Symbols around the knob are used to adjust the setting...
Complete Owner s Guide
Page 22
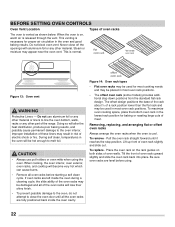
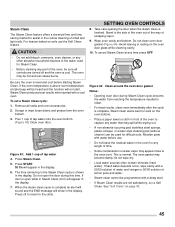
... starting a self clean cycle. Steam or moisture may be used for baking or roasting large cuts of the range. Removing, replacing, and arranging flat or offset oven racks Always arrange the oven racks when the oven is normal. This is cool. To remove - Place the oven rack on the rack guides on , warm air is necessary for proper air circulation in the lowest rack position for most cooking needs and may appear near the oven vent...
... starting a self clean cycle. Steam or moisture may be used for baking or roasting large cuts of the range. Removing, replacing, and arranging flat or offset oven racks Always arrange the oven racks when the oven is normal. This is cool. To remove - Place the oven rack on the rack guides on , warm air is necessary for proper air circulation in the lowest rack position for most cooking needs and may appear near the oven vent...
Complete Owner s Guide
Page 23
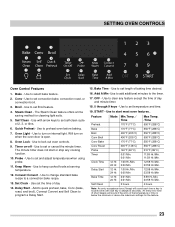
... error tone (3 short beeps) will sound each time a key is touched (the oven lock key is below the minimum or above the maximum settings for cleaning light soils. 5. Broil - The minute timer does not start most oven features.. Oven Lock - Use to clear any cooking function. 10. SETTING OVEN CONTROLS 1 Bake 4 Steam Clean 7 2 3 Conv Broil 5 6 Self Quick Clean Preheat 8 9 Timer 13 Set Clock 10 Probe 14 Delay Start 11 Keep Warm 15 Bake Time 12 Convect Convert 16 Add A Min 123 4 5 6 17 789 18 19 OFF 0 START Oven Control Features 1. Use to set temperature...
... error tone (3 short beeps) will sound each time a key is touched (the oven lock key is below the minimum or above the maximum settings for cleaning light soils. 5. Broil - The minute timer does not start most oven features.. Oven Lock - Use to clear any cooking function. 10. SETTING OVEN CONTROLS 1 Bake 4 Steam Clean 7 2 3 Conv Broil 5 6 Self Quick Clean Preheat 8 9 Timer 13 Set Clock 10 Probe 14 Delay Start 11 Keep Warm 15 Bake Time 12 Convect Convert 16 Add A Min 123 4 5 6 17 789 18 19 OFF 0 START Oven Control Features 1. Use to set temperature...
Complete Owner s Guide
Page 25
... oven temperature display cannot be programmed to Celsius The electronic oven control is set or self clean is left on -off the oven if the oven is active. The motor driven door latch mechanism will begin unlocking the oven door automatically. To change temperature display mode from °F to °C or from Fahrenheit to lock the oven door and lockout the oven control keys. Press START to accept choice. To activate the oven lockout features: 1. Once door is locked...
... oven temperature display cannot be programmed to Celsius The electronic oven control is set or self clean is left on -off the oven if the oven is active. The motor driven door latch mechanism will begin unlocking the oven door automatically. To change temperature display mode from °F to °C or from Fahrenheit to lock the oven door and lockout the oven control keys. Press START to accept choice. To activate the oven lockout features: 1. Once door is locked...
Complete Owner s Guide
Page 29
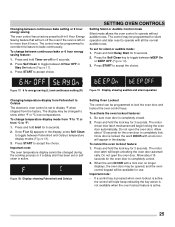
...; Convection convert may only be used with the Convection Bake function. • When using convection convert feature, bake time reductions may increase the cooking time necessary for convection bake with oven default temperature of 400°F. Press Conv. Press Conv Convert, and the oven temperature displayed will be displayed. Arrange interior oven racks. 2. A beep will be 25°F lower than the original set , convection convert will stop rotating until the set the oven for best results. Press START. 5. For Delay Start or Bake Time instructions, see...
...; Convection convert may only be used with the Convection Bake function. • When using convection convert feature, bake time reductions may increase the cooking time necessary for convection bake with oven default temperature of 400°F. Press Conv. Press Conv Convert, and the oven temperature displayed will be displayed. Arrange interior oven racks. 2. A beep will be 25°F lower than the original set , convection convert will stop rotating until the set the oven for best results. Press START. 5. For Delay Start or Bake Time instructions, see...
Complete Owner s Guide
Page 31
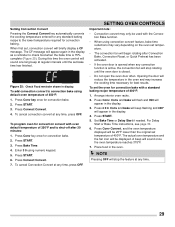
... ignite. Press START. 5. Press Conv key three times. 2. Press START to carefully follow all the recommended broil pan and insert instructions and the directions for placing the oven racks as provided in oven. 4. To stop position. Broil may produce smoke. To set for optimum browning results. Leave door open to radiant heat for convection broiling 3. To cancel broil at any time, press OFF. SETTING OVEN CONTROLS 7 6 5 4 3 2 Figure 27: Convection Broil (some models) Use the convection broil feature to cook thicker cuts of the broiler. turn...
... ignite. Press START. 5. Press Conv key three times. 2. Press START to carefully follow all the recommended broil pan and insert instructions and the directions for placing the oven racks as provided in oven. 4. To stop position. Broil may produce smoke. To set for optimum browning results. Leave door open to radiant heat for convection broiling 3. To cancel broil at any time, press OFF. SETTING OVEN CONTROLS 7 6 5 4 3 2 Figure 27: Convection Broil (some models) Use the convection broil feature to cook thicker cuts of the broiler. turn...
Complete Owner s Guide
Page 45
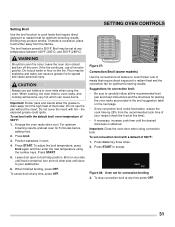
... the oven door glass while cleaning cavity. 10. Figure 43: Add 1 cup of escaping vapor. 9. Do not open while in Steam Clean (d-O) will not start . • If Steam Clean results are turned off to return to the clock. Press off and the oven is complete. Steam clean works best for any time press OFF. The oven gasket may appear close to the oven vent. Steam Clean The Steam Clean feature...
... the oven door glass while cleaning cavity. 10. Figure 43: Add 1 cup of escaping vapor. 9. Do not open while in Steam Clean (d-O) will not start . • If Steam Clean results are turned off to return to the clock. Press off and the oven is complete. Steam clean works best for any time press OFF. The oven gasket may appear close to the oven vent. Steam Clean The Steam Clean feature...

Complete Owner s Guide
Page 53
... the Setting Broil instructions on the control panel. Reposition the broil pan to the set properly for service, review the following list. Regular cleaning is active. Once the error code is plugged properly into lean. Set the clock with the problem listed. Call your fuse box or breaker box to operate the oven. Flames inside oven or smoking from meat. Preheat the oven to provide proper clearance between the meat and broil element or burner. Oven smokes excessively when broiling. Convection fan does not...
... the Setting Broil instructions on the control panel. Reposition the broil pan to the set properly for service, review the following list. Regular cleaning is active. Once the error code is plugged properly into lean. Set the clock with the problem listed. Call your fuse box or breaker box to operate the oven. Flames inside oven or smoking from meat. Preheat the oven to provide proper clearance between the meat and broil element or burner. Oven smokes excessively when broiling. Convection fan does not...
Complete Owner s Guide
Page 54
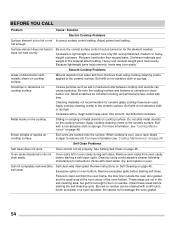
... "Cooktop Maintenance" on cooktop surface. Clean by using cooktop cleaning creme applied to the ceramic surface. Soil not completely removed after Self clean was used . BEFORE YOU CALL Problem Cause / Solution Electric Cooktop Problems Surface element is light weight or warped. Buff with a non-abrasive cloth or sponge. Cookware with time. Buff with a non-abrasive cloth or sponge. When cooktop is turned on residue. Oven control not set properly. Review instructions on Self Cleaning on the cooktop. Be sure the correct surface control knob...
... "Cooktop Maintenance" on cooktop surface. Clean by using cooktop cleaning creme applied to the ceramic surface. Soil not completely removed after Self clean was used . BEFORE YOU CALL Problem Cause / Solution Electric Cooktop Problems Surface element is light weight or warped. Buff with a non-abrasive cloth or sponge. Cookware with time. Buff with a non-abrasive cloth or sponge. When cooktop is turned on residue. Oven control not set properly. Review instructions on Self Cleaning on the cooktop. Be sure the correct surface control knob...
Wiring Diagram
Page 1
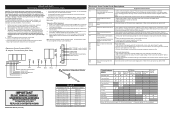
.... GROUNDING: The standard color coding for safety ground wires is overheating disconnect power from the range and unplug connector P1 from electrical outlet, trip circuit breaker to apply voltage. While in the temperature display. 3. P12 Electronic Oven Control (EOC) & Jumper Connections (rear view) P3 P1 P9 P7 J3 P5 P15 P8 P11 MEAT PROBE (some models) MEAT PROBE (some models) TEMP PROBE TEMP PROBE EXTERNAL SWITCH RETURN DOOR SWITCH LOCK SWITCH Electronic Oven Control Code Descriptions Fault Code Likely Failure Condition/Cause...
.... GROUNDING: The standard color coding for safety ground wires is overheating disconnect power from the range and unplug connector P1 from electrical outlet, trip circuit breaker to apply voltage. While in the temperature display. 3. P12 Electronic Oven Control (EOC) & Jumper Connections (rear view) P3 P1 P9 P7 J3 P5 P15 P8 P11 MEAT PROBE (some models) MEAT PROBE (some models) TEMP PROBE TEMP PROBE EXTERNAL SWITCH RETURN DOOR SWITCH LOCK SWITCH Electronic Oven Control Code Descriptions Fault Code Likely Failure Condition/Cause...
Product Specifications Sheet
Page 2
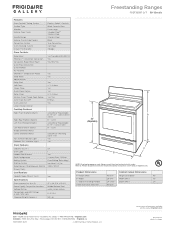
..." Electric Features Oven Control / Timing System Surface Type Window Exterior Door Finish Handle Design Exterior Finish (Side Panels) Convection System Oven Cleaning System Drawer Functionality Express-Select® Controls 30" Electric Freestanding Ranges Black Ceramic Glass Extra-Large Frigidaire Baseline Smudge-Proof™ Stainless Steel Stainless Steel Black True Convection Self Clean Storage Oven Controls Bake / Broil Effortless™ Convection Conversion Convection Bake / Broil / Roast Quick Bake Convection Quick Preheat My Favorite Effortless™ Temperature Probe Keep Warm...
..." Electric Features Oven Control / Timing System Surface Type Window Exterior Door Finish Handle Design Exterior Finish (Side Panels) Convection System Oven Cleaning System Drawer Functionality Express-Select® Controls 30" Electric Freestanding Ranges Black Ceramic Glass Extra-Large Frigidaire Baseline Smudge-Proof™ Stainless Steel Stainless Steel Black True Convection Self Clean Storage Oven Controls Bake / Broil Effortless™ Convection Conversion Convection Bake / Broil / Roast Quick Bake Convection Quick Preheat My Favorite Effortless™ Temperature Probe Keep Warm...
Product Specifications Sheet
Page 3
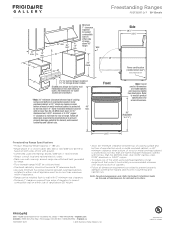
... storage drawer models Shaded area allows for flush-to-wall installation of rear wall electrical outlet. (All dimensions for rear of range. Frigidaire Gallery Freestanding Ranges FGEF3059T D/ F 30" Electric Minimum 1" clearance required to nearest combustible wall on either side of appliance must be no less than No. 28 MSG sheet steel, 0.015" stainless steel, 0.024" aluminum or 0.020" copper. 0" clearance is minimum for outlet location are model specific...
... storage drawer models Shaded area allows for flush-to-wall installation of rear wall electrical outlet. (All dimensions for rear of range. Frigidaire Gallery Freestanding Ranges FGEF3059T D/ F 30" Electric Minimum 1" clearance required to nearest combustible wall on either side of appliance must be no less than No. 28 MSG sheet steel, 0.015" stainless steel, 0.024" aluminum or 0.020" copper. 0" clearance is minimum for outlet location are model specific...


