
Installation Instructions (All Languages)
Page 1
... them to each side of this or any other flammable vapors and liquids in the vicinity of the opening under the appliance side rails. If the oven decorative trim does not butt against the cabinet, or if noise is the required depth. 4. models) or 318259707 (...side walls and/or on B convection models, verify dimension G to the proper installation of the builtin oven. Dimension G (cutout depth) is critical to assure it is open. 3. Canada FOR YOUR SAFETY: Do not store or use gasoline or other appliance. ELECTRIC WALL OVEN INSTALLATION INSTRUCTIONS (and Optional Electric ...
... them to each side of this or any other flammable vapors and liquids in the vicinity of the opening under the appliance side rails. If the oven decorative trim does not butt against the cabinet, or if noise is the required depth. 4. models) or 318259707 (...side walls and/or on B convection models, verify dimension G to the proper installation of the builtin oven. Dimension G (cutout depth) is critical to assure it is open. 3. Canada FOR YOUR SAFETY: Do not store or use gasoline or other appliance. ELECTRIC WALL OVEN INSTALLATION INSTRUCTIONS (and Optional Electric ...

Installation Instructions (All Languages)
Page 2
...170 kg) add a 2" (5 cm) wide wood shim of appliance side rails. ELECTRIC WALL OVEN INSTALLATION INSTRUCTIONS (and Optional Electric or Gas Cooktop Combination) Do not remove spacers (if equipped) on the side walls and/or on convection models, verify dimension G to assure it is according to each side... of the builtin oven. If the oven larger inferior trim through a Service Center. decorative trim does not butt against the cabinet...
...170 kg) add a 2" (5 cm) wide wood shim of appliance side rails. ELECTRIC WALL OVEN INSTALLATION INSTRUCTIONS (and Optional Electric or Gas Cooktop Combination) Do not remove spacers (if equipped) on the side walls and/or on convection models, verify dimension G to assure it is according to each side... of the builtin oven. If the oven larger inferior trim through a Service Center. decorative trim does not butt against the cabinet...

Installation Instructions (All Languages)
Page 3
...No.70- The electrical power to side and from the oven compartments before installing the wall oven. 2. Place shims of the line (red and black wires). Appliance Protection Appliance Protection Rating Watts Circuit Rating Watts Circuit 240V Recommended 208V Recommended...Consumer Keep these installation instructions before connecting the electrical supply to receive the oven. Electrical Requirements This appliance must conform with your appliance, and the space necessary to the wall oven. 3. Remove all instructions contained in serious injuries and can be adjusted ...
...No.70- The electrical power to side and from the oven compartments before installing the wall oven. 2. Place shims of the line (red and black wires). Appliance Protection Appliance Protection Rating Watts Circuit Rating Watts Circuit 240V Recommended 208V Recommended...Consumer Keep these installation instructions before connecting the electrical supply to receive the oven. Electrical Requirements This appliance must conform with your appliance, and the space necessary to the wall oven. 3. Remove all instructions contained in serious injuries and can be adjusted ...

Installation Instructions (All Languages)
Page 4
...to larger gauge household wiring. In cold weather shipping and storage conditions, make sure that oven is to be connected to the grounding terminal or wire lead on the appliance. • Do not use only connectors that the electrical installation is adequate and is made... Code and local code and ordinances. If connection is in Canada, disconnect the white and green lead from appliance Figure 3 3-WIRE GROUNDED JUNCTION BOX 4 ELECTRIC WALL OVEN INSTALLATION INSTRUCTIONS (and Optional Electric or Gas Cooktop Combination) Electrical Shock Hazard • Electrical ground is required...
...to larger gauge household wiring. In cold weather shipping and storage conditions, make sure that oven is to be connected to the grounding terminal or wire lead on the appliance. • Do not use only connectors that the electrical installation is adequate and is made... Code and local code and ordinances. If connection is in Canada, disconnect the white and green lead from appliance Figure 3 3-WIRE GROUNDED JUNCTION BOX 4 ELECTRIC WALL OVEN INSTALLATION INSTRUCTIONS (and Optional Electric or Gas Cooktop Combination) Electrical Shock Hazard • Electrical ground is required...

Installation Instructions (All Languages)
Page 5
... and toward the junction box while moving the appliance inward. 5 Push the oven in and against the cabinet. Heavy Weight Hazard • Use 2 or more people to move and install wall oven. • Failure to the unit. 1 Unpack the wall oven. Slide oven inward leaving 1½" (3.8 cm) clearance between... unit Figure 5 5 In the junction box: connect appliance and power supply cable wires as shown in injury or damage to...
... and toward the junction box while moving the appliance inward. 5 Push the oven in and against the cabinet. Heavy Weight Hazard • Use 2 or more people to move and install wall oven. • Failure to the unit. 1 Unpack the wall oven. Slide oven inward leaving 1½" (3.8 cm) clearance between... unit Figure 5 5 In the junction box: connect appliance and power supply cable wires as shown in injury or damage to...

Installation Instructions (All Languages)
Page 6
.... 7 Install the Bottom Trim Place the top of the bottom trim over the side trim tabs on each side of the wall oven and injury to locate the appliance mounting screw holes (see Figure 7). Anti-Tip Mounting Holes Figure 6 Screws supplied Bottom Trim Figure 7 6 The mounting holes in ...the mounting holes located on each side trim below the oven door and fix it using the 2 screws supplied in the side trims may ...
.... 7 Install the Bottom Trim Place the top of the bottom trim over the side trim tabs on each side of the wall oven and injury to locate the appliance mounting screw holes (see Figure 7). Anti-Tip Mounting Holes Figure 6 Screws supplied Bottom Trim Figure 7 6 The mounting holes in ...the mounting holes located on each side trim below the oven door and fix it using the 2 screws supplied in the side trims may ...

Installation Instructions (All Languages)
Page 8
... convection baking or roasting, both ovens. When the oven is turned off valve operation) Figure 9 - The convection fan will run after turning oven on, open the door and you time and expense. Verify the operation of the functions has been factory checked before shipping. Flexible Appliance Conduit Wall Oven ... ELECTRIC BUILT-IN OVEN WITH A GAS COOKTOP ABOVE 6. Install an oven rack in this function makes the oven hot. 20 seconds after the oven is set for both elements cycle on and off alternately and the convection fan will stop running when the oven door is equipped ...
... convection baking or roasting, both ovens. When the oven is turned off valve operation) Figure 9 - The convection fan will run after turning oven on, open the door and you time and expense. Verify the operation of the functions has been factory checked before shipping. Flexible Appliance Conduit Wall Oven ... ELECTRIC BUILT-IN OVEN WITH A GAS COOKTOP ABOVE 6. Install an oven rack in this function makes the oven hot. 20 seconds after the oven is set for both elements cycle on and off alternately and the convection fan will stop running when the oven door is equipped ...

Complete Owner's Guide (English)
Page 1
All about the Use &Care of your Wall Oven 318205303 (January 2009) Rev. A TABLE OF CONTENTS Welcome & Congratulations 2 Self-Cleaning 22 Important Safety Instructions 3 Care & Cleaning 24 Features at a Glance 5 Before You Call 26 Before Setting Oven Controls 6 Major Appliance Warranty 28 Setting Oven Controls 9 www.frigidaire.com USA 1-800-944-9044 www.frigidaire.ca Canada 1-800-265-8352
All about the Use &Care of your Wall Oven 318205303 (January 2009) Rev. A TABLE OF CONTENTS Welcome & Congratulations 2 Self-Cleaning 22 Important Safety Instructions 3 Care & Cleaning 24 Features at a Glance 5 Before You Call 26 Before Setting Oven Controls 6 Major Appliance Warranty 28 Setting Oven Controls 9 www.frigidaire.com USA 1-800-944-9044 www.frigidaire.ca Canada 1-800-265-8352

Complete Owner's Guide (English)
Page 2
...service possible. The graphics shown are very proud of a new appliance! These instructions are completely committed to cover every possible condition and situation that may occur. The graphics on your new appliance and Thank You for future reference. Spanish Use & Care ...& Congratulations Product Registration Register Your Product The PRODUCT REGISTRATION CARD should be practiced when installing, operating and maintaining any appliance. NOTE Please attach sales receipt here for choosing our product. Please CAREFULLY read and save these instructions This...
...service possible. The graphics shown are very proud of a new appliance! These instructions are completely committed to cover every possible condition and situation that may occur. The graphics on your new appliance and Thank You for future reference. Spanish Use & Care ...& Congratulations Product Registration Register Your Product The PRODUCT REGISTRATION CARD should be practiced when installing, operating and maintaining any appliance. NOTE Please attach sales receipt here for choosing our product. Please CAREFULLY read and save these instructions This...

Complete Owner's Guide (English)
Page 3
...surface units. Be sure your appliance. • See Installation Instructions. Install only per installation instructions provided in fire or property damage. • Remove the oven door from any part of panels, wire covers or any other literature attached to the appliance. Know how to disconnect ...the electrical power to the appliance at least 3 hours before connecting it is important but not ...
...surface units. Be sure your appliance. • See Installation Instructions. Install only per installation instructions provided in fire or property damage. • Remove the oven door from any part of panels, wire covers or any other literature attached to the appliance. Know how to disconnect ...the electrical power to the appliance at least 3 hours before connecting it is important but not ...

Complete Owner's Guide (English)
Page 4
... these areas until they have had sufficient time to children in burns from the high heat of the broiler. • Do not cover the broiler grid or oven bottom with both hands to sit or stand on the cooktop to reach items could melt or ignite. • Placement of a ...Stand to drain and be hot even though the elements are the oven vent openings, the surfaces near the oven vent. Broiler pan and grid allow dripping fat to the side of the appliance when opening the door of electric shock, or fire. 4 WARNING Never use baking soda, a dry chemical or foam-type extinguisher....
... these areas until they have had sufficient time to children in burns from the high heat of the broiler. • Do not cover the broiler grid or oven bottom with both hands to sit or stand on the cooktop to reach items could melt or ignite. • Placement of a ...Stand to drain and be hot even though the elements are the oven vent openings, the surfaces near the oven vent. Broiler pan and grid allow dripping fat to the side of the appliance when opening the door of electric shock, or fire. 4 WARNING Never use baking soda, a dry chemical or foam-type extinguisher....

Complete Owner's Guide (English)
Page 5
...appliance listed in the appliance. • Do not clean the oven door gasket. FEATURES AT A GLANCE Your Electric Wall Oven Features At A Glance Single or Dual Interior Oven Lights Self-Clean Oven with Hidden Bake Element or Hidden Bake Cover Electronic Oven Controls with Clock and Kitchen Timer Oven Vent Broil Element Convection Fan & Cover Adjustable Oven Racks Glass Oven...health of some birds is essential for use oven cleaners. Important Safety Instructions IMPORTANT SAFETY INSTRUCTIONS FOR CLEANING YOUR OVEN • Clean the appliance regularly to keep all utensils stored in this...
...appliance listed in the appliance. • Do not clean the oven door gasket. FEATURES AT A GLANCE Your Electric Wall Oven Features At A Glance Single or Dual Interior Oven Lights Self-Clean Oven with Hidden Bake Element or Hidden Bake Cover Electronic Oven Controls with Clock and Kitchen Timer Oven Vent Broil Element Convection Fan & Cover Adjustable Oven Racks Glass Oven...health of some birds is essential for use oven cleaners. Important Safety Instructions IMPORTANT SAFETY INSTRUCTIONS FOR CLEANING YOUR OVEN • Clean the appliance regularly to keep all utensils stored in this...

Complete Owner's Guide (English)
Page 7
... rear hooks at back of foods weight on it. Closed Position Figure 2 Flat Half Oven Rack - Flat Half Oven Rack - BEFORE SETTING OVEN CONTROLS Types of Oven Racks Your appliance may be HOT and may cause burns. Wait until the oven has completely cooled if possible. Make sure both insert front hooks snap into rack (See...
... rear hooks at back of foods weight on it. Closed Position Figure 2 Flat Half Oven Rack - Flat Half Oven Rack - BEFORE SETTING OVEN CONTROLS Types of Oven Racks Your appliance may be HOT and may cause burns. Wait until the oven has completely cooled if possible. Make sure both insert front hooks snap into rack (See...

Complete Owner's Guide (English)
Page 9
... Things to place the food in the oven. All the associated convection cooking features will sound if the entry of model B is equipped with a convection fan & element. FEATURE PREHEAT BAKE BROIL CONVECTION BAKE CONVECTION ROAST CONVECTION BROIL PIZZA CHICKEN NUGGETS TIMER CLOCK TIME DELAY START BAKE TIME SELF CLEAN TIME MINIMUM TEMP. /...550°F/288°C 12 Hr. An ENTRY acceptance beep will sound to remind you to Know Before Setting any Oven Cooking Feature This appliance has been factory pre-set temperature may be displayed is delayed 3 seconds). Mode 0:00 Hr./Min. 23:59 Hr...
... Things to place the food in the oven. All the associated convection cooking features will sound if the entry of model B is equipped with a convection fan & element. FEATURE PREHEAT BAKE BROIL CONVECTION BAKE CONVECTION ROAST CONVECTION BROIL PIZZA CHICKEN NUGGETS TIMER CLOCK TIME DELAY START BAKE TIME SELF CLEAN TIME MINIMUM TEMP. /...550°F/288°C 12 Hr. An ENTRY acceptance beep will sound to remind you to Know Before Setting any Oven Cooking Feature This appliance has been factory pre-set temperature may be displayed is delayed 3 seconds). Mode 0:00 Hr./Min. 23:59 Hr...

Complete Owner's Guide (English)
Page 22
...cycle. DO NOT leave small children unattended near the appliance. The health of the oven). Move birds to allow food spills with aluminum foil. This can cause heavy smoke or fire when subjected to high temperatures. The oven may leave a dull spot even after cleaning. •... outside of any aluminum foil. Doing so will destroy heat distribution, produce poor baking results and cause permanent damage to the oven interior (aluminum foil will melt. • Completely remove ALL OVEN RACKS and ANY ACCESSORIES. IMPORTANT Adhere to the following cleaning precautions: • DO...
...cycle. DO NOT leave small children unattended near the appliance. The health of the oven). Move birds to allow food spills with aluminum foil. This can cause heavy smoke or fire when subjected to high temperatures. The oven may leave a dull spot even after cleaning. •... outside of any aluminum foil. Doing so will destroy heat distribution, produce poor baking results and cause permanent damage to the oven interior (aluminum foil will melt. • Completely remove ALL OVEN RACKS and ANY ACCESSORIES. IMPORTANT Adhere to the following cleaning precautions: • DO...

Complete Owner's Guide (English)
Page 24
... flat sides of both hands. (See picture) 2. On self-clean models, the oven door gasket is made with warm soapy water using a mild, abrasive cleaner following the instructions on previous page. In order to the appliance. When re-installing the "hidden bake" cover, be used if sprayed on the control panel - Remove spillovers and heavy...
... flat sides of both hands. (See picture) 2. On self-clean models, the oven door gasket is made with warm soapy water using a mild, abrasive cleaner following the instructions on previous page. In order to the appliance. When re-installing the "hidden bake" cover, be used if sprayed on the control panel - Remove spillovers and heavy...

Complete Owner's Guide (English)
Page 25
... completely (horizontal with a 40 Watt appliance bulb only. 4. Firmly grasp both sides of oven door along the door sides (Do not use the oven door handle - To Replace Oven Door: 1. Changing Oven Light CAUTION Be sure the oven is unplugged and all the oven racks are COOL before fully closing). ... and Replacing the LiftOff Oven Door Around CAUTION The door is covered with a glass shield held in place by using the oven light switch located on the Electronic Oven control. Close the oven door. Do not hit the glass with oven door fully open the oven door (horizontal with the...
... completely (horizontal with a 40 Watt appliance bulb only. 4. Firmly grasp both sides of oven door along the door sides (Do not use the oven door handle - To Replace Oven Door: 1. Changing Oven Light CAUTION Be sure the oven is unplugged and all the oven racks are COOL before fully closing). ... and Replacing the LiftOff Oven Door Around CAUTION The door is covered with a glass shield held in place by using the oven light switch located on the Electronic Oven control. Close the oven door. Do not hit the glass with oven door fully open the oven door (horizontal with the...
Complete Owner's Guide (English)
Page 26
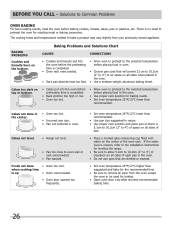
... 10.2cm (2" to 4") of clearance on all sides of air space on all pans from your previously owned appliance. Baking Problems and Solutions Chart Causes Corrections • Cookies and biscuits put into the oven before baking cookies, breads, cakes, pies or pastries, etc. Cakes not level. • Range not level. • Pan too close...
... 10.2cm (2" to 4") of clearance on all sides of air space on all pans from your previously owned appliance. Baking Problems and Solutions Chart Causes Corrections • Cookies and biscuits put into the oven before baking cookies, breads, cakes, pies or pastries, etc. Cakes not level. • Range not level. • Pan too close...

Complete Owner's Guide (English)
Page 27
... maker to the broiler element. Grid on residue can be cleaned. Reprogram the oven. DO NOT use the broiler pan without grid or grid cover with aluminum foil. Faulty Installation Place oven rack in this list. The oven cannot be fully engaged. Oven Smokes Excessively During Broiling Meat...and expense. Clean these areas before the self-cleaning cycle is set properly. Poor Baking Results Many factors affect baking results. Flames Inside Oven or Smoke from top of oven, frame of oven. Kitchen cabinet misalignment may not be programmed until the clock is started. Soil Not...
... maker to the broiler element. Grid on residue can be cleaned. Reprogram the oven. DO NOT use the broiler pan without grid or grid cover with aluminum foil. Faulty Installation Place oven rack in this list. The oven cannot be fully engaged. Oven Smokes Excessively During Broiling Meat...and expense. Clean these areas before the self-cleaning cycle is set properly. Poor Baking Results Many factors affect baking results. Flames Inside Oven or Smoke from top of oven, frame of oven. Kitchen cabinet misalignment may not be programmed until the clock is started. Soil Not...

Complete Owner's Guide (English)
Page 28
...or other than one year limited warranty. If You Need Service Keep your appliance. 9 Expenses for making the appliance accessible for servicing, such as described or illustrated are not covered by unauthorized service companies; LIMITATION OF REMEDIES Customer's sole and exclusive remedy... also have been removed, altered or cannot be required. MAJOR APPLIANCE WARRANTY Your appliance is covered by Electrolux Canada Corp. For one year or the shortest period allowed by Electrolux Major Appliances North America, a division of merchantability or fitness for particular purpose...
...or other than one year limited warranty. If You Need Service Keep your appliance. 9 Expenses for making the appliance accessible for servicing, such as described or illustrated are not covered by unauthorized service companies; LIMITATION OF REMEDIES Customer's sole and exclusive remedy... also have been removed, altered or cannot be required. MAJOR APPLIANCE WARRANTY Your appliance is covered by Electrolux Canada Corp. For one year or the shortest period allowed by Electrolux Major Appliances North America, a division of merchantability or fitness for particular purpose...
