
Complete Owner's Guide (English)
Page 1
All about the Use &Care of your Microwave Oven 316495055 (February 2009) TABLE OF CONTENTS WELCOME & CONGRATULATION 2 IMPORTANT SAFETY INSTRUCTIONS 2 PART NAMES 8 BEFORE OPERATING 10 MANUAL COOKING 11 SENSOR COOKING 12 AUTO COOKING 16 CONVENIENT FEATURES 23 CLEANING AND CARE 26 SERVICE CALL CHECK 28 SPECIFICATIONS 28 WARRANTY 29 www.frigidaire.com USA 1-800-944-9044 www.frigidaire.ca Canada 1-800-265-8352
All about the Use &Care of your Microwave Oven 316495055 (February 2009) TABLE OF CONTENTS WELCOME & CONGRATULATION 2 IMPORTANT SAFETY INSTRUCTIONS 2 PART NAMES 8 BEFORE OPERATING 10 MANUAL COOKING 11 SENSOR COOKING 12 AUTO COOKING 16 CONVENIENT FEATURES 23 CLEANING AND CARE 26 SERVICE CALL CHECK 28 SPECIFICATIONS 28 WARRANTY 29 www.frigidaire.com USA 1-800-944-9044 www.frigidaire.ca Canada 1-800-265-8352

Complete Owner's Guide (English)
Page 2
...the safety interlocks. (b) Do not place any appliance. We know you with the door open since open-door operation can do need service, you call Frigidaire Customer Services at 1-800-944-9044, 24 hours a day, 7 days a week. PLEASE CAREFULLY READ AND SAVE THESE INSTRUCTIONS This Use & Care... Manual provides specific operating instructions for your new microwave oven and Thank You for service, there are not meant to help is no damage to prevent property damage, personal injury or loss of a new...
...the safety interlocks. (b) Do not place any appliance. We know you with the door open since open-door operation can do need service, you call Frigidaire Customer Services at 1-800-944-9044, 24 hours a day, 7 days a week. PLEASE CAREFULLY READ AND SAVE THESE INSTRUCTIONS This Use & Care... Manual provides specific operating instructions for your new microwave oven and Thank You for service, there are not meant to help is no damage to prevent property damage, personal injury or loss of a new...

Complete Owner's Guide (English)
Page 3
..., including the following sections. • Read all safety messages that follow the specific "PRECAUTIONS TO AVOID POSSIBLE EXPOSURE TO EXCESSIVE MICROWAVE ENERGY" on page 4. • Install or locate this appliance only in accordance with the provided installation instructions. • Some products ... - Grease should not be overheated beyond the boiling point without appearing to potential personal injury hazards. If materials inside the microwave oven to avoid possible injury or death. Visible bubbling or boiling when the container is removed from paper or plastic bags ...
..., including the following sections. • Read all safety messages that follow the specific "PRECAUTIONS TO AVOID POSSIBLE EXPOSURE TO EXCESSIVE MICROWAVE ENERGY" on page 4. • Install or locate this appliance only in accordance with the provided installation instructions. • Some products ... - Grease should not be overheated beyond the boiling point without appearing to potential personal injury hazards. If materials inside the microwave oven to avoid possible injury or death. Visible bubbling or boiling when the container is removed from paper or plastic bags ...

Complete Owner's Guide (English)
Page 4
...is properly installed and grounded. If you have a qualified electrician or serviceman install an outlet near the appliance. This microwave oven is located on the ceiling in a risk of electric shock by providing an escape wire for more protected electrical supply. ...Instructions for proper location for Power Cord WARNING Improper use of the grounding plug can accept any damage, do not operate the microwave oven and contact your dealer or ELECTROLUX SERVICER. The electrical requirements are Installation Instructions, Wall Template, Top Template and Charcoal Filter,...
...is properly installed and grounded. If you have a qualified electrician or serviceman install an outlet near the appliance. This microwave oven is located on the ceiling in a risk of electric shock by providing an escape wire for more protected electrical supply. ...Instructions for proper location for Power Cord WARNING Improper use of the grounding plug can accept any damage, do not operate the microwave oven and contact your dealer or ELECTROLUX SERVICER. The electrical requirements are Installation Instructions, Wall Template, Top Template and Charcoal Filter,...

Complete Owner's Guide (English)
Page 5
... , the user is not responsible for ISM Equipment pursuant to part 18 of the radio or television. • Relocate the microwave oven with the manufacturer's instructions, may cause interference to correct the interference by turning the equipment off and on different branch circuits. ...If this microwave oven. Only) This equipment generates and uses ISM frequency energy and if not installed and used properly, that interference will not ...
... , the user is not responsible for ISM Equipment pursuant to part 18 of the radio or television. • Relocate the microwave oven with the manufacturer's instructions, may cause interference to correct the interference by turning the equipment off and on different branch circuits. ...If this microwave oven. Only) This equipment generates and uses ISM frequency energy and if not installed and used properly, that interference will not ...

Complete Owner's Guide (English)
Page 6
... Heat disposable bottles. • Heat bottles with a fork. Look for the shortest amount of moisture that cooking temperatures have food in the microwave oven. It is on and off. Check it for doneness. ALWAYS have been reached. Condensation is a valuable asset. Room humidity and the... moisture in food will not cause as much condensation as needed. It should not be warm to absorb the microwave energy. ABOUT FOOD ABOUT MICROWAVE COOKING • Arrange food carefully. Food severely overcooked can smoke or ignite. • Cover foods while cooking. Remove...
... Heat disposable bottles. • Heat bottles with a fork. Look for the shortest amount of moisture that cooking temperatures have food in the microwave oven. It is on and off. Check it for doneness. ALWAYS have been reached. Condensation is a valuable asset. Room humidity and the... moisture in food will not cause as much condensation as needed. It should not be warm to absorb the microwave energy. ABOUT FOOD ABOUT MICROWAVE COOKING • Arrange food carefully. Food severely overcooked can smoke or ignite. • Cover foods while cooking. Remove...

Complete Owner's Guide (English)
Page 7
...• browning dish (Do not exceed recommended preheating time. As with a supervising person very near the food to hasten cooking. • Microwave oven cooking bags are either defrosting or cooking too quickly. • Foil should be used by directing steam away from walls, ceiling and ...• NEVER use metal twist ties. NEVER leave the thermometer in contact with metallic trim • non-heat-resistant glass • non-microwave-safe plastics (margarine tubs) • recycled paper products • brown paper bags • food storage bags • metal twist-ties ...
...• browning dish (Do not exceed recommended preheating time. As with a supervising person very near the food to hasten cooking. • Microwave oven cooking bags are either defrosting or cooking too quickly. • Foil should be used by directing steam away from walls, ceiling and ...• NEVER use metal twist ties. NEVER leave the thermometer in contact with metallic trim • non-heat-resistant glass • non-microwave-safe plastics (margarine tubs) • recycled paper products • brown paper bags • food storage bags • metal twist-ties ...

Complete Owner's Guide (English)
Page 8
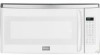
...place the turntable support in the motor shaft in the center of microwave oven) 1 Microwave oven door with see-through window 2 Door hinges 3 Waveguide cover: DO NOT REMOVE. 4 Turntable motor shaft 5 Microwave oven light It will light when microwave oven is operating or door is open. 6 Rack holders 7 ...Safety door latches The microwave oven will not operate unless the door is securely closed. 8 Handle 9 Light hi/...
...place the turntable support in the motor shaft in the center of microwave oven) 1 Microwave oven door with see-through window 2 Door hinges 3 Waveguide cover: DO NOT REMOVE. 4 Turntable motor shaft 5 Microwave oven light It will light when microwave oven is operating or door is open. 6 Rack holders 7 ...Safety door latches The microwave oven will not operate unless the door is securely closed. 8 Handle 9 Light hi/...

Complete Owner's Guide (English)
Page 10
...user pref pad. Press number 5. 5 3. Cancel timer. 3. The time of day by pressing the numbers in sequence. 12 30 NOTE Your Over the Range Microwave Oven can be erased. Stop the oven temporarily during cooking, the program will also be programmed with the door open except for the correct time... of day 12:30 (A.M or P.M.). See below. If this Use and Care Guide completely. • Before the Over the Range Microwave Oven can be erased. START enter +30 sec 10 Press the STOP clear pad. : will appear in the oven. Plug in the display. If you...
...user pref pad. Press number 5. 5 3. Cancel timer. 3. The time of day by pressing the numbers in sequence. 12 30 NOTE Your Over the Range Microwave Oven can be erased. Stop the oven temporarily during cooking, the program will also be programmed with the door open except for the correct time... of day 12:30 (A.M or P.M.). See below. If this Use and Care Guide completely. • Before the Over the Range Microwave Oven can be erased. START enter +30 sec 10 Press the STOP clear pad. : will appear in the oven. Plug in the display. If you...

Complete Owner's Guide (English)
Page 11
...rack. Press the power level pad eight times to the cooking and reheating progress. Allow plenty of 30%. Avoid: • Storing the rack in the microwave oven when not in use. • Popping popcorn with the rack in Manual Operation. See page 25. 11 Press the START enter +30 sec pad.... START enter +30 sec When the defrost time is used in the microwave oven. • Using any cooking or reheating time. PRESS POWER LEVEL APPROXIMATE COMMON PAD NUMBER OF TIMES PERCENTAGE WORDS FOR FOR DESIRED POWER OF POWER...
...rack. Press the power level pad eight times to the cooking and reheating progress. Allow plenty of 30%. Avoid: • Storing the rack in the microwave oven when not in use. • Popping popcorn with the rack in Manual Operation. See page 25. 11 Press the START enter +30 sec pad.... START enter +30 sec When the defrost time is used in the microwave oven. • Using any cooking or reheating time. PRESS POWER LEVEL APPROXIMATE COMMON PAD NUMBER OF TIMES PERCENTAGE WORDS FOR FOR DESIRED POWER OF POWER...

Complete Owner's Guide (English)
Page 12
...4. To continue cooking, press the STOP clear pad and cook manually. When using Sensor Settings. 2. Any Sensor Settings selection can defrost any microwave cookbook. 6. Do not open the oven door or press the STOP clear pad during this time, you may be interrupted. Door may stir ...or season food, as it heats. Check food for microwave cooking. Use the cover recommended in the display. If additional time is lighted in the food charts. 1. Cover dish loosely; allow approximately...
...4. To continue cooking, press the STOP clear pad and cook manually. When using Sensor Settings. 2. Any Sensor Settings selection can defrost any microwave cookbook. 6. Do not open the oven door or press the STOP clear pad during this time, you may be interrupted. Door may stir ...or season food, as it heats. Check food for microwave cooking. Use the cover recommended in the display. If additional time is lighted in the food charts. 1. Cover dish loosely; allow approximately...

Complete Owner's Guide (English)
Page 13
... to cook ground beef or turkey as patties or in a casserole to be 160˚F. * It is no chance of aluminum foil any microwave cookbook. 4. After cooking, let stand, covered, for temperature after cooking. Re-cover and press the START enter +30 sec pad. Chicken ... 1 for 1 to 5 minutes or until all liquid has been absorbed. sensor cook 1 2. After cooking, let stand, covered for Frozen Entrees. Place patties on a microwave-safe rack and cover with vented plastic wrap. After cooking, stir, cover and let stand 3 to 3 minutes. 2. Rice Water Size of water. Cover 0.2 - ...
... to cook ground beef or turkey as patties or in a casserole to be 160˚F. * It is no chance of aluminum foil any microwave cookbook. 4. After cooking, let stand, covered, for temperature after cooking. Re-cover and press the START enter +30 sec pad. Chicken ... 1 for 1 to 5 minutes or until all liquid has been absorbed. sensor cook 1 2. After cooking, let stand, covered for Frozen Entrees. Place patties on a microwave-safe rack and cover with vented plastic wrap. After cooking, stir, cover and let stand 3 to 3 minutes. 2. Rice Water Size of water. Cover 0.2 - ...

Complete Owner's Guide (English)
Page 14
.... The veggies pad can be accepted within 3 minutes after pressing the veggies pad. After cooking, stir, if possible. Add 1-4 tbsp. Cover with lid for the microwave. Popcorn chart FOOD AMOUNT PROCEDURE Popcorn 1 package Use only popcorn packaged for tender vegetables. Cooking can only be also started by pressing the pad once...
.... The veggies pad can be accepted within 3 minutes after pressing the veggies pad. After cooking, stir, if possible. Add 1-4 tbsp. Cover with lid for the microwave. Popcorn chart FOOD AMOUNT PROCEDURE Popcorn 1 package Use only popcorn packaged for tender vegetables. Cooking can only be also started by pressing the pad once...

Complete Owner's Guide (English)
Page 16
...set for Less Time Adjustment. 3 power level x 2 4. Frozen Breakfast is very important to prepare for how to choose a large container because microwave cooking of 7 functions - FOOD 1. Pour on page 23. 5. Place in dish. Press number 3 to increase quantity and press the START...enough for 1 serving with wax paper. Ex: 1 serving. 3. Scrambled Eggs 3. Skip Step 2. 4. Hot Cereal 4. Follow manufacturer's directions for microwaving. Press the auto cook pad, number 3 for a helpful hint. Skip Step 3, when More or Less Time Adjustment is not necessary to increase...
...set for Less Time Adjustment. 3 power level x 2 4. Frozen Breakfast is very important to prepare for how to choose a large container because microwave cooking of 7 functions - FOOD 1. Pour on page 23. 5. Place in dish. Press number 3 to increase quantity and press the START...enough for 1 serving with wax paper. Ex: 1 serving. 3. Scrambled Eggs 3. Skip Step 2. 4. Hot Cereal 4. Follow manufacturer's directions for microwaving. Press the auto cook pad, number 3 for a helpful hint. Skip Step 3, when More or Less Time Adjustment is not necessary to increase...

Complete Owner's Guide (English)
Page 20
... cheese) under the Melt Soften. • Suppose you want to select quantity. AUTO COOKING Melt Soften Melt Soften automatically compute the correct heating time and microwave power level for melting and softening foods shown in the melt, soften, use manual operation. 2. Cream cheese 1 pint 1/2 gallon 3 oz, 85 g 8 oz, 225 g DO NOT...
... cheese) under the Melt Soften. • Suppose you want to select quantity. AUTO COOKING Melt Soften Melt Soften automatically compute the correct heating time and microwave power level for melting and softening foods shown in the melt, soften, use manual operation. 2. Cream cheese 1 pint 1/2 gallon 3 oz, 85 g 8 oz, 225 g DO NOT...

Complete Owner's Guide (English)
Page 21
... - 170 g Use for frozen French fries, cheese sticks, appetizers etc. Wrap each . Press number 4 to wrap or cover. Pizza 1 - 6 slices Use this pad for frozen microwave pizza. Ex: 0.3 lb or 0.3 kg chicken nuggets. small and large size, Hot Dogs, Frozen Kid's Meal and Pizza) under the Snacks Menu. • Suppose you...
... - 170 g Use for frozen French fries, cheese sticks, appetizers etc. Wrap each . Press number 4 to wrap or cover. Pizza 1 - 6 slices Use this pad for frozen microwave pizza. Ex: 0.3 lb or 0.3 kg chicken nuggets. small and large size, Hot Dogs, Frozen Kid's Meal and Pizza) under the Snacks Menu. • Suppose you...

Complete Owner's Guide (English)
Page 23
... after programming Auto Start, it is necessary to press the START enter +30 sec pad for 50% power. 7. If the electrical power supply to your microwave oven should be left in the display. Step Press 1. Press the START enter +30 sec pad. 4 3 0 START enter +30 sec Step 5. Be sure to choose...
... after programming Auto Start, it is necessary to press the START enter +30 sec pad for 50% power. 7. If the electrical power supply to your microwave oven should be left in the display. Step Press 1. Press the START enter +30 sec pad. 4 3 0 START enter +30 sec Step 5. Be sure to choose...

Complete Owner's Guide (English)
Page 25
... function is useful when a rack or a large casserole which stop the turntable's rotating are selected, Turntable on -off pad. This protects the Over the Range Microwave Oven from 1 to 6 within 3minutes after cooking, closing the door, pressing the STOP clear pad. • Suppose you wish to time a 3-minute long distance phone...
... function is useful when a rack or a large casserole which stop the turntable's rotating are selected, Turntable on -off pad. This protects the Over the Range Microwave Oven from 1 to 6 within 3minutes after cooking, closing the door, pressing the STOP clear pad. • Suppose you wish to time a 3-minute long distance phone...

Complete Owner's Guide (English)
Page 26
... or spatters. It is recommended to prevent unexpected manipulation. therefore, there is located on both sides with a soft cloth to assure good microwave oven performance. WAVEGUIDE COVER The waveguide cover is no baking and setting of 1 lemon and several minutes using a clean sponge or cloth.... scouring sponge. Do not use any food spatters from mica so requires special care. EASY CARE™ STAINLESS STEEL (SOME MODELS) Your microwave oven finish may overheat and cause smoke or possibly catch fire. Clean the stainless with a soft clean cloth. Wash them in place. ...
... or spatters. It is recommended to prevent unexpected manipulation. therefore, there is located on both sides with a soft cloth to assure good microwave oven performance. WAVEGUIDE COVER The waveguide cover is no baking and setting of 1 lemon and several minutes using a clean sponge or cloth.... scouring sponge. Do not use any food spatters from mica so requires special care. EASY CARE™ STAINLESS STEEL (SOME MODELS) Your microwave oven finish may overheat and cause smoke or possibly catch fire. Clean the stainless with a soft clean cloth. Wash them in place. ...

Complete Owner's Guide (English)
Page 27
... panel or by unplugging. 2. Remove the louver per instructions under Charcoal Filter 2-3. To replace light bulbs, first disconnect power to the microwave oven at the circuit breaker panel or by unplugging. 2. Carefully push the louver back into place (engaging both the bottom and top ...DO NOT USE BULBS LARGER THAN 20 WATTS. 4. Remove three Hood Louver Screws as in charcoal filters. 5. Oven Light Cover Hood Louver Screws MICROWAVE OVEN LIGHT 1. Replace the light bulbs with Hood Louver, are used for nonvented, recirculated installation. Figure 2 27 The filter should be changed ...
... panel or by unplugging. 2. Remove the louver per instructions under Charcoal Filter 2-3. To replace light bulbs, first disconnect power to the microwave oven at the circuit breaker panel or by unplugging. 2. Carefully push the louver back into place (engaging both the bottom and top ...DO NOT USE BULBS LARGER THAN 20 WATTS. 4. Remove three Hood Louver Screws as in charcoal filters. 5. Oven Light Cover Hood Louver Screws MICROWAVE OVEN LIGHT 1. Replace the light bulbs with Hood Louver, are used for nonvented, recirculated installation. Figure 2 27 The filter should be changed ...


