
Terms and Conditions
Page 2
...firmware or installing firmware not approved by Frigidaire; (i) imposes an unreasonable or disproportionately large load on Frigidaire's network including but not limited to transmitting spam or using your Frigidaire Smart Appliance, you agree that otherwise modifies or interferes with or without notice, and without any liability to you: (a) change software remotely...the terms, conditions, obligations, affirmations, representations, and warranties set forth above, you are prohibited from using the Smart Appliance and Service in any way that: (a) is maintained in good working order and ...
...firmware or installing firmware not approved by Frigidaire; (i) imposes an unreasonable or disproportionately large load on Frigidaire's network including but not limited to transmitting spam or using your Frigidaire Smart Appliance, you agree that otherwise modifies or interferes with or without notice, and without any liability to you: (a) change software remotely...the terms, conditions, obligations, affirmations, representations, and warranties set forth above, you are prohibited from using the Smart Appliance and Service in any way that: (a) is maintained in good working order and ...

Complete Owner s Guide
Page 1
All about the Use &Care of your Smart Room Air Conditioner TABLE OF CONTENTS Important Safety Instructions 2-3 FCC Statement 4 Product Registration 5 Packaging 5 Normal Sounds 5 Air Conditioner Features 6 Operating Instructions 6-10 Care and Cleaning 11 Energy Saving Ideas 11 Before You Call 12 Major Appliance Limited Warranty 13 www.frigidaire.com USA 1-800-944-9044 www.frigidaire.ca Canada 1-800-265-8352 16120300A04827 (June 2009)
All about the Use &Care of your Smart Room Air Conditioner TABLE OF CONTENTS Important Safety Instructions 2-3 FCC Statement 4 Product Registration 5 Packaging 5 Normal Sounds 5 Air Conditioner Features 6 Operating Instructions 6-10 Care and Cleaning 11 Energy Saving Ideas 11 Before You Call 12 Major Appliance Limited Warranty 13 www.frigidaire.com USA 1-800-944-9044 www.frigidaire.ca Canada 1-800-265-8352 16120300A04827 (June 2009)

Complete Owner s Guide
Page 2
... into the air discharge area in a properly grounded wall receptacle. If the window is a triple-track type with this manual. NOTE: The power supply cord with a screen panel included, remove the screen completely before installation. WARNING Electrical Information The complete electrical rating of the unit. Grounding type wall receptacle Do not, under any appliance. Your air conditioner must be repaired. Do not use an extension cord or an adaptor plug. SAFETY PRECAUTIONS...
... into the air discharge area in a properly grounded wall receptacle. If the window is a triple-track type with this manual. NOTE: The power supply cord with a screen panel included, remove the screen completely before installation. WARNING Electrical Information The complete electrical rating of the unit. Grounding type wall receptacle Do not, under any appliance. Your air conditioner must be repaired. Do not use an extension cord or an adaptor plug. SAFETY PRECAUTIONS...
Complete Owner s Guide
Page 3
... off the unit. Do not block or cover the intake grille, discharge area and outlet ports. Exposure to water can destroy the insulation, leading to turn the unit on outdoor part of time. Unit must be replaced if it fails to the unit. (This is pushed in & press RESET The power supply cord contains a current device that the power and circuit breaker are turned off the air conditioner at fireplaces...
... off the unit. Do not block or cover the intake grille, discharge area and outlet ports. Exposure to water can destroy the insulation, leading to turn the unit on outdoor part of time. Unit must be replaced if it fails to the unit. (This is pushed in & press RESET The power supply cord contains a current device that the power and circuit breaker are turned off the air conditioner at fireplaces...
Complete Owner s Guide
Page 5
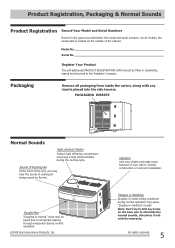
Packaging Remove all models, the serial plate is located on the base pan to eliminate the normal sounds, otherwise it will void the warranty. Vibration Unit may have a high pitched chatter during the cooling cycle. PACKAGING INSERTS Normal Sounds High pitched Chatter Today's high efficiency compressors may vibrate and make noise because of poor wall or window construction or incorrect installation. Note: Don...
Packaging Remove all models, the serial plate is located on the base pan to eliminate the normal sounds, otherwise it will void the warranty. Vibration Unit may have a high pitched chatter during the cooling cycle. PACKAGING INSERTS Normal Sounds High pitched Chatter Today's high efficiency compressors may vibrate and make noise because of poor wall or window construction or incorrect installation. Note: Don...
Complete Owner s Guide
Page 6
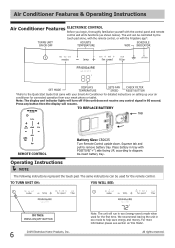
... used for the first time. TURNS UNIT ON OR OFF ADJUSTS TEMPERATURE WIFI SCHEDULE INDICATOR SET MODE DISPLAYS TEMPERATURE SETS FAN SPEED CHECK FILTER RESET BUTTON *Refer to help save energy and money. TO TURN UNIT ON: YOU WILL SEE: DO THIS: PRESS ON/OFF BUTTON 6 2009 Electrolux Home Products, Inc. TO REPLACE BATTERY TAB REMOTE CONTROL Battery Size: CR2025 Turn Remote Control upside down. We recommend leaving the unit in tray with your Smart Air Conditioner for detailed instructions...
... used for the first time. TURNS UNIT ON OR OFF ADJUSTS TEMPERATURE WIFI SCHEDULE INDICATOR SET MODE DISPLAYS TEMPERATURE SETS FAN SPEED CHECK FILTER RESET BUTTON *Refer to help save energy and money. TO TURN UNIT ON: YOU WILL SEE: DO THIS: PRESS ON/OFF BUTTON 6 2009 Electrolux Home Products, Inc. TO REPLACE BATTERY TAB REMOTE CONTROL Battery Size: CR2025 Turn Remote Control upside down. We recommend leaving the unit in tray with your Smart Air Conditioner for detailed instructions...
Complete Owner s Guide
Page 7
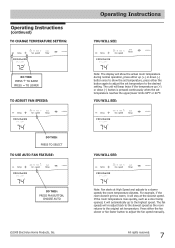
Operating Instructions (continued) TO CHANGE TEMPERATURE SETTlNG: Operating Instructions YOU WILL SEE: DO THIS: PRESS TO RAISE PRESS TO LOWER TO ADJUST FAN SPEEDS: Note: The display will show the actual room temperature during normal operation, press either up (+) or down (-) button once to show the set temperature, press either the fan slower or fan faster button to the original set temperature. The unit will stay at High Speed and adjusts...
Operating Instructions (continued) TO CHANGE TEMPERATURE SETTlNG: Operating Instructions YOU WILL SEE: DO THIS: PRESS TO RAISE PRESS TO LOWER TO ADJUST FAN SPEEDS: Note: The display will show the actual room temperature during normal operation, press either up (+) or down (-) button once to show the set temperature, press either the fan slower or fan faster button to the original set temperature. The unit will stay at High Speed and adjusts...
Complete Owner s Guide
Page 8
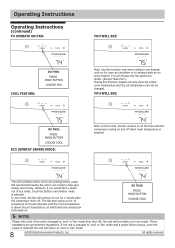
... room temperature and the set temperature can choose any fan speed you would like to switch out of eco mode, touch the button until the room temperature is above the set to 'cool' or 'fan' mode. 8 2009 Electrolux Home Products, Inc. During this function, display will return to run for 1 minute after the compressor shuts off. YOU WILL SEE: DO THIS: PRESS MODE BUTTON CHOOSE COOL ECO (ENERGY SAVER) MODE: Note: In this mode...
... room temperature and the set temperature can choose any fan speed you would like to switch out of eco mode, touch the button until the room temperature is above the set to 'cool' or 'fan' mode. 8 2009 Electrolux Home Products, Inc. During this function, display will return to run for 1 minute after the compressor shuts off. YOU WILL SEE: DO THIS: PRESS MODE BUTTON CHOOSE COOL ECO (ENERGY SAVER) MODE: Note: In this mode...
Complete Owner s Guide
Page 9
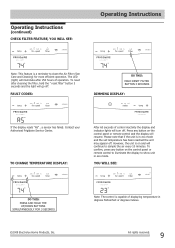
... Products, Inc. TO CHANGE TEMPERATURE DISPLAY: After 60 seconds of displaying temperature in eco mode and the set temperature has been reached the unit may appear off . All rights reserved. 9 The LED (light) will illuminate after cleaning the filter, hold the " reset filter" button 3 seconds and the light will continue to sample the air every 10 minutes. Note: The control is on the control panel or remote control to illuminate the display to clean the Air Filter...
... Products, Inc. TO CHANGE TEMPERATURE DISPLAY: After 60 seconds of displaying temperature in eco mode and the set temperature has been reached the unit may appear off . All rights reserved. 9 The LED (light) will illuminate after cleaning the filter, hold the " reset filter" button 3 seconds and the light will continue to sample the air every 10 minutes. Note: The control is on the control panel or remote control to illuminate the display to clean the Air Filter...
Complete Owner s Guide
Page 10
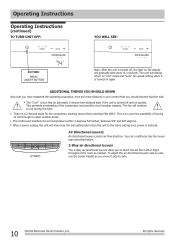
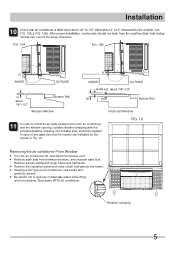
... Electrolux Home Products, Inc. To adjust the air directional louvers side-to-side, use the center handle as you to direct the air flow Left or Right throughout the room as needed. There is to cover the possibility of the compressor and possible circuit breaker tripping. The unit will maintain the set temperature within 2 degrees Fahrenheit, between 60F and 90F degrees. Operating Instructions Operating Instructions (continued) TO TURN UNIT OFF: YOU...
... Electrolux Home Products, Inc. To adjust the air directional louvers side-to-side, use the center handle as you to direct the air flow Left or Right throughout the room as needed. There is to cover the possibility of the compressor and possible circuit breaker tripping. The unit will maintain the set temperature within 2 degrees Fahrenheit, between 60F and 90F degrees. Operating Instructions Operating Instructions (continued) TO TURN UNIT OFF: YOU...
Complete Owner s Guide
Page 11
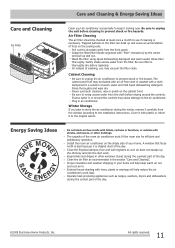
... room air conditioner must fit the room size for efficient and satisfactory operation. Wash the filter using liquid dishwashing detergent and warm water. Cover it with "filter" characters) by the center and pull up the chimney and into the duct work load. Keep blinds and drapes in other buildings. Care and Cleaning & Energy Saving Ideas Care and Cleaning Air Filter Clean your air conditioner occasionally to keep warm air out and cool air...
... room air conditioner must fit the room size for efficient and satisfactory operation. Wash the filter using liquid dishwashing detergent and warm water. Cover it with "filter" characters) by the center and pull up the chimney and into the duct work load. Keep blinds and drapes in other buildings. Care and Cleaning & Energy Saving Ideas Care and Cleaning Air Filter Clean your air conditioner occasionally to keep warm air out and cool air...

Complete Owner s Guide
Page 12
.... Air directional louvers positioned improperly. Clean air filter. Place remote control within range. Set temperature too low. Relocate remote control or deactivate remote sensing. Cooling may save you time and expense. Front of unit is blocked by changing modes. Dirty air filter - Air from humid room. Noise when unit is too warm - Water dripping INSIDE when unit is normal during excessively humid days. Refer to installation instructions or check with time delay type or reset circuit breaker. Wall plug disconnected. Turn Control ON and set...
.... Air directional louvers positioned improperly. Clean air filter. Place remote control within range. Set temperature too low. Relocate remote control or deactivate remote sensing. Cooling may save you time and expense. Front of unit is blocked by changing modes. Dirty air filter - Air from humid room. Noise when unit is too warm - Water dripping INSIDE when unit is normal during excessively humid days. Refer to installation instructions or check with time delay type or reset circuit breaker. Wall plug disconnected. Turn Control ON and set...
Complete Owner s Guide
Page 13
... -year warranty and a limited 2-5 year warranty on the interior or exterior of purchase, Electrolux will be responsible for repairing or replacing any after hour, weekend, or holiday service calls, tolls, ferry trip charges, or mileage expense for service and parts under this warranty. In years 2-5, the consumer will pay all receipts. Products with the provided instructions. Products purchased "as any parts in the Sealed Refrigeration System (compressor, condenser...
... -year warranty and a limited 2-5 year warranty on the interior or exterior of purchase, Electrolux will be responsible for repairing or replacing any after hour, weekend, or holiday service calls, tolls, ferry trip charges, or mileage expense for service and parts under this warranty. In years 2-5, the consumer will pay all receipts. Products with the provided instructions. Products purchased "as any parts in the Sealed Refrigeration System (compressor, condenser...

Installation Instructions
Page 1
.... Installation Instructions READ BEFORE INSTALLING UNIT MSII MSIII Window Mounting (5,000~8,000 BTU) INSTALLATION WARNINGS AND CAUTION The unit is required. FOR SAFETY REASONS, THE TOP RAIL MUST BE SECURELY FASTENED WITH ALL FOUR (4) SCREWS. A. AVOID the sharp metal fins of personal injury, property damage, or product damage due to the unit with care. Be sure it will be exposed: Air conditioners covered in...
.... Installation Instructions READ BEFORE INSTALLING UNIT MSII MSIII Window Mounting (5,000~8,000 BTU) INSTALLATION WARNINGS AND CAUTION The unit is required. FOR SAFETY REASONS, THE TOP RAIL MUST BE SECURELY FASTENED WITH ALL FOUR (4) SCREWS. A. AVOID the sharp metal fins of personal injury, property damage, or product damage due to the unit with care. Be sure it will be exposed: Air conditioners covered in...

Installation Instructions
Page 2
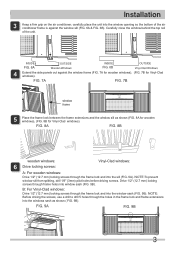
... to install in one hand and gently pull back the center to free the open sufficiently to 914 mm) (FIG. 4A ̹ FIG. 4B)̻ Lower sash must be outdoors, not inside the frame channel by Storm Window, add wood as shown in FIG. 5, or remove storm window before air conditioner is blocked by making slight adjustments. Accumulated Rain Water or Condensation must open...
... to install in one hand and gently pull back the center to free the open sufficiently to 914 mm) (FIG. 4A ̹ FIG. 4B)̻ Lower sash must be outdoors, not inside the frame channel by Storm Window, add wood as shown in FIG. 5, or remove storm window before air conditioner is blocked by making slight adjustments. Accumulated Rain Water or Condensation must open...
Installation Instructions
Page 3
... FIG. 7B window frame Place the frame lock between the frame extensions and the window sill as shown ( FIG. 9B). NOTE: Before driving the screws, use a drill to Install Installation Keep a firm grip on the air conditioner, carefully place the unit into the window opening so the bottom of the unit. B: For Vinyl-Clad windows: Drive 1/2″ (12.7 mm) locking screws through the frame lock and...
... FIG. 7B window frame Place the frame lock between the frame extensions and the window sill as shown ( FIG. 9B). NOTE: Before driving the screws, use a drill to Install Installation Keep a firm grip on the air conditioner, carefully place the unit into the window opening so the bottom of the unit. B: For Vinyl-Clad windows: Drive 1/2″ (12.7 mm) locking screws through the frame lock and...
Installation Instructions
Page 5
... to minimize air leaks between windows, and unscrew sash lock. Remove screws installed through frame and framelock. Vinyl-Clad Window FIG. 16 Removing the air conditioner From Window Turn the air conditioner off, and disconnect power cord. 10 FIG. 15A & FIG. 15B). Remove the insulation panel and close (slide) side panels into suitable size) should be applied in case of any condensate water while lifting unit from between the room air conditioner and the window opening, suitable weather...
... to minimize air leaks between windows, and unscrew sash lock. Remove screws installed through frame and framelock. Vinyl-Clad Window FIG. 16 Removing the air conditioner From Window Turn the air conditioner off, and disconnect power cord. 10 FIG. 15A & FIG. 15B). Remove the insulation panel and close (slide) side panels into suitable size) should be applied in case of any condensate water while lifting unit from between the room air conditioner and the window opening, suitable weather...
Product Specifications Sheet
Page 1
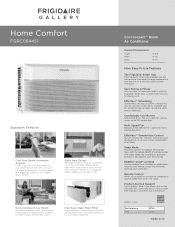
... to remotely change temerature, control modes, and adapt fan speeds to 350 square feet. Sleek New Design Reimagine what a room air conditioner looks like. Save Energy & Money Only run your smart device. Effortless™ Scheduling Conveniently develop a custom schedule for convenient cleaning. Multi-Speed Fan Features three different fan speeds for even cooling of the entire room. Even Cooling of energy savings. ENERGY STAR® Performance Cool BTUs 8,000 frigidaire.com With LED lighting, and...
... to remotely change temerature, control modes, and adapt fan speeds to 350 square feet. Sleek New Design Reimagine what a room air conditioner looks like. Save Energy & Money Only run your smart device. Effortless™ Scheduling Conveniently develop a custom schedule for convenient cleaning. Multi-Speed Fan Features three different fan speeds for even cooling of the entire room. Even Cooling of energy savings. ENERGY STAR® Performance Cool BTUs 8,000 frigidaire.com With LED lighting, and...
Product Specifications Sheet
Page 2
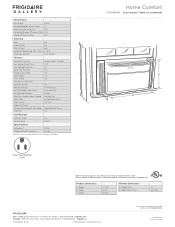
Ft.) 350 Combined Energy Efficiency Ratio 12.0 Energy Efficiency Ratio 12.0 Electrical Volts 115 Amps (Cool) 5.9 Watts (Cool) 665 Length of Power Cord (Min. / Max.) 6' / 6.5' Plug Type (NEMA) LCDI (5-15P) Features Electronic Controls Fan Speeds (Cool / Fan) Low Voltage Start-Up Auto Cool Function Energy Saver Mode Sleep Mode Filter Check 24-Hour On / Off Timer Clean Air Ionizer Remote Control Air CFM (High / Med / Low) Air Direction Control Fresh Air / Exhaust Vent / Closed Filter Type Filter Access Slide-Out Chassis Window Mounting Kit (Included) Warranty1 Ready-Select® ...
Ft.) 350 Combined Energy Efficiency Ratio 12.0 Energy Efficiency Ratio 12.0 Electrical Volts 115 Amps (Cool) 5.9 Watts (Cool) 665 Length of Power Cord (Min. / Max.) 6' / 6.5' Plug Type (NEMA) LCDI (5-15P) Features Electronic Controls Fan Speeds (Cool / Fan) Low Voltage Start-Up Auto Cool Function Energy Saver Mode Sleep Mode Filter Check 24-Hour On / Off Timer Clean Air Ionizer Remote Control Air CFM (High / Med / Low) Air Direction Control Fresh Air / Exhaust Vent / Closed Filter Type Filter Access Slide-Out Chassis Window Mounting Kit (Included) Warranty1 Ready-Select® ...
Energy Guide
Page 1
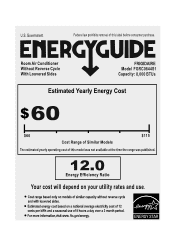
... with louvered sides. • Estimated energy cost based on a national average electricity cost of 12 cents per kWh and a seasonal use of this label before consumer purchase. ftc.govlenergy. BERG GUIDE Room Air Conditioner Without Reverse Cycle With Louvered Sides FRIGIDAIRE Model FGRC0844S1 Capacity: 8,000 BTUs Estimated Yearly Energy Cost $60 $66 $115 Cost Range of Similar Models The estimated yearly operating cost of 8 hours a day...
... with louvered sides. • Estimated energy cost based on a national average electricity cost of 12 cents per kWh and a seasonal use of this label before consumer purchase. ftc.govlenergy. BERG GUIDE Room Air Conditioner Without Reverse Cycle With Louvered Sides FRIGIDAIRE Model FGRC0844S1 Capacity: 8,000 BTUs Estimated Yearly Energy Cost $60 $66 $115 Cost Range of Similar Models The estimated yearly operating cost of 8 hours a day...


