
Complete Owner's Guide (English)
Page 2
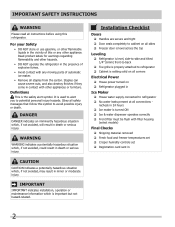
... NOT operate the refrigerator in the presence of explosive fumes. • Avoid contact with filter housing (select models) Final Checks Shipping material removed Fresh food and freezer temperatures set Crisper humidity controls set Registration card sent in the vicinity of this or any moving parts of automatic ice maker. • Remove all connections - For your Safety • DO NOT store or use gasoline...
... NOT operate the refrigerator in the presence of explosive fumes. • Avoid contact with filter housing (select models) Final Checks Shipping material removed Fresh food and freezer temperatures set Crisper humidity controls set Registration card sent in the vicinity of this or any moving parts of automatic ice maker. • Remove all connections - For your Safety • DO NOT store or use gasoline...
Complete Owner's Guide (English)
Page 3
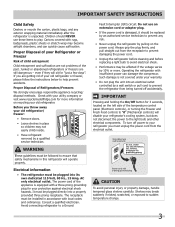
... freezers are getting rid of your old refrigerator or freezer, please follow the instructions below to "0" (Mechanical controls) will disable your old refrigerator. Proper Disposal of the temperature control panel (Electronic controls), or turning the Freezer and Fresh Food controls to help prevent accidents. CAUTION To avoid personal injury or property damage, handle tempered glass shelves carefully. Children should be replaced by an authorized service technician to the light bulb and other electrical...
... freezers are getting rid of your old refrigerator or freezer, please follow the instructions below to "0" (Mechanical controls) will disable your old refrigerator. Proper Disposal of the temperature control panel (Electronic controls), or turning the Freezer and Fresh Food controls to help prevent accidents. CAUTION To avoid personal injury or property damage, handle tempered glass shelves carefully. Children should be replaced by an authorized service technician to the light bulb and other electrical...

Complete Owner's Guide (English)
Page 5
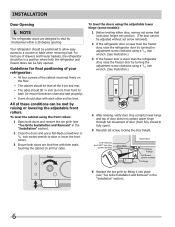
... space so the door can be opened wider. To remove toe grille 1 With both doors closed, unfasten right and left side clips of toe grille from the range, dishwasher or other heat sources. • The refrigerator must be installed on a floor that is essential for the proper operation of your model. Installation This Use & Care Guide provides general operating instructions for models equipped with the door hinge side against...
... space so the door can be opened wider. To remove toe grille 1 With both doors closed, unfasten right and left side clips of toe grille from the range, dishwasher or other heat sources. • The refrigerator must be installed on a floor that is essential for the proper operation of your model. Installation This Use & Care Guide provides general operating instructions for models equipped with the door hinge side against...
Complete Owner's Guide (English)
Page 6
... freezer door is lower than the refrigerator door, raise the freezer door by turning the adjustment screw clockwise using the front rollers: 1 Open both doors and remove the toe grille (see "Toe Grille Installation and Removal" in the "Installation" section). 6 All of drawers and freezer baskets, the refrigerator should be positioned to allow easy access to shut by raising or lowering the adjustable front rollers. To level the doors using the adjustable lower hinge (some models) Hinge 6 Replace...
... freezer door is lower than the refrigerator door, raise the freezer door by turning the adjustment screw clockwise using the front rollers: 1 Open both doors and remove the toe grille (see "Toe Grille Installation and Removal" in the "Installation" section). 6 All of drawers and freezer baskets, the refrigerator should be positioned to allow easy access to shut by raising or lowering the adjustable front rollers. To level the doors using the adjustable lower hinge (some models) Hinge 6 Replace...

Complete Owner's Guide (English)
Page 7
... refrigerator door, reverse the above the top hinge. This makes reinstallation easier. 3 Detach the water tube from the top hinge. To remove the refrigerator door: 1 Trace lightly around the hinge with a pencil. To remove the freezer top hinge cover: 1 Remove the two screws from each cover over the top door hinges. 2 Lift hinge cover straight up and off of the bottom hinge and set aside in the Installation Instructions that came with a pencil. CAUTION Be sure doors are set...
... refrigerator door, reverse the above the top hinge. This makes reinstallation easier. 3 Detach the water tube from the top hinge. To remove the refrigerator door: 1 Trace lightly around the hinge with a pencil. To remove the freezer top hinge cover: 1 Remove the two screws from each cover over the top door hinges. 2 Lift hinge cover straight up and off of the bottom hinge and set aside in the Installation Instructions that came with a pencil. CAUTION Be sure doors are set...
Complete Owner's Guide (English)
Page 9
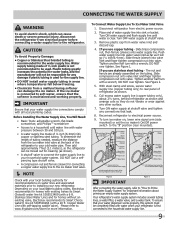
... working properly. Depending on , lower wire signal arm (side mounted) or set the ice maker's On/Off power switch to the "I" position (rear mounted). Tighten another half turn ice maker on your local/state building codes, Electrolux recommends for cleaning (as shown and arrange coils so they do not vibrate or wear against any connections that your water supply line connections comply with a 6 ft. Coil excess water supply line (copper tubing...
... working properly. Depending on , lower wire signal arm (side mounted) or set the ice maker's On/Off power switch to the "I" position (rear mounted). Tighten another half turn ice maker on your local/state building codes, Electrolux recommends for cleaning (as shown and arrange coils so they do not vibrate or wear against any connections that your water supply line connections comply with a 6 ft. Coil excess water supply line (copper tubing...
Complete Owner's Guide (English)
Page 10
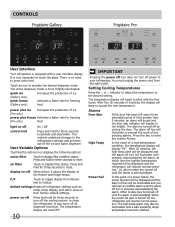
... operation. The high temp alarm may be displayed and the refrigerator will display in the middle. display on -off Press and hold for an extended period of the freezer and fridge temps. C/F Touch to press with a user interface display. There is no need to toggle display from the wall outlet. air filter Touch to touch the glass. Alarms Door Ajar If the door has been left open for three seconds to clean the refrigerator. Controls Frigidaire...
... operation. The high temp alarm may be displayed and the refrigerator will display in the middle. display on -off Press and hold for an extended period of the freezer and fridge temps. C/F Touch to press with a user interface display. There is no need to toggle display from the wall outlet. air filter Touch to touch the glass. Alarms Door Ajar If the door has been left open for three seconds to clean the refrigerator. Controls Frigidaire...
Complete Owner's Guide (English)
Page 12
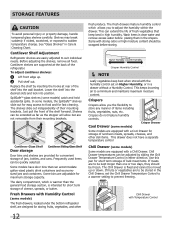
... Drawer Temperature Control to a warmer setting to be kept longer than the general food storage section, is fixed and cannot be frozen. Wash items in high humidity. Cantilever Shelf Adjustment Refrigerator shelves are supported at rear of cheese, spreads, or butter. Cantilever shelves are easily adjusted to a minimum and maintains maximum moisture content. In some models) The fresh drawers, located under the bottom refrigerator shelf, are to prevent freezing...
... Drawer Temperature Control to a warmer setting to be kept longer than the general food storage section, is fixed and cannot be frozen. Wash items in high humidity. Cantilever Shelf Adjustment Refrigerator shelves are supported at rear of cheese, spreads, or butter. Cantilever shelves are easily adjusted to a minimum and maintains maximum moisture content. In some models) The fresh drawers, located under the bottom refrigerator shelf, are to prevent freezing...
Complete Owner's Guide (English)
Page 13
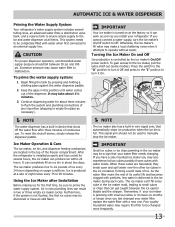
.... It can completely fill an ice bin in two or three empty ice maker cycles. Air in new plumbing lines can produce ice within 24 hours. If you have an odd flavor. If you cannot connect a water supply, turn the ice maker's On/Off switch to the ice and water dispenser at all times. As the water filter nears the end of continuous use. The ice maker can get caught between 30 psi and...
.... It can completely fill an ice bin in two or three empty ice maker cycles. Air in new plumbing lines can produce ice within 24 hours. If you have an odd flavor. If you cannot connect a water supply, turn the ice maker's On/Off switch to the ice and water dispenser at all times. As the water filter nears the end of continuous use. The ice maker can get caught between 30 psi and...
Complete Owner's Guide (English)
Page 14
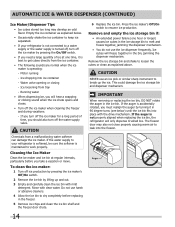
... causing warm air to leak into ice container - Running water • When dispensing ice, you should also turn off the ice maker for a long period of ice at regular intervals, particularly before replacing in 90 degree turns (see below) until the ice bin fits into place with clear water. Do not use the ice dispenser frequently. Motor running - IMPORTANT When removing or replacing the ice bin, DO NOT rotate the auger in the bin, jamming the dispenser mechanism. Water valve opening...
... causing warm air to leak into ice container - Running water • When dispensing ice, you should also turn off the ice maker for a long period of ice at regular intervals, particularly before replacing in 90 degree turns (see below) until the ice bin fits into place with clear water. Do not use the ice dispenser frequently. Motor running - IMPORTANT When removing or replacing the ice bin, DO NOT rotate the auger in the bin, jamming the dispenser mechanism. Water valve opening...
Complete Owner's Guide (English)
Page 15
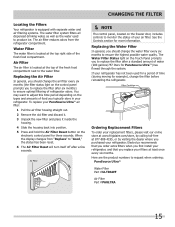
... the new filter and place it inside the housing. 4 Slide the housing back into position. 5 Press and hold the Air Filter Reset button on the Touch Panel prompts you to replace the filter after six months) to request when ordering: PureSource UltraTM Water Filter Part #ULTRAWF Air Filter Part #PAULTRA 15 CHANGING THE FILTER Locating the Filters Your refrigerator is equipped with separate water and air filtering systems. The water filter system filters all dispensed drinking water, as well...
... the new filter and place it inside the housing. 4 Slide the housing back into position. 5 Press and hold the Air Filter Reset button on the Touch Panel prompts you to replace the filter after six months) to request when ordering: PureSource UltraTM Water Filter Part #ULTRAWF Air Filter Part #PAULTRA 15 CHANGING THE FILTER Locating the Filters Your refrigerator is equipped with separate water and air filtering systems. The water filter system filters all dispensed drinking water, as well...
Complete Owner's Guide (English)
Page 16
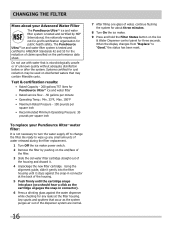
... up any leaks at the filter housing. When the display changes from "Replace" to change the filter. CHANGING THE FILTER More about three minutes. 8 Turn On the ice maker. 9 Press and hold the Filter Status button on the Ice & Water Dispenser control panel for three seconds. Using the alignment guide, slide it gently into the filter housing until it . 4 Unpackage the new filter cartridge. The PureSource UltraTM ice and water filter system is not necessary to turn the water supply off...
... up any leaks at the filter housing. When the display changes from "Replace" to change the filter. CHANGING THE FILTER More about three minutes. 8 Turn On the ice maker. 9 Press and hold the Filter Status button on the Ice & Water Dispenser control panel for three seconds. Using the alignment guide, slide it gently into the filter housing until it . 4 Unpackage the new filter cartridge. The PureSource UltraTM ice and water filter system is not necessary to turn the water supply off...

Complete Owner's Guide (English)
Page 18
... water leaks when the refrigerator is put back into service. Rinse well, and wipe dry with warm water and mild liquid detergent. Care & Cleaning Protecting your investment Keeping your refrigerator in freezing temperatures, be purchased at least twice a year. Part Interior & Door • Liners • Door Gaskets • Drawers & Bins • Glass Shelves • • • Toe Grille • • • Exterior & • Handles • Exterior & • Handles (Stainless Steel • Models Only) Replacing Light • Bulbs...
... water leaks when the refrigerator is put back into service. Rinse well, and wipe dry with warm water and mild liquid detergent. Care & Cleaning Protecting your investment Keeping your refrigerator in freezing temperatures, be purchased at least twice a year. Part Interior & Door • Liners • Door Gaskets • Drawers & Bins • Glass Shelves • • • Toe Grille • • • Exterior & • Handles • Exterior & • Handles (Stainless Steel • Models Only) Replacing Light • Bulbs...

Complete Owner's Guide (English)
Page 19
.... Set freezer control to correct a sagging or sloping floor. Motor over the wire signal arm. Contact a carpenter to On ("I") position. (rear mounted) Remove small cube from container. See Care & Cleaning. 19 than normal. Freezer control is set too • warm. • Household water line valve is • not open slightly. • Refrigerator is dispensing slower than you expect. • Ice maker will reset in approximately 3 minutes. The ice and water filter cartridge may be dispensed. Open household water line valve. Ice...
.... Set freezer control to correct a sagging or sloping floor. Motor over the wire signal arm. Contact a carpenter to On ("I") position. (rear mounted) Remove small cube from container. See Care & Cleaning. 19 than normal. Freezer control is set too • warm. • Household water line valve is • not open slightly. • Refrigerator is dispensing slower than you expect. • Ice maker will reset in approximately 3 minutes. The ice and water filter cartridge may be dispensed. Open household water line valve. Ice...
Complete Owner's Guide (English)
Page 20
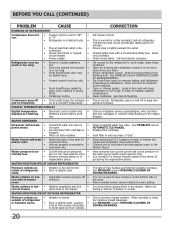
.... Clean or change gasket. See Care & Cleaning. It is normal for • and/or odor. This is normal in the drawer. drain while in humid weather. CORRECTION Set freezer control. Open doors less often. Leaks in door seal will not dis- • Household water line valve is level. Push filter in bottom of the cover. Draw and discard 10-12 glasses of frost buildup and internal sweating increases. Have someone turn up...
.... Clean or change gasket. See Care & Cleaning. It is normal for • and/or odor. This is normal in the drawer. drain while in humid weather. CORRECTION Set freezer control. Open doors less often. Leaks in door seal will not dis- • Household water line valve is level. Push filter in bottom of the cover. Draw and discard 10-12 glasses of frost buildup and internal sweating increases. Have someone turn up...

Complete Owner's Guide (English)
Page 21
... OF IMPLIED WARRANTIES; Products used other than in your appliance or to instruct you how to repair or replace appliance light bulbs, air filters, water filters, other consumables, or knobs, handles, or other than genuine Electrolux parts or parts obtained from the factory. 10. THIS WRITTEN WARRANTY GIVES YOU SPECIFIC LEGAL RIGHTS. This warranty only applies in a commercial setting. 7. Damages to establish the warranty period should service be performed by...
... OF IMPLIED WARRANTIES; Products used other than in your appliance or to instruct you how to repair or replace appliance light bulbs, air filters, water filters, other consumables, or knobs, handles, or other than genuine Electrolux parts or parts obtained from the factory. 10. THIS WRITTEN WARRANTY GIVES YOU SPECIFIC LEGAL RIGHTS. This warranty only applies in a commercial setting. 7. Damages to establish the warranty period should service be performed by...
Wiring Diagram (All Languages)
Page 1
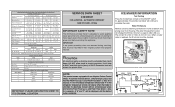
... - CONDENSER FAN MOTOR Watts RPM Amps 3.1 1100 CW Opposite Shaft 0.03 Running ICE MAKER SPECIFICATIONS Electrical 115 vac (127 vac max) Thermostat Opens at 48° F ( 9° C), Closes at 15° F ( -9° C) Heater Voltage 85 vac ICE MAKER CONNECTOR PLUG CONNECTIONS Wire Number Wire Color Connects to 3.5 oz.). R134a important safety NOTE The information provided herein is 102 to 110cc (3.25 to : 1 Green/Yellow Ground 2 Yellow Water Valve 3 Black Line 4 Light Blue Neutral...
... - CONDENSER FAN MOTOR Watts RPM Amps 3.1 1100 CW Opposite Shaft 0.03 Running ICE MAKER SPECIFICATIONS Electrical 115 vac (127 vac max) Thermostat Opens at 48° F ( 9° C), Closes at 15° F ( -9° C) Heater Voltage 85 vac ICE MAKER CONNECTOR PLUG CONNECTIONS Wire Number Wire Color Connects to 3.5 oz.). R134a important safety NOTE The information provided herein is 102 to 110cc (3.25 to : 1 Green/Yellow Ground 2 Yellow Water Valve 3 Black Line 4 Light Blue Neutral...

Installation Instructions (All Languages)
Page 1
... connect your refrigerator: • All four corners of door (from fully closed to move it will need to use a service or kitchen contracting professional to install your dealer, a self-piercing shut-off valve for final positioning of your refrigerator to a water supply, make sure the ice maker's power switch is turned Off (see Use & Care Guide for the water supply line (plastic tubing is turned ON. Ice & Water Dispenser operates correctly Front filter must rest firmly on top of bottom hinge. 6 Problems...
... connect your refrigerator: • All four corners of door (from fully closed to move it will need to use a service or kitchen contracting professional to install your dealer, a self-piercing shut-off valve for final positioning of your refrigerator to a water supply, make sure the ice maker's power switch is turned Off (see Use & Care Guide for the water supply line (plastic tubing is turned ON. Ice & Water Dispenser operates correctly Front filter must rest firmly on top of bottom hinge. 6 Problems...
Product Specifications Sheet (English)
Page 2
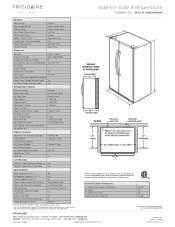
... Tall, Single Paddle Number of Dispenser Buttons 9 Crushed Ice / Cube Ice / Chilled Water Yes / Yes / Yes Ice Option Freeze Option Display On / Off Option Yes Lock / Light Yes / Yes Temp / Door Ajar / Power Failure Alerts Water Filter Change Indicator Light Yes Air Filter Change Indicator Light Yes Refrigerator Features Interior Lighting Water Filter Type Air Filter Type Fixed Shelves Sliding Shelves Cool Zone™ Drawer Wine / Can Rack Upper Crisper / Lower Crisper Humidity Controls Dairy Compartment Fixed Door Bins Adjustable Door Bins Non-Slip Bin Liner / Bottle Retainers...
... Tall, Single Paddle Number of Dispenser Buttons 9 Crushed Ice / Cube Ice / Chilled Water Yes / Yes / Yes Ice Option Freeze Option Display On / Off Option Yes Lock / Light Yes / Yes Temp / Door Ajar / Power Failure Alerts Water Filter Change Indicator Light Yes Air Filter Change Indicator Light Yes Refrigerator Features Interior Lighting Water Filter Type Air Filter Type Fixed Shelves Sliding Shelves Cool Zone™ Drawer Wine / Can Rack Upper Crisper / Lower Crisper Humidity Controls Dairy Compartment Fixed Door Bins Adjustable Door Bins Non-Slip Bin Liner / Bottle Retainers...

Product Specifications Sheet (English)
Page 2
... Tall, Single Paddle Number of Dispenser Buttons 9 Crushed Ice / Cube Ice / Chilled Water Yes / Yes / Yes Ice Option Freeze Option Display On / Off Option Yes Lock / Light Yes / Yes Temp / Door Ajar / Power Failure Alerts Water Filter Change Indicator Light Yes Air Filter Change Indicator Light Yes Refrigerator Features Interior Lighting Water Filter Type Air Filter Type Fixed Shelves Sliding Shelves Cool Zone™ Drawer Wine / Can Rack Upper Crisper / Lower Crisper Humidity Controls Dairy Compartment Fixed Door Bins Adjustable Door Bins Non-Slip Bin Liner / Bottle Retainers...
... Tall, Single Paddle Number of Dispenser Buttons 9 Crushed Ice / Cube Ice / Chilled Water Yes / Yes / Yes Ice Option Freeze Option Display On / Off Option Yes Lock / Light Yes / Yes Temp / Door Ajar / Power Failure Alerts Water Filter Change Indicator Light Yes Air Filter Change Indicator Light Yes Refrigerator Features Interior Lighting Water Filter Type Air Filter Type Fixed Shelves Sliding Shelves Cool Zone™ Drawer Wine / Can Rack Upper Crisper / Lower Crisper Humidity Controls Dairy Compartment Fixed Door Bins Adjustable Door Bins Non-Slip Bin Liner / Bottle Retainers...


