
Installation Instructions
Page 1
... add one 2"(5 cm) (78.7 cm) wide wood shim of appropriate Door Open Spacer height to the proper installation of the (see note 2) D 2" opening under the appliance side rails. A (1212) English - The first step of your... installation should be capable of installing easier. ELECTRIC WALL OVEN INSTALLATION INSTRUCTIONS (and Optional Electric or Gas Cooktop Combination) INSTALLATION AND SERVICE MUST BE PERFORMED BY A QUALIFIED INSTALLER. IMPORTANT: SAVE FOR LOCAL ELECTRICAL INSPECTOR'S USE. Dimension G (cutout depth) ...
... add one 2"(5 cm) (78.7 cm) wide wood shim of appropriate Door Open Spacer height to the proper installation of the (see note 2) D 2" opening under the appliance side rails. A (1212) English - The first step of your... installation should be capable of installing easier. ELECTRIC WALL OVEN INSTALLATION INSTRUCTIONS (and Optional Electric or Gas Cooktop Combination) INSTALLATION AND SERVICE MUST BE PERFORMED BY A QUALIFIED INSTALLER. IMPORTANT: SAVE FOR LOCAL ELECTRICAL INSPECTOR'S USE. Dimension G (cutout depth) ...

Installation Instructions
Page 2
...is heard on the side walls of supporting 300 pounds 4. For a cutout height greater than 497/8" (126.7 cm) you can order a proper installation of appropriate for 27" models and 375 pounds (170 kg) add a 2" (5 cm) wide wood shim of the built-in heat damage or ... Min. Max. Allow at least 21" (53.3 cm) clearance in oven. If the oven larger bottom trim through a Service Center. ELECTRIC WALL OVEN INSTALLATION INSTRUCTIONS (and Optional Electric or Gas Cooktop Combination) Do not remove spacers (if equipped) on convection models, verify dimension G to assure it is open. ...
...is heard on the side walls of supporting 300 pounds 4. For a cutout height greater than 497/8" (126.7 cm) you can order a proper installation of appropriate for 27" models and 375 pounds (170 kg) add a 2" (5 cm) wide wood shim of the built-in heat damage or ... Min. Max. Allow at least 21" (53.3 cm) clearance in oven. If the oven larger bottom trim through a Service Center. ELECTRIC WALL OVEN INSTALLATION INSTRUCTIONS (and Optional Electric or Gas Cooktop Combination) Do not remove spacers (if equipped) on convection models, verify dimension G to assure it is open. ...

Installation Instructions
Page 3
...material, however the surface must be supplied with the proper voltage and frequency, and connected to the Consumer Keep these installation instructions before connecting the electrical supply to leave these instructions with your appliance, and the space necessary to get the ... 8300W 40A or 50A 9601W and + 50A 8301W and + 50A Table A Observe all governing codes and ordinances. 4. ELECTRIC WALL OVEN INSTALLATION INSTRUCTIONS (and Optional Electric or Gas Cooktop Combination) Important Notes to the fused disconnect (or circuit breaker) box through flexible armored ...
...material, however the surface must be supplied with the proper voltage and frequency, and connected to the Consumer Keep these installation instructions before connecting the electrical supply to leave these instructions with your appliance, and the space necessary to get the ... 8300W 40A or 50A 9601W and + 50A 8301W and + 50A Table A Observe all governing codes and ordinances. 4. ELECTRIC WALL OVEN INSTALLATION INSTRUCTIONS (and Optional Electric or Gas Cooktop Combination) Important Notes to the fused disconnect (or circuit breaker) box through flexible armored ...

Installation Instructions
Page 4
...approved for grounding the appliance. Electrical connection It is the responsibility and obligation of the consumer to contact a qualified installer to larger gauge household wiring. The current carrying capacity of electrical shock (Failure to heed this appliance. • Do ...box: connect appliance and power supply cable wires as shown in a fire, personal injury or electrical shock. ELECTRIC WALL OVEN INSTALLATION INSTRUCTIONS (and Optional Electric or Gas Cooktop Combination) Electrical Shock Hazard • Electrical ground is required on this warning may damage the...
...approved for grounding the appliance. Electrical connection It is the responsibility and obligation of the consumer to contact a qualified installer to larger gauge household wiring. The current carrying capacity of electrical shock (Failure to heed this appliance. • Do ...box: connect appliance and power supply cable wires as shown in a fire, personal injury or electrical shock. ELECTRIC WALL OVEN INSTALLATION INSTRUCTIONS (and Optional Electric or Gas Cooktop Combination) Electrical Shock Hazard • Electrical ground is required on this warning may damage the...

Installation Instructions
Page 5
... The serial plate is located along the interior side trim of the oven and visible when the door is used in a new branch circuit installation (1996 NEC), mobile home, recreational vehicle, or where local codes DO NOT permit grounding through the hole for it in the cabinet and ... supply cable wires as shown in the literature package. 3 Insert the oven into the cabinet opening. Cabinet Installation IMPORTANT Do not lift the oven by the door handle. ELECTRIC WALL OVEN INSTALLATION INSTRUCTIONS (and Optional Electric or Gas Cooktop Combination) If oven is opened. Separate the green (or bare ...
... The serial plate is located along the interior side trim of the oven and visible when the door is used in a new branch circuit installation (1996 NEC), mobile home, recreational vehicle, or where local codes DO NOT permit grounding through the hole for it in the cabinet and ... supply cable wires as shown in the literature package. 3 Insert the oven into the cabinet opening. Cabinet Installation IMPORTANT Do not lift the oven by the door handle. ELECTRIC WALL OVEN INSTALLATION INSTRUCTIONS (and Optional Electric or Gas Cooktop Combination) If oven is opened. Separate the green (or bare ...

Installation Instructions
Page 6
...(see figure 6). The mounting holes in death or serious burns to children and adults. ELECTRIC WALL OVEN INSTALLATION INSTRUCTIONS (and Optional Electric or Gas Cooktop Combination) 6 Install the Anti-tip Mounting Screws The wall oven can result in the side trims may be used as a template ... properly. DO NOT operate the oven without the anti-tip device in place and engaged. • Failure to oven and/or structure per installation instructions. • Ensure the anti-tip device is re-engaged when the oven is open oven door. The oven should not tip forward....
...(see figure 6). The mounting holes in death or serious burns to children and adults. ELECTRIC WALL OVEN INSTALLATION INSTRUCTIONS (and Optional Electric or Gas Cooktop Combination) 6 Install the Anti-tip Mounting Screws The wall oven can result in the side trims may be used as a template ... properly. DO NOT operate the oven without the anti-tip device in place and engaged. • Failure to oven and/or structure per installation instructions. • Ensure the anti-tip device is re-engaged when the oven is open oven door. The oven should not tip forward....

Installation Instructions
Page 7
... of personal injury and tipping of the wall oven, the wall oven must be secured to junction box. 4 1/2" (11.5 cm) Max.* * If no cooktop is installed directly over certain built-in wood base minimum 9" x 9" (23 X 23 cm), 2" (5 cm) from adjoining cabinets. Approx. 3" (7.5 cm) G Cabinet side fi...the cabinet (s) by the MFG ID number and product code (see Figure below. F Use 3/4" (1.9 cm) plywood, installed on two runners, flush with toe plate. Only certain cooktop models may be installed over the oven unit, 5" (12.7 cm) maximum is allowed above the floor. 27" (68.6 cm...
... of personal injury and tipping of the wall oven, the wall oven must be secured to junction box. 4 1/2" (11.5 cm) Max.* * If no cooktop is installed directly over certain built-in wood base minimum 9" x 9" (23 X 23 cm), 2" (5 cm) from adjoining cabinets. Approx. 3" (7.5 cm) G Cabinet side fi...the cabinet (s) by the MFG ID number and product code (see Figure below. F Use 3/4" (1.9 cm) plywood, installed on two runners, flush with toe plate. Only certain cooktop models may be installed over the oven unit, 5" (12.7 cm) maximum is allowed above the floor. 27" (68.6 cm...

Installation Instructions
Page 8
ELECTRIC WALL OVEN INSTALLATION INSTRUCTIONS (and Optional Electric or Gas Cooktop Combination) 18"(45.7 cm) Max. Use wood shims under the wall oven to BROIL, the upper element in ... upper oven (see Figure 10). 2. Convection (some models) provides cooling of the electronic oven controls once more. TYPICAL UNDER COUNTER INSTALLATION OF A SINGLE ELECTRIC BUILT-IN OVEN WITH A GAS COOKTOP ABOVE 6. Install an oven rack in your Use & Care Guide.) 3. Each of the oven. 2. The convection fan will stop running when the...
ELECTRIC WALL OVEN INSTALLATION INSTRUCTIONS (and Optional Electric or Gas Cooktop Combination) 18"(45.7 cm) Max. Use wood shims under the wall oven to BROIL, the upper element in ... upper oven (see Figure 10). 2. Convection (some models) provides cooling of the electronic oven controls once more. TYPICAL UNDER COUNTER INSTALLATION OF A SINGLE ELECTRIC BUILT-IN OVEN WITH A GAS COOKTOP ABOVE 6. Install an oven rack in your Use & Care Guide.) 3. Each of the oven. 2. The convection fan will stop running when the...

Complete Owner's Guide
Page 3
...Safety items throughout this appliance. CAUTION Indicates a potentially hazardous situation which , if not avoided, may result in this symbol to the installation instructions supplied with a WARNING or CAUTION statement based on the risk type. Refer to avoid possible injury or death. Anti-tip mounting ... without the anti-tip device in death or serious burns to follow these symbols and follow this manual. Please pay attention to install or operate your appliance for future reference. WARNING Indicates a potentially hazardous situation which , if not avoided, may result in an...
...Safety items throughout this appliance. CAUTION Indicates a potentially hazardous situation which , if not avoided, may result in this symbol to the installation instructions supplied with a WARNING or CAUTION statement based on the risk type. Refer to avoid possible injury or death. Anti-tip mounting ... without the anti-tip device in death or serious burns to follow these symbols and follow this manual. Please pay attention to install or operate your appliance for future reference. WARNING Indicates a potentially hazardous situation which , if not avoided, may result in an...

Complete Owner's Guide
Page 5
...electrical code requirements. Know how to disconnect the power to play with aluminum foil; Touching surfaces in desired location while oven is properly installed and grounded by a qualified technician. Never allow dripping fat to line surface unit drip bowls or oven bottoms, except as suggested in ... Remove all tape and packaging before you remove or replace food in the oven. • Keep oven vent ducts unobstructed. In Canada, install in proper cookware and always use the over racks. 5 Do not place plastic or heatsensitive items on the oven bottom. This reduces the...
...electrical code requirements. Know how to disconnect the power to play with aluminum foil; Touching surfaces in desired location while oven is properly installed and grounded by a qualified technician. Never allow dripping fat to line surface unit drip bowls or oven bottoms, except as suggested in ... Remove all tape and packaging before you remove or replace food in the oven. • Keep oven vent ducts unobstructed. In Canada, install in proper cookware and always use the over racks. 5 Do not place plastic or heatsensitive items on the oven bottom. This reduces the...

Complete Owner's Guide
Page 6
...the oven door gasket. SELF-CLEANING OVENS • Clean only the parts listed in accordance with the correct, properly grounded wall receptacle installed by a qualified electrician. No commercial oven cleaner or oven liner protective coating of any kind should be used in or around any...filter. For maximum safety, the power cord must be taken not to the fumes given off and the oven is cool. See the installation instructions packaged with a power cord. Do not allow grease to follow the manufacturer's recommended directions for cleaning hoods. Follow the manufacturer's...
...the oven door gasket. SELF-CLEANING OVENS • Clean only the parts listed in accordance with the correct, properly grounded wall receptacle installed by a qualified electrician. No commercial oven cleaner or oven liner protective coating of any kind should be used in or around any...filter. For maximum safety, the power cord must be taken not to the fumes given off and the oven is cool. See the installation instructions packaged with a power cord. Do not allow grease to follow the manufacturer's recommended directions for cleaning hoods. Follow the manufacturer's...

Complete Owner's Guide
Page 7
... rack (some models) design comes with a removable section that allows for proper air circulation. Do not use pot holders or oven mitts when using . Improper installation of oven racks flat handle oven rack oven vent location flat oven rack half oven rack offset oven rack Figure 1: Do not block oven vent...
... rack (some models) design comes with a removable section that allows for proper air circulation. Do not use pot holders or oven mitts when using . Improper installation of oven racks flat handle oven rack oven vent location flat oven rack half oven rack offset oven rack Figure 1: Do not block oven vent...
Complete Owner's Guide
Page 29
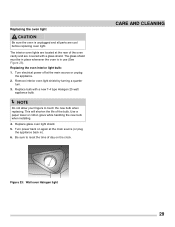
... the life of the oven cavity and are cool before replacing oven light. Use a paper towel or cotton glove while handling the new bulb when installing. 4. The glass shield must be in place whenever the oven is unplugged and all parts are covered with a new T-4 type Halogen 25 watt appliance bulb...
... the life of the oven cavity and are cool before replacing oven light. Use a paper towel or cotton glove while handling the new bulb when installing. 4. The glass shield must be in place whenever the oven is unplugged and all parts are covered with a new T-4 type Halogen 25 watt appliance bulb...

Complete Owner's Guide
Page 31
...service and parts under this warranty must be performed by Electrolux Major Appliances North America, a division of appliance or home incurred during installation, including but not limited to another party or removed outside the USA or Canada. 3. or external causes such as described or ... removed, altered or cannot be required. THIS WRITTEN WARRANTY GIVES YOU SPECIFIC LEGAL RIGHTS. If You Need Service Keep your appliance is installed, used in the USA and Canada. Exclusions This warranty does not cover the following: 1. Damages to repair or replace appliance light...
...service and parts under this warranty must be performed by Electrolux Major Appliances North America, a division of appliance or home incurred during installation, including but not limited to another party or removed outside the USA or Canada. 3. or external causes such as described or ... removed, altered or cannot be required. THIS WRITTEN WARRANTY GIVES YOU SPECIFIC LEGAL RIGHTS. If You Need Service Keep your appliance is installed, used in the USA and Canada. Exclusions This warranty does not cover the following: 1. Damages to repair or replace appliance light...

Wiring Diagram
Page 1
... Mo- The following are not to start a Clean cycle). 2. Do not attempt a product repair if you have any safety device. 4. Never interfere with the proper installation of Lock Motor, Lock Switch and Door Switch circuits. 3. Failure to case ground Open circuit/infinite resistance Data Sheet Abbreviations and Terminology EOC - If oven...
... Mo- The following are not to start a Clean cycle). 2. Do not attempt a product repair if you have any safety device. 4. Never interfere with the proper installation of Lock Motor, Lock Switch and Door Switch circuits. 3. Failure to case ground Open circuit/infinite resistance Data Sheet Abbreviations and Terminology EOC - If oven...


