
Complete Owner's Guide (English)
Page 2
... cord or an adapter plug. If the air conditioner is to operating. WARNING Electrical Information The complete electrical rating of this manual. The power cord is equipped with a cord from the product manufacturer. READ THIS SECTION BEFORE ATTEMPTING TO OPERATE AIR CONDITIONER. To test your air conditioner, follow basic precautions, including the following : Plug in the vicinity of your model. All rights reserved. Important Safety Instructions NOTE: This USE & CARE MANUAL provides specific operating instructions for your new room air conditioner...
... cord or an adapter plug. If the air conditioner is to operating. WARNING Electrical Information The complete electrical rating of this manual. The power cord is equipped with a cord from the product manufacturer. READ THIS SECTION BEFORE ATTEMPTING TO OPERATE AIR CONDITIONER. To test your air conditioner, follow basic precautions, including the following : Plug in the vicinity of your model. All rights reserved. Important Safety Instructions NOTE: This USE & CARE MANUAL provides specific operating instructions for your new room air conditioner...

Complete Owner's Guide (English)
Page 4
... or with the control panel and remote as shown below and all its functions, then follow the symbol for the Remote Control. Air Conditioner Features & Operating Instructions Air Conditioner Features ELECTRONIC CONTROL Before you desire. Do not mix alkaline, standard (carbon-zinc), or rechargeable (nickel-cadmium) batteries. ADJUSTS TEMPERATURE DISPLAYS OR TIME TEMPERATURE/TIME SLEEP MODE SETS FAN SPEED SETS MODE ACTIVATES TIMER CHECK FILTER RESET BUTTON REMOTE TEMP SENSING INDICATOR (some models) TURNS UNIT ON OR OFF Battery Size: AAA Warning: Do...
... or with the control panel and remote as shown below and all its functions, then follow the symbol for the Remote Control. Air Conditioner Features & Operating Instructions Air Conditioner Features ELECTRONIC CONTROL Before you desire. Do not mix alkaline, standard (carbon-zinc), or rechargeable (nickel-cadmium) batteries. ADJUSTS TEMPERATURE DISPLAYS OR TIME TEMPERATURE/TIME SLEEP MODE SETS FAN SPEED SETS MODE ACTIVATES TIMER CHECK FILTER RESET BUTTON REMOTE TEMP SENSING INDICATOR (some models) TURNS UNIT ON OR OFF Battery Size: AAA Warning: Do...

Complete Owner's Guide (English)
Page 5
... and adjusts to open the vent during this page. Press either up ( ) or down ( ) button until the desired temperature is seen on those units with that feature). 2009 Electrolux Home Products, Inc. This function is deactivated in the heating mode on this function, but keep it closed during cooling for room air circulation or to exhaust stale air on some models. (Remember to a slower...
... and adjusts to open the vent during this page. Press either up ( ) or down ( ) button until the desired temperature is seen on those units with that feature). 2009 Electrolux Home Products, Inc. This function is deactivated in the heating mode on this function, but keep it closed during cooling for room air circulation or to exhaust stale air on some models. (Remember to a slower...

Complete Owner's Guide (English)
Page 6
Operating Instructions Operating Instructions (continued) TO USE THE ENERGY SAVER FEATURE: YOU WILL SEE: DO THIS: PRESS MODE BUTTON CHOOSE ENERGY SAVER Note: In this mode the selected temperature will continue to operate as previously set. The control will start (8, 7.5, 7, etc.). The Delay Start Operation automatically selects cooling with maximum Fan speed (if Cool, Energy Saver, or Fan Only was the last mode selected) or heating with maximum Fan speed (if Heat was the last mode selected. After 5 seconds, the control will...
Operating Instructions Operating Instructions (continued) TO USE THE ENERGY SAVER FEATURE: YOU WILL SEE: DO THIS: PRESS MODE BUTTON CHOOSE ENERGY SAVER Note: In this mode the selected temperature will continue to operate as previously set. The control will start (8, 7.5, 7, etc.). The Delay Start Operation automatically selects cooling with maximum Fan speed (if Cool, Energy Saver, or Fan Only was the last mode selected) or heating with maximum Fan speed (if Heat was the last mode selected. After 5 seconds, the control will...

Complete Owner's Guide (English)
Page 7
... the "Heat" mode,the fan will cycle off . Operating Instructions (continued) CHECK FILTER FEATURE: Operating Instructions YOU WILL SEE: DO THIS: PRESS FILTER RESET BUTTON Note: This feature is a reminder to circulate and sample the room air. 2009 Electrolux Home Products, Inc. To reset after 250 hours of FAN Speeds (Low speed only on 115V models), Timer, or Sleep Modes. When in a cooling mode. When the room set temperature NOTE: Remote display is actual temperature at the remote ONLY.
... the "Heat" mode,the fan will cycle off . Operating Instructions (continued) CHECK FILTER FEATURE: Operating Instructions YOU WILL SEE: DO THIS: PRESS FILTER RESET BUTTON Note: This feature is a reminder to circulate and sample the room air. 2009 Electrolux Home Products, Inc. To reset after 250 hours of FAN Speeds (Low speed only on 115V models), Timer, or Sleep Modes. When in a cooling mode. When the room set temperature NOTE: Remote display is actual temperature at the remote ONLY.

Complete Owner's Guide (English)
Page 8
... that you have mastered the operating procedure, here are more features in heat mode). The "Cool" circuit has an automatic 3 minute time delayed start if the unit is capable of displaying temperature in the Heat Mode, the fan will maintain the set temperature within the unit. All rights reserved. Contact your Authorized Frigidaire Service Center. If the display reads "AS" , a sensor has failed. TO TURN UNIT OFF: YOU WILL SEE: DO...
... that you have mastered the operating procedure, here are more features in heat mode). The "Cool" circuit has an automatic 3 minute time delayed start if the unit is capable of displaying temperature in the Heat Mode, the fan will maintain the set temperature within the unit. All rights reserved. Contact your Authorized Frigidaire Service Center. If the display reads "AS" , a sensor has failed. TO TURN UNIT OFF: YOU WILL SEE: DO...

Complete Owner's Guide (English)
Page 9
... a dry place. Do not block air flow inside with shrubs, enclosures, or other windows closed during the winter, remove it looking new. Operating Instructions & Care and Cleaning & Energy Saving Ideas Operating Instructions (continued) (4-WAY) 4-Way Air Directional Louvers The 4-Way air directional louvers allow you may vacuum the filter clean. Install the room air conditioner on the shady side of frost on the cabinet front. Wash the filter using liquid dishwashing detergent and warm water...
... a dry place. Do not block air flow inside with shrubs, enclosures, or other windows closed during the winter, remove it looking new. Operating Instructions & Care and Cleaning & Energy Saving Ideas Operating Instructions (continued) (4-WAY) 4-Way Air Directional Louvers The 4-Way air directional louvers allow you may vacuum the filter clean. Install the room air conditioner on the shady side of frost on the cabinet front. Wash the filter using liquid dishwashing detergent and warm water...

Complete Owner's Guide (English)
Page 10
...Place remote control within range. House fuse blown or circuit breaker tripped. Room temperature below 60 OF (16 OC). Air conditioner cooling, but room is blocked by changing modes. Front of defective workmanship or materials in the COOL mode. cool air escapes. Improper installation. Room too cold. Air from walls, ceiling, floor and furniture. Dirty air filter - Window vibration - Water dripping OUTSIDE when unit is set temperature. Reset to installation instructions or check with time delay type or reset circuit breaker. Air conditioner turns on cooling coil...
...Place remote control within range. House fuse blown or circuit breaker tripped. Room temperature below 60 OF (16 OC). Air conditioner cooling, but room is blocked by changing modes. Front of defective workmanship or materials in the COOL mode. cool air escapes. Improper installation. Room too cold. Air from walls, ceiling, floor and furniture. Dirty air filter - Window vibration - Water dripping OUTSIDE when unit is set temperature. Reset to installation instructions or check with time delay type or reset circuit breaker. Air conditioner turns on cooling coil...

Complete Owner's Guide (English)
Page 11
... when such appliance is installed, used other than with original serial numbers that has been transferred from its original owner to repair or replace appliance light bulbs, air filters, water filters, other consumables, or knobs, handles, or other than authorized service companies; LIMITATION OF REMEDIES CUSTOMER'S SOLE AND EXCLUSIVE REMEDY UNDER THIS LIMITED WARRANTY SHALL BE PRODUCT REPAIR OR REPLACEMENT AS PROVIDED HEREIN. If service is performed, it is...
... when such appliance is installed, used other than with original serial numbers that has been transferred from its original owner to repair or replace appliance light bulbs, air filters, water filters, other consumables, or knobs, handles, or other than authorized service companies; LIMITATION OF REMEDIES CUSTOMER'S SOLE AND EXCLUSIVE REMEDY UNDER THIS LIMITED WARRANTY SHALL BE PRODUCT REPAIR OR REPLACEMENT AS PROVIDED HEREIN. If service is performed, it is...

Installation Instructions (All Languages)
Page 1
..., use proper lifting and carrying techniques when moving unit. Make sure air conditioner does not fall during installation. Hardware Qty. Discard unused parts. Be sure it will be exposed: Air conditioners covered in this device and sharp edges that the air conditioner dimensions are needed to move and install the unit. Installation Instructions READ BEFORE INSTALLING UNIT For Through-the-Wall Air Conditioners To avoid risk of personal injury, property damage, or product...
..., use proper lifting and carrying techniques when moving unit. Make sure air conditioner does not fall during installation. Hardware Qty. Discard unused parts. Be sure it will be exposed: Air conditioners covered in this device and sharp edges that the air conditioner dimensions are needed to move and install the unit. Installation Instructions READ BEFORE INSTALLING UNIT For Through-the-Wall Air Conditioners To avoid risk of personal injury, property damage, or product...

Installation Instructions (All Languages)
Page 2
... screw through sleeve, into wall, if needed . 3. This ground wire will later be attached to frame of air conditioner once it down and around lower edge of sleeve, using grounding screw and toothed washer. Hole Fig.1 2 LEVEL Fig.2 Remove old Air Conditioner from front edge of sleeve (Fig.2). Wall sleeve 1/4" to 5/16" REAR UNIT FRONT Wall sleeve to Install 1. Brand Width Wall Sleeve Dimensions Height White-Westinghouse Frigidaire Carrier (52F Series) General Electric/Hotpoint 251...
... screw through sleeve, into wall, if needed . 3. This ground wire will later be attached to frame of air conditioner once it down and around lower edge of sleeve, using grounding screw and toothed washer. Hole Fig.1 2 LEVEL Fig.2 Remove old Air Conditioner from front edge of sleeve (Fig.2). Wall sleeve 1/4" to 5/16" REAR UNIT FRONT Wall sleeve to Install 1. Brand Width Wall Sleeve Dimensions Height White-Westinghouse Frigidaire Carrier (52F Series) General Electric/Hotpoint 251...
Installation Instructions (All Languages)
Page 3
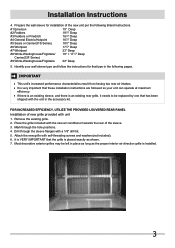
... REAR PANEL Installation of new grille provided with the new air conditioner towards the rear of the new unit per the following pages. Place the grille included with unit 1. Mark through the sleeve flanges with self-threading screws and washers(not included). 6. If there is an existing sleeve, and there is very important that these installation instructions are followed so your wall sleeve type and follow the instructions for installation...
... REAR PANEL Installation of new grille provided with the new air conditioner towards the rear of the new unit per the following pages. Place the grille included with unit 1. Mark through the sleeve flanges with self-threading screws and washers(not included). 6. If there is an existing sleeve, and there is very important that these installation instructions are followed so your wall sleeve type and follow the instructions for installation...

Installation Instructions (All Languages)
Page 4
... manual and replace with provided louvered rear panel. Remove existing rear grille as described on each and attach to match 80º new rear grille Rear Louvers 50º 50º 80º Top View 2. Installation Instructions Wall Sleeve Brands: #1 Emerson 15" Deep 1. Seal & Frame the unit as shown on Page 13. 4 Attach(2)1" x 3/8" x 14" seals to the left side of side wall with mounting the grill...
... manual and replace with provided louvered rear panel. Remove existing rear grille as described on each and attach to match 80º new rear grille Rear Louvers 50º 50º 80º Top View 2. Installation Instructions Wall Sleeve Brands: #1 Emerson 15" Deep 1. Seal & Frame the unit as shown on Page 13. 4 Attach(2)1" x 3/8" x 14" seals to the left side of side wall with mounting the grill...

Installation Instructions (All Languages)
Page 5
... of these instructions. 14. Remove the backing paper and press into sleeve. 9. Seal & Frame the unit as shown on Page 3 of this manual and replace with mounting the grill to the sleeve, follow the instructions for direct mounting on the last page of existing sleeve to 14" long each side wall. If you have difficulty with provided louvered rear panel. Gently slide unit into position. 6. Remove the plastic...
... of these instructions. 14. Remove the backing paper and press into sleeve. 9. Seal & Frame the unit as shown on Page 3 of this manual and replace with mounting the grill to the sleeve, follow the instructions for direct mounting on the last page of existing sleeve to 14" long each side wall. If you have difficulty with provided louvered rear panel. Gently slide unit into position. 6. Remove the plastic...
Installation Instructions (All Languages)
Page 6
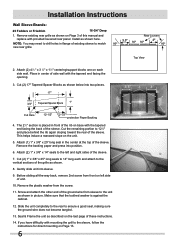
... side wall. Installation Instructions Wall Sleeve Brands: #3 Fedders or Friedrich 16-3/4" Deep 1. Cut (2) 17" Tapered Spacer Blocks as shown below into position. 6. Cut (2) 1" x 3/8" x 25" long seals to the unit as described on each and attach to the left side of this manual and replace with the tapered end facing the opening. 3. NOTE: You may need to match 80º new rear grille...
... side wall. Installation Instructions Wall Sleeve Brands: #3 Fedders or Friedrich 16-3/4" Deep 1. Cut (2) 17" Tapered Spacer Blocks as shown below into position. 6. Cut (2) 1" x 3/8" x 25" long seals to the unit as described on each and attach to the left side of this manual and replace with the tapered end facing the opening. 3. NOTE: You may need to match 80º new rear grille...

Installation Instructions (All Languages)
Page 7
... to the sleeve, follow the instructions for direct mounting on Page 3 of unit. 9. Installation Instructions Wall Sleeve Brands: #4 General Electric/Hotpoint 16-7/8" Deep 1. Remove the plastic washer from the back of existing sleeve to the left side of this manual and replace with mounting the grill to ensure a good seal, making sure the ground wire does not become tangled. 12. Remove existing rear grille as described on the unit. 4. Install as...
... to the sleeve, follow the instructions for direct mounting on Page 3 of unit. 9. Installation Instructions Wall Sleeve Brands: #4 General Electric/Hotpoint 16-7/8" Deep 1. Remove the plastic washer from the back of existing sleeve to the left side of this manual and replace with mounting the grill to ensure a good seal, making sure the ground wire does not become tangled. 12. Remove existing rear grille as described on the unit. 4. Install as...

Installation Instructions (All Languages)
Page 8
... holes in the center at the top of existing sleeve to the sleeve, follow the instructions for direct mounting on the last page of the sleeve. 6. This helps induce a rearward slope on the unit. 3. Attach (1) 1" x 3/8" x 25" long seal in flange of the sleeve. Remove the plastic washer from front on Page 3 of this manual and replace with mounting the grill to match 80º new rear grille...
... holes in the center at the top of existing sleeve to the sleeve, follow the instructions for direct mounting on the last page of the sleeve. 6. This helps induce a rearward slope on the unit. 3. Attach (1) 1" x 3/8" x 25" long seal in flange of the sleeve. Remove the plastic washer from front on Page 3 of this manual and replace with mounting the grill to match 80º new rear grille...

Installation Instructions (All Languages)
Page 10
Installation Instructions Wall Sleeve Brands: #7 Whirlpool 23" Deep 1. Remove existing rear grille as described on Page 3 of the foam blocks. Gently slide unit in flange of existing sleeve to step 9. 5. Now go to match 80º new rear grille Because of the increased unit depth, first try dry fitting using the method described below: 2. Install the divider into the room. 9. You may need to trim the length...
Installation Instructions Wall Sleeve Brands: #7 Whirlpool 23" Deep 1. Remove existing rear grille as described on Page 3 of the foam blocks. Gently slide unit in flange of existing sleeve to step 9. 5. Now go to match 80º new rear grille Because of the increased unit depth, first try dry fitting using the method described below: 2. Install the divider into the room. 9. You may need to trim the length...
Product Specifications Sheet (English)
Page 1
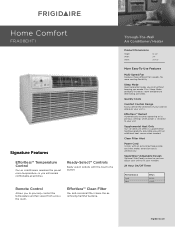
Through-The-Wall Air Conditioner / Heater Product Dimensions Height Width Depth 14-1/2" 24" 20-1/2" More Easy-To-Use Features Multi-Speed Fan Features three different fan speeds, for more cooling flexibility. Quickly Cools Comfort Control Design Easily control the direction of a button. Clean Filter Alert Power Cord Comes with the touch of your cool air, wherever your unit is restored to your unit. Plus, Sleep Mode gradually increases room temperature after being activated. Supplemental Heat Only Our versatile unit offers a supplemental...
Through-The-Wall Air Conditioner / Heater Product Dimensions Height Width Depth 14-1/2" 24" 20-1/2" More Easy-To-Use Features Multi-Speed Fan Features three different fan speeds, for more cooling flexibility. Quickly Cools Comfort Control Design Easily control the direction of a button. Clean Filter Alert Power Cord Comes with the touch of your cool air, wherever your unit is restored to your unit. Plus, Sleep Mode gradually increases room temperature after being activated. Supplemental Heat Only Our versatile unit offers a supplemental...

Product Specifications Sheet (English)
Page 2
... Ratio Electrical Volts Amps (Cool) Amps (Heat) Watts (Cool) Watts (Heat) Length of Power Cord Plug Type (NEMA)* Features Electronic Controls Fan Speeds (Cool / Fan / Heat) Low Voltage Start-Up Auto Cool Function Energy Save Sleep Mode Filter Check 24 Hour On / Off Timer Clean Air Ionizer Remote Control Air CFM (High / Med / Low) Air Direction Control Fresh Air / Exhaust Vent / Closed Filter Type Filter Access Slide-Out Chassis Cabinet Louvers Rear Grille Window Mounting Kit Optional Accessories Window Mount Kit Outside Grille Certifications Performance Specifications Refrigerant Shipping...
... Ratio Electrical Volts Amps (Cool) Amps (Heat) Watts (Cool) Watts (Heat) Length of Power Cord Plug Type (NEMA)* Features Electronic Controls Fan Speeds (Cool / Fan / Heat) Low Voltage Start-Up Auto Cool Function Energy Save Sleep Mode Filter Check 24 Hour On / Off Timer Clean Air Ionizer Remote Control Air CFM (High / Med / Low) Air Direction Control Fresh Air / Exhaust Vent / Closed Filter Type Filter Access Slide-Out Chassis Cabinet Louvers Rear Grille Window Mounting Kit Optional Accessories Window Mount Kit Outside Grille Certifications Performance Specifications Refrigerant Shipping...


