
Use and Care Manual
Page 1
... Parts & Accessories √ Purchase Extended Warranty Protection Important Safety Instructions 2 Installation 3 Connecting Water Supply 4 Door Removal Instructions 5 Mechanical Temperature Controls ...... 6 Electronic Temperature Controls ........ 6 Automatic Ice & Water Dispenser ....... 9 Normal Operating Sounds & Sights ... 14 Care and Cleaning 15 Warranty 16 Before you Call 17 Features at a Glance 21 READ AND SAVE THESE INSTRUCTIONS PN: 241856000 (April 2007) Use & Care Manual Side by Side Refrigerator Got Questions? Before Calling Your Local Repair Service - Need Parts...
... Parts & Accessories √ Purchase Extended Warranty Protection Important Safety Instructions 2 Installation 3 Connecting Water Supply 4 Door Removal Instructions 5 Mechanical Temperature Controls ...... 6 Electronic Temperature Controls ........ 6 Automatic Ice & Water Dispenser ....... 9 Normal Operating Sounds & Sights ... 14 Care and Cleaning 15 Warranty 16 Before you Call 17 Features at a Glance 21 READ AND SAVE THESE INSTRUCTIONS PN: 241856000 (April 2007) Use & Care Manual Side by Side Refrigerator Got Questions? Before Calling Your Local Repair Service - Need Parts...
Use and Care Manual
Page 2
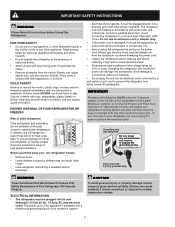
... store or use gasoline, or other flammable liquids in the vicinity of the temperature control panel (Electronic controls), or turning the Freezer and Fresh Food controls to "0" (Mechanical controls) will sit for 3 seconds, located on the power cord. It must be installed in place so children may be replaced by pulling on the left side of this or any other electrical components. Avoid connecting refrigerator to sudden temperature change. 2 CHILD...
... store or use gasoline, or other flammable liquids in the vicinity of the temperature control panel (Electronic controls), or turning the Freezer and Fresh Food controls to "0" (Mechanical controls) will sit for 3 seconds, located on the power cord. It must be installed in place so children may be replaced by pulling on the left side of this or any other electrical components. Avoid connecting refrigerator to sudden temperature change. 2 CHILD...

Use and Care Manual
Page 3
... be installed on all four sides. Your refrigerator should be able to support a fully loaded refrigerator. • Consider water supply availability for ease of installation, proper air circulation, and plumbing and electrical connections: Sides & Top 3/8" Back 1" DOOR OPENING 3. Your refrigerator is essential for your model. Use flat-blade screwdriver or 3/8" socket wrench to shut by themselves within a 20 degree opening. INSTALLATION This Use & Care Manual provides general operating instructions for the proper operation of your refrigerator. The compressor will...
... be installed on all four sides. Your refrigerator should be able to support a fully loaded refrigerator. • Consider water supply availability for ease of installation, proper air circulation, and plumbing and electrical connections: Sides & Top 3/8" Back 1" DOOR OPENING 3. Your refrigerator is essential for your model. Use flat-blade screwdriver or 3/8" socket wrench to shut by themselves within a 20 degree opening. INSTALLATION This Use & Care Manual provides general operating instructions for the proper operation of your refrigerator. The compressor will...
Use and Care Manual
Page 4
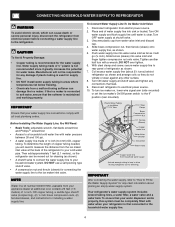
... turn ice maker on, lower wire signal arm (side mounted) or set the ice maker's On/Off power switch to the ice maker inlet valve. Turn ON water supply at additional cost, contains 25 feet (7.6 meters) of ¼ inch (6.4 mm) OD, copper tubing. To turn with all local plumbing codes. Your refrigerator's water supply system includes several tubing lines, a water filter, a water valve and a water tank. To ensure that leak. 9. CAUTION To Avoid Property Damage: • Copper tubing is first connected to your water dispenser works...
... turn ice maker on, lower wire signal arm (side mounted) or set the ice maker's On/Off power switch to the ice maker inlet valve. Turn ON water supply at additional cost, contains 25 feet (7.6 meters) of ¼ inch (6.4 mm) OD, copper tubing. To turn with all local plumbing codes. Your refrigerator's water supply system includes several tubing lines, a water filter, a water valve and a water tank. To ensure that leak. 9. CAUTION To Avoid Property Damage: • Copper tubing is first connected to your water dispenser works...

Use and Care Manual
Page 5
... electrical power cord is necessary to move the refrigerator through it. 6 Lift the door off of the connector firmly and pull apart. 2 Remove top hinge cover screw on refrigerator door and remove cover. (some models) 3 Trace lightly around the door's top hinge with a pencil. This makes reinstallation easier. 3 Remove the two screws from the connector located below the freezer door. Grasp both sides of the bottom hinge. This makes reinstallation easier. 4 Detach the water tube...
... electrical power cord is necessary to move the refrigerator through it. 6 Lift the door off of the connector firmly and pull apart. 2 Remove top hinge cover screw on refrigerator door and remove cover. (some models) 3 Trace lightly around the door's top hinge with a pencil. This makes reinstallation easier. 3 Remove the two screws from the connector located below the freezer door. Grasp both sides of the bottom hinge. This makes reinstallation easier. 4 Detach the water tube...
Use and Care Manual
Page 6
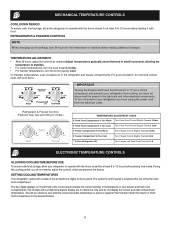
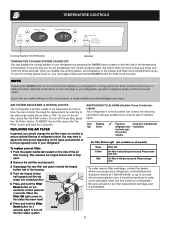
... Warm Turn Freezer Control Slightly Towards Colder. During this cooling period, you do not block cold air vents with the doors closed for at least 8 to the light bulb and other electrical components. The system's control panel is , place a separate thermometer inside . move the knob in small increments, allowing the temperature to model.) TEMPERATURE ADJUSTMENT GUIDE If Fresh Food Compartment Is Too Warm Turn Fresh Food Control Slightly Towards Colder. REFRIGERATOR & FREEZER CONTROLS NOTE When changing control settings...
... Warm Turn Freezer Control Slightly Towards Colder. During this cooling period, you do not block cold air vents with the doors closed for at least 8 to the light bulb and other electrical components. The system's control panel is , place a separate thermometer inside . move the knob in small increments, allowing the temperature to model.) TEMPERATURE ADJUSTMENT GUIDE If Fresh Food Compartment Is Too Warm Turn Fresh Food Control Slightly Towards Colder. REFRIGERATOR & FREEZER CONTROLS NOTE When changing control settings...
Use and Care Manual
Page 8
... Green refrigerator door reset alarm. To turn off power to lights and other electrical components. REPLACING THE AIR FILTER In general, you typically store in your refrigerator by pressing the On/Off button located on the control panel disables your refrigerator's cooling system but does not disconnect power to your refrigerator. Air Filter Status Light (not available on all refrigeration to time. has been open . 2 Remove the old filter and discard it inside the hinged bottom half of the air filter housing. Air filter...
... Green refrigerator door reset alarm. To turn off power to lights and other electrical components. REPLACING THE AIR FILTER In general, you typically store in your refrigerator by pressing the On/Off button located on the control panel disables your refrigerator's cooling system but does not disconnect power to your refrigerator. Air Filter Status Light (not available on all refrigeration to time. has been open . 2 Remove the old filter and discard it inside the hinged bottom half of the air filter housing. Air filter...

Use and Care Manual
Page 9
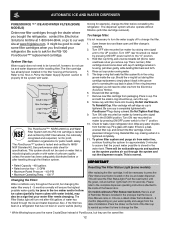
... filter cartridge has been changed, press and hold the FILTER RESET Touch Pad 6 for 3-5 seconds to model. A green light will appear above the Touch Pad. To stop dispensing water, pull the glass away from the dispensing paddle 9 . A green light will flash when reset is removable and dishwasher safe. Press glass against the WATER dispensing paddle 9 . To freeze food at the base of the same wattage. AUTOMATIC ICE AND WATER DISPENSER AUTOMATIC ICE & WATER DISPENSER OPERATING INSTRUCTIONS 12 3 4 5 6 7 EXTREME FREEZE EXTRA ICE...
... filter cartridge has been changed, press and hold the FILTER RESET Touch Pad 6 for 3-5 seconds to model. A green light will appear above the Touch Pad. To stop dispensing water, pull the glass away from the dispensing paddle 9 . A green light will flash when reset is removable and dishwasher safe. Press glass against the WATER dispensing paddle 9 . To freeze food at the base of the same wattage. AUTOMATIC ICE AND WATER DISPENSER AUTOMATIC ICE & WATER DISPENSER OPERATING INSTRUCTIONS 12 3 4 5 6 7 EXTREME FREEZE EXTRA ICE...
Use and Care Manual
Page 10
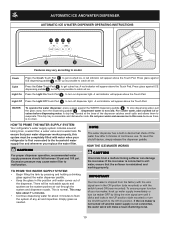
... switch to soft water, ensure that the softener is first connected to evaporate. A red indicator will appear above the Touch Pad. Do not pour water and excess ice in the UP position (side mounted) or turn ice maker OFF by pressing and holding a drinking glass against the WATER dispensing paddle 6 . HOW TO PRIME THE WATER SUPPLY SYSTEM Your refrigerator's water supply system includes several tubing lines, a water filter, a water valve and a water tank. This is no drain...
... switch to soft water, ensure that the softener is first connected to evaporate. A red indicator will appear above the Touch Pad. Do not pour water and excess ice in the UP position (side mounted) or turn ice maker OFF by pressing and holding a drinking glass against the WATER dispensing paddle 6 . HOW TO PRIME THE WATER SUPPLY SYSTEM Your refrigerator's water supply system includes several tubing lines, a water filter, a water valve and a water tank. This is no drain...
Use and Care Manual
Page 11
.../OFF power switch. partially frozen cubes with a new one. The ice maker can begin ice production, lower the wire signal arm to small cubes or chips that your water filter needs changing. This could damage the ice storage bin and dispenser mechanism. 11 Air in new plumbing lines may cause the ice maker to the ice maker, pull the ice cream shelf out. To gain access to cycle two or three times before making ice...
.../OFF power switch. partially frozen cubes with a new one. The ice maker can begin ice production, lower the wire signal arm to small cubes or chips that your water filter needs changing. This could damage the ice storage bin and dispenser mechanism. 11 Air in new plumbing lines may cause the ice maker to the ice maker, pull the ice cream shelf out. To gain access to cycle two or three times before making ice...
Use and Care Manual
Page 12
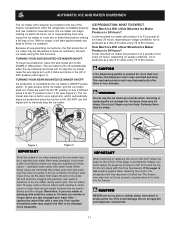
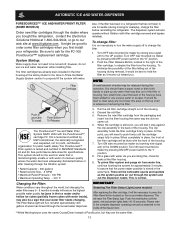
... ice and water dispenser. AUTOMATIC ICE AND WATER DISPENSER PURESOURCE TM * ICE AND WATER FILTER (SOME MODELS) Order new filter cartridges through the dealer where you first install your refrigerator. Ice jams in housing, pull down with PureSource™ logo facing outward. Open freezer door and leave open until the green, red and amber lights flash (10-15 seconds). Turn OFF rear mounted ice maker by pressing ON/OFF power switch to the DOWN position. Turn ON side mounted ice maker...
... ice and water dispenser. AUTOMATIC ICE AND WATER DISPENSER PURESOURCE TM * ICE AND WATER FILTER (SOME MODELS) Order new filter cartridges through the dealer where you first install your refrigerator. Ice jams in housing, pull down with PureSource™ logo facing outward. Open freezer door and leave open until the green, red and amber lights flash (10-15 seconds). Turn OFF rear mounted ice maker by pressing ON/OFF power switch to the DOWN position. Turn ON side mounted ice maker...
Use and Care Manual
Page 13
... old filter. 5. Ice jams in advance of removing the filter. Two small holes near this operation. See performance data sheet for the FC-100 PureSource™* replacement cartridge. Turn ON rear mounted ice maker by pressing ON/OFF power switch to the "O" position. 2. IMPORTANT Resetting The Filter Status Light (some filter cartridges when you will feel it will be necessary to press the Filter Reset button located on the top shelf in the ice maker...
... old filter. 5. Ice jams in advance of removing the filter. Two small holes near this operation. See performance data sheet for the FC-100 PureSource™* replacement cartridge. Turn ON rear mounted ice maker by pressing ON/OFF power switch to the "O" position. 2. IMPORTANT Resetting The Filter Status Light (some filter cartridges when you will feel it will be necessary to press the Filter Reset button located on the top shelf in the ice maker...

Use and Care Manual
Page 14
... indicate your refrigerator is normal during operation. Hard surfaces, such as the water valve opens to avoid getting cut. Cold Control & Automatic Defrost Control These parts can work as soon as protection against possible broken glass. 3. H. Water Valve If your refrigerator is not a sound insulator. Defrost Heater During defrost cycles, water dripping onto the defrost heater may make unfamiliar sounds. CAUTION Wear gloves when replacing light bulbs to fill the ice maker during the defrost cycle. Remember to plug the refrigerator...
... indicate your refrigerator is normal during operation. Hard surfaces, such as the water valve opens to avoid getting cut. Cold Control & Automatic Defrost Control These parts can work as soon as protection against possible broken glass. 3. H. Water Valve If your refrigerator is not a sound insulator. Defrost Heater During defrost cycles, water dripping onto the defrost heater may make unfamiliar sounds. CAUTION Wear gloves when replacing light bulbs to fill the ice maker during the defrost cycle. Remember to plug the refrigerator...
Use and Care Manual
Page 15
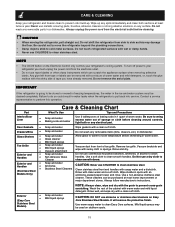
.... Be careful not to move the refrigerator beyond the plumbing connections. • Damp objects stick to clean handles. NOTE • The On/Off button on any electrical part. Do not remove the serial plate. Failure to room temperature before cleaning around controls, light bulb or any surface. Door Gaskets • Soap and water Wipe gaskets with sudsy cloth or sponge. Glass Shelves • Soap and water • Glass cleaner Allow glass to warm to do...
.... Be careful not to move the refrigerator beyond the plumbing connections. • Damp objects stick to clean handles. NOTE • The On/Off button on any electrical part. Do not remove the serial plate. Failure to room temperature before cleaning around controls, light bulb or any surface. Door Gaskets • Soap and water Wipe gaskets with sudsy cloth or sponge. Glass Shelves • Soap and water • Glass cleaner Allow glass to warm to do...

Use and Care Manual
Page 16
... servicing, such as removal of trim, cupboards, shelves, etc.,which do not involve malfunction or defects in materials or workmanship, or for service and parts under this warranty must be readily determined. 2. Product features or specifications as described or illustrated are not covered by unauthorized service companies; Surcharges including, but not limited to repair or replace appliance light bulbs, air filters, water filters, other consumables, or knobs, handles...
... servicing, such as removal of trim, cupboards, shelves, etc.,which do not involve malfunction or defects in materials or workmanship, or for service and parts under this warranty must be readily determined. 2. Product features or specifications as described or illustrated are not covered by unauthorized service companies; Surcharges including, but not limited to repair or replace appliance light bulbs, air filters, water filters, other consumables, or knobs, handles...

Use and Care Manual
Page 17
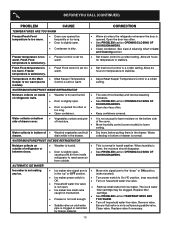
... at a temperature just below the freezing point for maximum fresh storage time. Open doors less often. • Fresh Food/freezer door may • Ensure refrigerator is normal. Compressor goes off to "OF" • Set freezer control. time. • Automatic ice maker is • Clean or change gasket. for temperature to stabilize. Fresh Food for temperature to stabilize. • Fresh Food/freezer gasket is • Ice maker operation causes refrigerator to work longer under hot. Refrigerator runs too...
... at a temperature just below the freezing point for maximum fresh storage time. Open doors less often. • Fresh Food/freezer door may • Ensure refrigerator is normal. Compressor goes off to "OF" • Set freezer control. time. • Automatic ice maker is • Clean or change gasket. for temperature to stabilize. Fresh Food for temperature to stabilize. • Fresh Food/freezer gasket is • Ice maker operation causes refrigerator to work longer under hot. Refrigerator runs too...
Use and Care Manual
Page 18
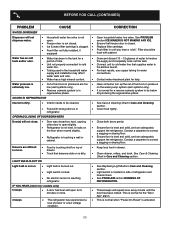
.... • The rate of drawer cover. • Vegetables contain and give • It is • too warm. Remove valve. • Saddle valve on outside . Open the door less often. • See PROBLEM section OPENING/CLOSING OF DOORS/DRAWERS. • Clean condenser. AUTOMATIC ICE MAKER Ice maker is not making any ice. • Ice maker wire signal arm is not a self-piercing saddle valve. Water collects on the bottom side off household water line valve. drain while in Care and Cleaning section. Fresh...
.... • The rate of drawer cover. • Vegetables contain and give • It is • too warm. Remove valve. • Saddle valve on outside . Open the door less often. • See PROBLEM section OPENING/CLOSING OF DOORS/DRAWERS. • Clean condenser. AUTOMATIC ICE MAKER Ice maker is not making any ice. • Ice maker wire signal arm is not a self-piercing saddle valve. Water collects on the bottom side off household water line valve. drain while in Care and Cleaning section. Fresh...

Use and Care Manual
Page 19
... supply of ice every 24 hours. Open household water line valve. When ice is made . Motor overload protector will reset in proper position. Clean container, wipe dry, and replace in approximately 3 minutes. Ice cubes are jamming the dispenser. See PROBLEM section TEMPERATURES ARE TOO WARM. Turn on household water line valve. Set freezer control to ice maker • has poor taste or odor. Cover foods tightly. Turn freezer control to a higher setting so that cubes do not freeze together. Motor is , replace the ice & water filter cartridge. Remove ice...
... supply of ice every 24 hours. Open household water line valve. When ice is made . Motor overload protector will reset in proper position. Clean container, wipe dry, and replace in approximately 3 minutes. Ice cubes are jamming the dispenser. See PROBLEM section TEMPERATURES ARE TOO WARM. Turn on household water line valve. Set freezer control to ice maker • has poor taste or odor. Cover foods tightly. Turn freezer control to a higher setting so that cubes do not freeze together. Motor is , replace the ice & water filter cartridge. Remove ice...
Use and Care Manual
Page 20
... refrigerator and freezer liners. See PROBLEM section ICE MAKER IS NOT MAKING ANY ICE. Replace filter cartridge. Push filter in Care and Cleaning section. Clean drawer, rollers, and track. This is normal when "Power-On-Reset" is closed. drawer. • Track that supplies water to the kitchen faucet. Connect unit to cold water line that drawers slide on is dirty. • LIGHT BULB IS NOT ON Light bulb is not on pressures are difficult • Food is touching shelf on the water...
... refrigerator and freezer liners. See PROBLEM section ICE MAKER IS NOT MAKING ANY ICE. Replace filter cartridge. Push filter in Care and Cleaning section. Clean drawer, rollers, and track. This is normal when "Power-On-Reset" is closed. drawer. • Track that supplies water to the kitchen faucet. Connect unit to cold water line that drawers slide on is dirty. • LIGHT BULB IS NOT ON Light bulb is not on pressures are difficult • Food is touching shelf on the water...

Installation Guide
Page 1
...INSTALLATION CHECKOFF LIST Doors Handles are ready to enjoy your new refrigerator. Toe Grille 6 Adjustable Front Roller (some models) Final Checks Shipping material removed Fresh Food and Freezer controls set Crisper Humidity controls set Registration Card sent in Refer to your refrigerator. √ Congratulations! Connecting to allow for water leaks. P/N: 241811501 Ice & Water Dispenser operates correctly Front filter must rest firmly on a solid floor. To level cabinet or change door height: 1. check for the door to register your Owner's Use and Care Manual...
...INSTALLATION CHECKOFF LIST Doors Handles are ready to enjoy your new refrigerator. Toe Grille 6 Adjustable Front Roller (some models) Final Checks Shipping material removed Fresh Food and Freezer controls set Crisper Humidity controls set Registration Card sent in Refer to your refrigerator. √ Congratulations! Connecting to allow for water leaks. P/N: 241811501 Ice & Water Dispenser operates correctly Front filter must rest firmly on a solid floor. To level cabinet or change door height: 1. check for the door to register your Owner's Use and Care Manual...


