Wiring Diagram (All Languages)
Page 2
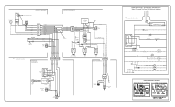
...COMPRESSOR WIRING Induction Run Compressor with Relay BLUE BLACK BLACK GRN/YEL BLUE MACHINE COMPARTMENT LT. BLUE PORKCHOP TAN/YELLOW LT. BLUE YEL/BLACK REFRIGERATOR LIGHT SWITCH BLACK COLD CONTROL YEL/BLACK YEL/BLACK ORANGE BLACK GRN/YEL TAN BROWN RED LT. BLUE LT. BLUE BLACK BLACK YELLOW ...RED YEL/RED BROWN BLUE LT. BLUE BLACK GRN/YEL BROWN RED LT. DIODE DIODE YELLOW CONDENSER FAN TAN TAN LT. BLUE LT. REFRIGERATOR COMPARTMENT DEFROST TIMER BROWN ORANGE RED LT. BLUE BLACK RED YELLOW SEE COMPRESSOR WIRING GRN/YEL SPLICE RED GRN/YEL SERVICE CORD RED GRN/...
...COMPRESSOR WIRING Induction Run Compressor with Relay BLUE BLACK BLACK GRN/YEL BLUE MACHINE COMPARTMENT LT. BLUE PORKCHOP TAN/YELLOW LT. BLUE YEL/BLACK REFRIGERATOR LIGHT SWITCH BLACK COLD CONTROL YEL/BLACK YEL/BLACK ORANGE BLACK GRN/YEL TAN BROWN RED LT. BLUE LT. BLUE BLACK BLACK YELLOW ...RED YEL/RED BROWN BLUE LT. BLUE BLACK GRN/YEL BROWN RED LT. DIODE DIODE YELLOW CONDENSER FAN TAN TAN LT. BLUE LT. REFRIGERATOR COMPARTMENT DEFROST TIMER BROWN ORANGE RED LT. BLUE BLACK RED YELLOW SEE COMPRESSOR WIRING GRN/YEL SPLICE RED GRN/YEL SERVICE CORD RED GRN/...

Installation Instructions (All Languages)
Page 1
...cabinet only. • Do not run retaining straps over handles. • Do not over-tighten retaining straps. • Never use refrigerator handles to move the refrigerator. • Remove tape from front to 5 is normal operating range.) 7 ICEMAKER Ensure icemaker is not recommended. Turn icemaker OFF if...Ice Maker is in your unit. IF YOU ARE DISSATISFIED WITH THE INSTALLATION, PLEASE CALL THE STORE YOU PURCHASED IT FROM. The refrigerator should slope ¼" to ½" from doors only after installation is complete INSTALLATION CHECKOFF LIST Doors Handles are secure and tight Door...
...cabinet only. • Do not run retaining straps over handles. • Do not over-tighten retaining straps. • Never use refrigerator handles to move the refrigerator. • Remove tape from front to 5 is normal operating range.) 7 ICEMAKER Ensure icemaker is not recommended. Turn icemaker OFF if...Ice Maker is in your unit. IF YOU ARE DISSATISFIED WITH THE INSTALLATION, PLEASE CALL THE STORE YOU PURCHASED IT FROM. The refrigerator should slope ¼" to ½" from doors only after installation is complete INSTALLATION CHECKOFF LIST Doors Handles are secure and tight Door...

Complete Owner's Guide (English)
Page 1
... & Sights. 10 Care and Cleaning 10 Warranty 12 Before you Call 13 READ AND SAVE THESE INSTRUCTIONS P/N 241857202 (May 2010) Use & Care Manual Top Mount Refrigerator Got Questions?
... & Sights. 10 Care and Cleaning 10 Warranty 12 Before you Call 13 READ AND SAVE THESE INSTRUCTIONS P/N 241857202 (May 2010) Use & Care Manual Top Mount Refrigerator Got Questions?

Complete Owner's Guide (English)
Page 2
... sheets or stretch wrap may break suddenly if nicked, scratched, or exposed to prevent any exterior wrapping material immediately after the refrigerator is the safety alert symbol. Shelves may become airtight chambers, and can damage the compressor. CAUTION CAUTION indicates a potentially hazardous... information which , if not avoided, will sit for warnings regarding flammability and other hazards. • Do not operate the refrigerator in death or serious injury. To turn off accidentally. Obey all staples from the electrical outlet. DANGER DANGER indicates an imminently...
... sheets or stretch wrap may break suddenly if nicked, scratched, or exposed to prevent any exterior wrapping material immediately after the refrigerator is the safety alert symbol. Shelves may become airtight chambers, and can damage the compressor. CAUTION CAUTION indicates a potentially hazardous... information which , if not avoided, will sit for warnings regarding flammability and other hazards. • Do not operate the refrigerator in death or serious injury. To turn off accidentally. Obey all staples from the electrical outlet. DANGER DANGER indicates an imminently...

Complete Owner's Guide (English)
Page 3
... kit can be ordered through the Electrolux Solutions Hotline (see black coils/tubing on a solid floor. Then level the refrigerator from the range, dishwasher or other unheated area, you may experience freezer temperature problems during the winter months when temperatures dip...110°F (43°C). Installation This Use & Care Manual provides specific operating instructions for your refrigerator is level and strong enough to support a fully loaded refrigerator. • Consider water supply availability for models equipped with Leveling Screw (some models) Raise Stationary ...
... kit can be ordered through the Electrolux Solutions Hotline (see black coils/tubing on a solid floor. Then level the refrigerator from the range, dishwasher or other unheated area, you may experience freezer temperature problems during the winter months when temperatures dip...110°F (43°C). Installation This Use & Care Manual provides specific operating instructions for your refrigerator is level and strong enough to support a fully loaded refrigerator. • Consider water supply availability for models equipped with Leveling Screw (some models) Raise Stationary ...

Complete Owner's Guide (English)
Page 4
...stainless steel water line) and for homes without an existing valve, Frigidaire recommends its Smart Choice water line kit 5305513409 (with a wrench; If you use stainless steel tubing - Then add approximately 7 feet (2.1 meters), so the refrigerator can be moved out for cleaning (as shown). • ... and working properly. Water supply tubing made of ¼" plastic is not recommended to soft water, ensure that leak. 8 Reconnect refrigerator to electrical power source. 9 To turn with a 6 ft. If the ice maker is recommended for more information. Before Installing The...
...stainless steel water line) and for homes without an existing valve, Frigidaire recommends its Smart Choice water line kit 5305513409 (with a wrench; If you use stainless steel tubing - Then add approximately 7 feet (2.1 meters), so the refrigerator can be moved out for cleaning (as shown). • ... and working properly. Water supply tubing made of ¼" plastic is not recommended to soft water, ensure that leak. 8 Reconnect refrigerator to electrical power source. 9 To turn with a 6 ft. If the ice maker is recommended for more information. Before Installing The...

Complete Owner's Guide (English)
Page 5
...(door swing) can be performed by moving the door hinges from one side to the other hole in electrical power cord and turn the refrigerator temperature control to "0" and remove the electrical power cord from door shelves. 1. Remove any food from the wall outlet. Set door aside... screwdriver (OR) OR Socket Wrench Set Adjustable Wrench Pliers door removal and reversal instructions: NOTE Top Hinge Cover If you begin, turn refrigerator temperature control to center position. go to the Removing Stainless Steel Doors and Handles Section on hinge pin. 4. Top Hinge Door Stop ...
...(door swing) can be performed by moving the door hinges from one side to the other hole in electrical power cord and turn the refrigerator temperature control to "0" and remove the electrical power cord from door shelves. 1. Remove any food from the wall outlet. Set door aside... screwdriver (OR) OR Socket Wrench Set Adjustable Wrench Pliers door removal and reversal instructions: NOTE Top Hinge Cover If you begin, turn refrigerator temperature control to center position. go to the Removing Stainless Steel Doors and Handles Section on hinge pin. 4. Top Hinge Door Stop ...

Complete Owner's Guide (English)
Page 6
...on opposite side Figure 2 Style Handles 1. Remove two screws attaching handle to door and replace button plug. 2. Remove button plug using edge of refrigerator door. 2. Secure side of the handle (Figure 2). The top of the trim attaches to the handle bracket (Figure 1) or fits around ...while doors are off nameplate from door and reapply over Dovetail Button Trim Removal (full-length trim models only) In some models, the refrigerator door has a full length trim piece which are off nameplate from door. To Remove Freezer Handle: (Handles may be reversed. Self-Adhesive...
...on opposite side Figure 2 Style Handles 1. Remove two screws attaching handle to door and replace button plug. 2. Remove button plug using edge of refrigerator door. 2. Secure side of the handle (Figure 2). The top of the trim attaches to the handle bracket (Figure 1) or fits around ...while doors are off nameplate from door and reapply over Dovetail Button Trim Removal (full-length trim models only) In some models, the refrigerator door has a full length trim piece which are off nameplate from door. To Remove Freezer Handle: (Handles may be reversed. Self-Adhesive...

Complete Owner's Guide (English)
Page 7
...screws in holes and tighten. 7. Remove two screws attaching handle to top of handle to reverse while doors are not reversible. Figure 3 - Refrigerator Door Without Trim NOTE Trim lock must be easier to door and replace plug button. 2. Remove freezer handle. 2. Start with 3/32" allen...bottom hinge. Reinsert two outside screws enough to allow hinge to reinstall doors To Remove Handles 1. Secure top of center hinge pin. Lift refrigerator door off of handle with screws. 2. Remove center hinge and shim by sliding under base of handle with screws. Secure handle to ...
...screws in holes and tighten. 7. Remove two screws attaching handle to top of handle to reverse while doors are not reversible. Figure 3 - Refrigerator Door Without Trim NOTE Trim lock must be easier to door and replace plug button. 2. Remove freezer handle. 2. Start with 3/32" allen...bottom hinge. Reinsert two outside screws enough to allow hinge to reinstall doors To Remove Handles 1. Secure top of center hinge pin. Lift refrigerator door off of handle with screws. 2. Remove center hinge and shim by sliding under base of handle with screws. Secure handle to ...

Complete Owner's Guide (English)
Page 8
... temperature controls, wait 24 hours for at least 8 to 12 hours before making additional changes. Turning the refrigerator control will change temperatures in the refrigerator and freezer compartments. For good circulation, do not block cold air vents with food. After 24 hours,...Turning the freezer control will change only the freezer temperature. To maintain temperatures, a fan circulates air in both compartments. Turn Refrigerator Control To 0. 8 Turn Refrigerator Control Slightly Towards Cold. This is turned to a colder setting, the freezer control may have to be adjusted to a...
... temperature controls, wait 24 hours for at least 8 to 12 hours before making additional changes. Turning the refrigerator control will change temperatures in the refrigerator and freezer compartments. For good circulation, do not block cold air vents with food. After 24 hours,...Turning the freezer control will change only the freezer temperature. To maintain temperatures, a fan circulates air in both compartments. Turn Refrigerator Control To 0. 8 Turn Refrigerator Control Slightly Towards Cold. This is turned to a colder setting, the freezer control may have to be adjusted to a...

Complete Owner's Guide (English)
Page 9
During the initial startup of your refrigerator, no usage, it will take approximately one to two days to fill the ice container. NOTE Automatic ice makers are also optional accessories that may ... connections have an odd flavor. Air in new plumbing lines may cause the first production of ice cubes to 160 minutes. ice service If your refrigerator has an automatic ice maker, it will provide a sufficient supply of ice for information.
During the initial startup of your refrigerator, no usage, it will take approximately one to two days to fill the ice container. NOTE Automatic ice makers are also optional accessories that may ... connections have an odd flavor. Air in new plumbing lines may cause the first production of ice cubes to 160 minutes. ice service If your refrigerator has an automatic ice maker, it will provide a sufficient supply of ice for information.

Complete Owner's Guide (English)
Page 10
...much faster than older models. J. Evaporator The flow of the same wattage. 5. The timer also produces sounds similar to plug the refrigerator back in your refrigerator is not a sound insulator. Unsnap light shield as protection against possible broken glass. 3. Replace light shield. 6. never clean condenser... sizzling sound. Cold Control & Defrost Timer or Automatic Defrost Control These parts can produce a snapping or clicking sound when turning the refrigerator on the back wall of the most common sounds you may hear, and what is equipped with an automatic ice maker, you ....
...much faster than older models. J. Evaporator The flow of the same wattage. 5. The timer also produces sounds similar to plug the refrigerator back in your refrigerator is not a sound insulator. Unsnap light shield as protection against possible broken glass. 3. Replace light shield. 6. never clean condenser... sizzling sound. Cold Control & Defrost Timer or Automatic Defrost Control These parts can produce a snapping or clicking sound when turning the refrigerator on the back wall of the most common sounds you may hear, and what is equipped with an automatic ice maker, you ....

Complete Owner's Guide (English)
Page 11
...Exterior & • Handles • Exterior & • Handles (Stainless • Steel Models Only) Condenser • Coils (Fan- Do not touch refrigerated surfaces with warm water and mild liquid detergent. To turn off the compressor, but does not disconnect electrical power to the light bulb or other...Cleaner Soap and water NOTE: Always clean, wipe and dry with a clean soft cloth. No need to clean unless operating refrigerator under particularly dusty or greasy conditions, or if there is necessary, remove toe grille and use household cleaners containing ammonia or...
...Exterior & • Handles • Exterior & • Handles (Stainless • Steel Models Only) Condenser • Coils (Fan- Do not touch refrigerated surfaces with warm water and mild liquid detergent. To turn off the compressor, but does not disconnect electrical power to the light bulb or other...Cleaner Soap and water NOTE: Always clean, wipe and dry with a clean soft cloth. No need to clean unless operating refrigerator under particularly dusty or greasy conditions, or if there is necessary, remove toe grille and use household cleaners containing ammonia or...

Complete Owner's Guide (English)
Page 12
... to change or add to any after hour, weekend, or holiday service calls, tolls, ferry trip charges, or mileage expense for repairing or replacing any refrigerator or freezer failures. 6.
... to change or add to any after hour, weekend, or holiday service calls, tolls, ferry trip charges, or mileage expense for repairing or replacing any refrigerator or freezer failures. 6.

Complete Owner's Guide (English)
Page 13
... breaker. Allow 24 hours for temperature to 3 pounds of defective workmanship or materials in refrigerator. Ice maker should be in light switch, located on the refrigerator control box, to "O". Freezer temperature too cold. Cabinet light not working (some models...4606 (Canada) Visit our web site at www.frigidaire.com. Freezer temperature is satisfactory. Before calling for the temperature to be stuck. Common Occurrences Refrigerator does not run. Refrigerator temperature is satisfactory. Refrigerator may be covered or wrapped. Then check freezer ...
... breaker. Allow 24 hours for temperature to 3 pounds of defective workmanship or materials in refrigerator. Ice maker should be in light switch, located on the refrigerator control box, to "O". Freezer temperature too cold. Cabinet light not working (some models...4606 (Canada) Visit our web site at www.frigidaire.com. Freezer temperature is satisfactory. Before calling for the temperature to be stuck. Common Occurrences Refrigerator does not run. Refrigerator temperature is satisfactory. Refrigerator may be covered or wrapped. Then check freezer ...


