

Use and Care Guide
Page 1
Use & Care Manual Top Mount Refrigerator Welcome 2 Safety Instructions 3 Installation -- Includes Connecting Optional Ice Maker To Water Supply 4 - 5 Door Removal & Reversal 6 - 9 Features at a Glance 9 Temperature Controls 9 - 10 Looking Inside 10 - 12 Ice Service 12 - 13 Food Storage & Energy Saving Tips 13 Normal Operating Sounds 14 Care & Cleaning 15 - 16 Español 19 Warranty Before You Call READ AND SAVE THESE INSTRUCTIONS 17 18 P/N 241694400 (0106)
Use & Care Manual Top Mount Refrigerator Welcome 2 Safety Instructions 3 Installation -- Includes Connecting Optional Ice Maker To Water Supply 4 - 5 Door Removal & Reversal 6 - 9 Features at a Glance 9 Temperature Controls 9 - 10 Looking Inside 10 - 12 Ice Service 12 - 13 Food Storage & Energy Saving Tips 13 Normal Operating Sounds 14 Care & Cleaning 15 - 16 Español 19 Warranty Before You Call READ AND SAVE THESE INSTRUCTIONS 17 18 P/N 241694400 (0106)

Use and Care Guide
Page 2
... THESE INSTRUCTIONS This Use & Care Manual provides specific operating instructions for choosing our product. Common sense and caution must be practiced when installing, operating and maintaining any appliance. Your satisfaction is just a phone call away. • Top-quality repairs by factory-trained experts. • Quick access to genuine replacement parts so you consider us for future purchases. These instructions are completly committed to clean serial...
... THESE INSTRUCTIONS This Use & Care Manual provides specific operating instructions for choosing our product. Common sense and caution must be practiced when installing, operating and maintaining any appliance. Your satisfaction is just a phone call away. • Top-quality repairs by factory-trained experts. • Quick access to genuine replacement parts so you consider us for future purchases. These instructions are completly committed to clean serial...

Use and Care Guide
Page 3
... power cord from cooling, but does not disconnect the power to play. Children should be replaced by a qualified service technician. The power cord of your refrigerator from the wall outlet. 3 IMPORTANT SAFETY INSTRUCTIONS WARNING Please Read All Instructions Before Using This Refrigerator. Read product labels for your old refrigerator/ freezer: • Remove doors. • Leave shelves in place so children may be installed in contact with local codes...
... power cord from cooling, but does not disconnect the power to play. Children should be replaced by a qualified service technician. The power cord of your refrigerator from the wall outlet. 3 IMPORTANT SAFETY INSTRUCTIONS WARNING Please Read All Instructions Before Using This Refrigerator. Read product labels for your old refrigerator/ freezer: • Remove doors. • Leave shelves in place so children may be installed in contact with local codes...

Use and Care Guide
Page 4
.... See Door Removal & Reversal Instructions. 4 To make this Use & Care Manual. Do Not use an extension cord or an adapter plug. • If possible, place the refrigerator out of your refrigerator. The compressor will drop below 55°F (13°C) or rise above 110°F (43°C). The refrigerator should be positioned to support a fully loaded refrigerator. • Consider water supply availability for the proper operation of your refrigerator (air-cooled condenser...
.... See Door Removal & Reversal Instructions. 4 To make this Use & Care Manual. Do Not use an extension cord or an adapter plug. • If possible, place the refrigerator out of your refrigerator. The compressor will drop below 55°F (13°C) or rise above 110°F (43°C). The refrigerator should be positioned to support a fully loaded refrigerator. • Consider water supply availability for the proper operation of your refrigerator (air-cooled condenser...

Use and Care Guide
Page 5
... refrigerator can be moved out for installing a water supply line. NOTE Water line kit number 5303917950, available from electrical power before making a full tray of water supply line into valve inlet and finger tighten compression nut onto valve. New plumbing may cause ice maker to cycle two or three times before connecting a water supply line to your household water system. CONNECTING ICE MAKER TO WATER SUPPLY WARNING To avoid electric shock, which can damage the ice maker. CAUTION To Avoid Property Damage: • Copper tubing...
... refrigerator can be moved out for installing a water supply line. NOTE Water line kit number 5303917950, available from electrical power before making a full tray of water supply line into valve inlet and finger tighten compression nut onto valve. New plumbing may cause ice maker to cycle two or three times before connecting a water supply line to your household water system. CONNECTING ICE MAKER TO WATER SUPPLY WARNING To avoid electric shock, which can damage the ice maker. CAUTION To Avoid Property Damage: • Copper tubing...

Use and Care Guide
Page 6
.... Tighten center hinge pin with 3/8" hex driver and lift freezer door off of refrigerator, remove inside screw and loosening two outside screws on next page). 11. Plug in hinge and tighten with the two screws removed from one side to the other hole in electrical power cord and turn the refrigerator temperature control to "0" and remove the electrical power cord from door shelves. 1. IMPORTANT Before you have stainless steel doors -- Reverse door handles (see instructions on opposite...
.... Tighten center hinge pin with 3/8" hex driver and lift freezer door off of refrigerator, remove inside screw and loosening two outside screws on next page). 11. Plug in hinge and tighten with the two screws removed from one side to the other hole in electrical power cord and turn the refrigerator temperature control to "0" and remove the electrical power cord from door shelves. 1. IMPORTANT Before you have stainless steel doors -- Reverse door handles (see instructions on opposite...

Use and Care Guide
Page 7
TO REMOVE FREEZER HANDLE: (Handles may be easier to reverse while doors are off .) 1. Remove screw attaching top of handle to door and replace button plug. 2. Secure side of handle to door. 4. Remove nameplate from its frame, turn frame upside down . Start with short handle trim, remove by either an adhesive trim lock, or a trim lock with two screws removed earlier. TRIM REMOVAL (FULL-LENGTH TRIM MODELS ONLY) In some models, the refrigerator door has...
TO REMOVE FREEZER HANDLE: (Handles may be easier to reverse while doors are off .) 1. Remove screw attaching top of handle to door and replace button plug. 2. Secure side of handle to door. 4. Remove nameplate from its frame, turn frame upside down . Start with short handle trim, remove by either an adhesive trim lock, or a trim lock with two screws removed earlier. TRIM REMOVAL (FULL-LENGTH TRIM MODELS ONLY) In some models, the refrigerator door has...

Use and Care Guide
Page 8
... door. 3. Remove screw attaching bottom of center hinge pin. Remove two screws attaching handle to top of stainless steel doors to avoid scratching. Remove button plug using tools near surface of refrigerator door. 2. Remove screw on Typical Handle hinge pin. 4. Handle Reversal TO ATTACH REFRIGERATOR HANDLE: 1. To Remove Doors Stainless steel doors are off.) Figure 1 Style Handles 1. Remove two screws attaching handle to top of door and install on next page) 8 Insert new adhesive trim locks contained in figure 3. Reverse freezer and refrigerator handles...
... door. 3. Remove screw attaching bottom of center hinge pin. Remove two screws attaching handle to top of stainless steel doors to avoid scratching. Remove button plug using tools near surface of refrigerator door. 2. Remove screw on Typical Handle hinge pin. 4. Handle Reversal TO ATTACH REFRIGERATOR HANDLE: 1. To Remove Doors Stainless steel doors are off.) Figure 1 Style Handles 1. Remove two screws attaching handle to top of door and install on next page) 8 Insert new adhesive trim locks contained in figure 3. Reverse freezer and refrigerator handles...

Use and Care Guide
Page 9
... / REVERSAL INSTRUCTIONS 6. Remove bottom hinge. Reinsert two outside screws in the refrigerator and freezer compartments. Turning the refrigerator control will change temperatures in small increments, allowing the temperature to W which is turned to a colder setting, the freezer control may vary according to model Ice Maker Ice Bucket Freezer Shelf Freezer Control Refrigerator Control Deli Drawer Cover Deli Drawer Half Shelf Wine Rack Full Shelf Special Item Rack Mid Level Light Crisper Cover Crisper Drawers FEATURES AT A GLANCE Ice Tray Freezer Light Toe Grille Fixed Door...
... / REVERSAL INSTRUCTIONS 6. Remove bottom hinge. Reinsert two outside screws in the refrigerator and freezer compartments. Turning the refrigerator control will change temperatures in small increments, allowing the temperature to W which is turned to a colder setting, the freezer control may vary according to model Ice Maker Ice Bucket Freezer Shelf Freezer Control Refrigerator Control Deli Drawer Cover Deli Drawer Half Shelf Wine Rack Full Shelf Special Item Rack Mid Level Light Crisper Cover Crisper Drawers FEATURES AT A GLANCE Ice Tray Freezer Light Toe Grille Fixed Door...

Use and Care Guide
Page 10
... property damage, handle tempered glass shelves carefully. TEMPERATURE ADJUSTMENT GUIDE If Refrigerator compartment Is Too Warm Turn Refrigerator Control Slightly Towards Colder. Before adjusting the shelves, remove all food. Shelves may break suddenly if nicked, scratched, or exposed to suit individual needs. Replace the shelf on any pair of rails by pulling forward to the light bulb and other electrical components. To turn off the compressor, but does not disconnect the power to stop position. 2 Lift...
... property damage, handle tempered glass shelves carefully. TEMPERATURE ADJUSTMENT GUIDE If Refrigerator compartment Is Too Warm Turn Refrigerator Control Slightly Towards Colder. Before adjusting the shelves, remove all food. Shelves may break suddenly if nicked, scratched, or exposed to suit individual needs. Replace the shelf on any pair of rails by pulling forward to the light bulb and other electrical components. To turn off the compressor, but does not disconnect the power to stop position. 2 Lift...

Use and Care Guide
Page 11
...-sized jars and containers. To move door bins 1. Lift bin straight up . 2 Pull shelf out. Full Width Cantilever Glass Shelf Cantilever Glass Shelf Fixed and Sliding DOOR STORAGE Door bins, shelves, and racks are supported at rear of the refrigerator. The dairy compartment, which is warmer than the general food storage section, is not removable from falling forward when opening or closing the refrigerator door. Wash items in clear water and remove excess water...
...-sized jars and containers. To move door bins 1. Lift bin straight up . 2 Pull shelf out. Full Width Cantilever Glass Shelf Cantilever Glass Shelf Fixed and Sliding DOOR STORAGE Door bins, shelves, and racks are supported at rear of the refrigerator. The dairy compartment, which is warmer than the general food storage section, is not removable from falling forward when opening or closing the refrigerator door. Wash items in clear water and remove excess water...

Use and Care Guide
Page 12
...; Ice dropping into ice container • Running water • Water valve opening or closing 12 LOOKING INSIDE (CONTINUED) HUMIDITY CONTROL (SOME MODELS) The Humidity Control, present on some models with crisper drawers, allows you to its "down " or ON position. Install on High Humidity, or in . Place the ice container under the ice maker, pushing it clicks and locks in its "up water supply immediately or turn ice maker OFF by lifting the wire...
...; Ice dropping into ice container • Running water • Water valve opening or closing 12 LOOKING INSIDE (CONTINUED) HUMIDITY CONTROL (SOME MODELS) The Humidity Control, present on some models with crisper drawers, allows you to its "down " or ON position. Install on High Humidity, or in . Place the ice container under the ice maker, pushing it clicks and locks in its "up water supply immediately or turn ice maker OFF by lifting the wire...

Use and Care Guide
Page 13
... the ice maker will help preserve the fruit and vegetable quality for Freezing in the coolest part of the room, out of 37° F. • Avoid overcrowding the refrigerator shelves. This overloads the freezer, slows the rate of freezing, and can circulate freely, allowing food to freeze as quickly as possible. • Avoid storing hard-to reduce door openings. Remove as many items as needed...
... the ice maker will help preserve the fruit and vegetable quality for Freezing in the coolest part of the room, out of 37° F. • Avoid overcrowding the refrigerator shelves. This overloads the freezer, slows the rate of freezing, and can circulate freely, allowing food to freeze as quickly as possible. • Avoid storing hard-to reduce door openings. Remove as many items as needed...
Use and Care Guide
Page 14
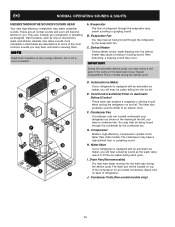
... automatic ice maker, you will hear ice cubes falling into the drain pan during the defrost cycle. G. Evaporator Fan You may hear air being forced through the evaporator may hear water running into the ice bin. Compressor Modern, high-efficiency compressors operate much faster than older models. I. B. C. Water Valve If your refrigerator as designed. NORMAL OPERATING SOUNDS & SIGHTS UNDERSTANDING THE SOUNDS YOU MAY HEAR Your new high-efficiency refrigerator may make unfamiliar sounds. E. The compressor may...
... automatic ice maker, you will hear ice cubes falling into the drain pan during the defrost cycle. G. Evaporator Fan You may hear air being forced through the evaporator may hear water running into the ice bin. Compressor Modern, high-efficiency compressors operate much faster than older models. I. B. C. Water Valve If your refrigerator as designed. NORMAL OPERATING SOUNDS & SIGHTS UNDERSTANDING THE SOUNDS YOU MAY HEAR Your new high-efficiency refrigerator may make unfamiliar sounds. E. The compressor may...

Use and Care Guide
Page 15
... water and a (Stainless Steel dishcloth. Wash the rest of air-cooled refrigerators only. Defrost Water Pan • Soap and water Some models have already removed. To turn off the compressor, but does not disconnect electrical power to cold metal surfaces. Care & Cleaning Chart Part What To Use Tips and Precautions Interior/Door Liner • Soap and water • Baking soda and water Use 2 tablespoons of baking soda in illustration on the condenser coils (black tubes and wires...
... water and a (Stainless Steel dishcloth. Wash the rest of air-cooled refrigerators only. Defrost Water Pan • Soap and water Some models have already removed. To turn off the compressor, but does not disconnect electrical power to cold metal surfaces. Care & Cleaning Chart Part What To Use Tips and Precautions Interior/Door Liner • Soap and water • Baking soda and water Use 2 tablespoons of baking soda in illustration on the condenser coils (black tubes and wires...

Use and Care Guide
Page 16
... disconnect power. • Turn off automatic ice maker and turn water supply valve to closed position. • Clean interior thoroughly. • Leave both doors open if necessary. • Remove all the way up . Unscrew and replace old bulb with a Never Clean condenser, there's no need to clean the condenser under particularly dusty or greasy conditions, or if there is equipped with an appliance bulb of 3 weeks or less. • Use...
... disconnect power. • Turn off automatic ice maker and turn water supply valve to closed position. • Clean interior thoroughly. • Leave both doors open if necessary. • Remove all the way up . Unscrew and replace old bulb with a Never Clean condenser, there's no need to clean the condenser under particularly dusty or greasy conditions, or if there is equipped with an appliance bulb of 3 weeks or less. • Use...

Use and Care Guide
Page 17
... for service calls to repair or replace appliance light bulbs, air filters, water filters, other consumables, or knobs, handles, or other than in accordance with original serial numbers that prove to use or used and maintained in accordance with the provided instructions. 8. or external causes such as described or illustrated are not covered by unauthorized service companies; Rust on the interior or exterior of the unit. 4. Major Appliance Warranty...
... for service calls to repair or replace appliance light bulbs, air filters, water filters, other consumables, or knobs, handles, or other than in accordance with original serial numbers that prove to use or used and maintained in accordance with the provided instructions. 8. or external causes such as described or illustrated are not covered by unauthorized service companies; Rust on the interior or exterior of the unit. 4. Major Appliance Warranty...

Use and Care Guide
Page 18
... Reverse The Doors See "Door Removal & Reversal" Section On Pages 6-9 Common Occurrences Refrigerator does not run. Refrigerator temperature is noisy or vibrates. Wait 20 minutes and check again. • Set freezer control to a warmer setting. Refrigerator temperature too cold. Cabinet light not working . (some models) Before calling for the temperature to stabilize. • Set refrigerator control to a warmer setting until freezer temperature is tightly pushed into electrical outlet. • Light switch may be in a 24 hour period. • Water supply is turned...
... Reverse The Doors See "Door Removal & Reversal" Section On Pages 6-9 Common Occurrences Refrigerator does not run. Refrigerator temperature is noisy or vibrates. Wait 20 minutes and check again. • Set freezer control to a warmer setting. Refrigerator temperature too cold. Cabinet light not working . (some models) Before calling for the temperature to stabilize. • Set refrigerator control to a warmer setting until freezer temperature is tightly pushed into electrical outlet. • Light switch may be in a 24 hour period. • Water supply is turned...


