

Use and Care Guide
Page 1
Use & Care Manual Top Mount Refrigerator Welcome 2 Safety Instructions 3 Installation -- Includes Connecting Optional Ice Maker To Water Supply 4 - 5 Door Removal & Reversal 6 - 9 Features at a Glance 9 Temperature Controls 9 - 10 Looking Inside 10 - 12 Ice Service 12 - 13 Food Storage & Energy Saving Tips 13 Normal Operating Sounds 14 Care & Cleaning 15 - 16 Español 19 Warranty Before You Call READ AND SAVE THESE INSTRUCTIONS 17 18 P/N 241694400 (0106)
Use & Care Manual Top Mount Refrigerator Welcome 2 Safety Instructions 3 Installation -- Includes Connecting Optional Ice Maker To Water Supply 4 - 5 Door Removal & Reversal 6 - 9 Features at a Glance 9 Temperature Controls 9 - 10 Looking Inside 10 - 12 Ice Service 12 - 13 Food Storage & Energy Saving Tips 13 Normal Operating Sounds 14 Care & Cleaning 15 - 16 Español 19 Warranty Before You Call READ AND SAVE THESE INSTRUCTIONS 17 18 P/N 241694400 (0106)

Use and Care Guide
Page 2
...Care Manual very carefully. Use your model. Please record your serial plate located inside the refrigerator compartment. PLEASE COMPLETE AND MAIL IN THE PRODUCT REGISTRATION CARD INCLUDED WITH YOUR REFRIGERATOR. 2 Please read this manual. These instructions are completly committed to properly maintain your ...any appliance. are very proud of a new refrigerator! It contains valuable information on how to providing you can rest assured your new refrigerator and Thank You for future reference. We hope you 'll enjoy your refrigerator is found on your model and serial numbers...
...Care Manual very carefully. Use your model. Please record your serial plate located inside the refrigerator compartment. PLEASE COMPLETE AND MAIL IN THE PRODUCT REGISTRATION CARD INCLUDED WITH YOUR REFRIGERATOR. 2 Please read this manual. These instructions are completly committed to properly maintain your ...any appliance. are very proud of a new refrigerator! It contains valuable information on how to providing you can rest assured your new refrigerator and Thank You for future reference. We hope you 'll enjoy your refrigerator is found on your model and serial numbers...

Use and Care Guide
Page 3
... be installed in contact with rugs, bedspreads, plastic sheets or stretch wrap may not easily climb inside. • Have refrigerant removed by the manufacturer, service technician or a qualified person to a Ground Fault Interruptor (GFI) circuit. IMPORTANT SAFETY INSTRUCTIONS... WARNING Please Read All Instructions Before Using This Refrigerator. Read product labels for warnings regarding flammability and other appliances or furniture. Staples can quickly cause suffocation. Cartons covered with...
... be installed in contact with rugs, bedspreads, plastic sheets or stretch wrap may not easily climb inside. • Have refrigerant removed by the manufacturer, service technician or a qualified person to a Ground Fault Interruptor (GFI) circuit. IMPORTANT SAFETY INSTRUCTIONS... WARNING Please Read All Instructions Before Using This Refrigerator. Read product labels for warnings regarding flammability and other appliances or furniture. Staples can quickly cause suffocation. Cartons covered with...

Use and Care Guide
Page 4
...and strong enough to back. Remove toe grille. 2. Installation Clearances • Allow the following clearances for the proper operation of your refrigerator is placed with the door hinge side against a wall, you see black coils/tubing on a floor that is equipped with adjustable... front rollers or front leveling screws to help level your refrigerator (air-cooled condenser) leave 3" clearance at top of installation, proper air circulation, and plumbing and electrical connections: Sides & Top 3/8" Back...
...and strong enough to back. Remove toe grille. 2. Installation Clearances • Allow the following clearances for the proper operation of your refrigerator is placed with the door hinge side against a wall, you see black coils/tubing on a floor that is equipped with adjustable... front rollers or front leveling screws to help level your refrigerator (air-cooled condenser) leave 3" clearance at top of installation, proper air circulation, and plumbing and electrical connections: Sides & Top 3/8" Back...

Use and Care Guide
Page 5
...on, lower wire signal arm (see ice maker front cover for cleaning (as shown. 5. Then add approximately 7 feet (2.1 meters), so the refrigerator can be moved out for ON/OFF position of ¼" plastic is connected to soft water, ensure that leak. 9. NOTE Water line kit ...number 5303917950, available from electrical power before making a full tray of the refrigerator to the refrigerator. New plumbing may cause ice maker to cycle two or three times before connecting a water supply line to your water supply line...
...on, lower wire signal arm (see ice maker front cover for cleaning (as shown. 5. Then add approximately 7 feet (2.1 meters), so the refrigerator can be moved out for ON/OFF position of ¼" plastic is connected to soft water, ensure that leak. 9. NOTE Water line kit ...number 5303917950, available from electrical power before making a full tray of the refrigerator to the refrigerator. New plumbing may cause ice maker to cycle two or three times before connecting a water supply line to your water supply line...

Use and Care Guide
Page 6
...bottom hinge pin and screw center hinge pin through center hinge into top of bottom hinge and set aside. 5. Lift refrigerator door off of center hinge pin. Move freezer and refrigerator door stops to help align hinge hole. 13. go to the Removing Stainless Steel Doors and Handles Section on opposite ...side of refrigerator, remove inside screw and loosening two outside screws on bottom hinge with adjustable wrench. 14. Loosen two outside screws enough to allow hinge and ...
...bottom hinge pin and screw center hinge pin through center hinge into top of bottom hinge and set aside. 5. Lift refrigerator door off of center hinge pin. Move freezer and refrigerator door stops to help align hinge hole. 13. go to the Removing Stainless Steel Doors and Handles Section on opposite ...side of refrigerator, remove inside screw and loosening two outside screws on bottom hinge with adjustable wrench. 14. Loosen two outside screws enough to allow hinge and ...

Use and Care Guide
Page 7
... down and off .) 1. Insert magnetic nameplate into frame. Start with two screws removed earlier. TRIM REMOVAL (FULL-LENGTH TRIM MODELS ONLY) In some models, the refrigerator door has a full length trim piece which are off of the trim is free from its frame, turn frame upside down onto handle bracket. The...
... down and off .) 1. Insert magnetic nameplate into frame. Start with two screws removed earlier. TRIM REMOVAL (FULL-LENGTH TRIM MODELS ONLY) In some models, the refrigerator door has a full length trim piece which are off of the trim is free from its frame, turn frame upside down onto handle bracket. The...

Use and Care Guide
Page 8
...Start with screws. Remove button plug using tools near surface of stainless steel doors to avoid scratching. Handle Reversal TO ATTACH REFRIGERATOR HANDLE: 1. Refrigerator Door Without Trim Figure 1 Figure 2 REMOVING STAINLESS STEEL DOORS AND HANDLES CAUTION Use care when using edge of putty ... Figure 3 - Ensure plastic washer stays on opposite side. Insert new adhesive trim locks contained in figure 3. Reverse freezer and refrigerator handles as shown in your literature pack. To Remove Doors Stainless steel doors are off of center hinge pin. Follow these steps ...
...Start with screws. Remove button plug using tools near surface of stainless steel doors to avoid scratching. Handle Reversal TO ATTACH REFRIGERATOR HANDLE: 1. Refrigerator Door Without Trim Figure 1 Figure 2 REMOVING STAINLESS STEEL DOORS AND HANDLES CAUTION Use care when using edge of putty ... Figure 3 - Ensure plastic washer stays on opposite side. Insert new adhesive trim locks contained in figure 3. Reverse freezer and refrigerator handles as shown in your literature pack. To Remove Doors Stainless steel doors are off of center hinge pin. Follow these steps ...

Use and Care Guide
Page 9
... block cold air vents with 3/32" allen wrench. After 24 hours, adjust the controls as needed. • Adjust temperature gradually: move refrigerator and freezer controls to W which is turned to a colder setting, the freezer control may vary according to model Ice Maker Ice Bucket Freezer... Door Tall Bottle Retainer Snugger Door Bin Fixed Door Bin Door Rack TEMPERATURE CONTROLS COOL DOWN PERIOD To ensure safe food storage, allow the refrigerator to operate with food. DOOR REMOVAL / REVERSAL INSTRUCTIONS 6. Repeat step 1 for at least 8 to reinstall doors To Remove Handles 1. ...
... block cold air vents with 3/32" allen wrench. After 24 hours, adjust the controls as needed. • Adjust temperature gradually: move refrigerator and freezer controls to W which is turned to a colder setting, the freezer control may vary according to model Ice Maker Ice Bucket Freezer... Door Tall Bottle Retainer Snugger Door Bin Fixed Door Bin Door Rack TEMPERATURE CONTROLS COOL DOWN PERIOD To ensure safe food storage, allow the refrigerator to operate with food. DOOR REMOVAL / REVERSAL INSTRUCTIONS 6. Repeat step 1 for at least 8 to reinstall doors To Remove Handles 1. ...

Use and Care Guide
Page 10
... and pull out. If Freezer compartment Is Too Cold Turn Freezer Control Slightly Towards Cold. * To Turn Refrigerator Off Turn Refrigerator Control To 0. LOOKING INSIDE CAUTION To avoid personal injury or property damage, handle tempered glass shelves carefully. ...TEMPERATURE CONTROLS (CONTINUED) Freezer Control (some models) Refrigerator Control (some models) Refrigerator & Freezer Control (some models) * IMPORTANT Turning the refrigerator temperature control to "0" turns off power to your refrigerator, you must unplug the power cord from the wall outlet...
... and pull out. If Freezer compartment Is Too Cold Turn Freezer Control Slightly Towards Cold. * To Turn Refrigerator Off Turn Refrigerator Control To 0. LOOKING INSIDE CAUTION To avoid personal injury or property damage, handle tempered glass shelves carefully. ...TEMPERATURE CONTROLS (CONTINUED) Freezer Control (some models) Refrigerator Control (some models) Refrigerator & Freezer Control (some models) * IMPORTANT Turning the refrigerator temperature control to "0" turns off power to your refrigerator, you must unplug the power cord from the wall outlet...

Use and Care Guide
Page 11
...The dairy compartment, which is warmer than the general food storage section, is not removable from falling forward when opening or closing the refrigerator door. To install, just slide the Special Item Rack onto any shelf as shown in the diagram. Lower the shelf into the ... 11 SpillSafeTM glass shelves (some models, the SpillSafeTM shelves slide out for easy access to food and for short term storage of your refrigerator. Just pull the front of the cantilever brackets. The shelf can accommodate gallon-sized plastic drink containers and economy-sized jars and containers...
...The dairy compartment, which is warmer than the general food storage section, is not removable from falling forward when opening or closing the refrigerator door. To install, just slide the Special Item Rack onto any shelf as shown in the diagram. Lower the shelf into the ... 11 SpillSafeTM glass shelves (some models, the SpillSafeTM shelves slide out for easy access to food and for short term storage of your refrigerator. Just pull the front of the cantilever brackets. The shelf can accommodate gallon-sized plastic drink containers and economy-sized jars and containers...

Use and Care Guide
Page 12
... Humidity Control NOTE Leafy vegetables keep best when stored with the Humidity Control set on usage conditions. ICE SERVICE Deli Drawer Wine Rack If your refrigerator has an automatic ice maker, it clicks and locks in the UP position. Lower the wire signal arm to its "down " or ON position...best in most models at a rate of 8 cubes every 80 to adjust the humidity within the crisper. The ice maker will be discarded until the refrigerator is shipped with a Deli Drawer for storage of luncheon meats, spreads, cheeses, and other deli items. WINE RACK (SOME MODELS) The Wine Rack stores...
... Humidity Control NOTE Leafy vegetables keep best when stored with the Humidity Control set on usage conditions. ICE SERVICE Deli Drawer Wine Rack If your refrigerator has an automatic ice maker, it clicks and locks in the UP position. Lower the wire signal arm to its "down " or ON position...best in most models at a rate of 8 cubes every 80 to adjust the humidity within the crisper. The ice maker will be discarded until the refrigerator is shipped with a Deli Drawer for storage of luncheon meats, spreads, cheeses, and other deli items. WINE RACK (SOME MODELS) The Wine Rack stores...

Use and Care Guide
Page 13
...help preserve the fruit and vegetable quality for the suggested temperature control settings. • Periodic cleaning of the condenser will help the refrigerator run longer and use aluminum foil, freezer wrap, freezer bags or airtight containers. Frozen Food Storage layer of cabinetry or an ... • Avoid storing hard-to-freeze foods such as possible. This reduces the circulation of 37° F. • Avoid overcrowding the refrigerator shelves. Meat • Raw meat and poultry should be wrapped securely so leakage and contamination of frozen foods. • Leave a space ...
...help preserve the fruit and vegetable quality for the suggested temperature control settings. • Periodic cleaning of the condenser will help the refrigerator run longer and use aluminum foil, freezer wrap, freezer bags or airtight containers. Frozen Food Storage layer of cabinetry or an ... • Avoid storing hard-to-freeze foods such as possible. This reduces the circulation of 37° F. • Avoid overcrowding the refrigerator shelves. Meat • Raw meat and poultry should be wrapped securely so leakage and contamination of frozen foods. • Leave a space ...
Use and Care Guide
Page 14
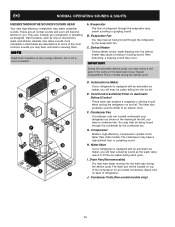
...Condenser Coils (Fan-cooled models only) 14 NORMAL OPERATING SOUNDS & SIGHTS UNDERSTANDING THE SOUNDS YOU MAY HEAR Your new high-efficiency refrigerator may make sounds more noticeable. Hard surfaces, such as shown in the vents on and off. C. IMPORTANT During the automatic ...defrost cycle, you . Automatic Ice Maker If your freezer compartment. Condenser Fan If condenser coils are descriptions of some of your refrigerator is equipped with an automatic ice maker, you will become familiar to an electric clock. The compressor may occur. J. After defrosting...
...Condenser Coils (Fan-cooled models only) 14 NORMAL OPERATING SOUNDS & SIGHTS UNDERSTANDING THE SOUNDS YOU MAY HEAR Your new high-efficiency refrigerator may make sounds more noticeable. Hard surfaces, such as shown in the vents on and off. C. IMPORTANT During the automatic ...defrost cycle, you . Automatic Ice Maker If your freezer compartment. Condenser Fan If condenser coils are descriptions of some of your refrigerator is equipped with an automatic ice maker, you will become familiar to an electric clock. The compressor may occur. J. After defrosting...

Use and Care Guide
Page 15
...or other sharp instruments which can scratch the appliance surface when removing adhesive labels. These cleaners can be careful not to move the refrigerator beyond the plumbing connections. • Damp objects stick to clean stainless steel. Condenser Coils (Fan-cooled models only) • ...the glue residue with wet or damp hands. • Never use extended vacuum attachment and condenser cleaning brush to clean unless operating refrigerator under particularly dusty or greasy conditions, or if there is NOT removable. 15 Rinse with an Models Only) ammonia-soaked paper towel...
...or other sharp instruments which can scratch the appliance surface when removing adhesive labels. These cleaners can be careful not to move the refrigerator beyond the plumbing connections. • Damp objects stick to clean stainless steel. Condenser Coils (Fan-cooled models only) • ...the glue residue with wet or damp hands. • Never use extended vacuum attachment and condenser cleaning brush to clean unless operating refrigerator under particularly dusty or greasy conditions, or if there is NOT removable. 15 Rinse with an Models Only) ammonia-soaked paper towel...

Use and Care Guide
Page 16
... thoroughly. • Leave both doors open if necessary. • Remove all food and ice. • If using handcart, load from refrigerator compartment. • Turn automatic ice maker off and empty ice bucket, even if you will be gone for maximum efficiency. CAUTION Avoid cuts... when replacing light bulbs, wear gloves. Wear gloves as shown. 4. If the refrigerator is operated under normal operating conditions. Unsnap light shield as protection against possible broken glass. 3. Freezer Light Cover Removal Short Vacations ...
... thoroughly. • Leave both doors open if necessary. • Remove all food and ice. • If using handcart, load from refrigerator compartment. • Turn automatic ice maker off and empty ice bucket, even if you will be gone for maximum efficiency. CAUTION Avoid cuts... when replacing light bulbs, wear gloves. Wear gloves as shown. 4. If the refrigerator is operated under normal operating conditions. Unsnap light shield as protection against possible broken glass. 3. Freezer Light Cover Removal Short Vacations ...

Use and Care Guide
Page 17
... in your best interest to obtain and keep all costs for servicing, such as -is" are not covered by this warranty. Service calls to any refrigerator or freezer failures. 6. Damages caused by: services performed by Electrolux Canada Corp. CLAIMS BASED ON IMPLIED WARRANTIES, INCLUDING WARRANTIES OF MERCHANTABILITY OR FITNESS FOR A PARTICULAR...
... in your best interest to obtain and keep all costs for servicing, such as -is" are not covered by this warranty. Service calls to any refrigerator or freezer failures. 6. Damages caused by: services performed by Electrolux Canada Corp. CLAIMS BASED ON IMPLIED WARRANTIES, INCLUDING WARRANTIES OF MERCHANTABILITY OR FITNESS FOR A PARTICULAR...

Use and Care Guide
Page 18
... plug is tightly pushed into electrical outlet. • Check/replace fuse with a 15 amp time-delay fuse. Automatic ice maker not working . Refrigerator temperature too cold. Wait 20 minutes and check again. • Set freezer control to be cleaned. • Foods that are not the result...page 14. 18 Allow 24 hours for the temperature to stabilize. • Set refrigerator control to release. • Ensure the Wire Signal Arm is not in refrigerator. Push in light switch, located on the refrigerator control box, to a warmer setting. Odors in UP position. • Ice maker...
... plug is tightly pushed into electrical outlet. • Check/replace fuse with a 15 amp time-delay fuse. Automatic ice maker not working . Refrigerator temperature too cold. Wait 20 minutes and check again. • Set freezer control to be cleaned. • Foods that are not the result...page 14. 18 Allow 24 hours for the temperature to stabilize. • Set refrigerator control to release. • Ensure the Wire Signal Arm is not in refrigerator. Push in light switch, located on the refrigerator control box, to a warmer setting. Odors in UP position. • Ice maker...


