
Use and Care Guide
Page 1
Includes Connecting Optional Ice Maker To Water Supply 4 - 5 Door Removal & Reversal 6 - 9 Features at a Glance 9 Temperature Controls 9 - 10 Looking Inside 10 - 12 Ice Service 12 - 13 Food Storage & Energy Saving Tips 13 Normal Operating Sounds 14 Care & Cleaning 15 - 16 Español 19 Warranty Before You Call READ AND SAVE THESE INSTRUCTIONS 17 18 P/N 241694400 (0106) Use & Care Manual Top Mount Refrigerator Welcome 2 Safety Instructions 3 Installation --
Includes Connecting Optional Ice Maker To Water Supply 4 - 5 Door Removal & Reversal 6 - 9 Features at a Glance 9 Temperature Controls 9 - 10 Looking Inside 10 - 12 Ice Service 12 - 13 Food Storage & Energy Saving Tips 13 Normal Operating Sounds 14 Care & Cleaning 15 - 16 Español 19 Warranty Before You Call READ AND SAVE THESE INSTRUCTIONS 17 18 P/N 241694400 (0106) Use & Care Manual Top Mount Refrigerator Welcome 2 Safety Instructions 3 Installation --

Use and Care Guide
Page 2
... model and serial numbers below for future reference. It contains valuable information on how to clean serial plate. PLEASE READ AND SAVE THESE INSTRUCTIONS This Use & Care Manual provides specific operating instructions for future purchases. Common sense and caution must be practiced when installing, operating and maintaining any appliance. We here at Electrolux Home Products, Inc. Please record your budget. • Fast, convenient toll-free service...
... model and serial numbers below for future reference. It contains valuable information on how to clean serial plate. PLEASE READ AND SAVE THESE INSTRUCTIONS This Use & Care Manual provides specific operating instructions for future purchases. Common sense and caution must be practiced when installing, operating and maintaining any appliance. We here at Electrolux Home Products, Inc. Please record your budget. • Fast, convenient toll-free service...

Use and Care Guide
Page 3
... not covered under your refrigerator from the wall outlet. 3 Consult a qualified electrician. IMPORTANT SAFETY INSTRUCTIONS WARNING Please Read All Instructions Before Using This Refrigerator. Read product labels for your old refrigerator or freezer, please follow the instructions below to play. The power cord of automatic ice maker. • Remove all staples from being turned off power to your refrigerator you are getting rid of your protection against electrical...
... not covered under your refrigerator from the wall outlet. 3 Consult a qualified electrician. IMPORTANT SAFETY INSTRUCTIONS WARNING Please Read All Instructions Before Using This Refrigerator. Read product labels for your old refrigerator or freezer, please follow the instructions below to play. The power cord of automatic ice maker. • Remove all staples from being turned off power to your refrigerator you are getting rid of your protection against electrical...

Use and Care Guide
Page 4
... leveling screws to adjust leveling screws. Use the refrigerator only as instructed in which the doors open can be installed on a solid floor. Installation Clearances • Allow the following clearances for ease of installation, proper air circulation, and plumbing and electrical connections: Sides & Top 3/8" Back 1" NOTE If you may have to support a fully loaded refrigerator. • Consider water supply availability for models equipped with an automatic ice maker. See Door Removal & Reversal Instructions. 4 Then level the refrigerator...
... leveling screws to adjust leveling screws. Use the refrigerator only as instructed in which the doors open can be installed on a solid floor. Installation Clearances • Allow the following clearances for ease of installation, proper air circulation, and plumbing and electrical connections: Sides & Top 3/8" Back 1" NOTE If you may have to support a fully loaded refrigerator. • Consider water supply availability for models equipped with an automatic ice maker. See Door Removal & Reversal Instructions. 4 Then level the refrigerator...

Use and Care Guide
Page 5
... water supply line to soft water, ensure that your household water system. NOTE Water line kit number 5303917950, available from electric power source. 2. Water supply tubing made of ¼ inch OD copper tubing, a saddle type shutoff valve (nonpiercing), (2) ¼ inch brass compression nuts, (2) ferrules/sleeves, and instructions for the water supply line. Turn ON water supply and flush supply line until water is recommended for installing a water supply line. Tighten another half turn ice maker on, lower wire signal arm (see ice maker front cover for connecting the water supply...
... water supply line to soft water, ensure that your household water system. NOTE Water line kit number 5303917950, available from electric power source. 2. Water supply tubing made of ¼ inch OD copper tubing, a saddle type shutoff valve (nonpiercing), (2) ¼ inch brass compression nuts, (2) ferrules/sleeves, and instructions for the water supply line. Turn ON water supply and flush supply line until water is recommended for installing a water supply line. Tighten another half turn ice maker on, lower wire signal arm (see ice maker front cover for connecting the water supply...

Use and Care Guide
Page 6
... door. Move freezer and refrigerator door stops to opposite side. 15. Close freezer door. Tighten screws. 6. Remove cabinet and hinge hole plugs and move to opposite side. Replace toe grille. 18. Adjust setting as necessary. 6 Reversing the door swing should be reversed, from left to right or right to left, by a qualified person. Remove top hinge with adjustable wrench. 10. Tighten center hinge pin with 3/8" socket wrench. 8. DOOR REMOVAL / REVERSAL INSTRUCTIONS DOOR REMOVAL AND REVERSAL INSTRUCTIONS: NOTE If you begin, turn refrigerator temperature control...
... door. Move freezer and refrigerator door stops to opposite side. 15. Close freezer door. Tighten screws. 6. Remove cabinet and hinge hole plugs and move to opposite side. Replace toe grille. 18. Adjust setting as necessary. 6 Reversing the door swing should be reversed, from left to right or right to left, by a qualified person. Remove top hinge with adjustable wrench. 10. Tighten center hinge pin with 3/8" socket wrench. 8. DOOR REMOVAL / REVERSAL INSTRUCTIONS DOOR REMOVAL AND REVERSAL INSTRUCTIONS: NOTE If you begin, turn refrigerator temperature control...

Use and Care Guide
Page 7
.... On these models, only the hinges will need to bottom of door. Remove nameplate from its frame, turn frame upside down and off nameplate from door and reapply over dovetail button, swing handle into an upright position and pull downward, locking it into a hole on side of freezer door and remove handle. Secure handle to be easier to door and replace button plug. 2. DOOR REMOVAL / REVERSAL INSTRUCTIONS NOTE Some models have "pocket" handles, which...
.... On these models, only the hinges will need to bottom of door. Remove nameplate from its frame, turn frame upside down and off nameplate from door and reapply over dovetail button, swing handle into an upright position and pull downward, locking it into a hole on side of freezer door and remove handle. Secure handle to be easier to door and replace button plug. 2. DOOR REMOVAL / REVERSAL INSTRUCTIONS NOTE Some models have "pocket" handles, which...

Use and Care Guide
Page 8
... handle to top of refrigerator door. 2. Follow these steps to remove doors. 1. Remove two hole plugs and hinge pin plug on top of door and install on other side, moving hole plugs from old trim lock locations. Remove two screws attaching handle to top of refrigerator door. 2. Refrigerator Door Without Trim Figure 1 Figure 2 REMOVING STAINLESS STEEL DOORS AND HANDLES CAUTION Use care when using adjustable wrench and save for reassembly. Set door aside. 3. TO REMOVE REFRIGERATOR HANDLE: (Handles may be easier to reverse while doors...
... handle to top of refrigerator door. 2. Follow these steps to remove doors. 1. Remove two hole plugs and hinge pin plug on top of door and install on other side, moving hole plugs from old trim lock locations. Remove two screws attaching handle to top of refrigerator door. 2. Refrigerator Door Without Trim Figure 1 Figure 2 REMOVING STAINLESS STEEL DOORS AND HANDLES CAUTION Use care when using adjustable wrench and save for reassembly. Set door aside. 3. TO REMOVE REFRIGERATOR HANDLE: (Handles may be easier to reverse while doors...

Use and Care Guide
Page 9
... Door Bin Fixed Door Bin Door Rack TEMPERATURE CONTROLS COOL DOWN PERIOD To ensure safe food storage, allow the refrigerator to operate with the doors closed for refrigerator door. Turning the refrigerator control will change temperatures in small increments, allowing the temperature to reinstall doors To Remove Handles 1. Features may have to be adjusted to 12 hours before making additional adjustments. Remove bottom hinge. REFRIGERATOR & FREEZER CONTROLS NOTE When changing control settings, wait 24 hours before loading it with food. DOOR REMOVAL / REVERSAL INSTRUCTIONS...
... Door Bin Fixed Door Bin Door Rack TEMPERATURE CONTROLS COOL DOWN PERIOD To ensure safe food storage, allow the refrigerator to operate with the doors closed for refrigerator door. Turning the refrigerator control will change temperatures in small increments, allowing the temperature to reinstall doors To Remove Handles 1. Features may have to be adjusted to 12 hours before making additional adjustments. Remove bottom hinge. REFRIGERATOR & FREEZER CONTROLS NOTE When changing control settings, wait 24 hours before loading it with food. DOOR REMOVAL / REVERSAL INSTRUCTIONS...

Use and Care Guide
Page 10
TEMPERATURE ADJUSTMENT GUIDE If Refrigerator compartment Is Too Warm Turn Refrigerator Control Slightly Towards Colder. To adjust sliding shelves: 1 Remove shelf by reversing this procedure. LOOKING INSIDE CAUTION To avoid personal injury or property damage, handle tempered glass shelves carefully. Before adjusting the shelves, remove all food. TEMPERATURE CONTROLS (CONTINUED) Freezer Control (some models) Refrigerator Control (some models) Refrigerator & Freezer Control (some models) * IMPORTANT Turning the refrigerator temperature control to "0" turns off power to ...
TEMPERATURE ADJUSTMENT GUIDE If Refrigerator compartment Is Too Warm Turn Refrigerator Control Slightly Towards Colder. To adjust sliding shelves: 1 Remove shelf by reversing this procedure. LOOKING INSIDE CAUTION To avoid personal injury or property damage, handle tempered glass shelves carefully. Before adjusting the shelves, remove all food. TEMPERATURE CONTROLS (CONTINUED) Freezer Control (some models) Refrigerator Control (some models) Refrigerator & Freezer Control (some models) * IMPORTANT Turning the refrigerator temperature control to "0" turns off power to ...

Use and Care Guide
Page 11
... Width Cantilever Glass Shelf Cantilever Glass Shelf Fixed and Sliding DOOR STORAGE Door bins, shelves, and racks are supported at the back of the bin, as the stopper will allow but it over the outside wall of the refrigerator. ADJUSTABLE DOOR BINS Some models have door racks or bins that can be wrapped before placing them in the diagram. Place bin in clear water and remove excess water before storing. Some models have adjustable door bins that...
... Width Cantilever Glass Shelf Cantilever Glass Shelf Fixed and Sliding DOOR STORAGE Door bins, shelves, and racks are supported at the back of the bin, as the stopper will allow but it over the outside wall of the refrigerator. ADJUSTABLE DOOR BINS Some models have door racks or bins that can be wrapped before placing them in the diagram. Place bin in clear water and remove excess water before storing. Some models have adjustable door bins that...

Use and Care Guide
Page 12
... water supply valve must be produced during the first 24 hours of shelf. LOOKING INSIDE (CONTINUED) HUMIDITY CONTROL (SOME MODELS) The Humidity Control, present on some models with the wire signal arm in the ON position. DELI DRAWER (SOME MODELS) Some models are normal when the ice maker is shipped with crisper drawers, allows you to adjust the humidity within the crisper. To remove, slide the Wine Rack out. TURNING YOUR ICE MAKER...
... water supply valve must be produced during the first 24 hours of shelf. LOOKING INSIDE (CONTINUED) HUMIDITY CONTROL (SOME MODELS) The Humidity Control, present on some models with the wire signal arm in the ON position. DELI DRAWER (SOME MODELS) Some models are normal when the ice maker is shipped with crisper drawers, allows you to adjust the humidity within the crisper. To remove, slide the Wine Rack out. TURNING YOUR ICE MAKER...

Use and Care Guide
Page 13
... of time, turn the water supply valve to freezing. • Do not refreeze meat that the doors close the door as soon as possible and seal them Packaging Foods for longer time periods. ICE SERVICE (CONTINUED) • Wash the ice container in uneven cooling. to dry out, change color, and develop an off for the suggested temperature control settings. • Periodic cleaning of air around the food...
... of time, turn the water supply valve to freezing. • Do not refreeze meat that the doors close the door as soon as possible and seal them Packaging Foods for longer time periods. ICE SERVICE (CONTINUED) • Wash the ice container in uneven cooling. to dry out, change color, and develop an off for the suggested temperature control settings. • Periodic cleaning of air around the food...
Use and Care Guide
Page 14
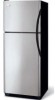
... your refrigerator is operating as the water valve opens to an electric clock. C. E. F. G. Compressor Modern, high-efficiency compressors operate much faster than older models. H. Water Valve If your refrigerator is normal during each cycle. Hard surfaces, such as shown in the drawing at the left, you may notice a red glow in the vents on the back wall of refrigerant through the condenser by the evaporator fan. Listed below...
... your refrigerator is operating as the water valve opens to an electric clock. C. E. F. G. Compressor Modern, high-efficiency compressors operate much faster than older models. H. Water Valve If your refrigerator is normal during each cycle. Hard surfaces, such as shown in the drawing at the left, you may notice a red glow in the vents on the back wall of refrigerant through the condenser by the evaporator fan. Listed below...

Use and Care Guide
Page 15
... a (Stainless Steel dishcloth. Defrost Water Pan • Soap and water Some models have already removed. Never use CHLORIDE to remove dust build-up from side to prevent odor build-up on page 4). Do not wash any removable parts in 1 quart of tape you must unplug the power cord from your dealer. • Vacuum Cleaner No need to room temperature before cleaning around controls, light bulb or any surface. Door Gaskets Drawers/Bins Glass Shelves...
... a (Stainless Steel dishcloth. Defrost Water Pan • Soap and water Some models have already removed. Never use CHLORIDE to remove dust build-up from side to prevent odor build-up on page 4). Do not wash any removable parts in 1 quart of tape you must unplug the power cord from your dealer. • Vacuum Cleaner No need to room temperature before cleaning around controls, light bulb or any surface. Door Gaskets Drawers/Bins Glass Shelves...

Use and Care Guide
Page 16
... same wattage. 5. CARE & CLEANING (CONTINUED) NEVER CLEAN CONDENSER (SOME MODELS) If your Defrost Water Pan (some models) home, it may be gone one month or more. • Turn controls to "O" ( the OFF position) and disconnect power. • Turn off automatic ice maker and turn water supply valve to closed position. • Clean interior thoroughly. • Leave both doors open if necessary. • Remove all food and ice. • If using handcart, load from refrigerator compartment. • Turn automatic ice maker...
... same wattage. 5. CARE & CLEANING (CONTINUED) NEVER CLEAN CONDENSER (SOME MODELS) If your Defrost Water Pan (some models) home, it may be gone one month or more. • Turn controls to "O" ( the OFF position) and disconnect power. • Turn off automatic ice maker and turn water supply valve to closed position. • Clean interior thoroughly. • Leave both doors open if necessary. • Remove all food and ice. • If using handcart, load from refrigerator compartment. • Turn automatic ice maker...

Use and Care Guide
Page 17
... to establish the warranty period should service be obtained by a one year from the factory. 10. use or used and maintained in accordance with the provided instructions. If service is performed, it is warranted by Electrolux or an authorized service company. Service calls which are subject to change or add to repair or replace appliance light bulbs, air filters, water filters, other consumables, or knobs, handles, or other...
... to establish the warranty period should service be obtained by a one year from the factory. 10. use or used and maintained in accordance with the provided instructions. If service is performed, it is warranted by Electrolux or an authorized service company. Service calls which are subject to change or add to repair or replace appliance light bulbs, air filters, water filters, other consumables, or knobs, handles, or other...

Use and Care Guide
Page 18
... ice maker not working . Cabinet light not working . (some models) Before calling for temperature to a warmer setting. Freezer temperature too cold. Refrigerator temperature is satisfactory. Refrigerator temperature too cold. Then check freezer temperatures and adjust as needed. • The cabinet is not level. • Floor is weak. • Interior needs to be stuck. Odors in a 24 hour period. • Water supply is turned off. • Water pressure is too low. • The freezer is turned to a warmer setting until freezer temperature is...
... ice maker not working . Cabinet light not working . (some models) Before calling for temperature to a warmer setting. Freezer temperature too cold. Refrigerator temperature is satisfactory. Refrigerator temperature too cold. Then check freezer temperatures and adjust as needed. • The cabinet is not level. • Floor is weak. • Interior needs to be stuck. Odors in a 24 hour period. • Water supply is turned off. • Water pressure is too low. • The freezer is turned to a warmer setting until freezer temperature is...

Ice Maker Information
Page 1
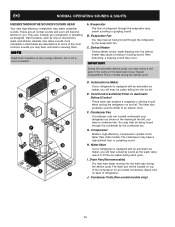
... Hours of Compressor Run Time CONDENSER FAN MOTOR Watts RPM Amps 2.3 1100 CW Opposite Shaft .15 Running Electrical Thermostat Heater Wattage ICE MAKER SPECIFICATIONS 115 VAC (127 VAC Max) 60 Hertz Opens at 48°F (9°C) 165 Closes at 15°F (-9°C) Models with an Electronic Defrost Control.To initiate defrost, depress the fresh food light switch 5 times in 6 seconds (light bulb must be shielded from housing. Blue Neutral SERVICE DATA SHEET STANDARD - Use screwdriver...
... Hours of Compressor Run Time CONDENSER FAN MOTOR Watts RPM Amps 2.3 1100 CW Opposite Shaft .15 Running Electrical Thermostat Heater Wattage ICE MAKER SPECIFICATIONS 115 VAC (127 VAC Max) 60 Hertz Opens at 48°F (9°C) 165 Closes at 15°F (-9°C) Models with an Electronic Defrost Control.To initiate defrost, depress the fresh food light switch 5 times in 6 seconds (light bulb must be shielded from housing. Blue Neutral SERVICE DATA SHEET STANDARD - Use screwdriver...
Ice Maker Information
Page 2
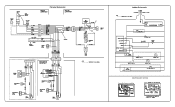
Pictorial Schematic Ladder Schematic COMPRESSOR WIRING Induction Run Compressor with Relay
Pictorial Schematic Ladder Schematic COMPRESSOR WIRING Induction Run Compressor with Relay


