Use and Care Guide
Page 2
... practiced when installing, operating and maintaining any appliance, Please record your refrigerator. Model Number: Serial Number: Purchase Date: Questions? 1 °800=944°9044 (United States) 1-866-213-9397 (Canada) or visit our web site a t www. Fast, convenient toil-free service is repaired with your model and seriaJ numbers beJow for future reference. repairs by factory-trained Quick access to genuine replacement parts so you...
... practiced when installing, operating and maintaining any appliance, Please record your refrigerator. Model Number: Serial Number: Purchase Date: Questions? 1 °800=944°9044 (United States) 1-866-213-9397 (Canada) or visit our web site a t www. Fast, convenient toil-free service is repaired with your model and seriaJ numbers beJow for future reference. repairs by factory-trained Quick access to genuine replacement parts so you...
Use and Care Guide
Page 3
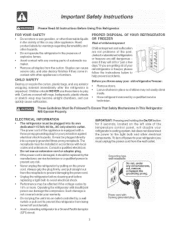
... refrigerators or freezers are still dangerous even if they come in contact with 3=pronggrounded pjug ELECTRICAL mNFORMATION * The refrigerator must be ptugged into an outlet controlled by a qualified service technician. Do not use an extension cord or adapter plug. , if the power cord is unpacked. Do not, under your refrigerator's cooling system, but does net disconnect must be replaced by the manufacturer, service...
... refrigerators or freezers are still dangerous even if they come in contact with 3=pronggrounded pjug ELECTRICAL mNFORMATION * The refrigerator must be ptugged into an outlet controlled by a qualified service technician. Do not use an extension cord or adapter plug. , if the power cord is unpacked. Do not, under your refrigerator's cooling system, but does net disconnect must be replaced by the manufacturer, service...
Use and Care Guide
Page 4
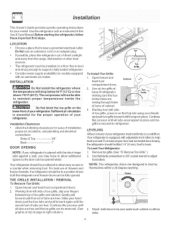
... of drawers and freezer baskets, the refrigerator should be in place and toe grille is near a grounded eUectricaUoutbt, Do Not use of toe grille and cabinet. Sufficient air circulation !s essential for ease of installation, proper air circulation, and plumbing and electrical connections: Sides & Top 3/8" Back 1" DOOR OPENING side against a wail, you may have to allow easy access to support a fully baded refrigerator, * Consider water...
... of drawers and freezer baskets, the refrigerator should be in place and toe grille is near a grounded eUectricaUoutbt, Do Not use of toe grille and cabinet. Sufficient air circulation !s essential for ease of installation, proper air circulation, and plumbing and electrical connections: Sides & Top 3/8" Back 1" DOOR OPENING side against a wail, you may have to allow easy access to support a fully baded refrigerator, * Consider water...
Use and Care Guide
Page 5
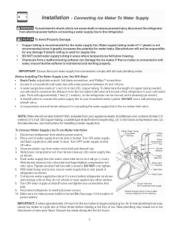
... damage if plastic tubing is turned On (See page 13 for connecting the water supply line to your cold water pipe, Then add approximately 7 feet (2.1 meters), so the refrigerator can be discolored or have poor flavor. Make sure ice maker power switch is used for cleaning (as shown), A shutoff valve to connect the water supply line to the ice maker inlet valve. With steel clamp and screw, secure water supply line to rear panel of water supply line into valve inlet and finger...
... damage if plastic tubing is turned On (See page 13 for connecting the water supply line to your cold water pipe, Then add approximately 7 feet (2.1 meters), so the refrigerator can be discolored or have poor flavor. Make sure ice maker power switch is used for cleaning (as shown), A shutoff valve to connect the water supply line to the ice maker inlet valve. With steel clamp and screw, secure water supply line to rear panel of water supply line into valve inlet and finger...

Use and Care Guide
Page 6
... replaced. 3. When both pieces apart. 4. Disconnect water line coming from door shelves. 1. Turn both doors, then remove toe grille. 3. Adjust settings as necessary. _p Screw Hinge _///_iup Cover Sc,ew H{ng_ Screw Door Removal Instructions ToolsNecessar, Phi ED_ r_eoc_ 3/8" Fixed Wrench TO DmSCONNECT • Press outer r g agal _tface _emove JuDe TO CONNECT n_ _,< 1SO_"t tube 8rid u_ _ oush until mark touches face of fitting, replace toe grille and plug in electrical power...
... replaced. 3. When both pieces apart. 4. Disconnect water line coming from door shelves. 1. Turn both doors, then remove toe grille. 3. Adjust settings as necessary. _p Screw Hinge _///_iup Cover Sc,ew H{ng_ Screw Door Removal Instructions ToolsNecessar, Phi ED_ r_eoc_ 3/8" Fixed Wrench TO DmSCONNECT • Press outer r g agal _tface _emove JuDe TO CONNECT n_ _,< 1SO_"t tube 8rid u_ _ oush until mark touches face of fitting, replace toe grille and plug in electrical power...
Use and Care Guide
Page 8
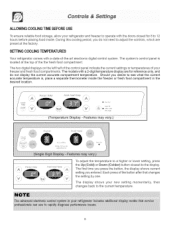
... (Cold) or Down (Colder) button closest to the display. During this cooling period, you do not display the current accurate compartment temperature. The system's control panel is , place a separate thermometer inside . The models with a state=of the button after that changes the setting by one. The display shows your freezer and fresh food compartments. The two digital displays on the left half of the control panel indicate the current settings or temperatures...
... (Cold) or Down (Colder) button closest to the display. During this cooling period, you do not display the current accurate compartment temperature. The system's control panel is , place a separate thermometer inside . The models with a state=of the button after that changes the setting by one. The display shows your freezer and fresh food compartments. The two digital displays on the left half of the control panel indicate the current settings or temperatures...

Use and Care Guide
Page 9
... to use, you can adjust temperatures as needed. Numeric Display Freezer Fresh Food Temperature Display (2-Digit) Freezer Fo Co Fresh Food Fo Co Temperature Adjustment Guide If Fresh Food Compartment is too warm Adjust Fresh Food control one degree colder by pressing the Up (Cold} button. If Freezer Compartment is too COld Adjust Freezer control one degree warmer by pressing Down (Colder} button. Making TemperatureAdjustments After running your refrigerator for 24 hours, you can set your control panel to display...
... to use, you can adjust temperatures as needed. Numeric Display Freezer Fresh Food Temperature Display (2-Digit) Freezer Fo Co Fresh Food Fo Co Temperature Adjustment Guide If Fresh Food Compartment is too warm Adjust Fresh Food control one degree colder by pressing the Up (Cold} button. If Freezer Compartment is too COld Adjust Freezer control one degree warmer by pressing Down (Colder} button. Making TemperatureAdjustments After running your refrigerator for 24 hours, you can set your control panel to display...
Use and Care Guide
Page 12
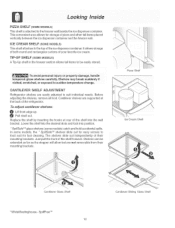
... _. : Looking reside / /t/¸ PIZZA SHELF (SOME MODELS} This shelf is attached to the freezer wail bee[de the ice dispenser container, This convenient area allows for fast cleaning, The shelves slide out independently of their mounting brackets, Ice Cream Shelf Cantilever Glass Shelf * Wh[teWest[nghouse - of both round and rectangular cartons of the refrigerator. Before adjusting the shelves, remove a[[ food. Shelves may break suddenly !f nicked, scratched...
... _. : Looking reside / /t/¸ PIZZA SHELF (SOME MODELS} This shelf is attached to the freezer wail bee[de the ice dispenser container, This convenient area allows for fast cleaning, The shelves slide out independently of their mounting brackets, Ice Cream Shelf Cantilever Glass Shelf * Wh[teWest[nghouse - of both round and rectangular cartons of the refrigerator. Before adjusting the shelves, remove a[[ food. Shelves may break suddenly !f nicked, scratched...
Use and Care Guide
Page 15
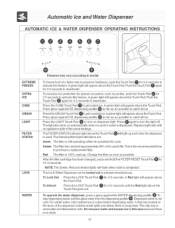
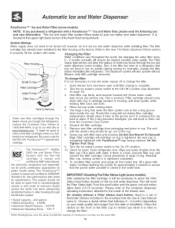
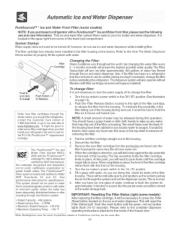
..., To operate the water dispenser, press a glass against the WATER d_pensing paddle _, To stop dispensing water, pull the glass away from the dispensing paddle_, Dispensed water is not cold, For colder water, add crushed ice or cubes before dispensing water, A drip tray located at the base of its useful life, This is the recommended time to purchase a replacement filter, Red The filter is 100% used up, Change the filter as soon as possible, After the filter cartridge has been changed...
..., To operate the water dispenser, press a glass against the WATER d_pensing paddle _, To stop dispensing water, pull the glass away from the dispensing paddle_, Dispensed water is not cold, For colder water, add crushed ice or cubes before dispensing water, A drip tray located at the base of its useful life, This is the recommended time to purchase a replacement filter, Red The filter is 100% used up, Change the filter as soon as possible, After the filter cartridge has been changed...

Use and Care Guide
Page 16
.... How the ice Dispenser Works s,_,_,A_,,, The ice maker and container are located in the top of the freezer compartment, After the refrigerator is installed properly and has cooled for the dispenser operation are free of water. These should fall between 30 psi and 100 psi. If the icemaker is not turned off , IMPORTANT: Your ice maker is Connected to soft water, ensure that will stop the ice maker, lift the wire signal arm...
.... How the ice Dispenser Works s,_,_,A_,,, The ice maker and container are located in the top of the freezer compartment, After the refrigerator is installed properly and has cooled for the dispenser operation are free of water. These should fall between 30 psi and 100 psi. If the icemaker is not turned off , IMPORTANT: Your ice maker is Connected to soft water, ensure that will stop the ice maker, lift the wire signal arm...
Use and Care Guide
Page 18
... to order some filter cartridges when you will turn the water supply off , however, do not use for awhile (during filter cartridge replacement, simply place it back in the groove prior to rem!nd you remove cup. Be sure to the Off ("O") position (See illustration on your ice maker and water dispenser. Turn the ice maker's power switch to ask for leaks. This is tested and certified to change the filter before or...
... to order some filter cartridges when you will turn the water supply off , however, do not use for awhile (during filter cartridge replacement, simply place it back in the groove prior to rem!nd you remove cup. Be sure to the Off ("O") position (See illustration on your ice maker and water dispenser. Turn the ice maker's power switch to ask for leaks. This is tested and certified to change the filter before or...
Use and Care Guide
Page 19
... the Filter Reset button located on page 16). 2. Turn the ice maker's power switch to the inside of water, continue to flush the system for awhile (during this point, you first install your refrigerator. It might be noticable spurts and sputters as it is stored in advance of removing the filter. 3. Be sure to order some models) After replacing the filter cartridge, it stop against the clip assembly in use and care !nformation...
... the Filter Reset button located on page 16). 2. Turn the ice maker's power switch to the inside of water, continue to flush the system for awhile (during this point, you first install your refrigerator. It might be noticable spurts and sputters as it is stored in advance of removing the filter. 3. Be sure to order some models) After replacing the filter cartridge, it stop against the clip assembly in use and care !nformation...

Use and Care Guide
Page 20
... them tightly. Remove as many items as needed at one time, This overloads the freezer, slows the rate of air around the food and resuUtsin uneven cooling. Force as much warm food to the freezer at one time and close tightly. ° Refer to freezing. This cuts down on the freezer door shelves. Fruits and VegetaMes o Storage in the freezer interior where the temperature varies less...
... them tightly. Remove as many items as needed at one time, This overloads the freezer, slows the rate of air around the food and resuUtsin uneven cooling. Force as much warm food to the freezer at one time and close tightly. ° Refer to freezing. This cuts down on the freezer door shelves. Fruits and VegetaMes o Storage in the freezer interior where the temperature varies less...
Use and Care Guide
Page 21
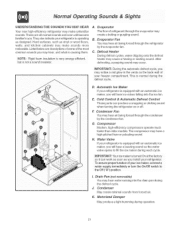
... occur, your ice maker, connect a water supply immediately or turn the on or off switch to fill the ice maker during operation, 21 Cold Control & Automatic Defrost Control These parts can work as soon as you install your refrigerator is equipped with an automatic ice maker, you wiii hear ice cubes failing into the drain pan during the defrost cycle, do Condenser May create minimal sounds from forced air, Ko Motorized Damper May produce a light humming during...
... occur, your ice maker, connect a water supply immediately or turn the on or off switch to fill the ice maker during operation, 21 Cold Control & Automatic Defrost Control These parts can work as soon as you install your refrigerator is equipped with an automatic ice maker, you wiii hear ice cubes failing into the drain pan during the defrost cycle, do Condenser May create minimal sounds from forced air, Ko Motorized Damper May produce a light humming during...

Use and Care Guide
Page 23
... same type and wattage, 5, RepUace Hght cover, if necessary, 6, Remember to pUugthe refrigerator back in water leaks when the refrigerator is put back into Service, Contact a service representative to avoid scratching surface. To turn water supply valve to prevent odors and mold build-up to protect them during vacations of ',ceContainer Crisper Light Replacement (Models may vary) Freezer Light Replacement Short Vacations Long Vacations Moving Vacation and Moving Tips Leave refrigerator operating...
... same type and wattage, 5, RepUace Hght cover, if necessary, 6, Remember to pUugthe refrigerator back in water leaks when the refrigerator is put back into Service, Contact a service representative to avoid scratching surface. To turn water supply valve to prevent odors and mold build-up to protect them during vacations of ',ceContainer Crisper Light Replacement (Models may vary) Freezer Light Replacement Short Vacations Long Vacations Moving Vacation and Moving Tips Leave refrigerator operating...
Use and Care Guide
Page 24
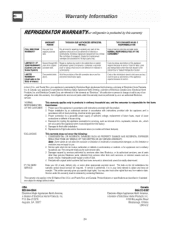
... installation by servicers other than Electrolux,or its authorizedservicers; EXCLUSIONS This warranty does not cover the following: 1. use , and the consumer is in this appliancewhich prove to a grounded power supply of God. 4. REFRIGERATOR WARRANTYourre geratisoprrotectbeydthiswarranty WARRAN1Y PERIOD THROUGH OUR AUTHORIZED SERVICERS, WE WILL: THE CONSUMER WILiB E RESPONSIBLE FOR: FULL ONE-YEAR WARRANTY One yearfrom original purchase date. Excludesoriginal and replacementIce & Water filter cartridges...
... installation by servicers other than Electrolux,or its authorizedservicers; EXCLUSIONS This warranty does not cover the following: 1. use , and the consumer is in this appliancewhich prove to a grounded power supply of God. 4. REFRIGERATOR WARRANTYourre geratisoprrotectbeydthiswarranty WARRAN1Y PERIOD THROUGH OUR AUTHORIZED SERVICERS, WE WILL: THE CONSUMER WILiB E RESPONSIBLE FOR: FULL ONE-YEAR WARRANTY One yearfrom original purchase date. Excludesoriginal and replacementIce & Water filter cartridges...
Use and Care Guide
Page 25
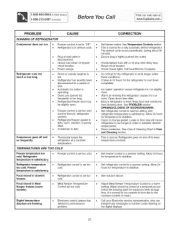
... models), • Meat Keeper Temperature Control set too cold. Refrigerator/freezer gasket is hot. TEMPERA TURES ARE TOO COLD Freezer temperature too cold. Refrigerator temperature too cold. Food stored in refrigerator section). Check/replace fuse with a 15 amp time-delay fuse. It's normal for temperature to stabilize. • Set refrigerator control to work longer under these conditions. Clean condenser. Food stored in defrost cycle. Digital temperature displays are opened too frequently or too long. See PROBLEM section OPENING/CLOSING OF DOORS/DRAWERS...
... models), • Meat Keeper Temperature Control set too cold. Refrigerator/freezer gasket is hot. TEMPERA TURES ARE TOO COLD Freezer temperature too cold. Refrigerator temperature too cold. Food stored in refrigerator section). Check/replace fuse with a 15 amp time-delay fuse. It's normal for temperature to stabilize. • Set refrigerator control to work longer under these conditions. Clean condenser. Food stored in defrost cycle. Digital temperature displays are opened too frequently or too long. See PROBLEM section OPENING/CLOSING OF DOORS/DRAWERS...

Use and Care Guide
Page 26
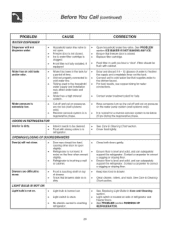
... ice & water filter cartridge is clogged or dispenser is satisfactory. Water collects on bottom side of drawer cover, • Vegetables contain and give off household water line valve. Water collects in humid weather. Moisture collects on cold water • See PROBLEM section TEMPERATURES ARE TOO WARM. • Turn off moisture, • It is not unusual to meet warm air from inside of refrigerator or between doors. • Weather is humid. • Door is slightly open...
... ice & water filter cartridge is clogged or dispenser is satisfactory. Water collects on bottom side of drawer cover, • Vegetables contain and give off household water line valve. Water collects in humid weather. Moisture collects on cold water • See PROBLEM section TEMPERATURES ARE TOO WARM. • Turn off moisture, • It is not unusual to meet warm air from inside of refrigerator or between doors. • Weather is humid. • Door is slightly open...

Use and Care Guide
Page 27
... produce fresh supply. • Add filter to a higher setting so that cubes do not freeze together. Freezer temperature is set too • Turn freezer control to water supply line. Ice dispenser is made , dispenser should operate. • Ensure freezer door is closed . When new ice is made , dispenser should fall within this range. 27 Use the dispenser often so that ice warm. Replace the filter cartridge. PROBLEM [ CAUSE _ A UTOMA TIC ICE MAKER (CONTINUED) CORRECTION Ice maker is not making ice. Ice not used frequently enough. of ice is jammed...
... produce fresh supply. • Add filter to a higher setting so that cubes do not freeze together. Freezer temperature is set too • Turn freezer control to water supply line. Ice dispenser is made , dispenser should operate. • Ensure freezer door is closed . When new ice is made , dispenser should fall within this range. 27 Use the dispenser often so that ice warm. Replace the filter cartridge. PROBLEM [ CAUSE _ A UTOMA TIC ICE MAKER (CONTINUED) CORRECTION Ice maker is not making ice. Ice not used frequently enough. of ice is jammed...
Use and Care Guide
Page 28
... odor. Drawers are too low (well systems only). For best results, use copper tubing for help. Contact a carpenter to • cold water line. Connect unit to open . • Freezer door is not closed. • • Ice & water filter cartridge is level and solid, and can adequately support the refrigerator. Contact a carpenter to freshen the supply and completely rinse out the tank. See Care & Cleaning Chart section. P.OBLEM1 C.OSE [ WATER DISPENSER Dispenser will not...
... odor. Drawers are too low (well systems only). For best results, use copper tubing for help. Contact a carpenter to • cold water line. Connect unit to open . • Freezer door is not closed. • • Ice & water filter cartridge is level and solid, and can adequately support the refrigerator. Contact a carpenter to freshen the supply and completely rinse out the tank. See Care & Cleaning Chart section. P.OBLEM1 C.OSE [ WATER DISPENSER Dispenser will not...


