Wiring Diagram (All Languages)
Page 1
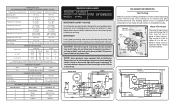
... Connects to: 1 Green/Yellow Ground 2 Yellow Water Valve 3 Black Line 4 Lt. All components of electrical shock. AUTOMATIC DEFROST TOP FREEZER P/N: 241588203 MODELS (R134a) IMPORTANT SAFETY NOTICE The information provided herein is completed. IMPORTANT If any green grounding wires are moved during servicing,... or Induction Run 65°F (18°C) Ambient 90°F (32°C) Ambient Operating Time 25 to 35% 45 to 55% Freezer Temperature Refrigerature Temperature Low Side Pressure (cut-in) Low Side Pressure (cut-out) High Side Pressure (Last 1/3 of cycle) Wattage (Last...
... Connects to: 1 Green/Yellow Ground 2 Yellow Water Valve 3 Black Line 4 Lt. All components of electrical shock. AUTOMATIC DEFROST TOP FREEZER P/N: 241588203 MODELS (R134a) IMPORTANT SAFETY NOTICE The information provided herein is completed. IMPORTANT If any green grounding wires are moved during servicing,... or Induction Run 65°F (18°C) Ambient 90°F (32°C) Ambient Operating Time 25 to 35% 45 to 55% Freezer Temperature Refrigerature Temperature Low Side Pressure (cut-in) Low Side Pressure (cut-out) High Side Pressure (Last 1/3 of cycle) Wattage (Last...
Wiring Diagram (All Languages)
Page 2
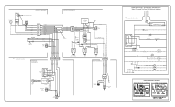
.... BLUE BLACK RED YELLOW LT. BLUE SPLICE D DIODES TO BE POLARIZED AS SHOWN. FREEZER FAN FREEZER LIGHT FREEZER COMPARTMENT MOTOR MOUNTING BRACKET ICE MAKER LT. BLUE FREEZER LIGHT SWITCH NOTE DENOTES NOT ON ALL MODELS. BLUE PORKCHOP TAN/YELLOW LT. TM Dynamic With Optional Water Through The Door Or Mid-level Lighting COMPRESSOR WIRING Induction...
.... BLUE BLACK RED YELLOW LT. BLUE SPLICE D DIODES TO BE POLARIZED AS SHOWN. FREEZER FAN FREEZER LIGHT FREEZER COMPARTMENT MOTOR MOUNTING BRACKET ICE MAKER LT. BLUE FREEZER LIGHT SWITCH NOTE DENOTES NOT ON ALL MODELS. BLUE PORKCHOP TAN/YELLOW LT. TM Dynamic With Optional Water Through The Door Or Mid-level Lighting COMPRESSOR WIRING Induction...

Use and Care Manual
Page 2
... may be installed in the vicinity of child entrapment Child entrapment and suffocation are still dangerous - Junked or abondoned refrigerators or freezers are not problems of the appliance is not covered under your refrigerator from being turned off accidentally. • Avoid connecting refrigerator... the carton. CAUTION To avoid personal injury or property damage, handle tempered glass shelves carefully. PROPER DISPOSAL OF YOUR REFRIGERATOR OR FREEZER Risk of this or any risk. • Never unplug the refrigerator by 10% or more. Children should NEVER use an ...
... may be installed in the vicinity of child entrapment Child entrapment and suffocation are still dangerous - Junked or abondoned refrigerators or freezers are not problems of the appliance is not covered under your refrigerator from being turned off accidentally. • Avoid connecting refrigerator... the carton. CAUTION To avoid personal injury or property damage, handle tempered glass shelves carefully. PROPER DISPOSAL OF YOUR REFRIGERATOR OR FREEZER Risk of this or any risk. • Never unplug the refrigerator by 10% or more. Children should NEVER use an ...

Use and Care Manual
Page 3
... (air-cooled condenser) leave 3" clearance at top of installation, proper air circulation, and plumbing and electrical connections: Sides & Top 3/8" Back 1" NOTE If you may experience freezer temperature problems during the winter months when temperatures dip below 55°F (13°C) or rise above 110°F (43°C). INSTALLATION This Use & Care...
... (air-cooled condenser) leave 3" clearance at top of installation, proper air circulation, and plumbing and electrical connections: Sides & Top 3/8" Back 1" NOTE If you may experience freezer temperature problems during the winter months when temperatures dip below 55°F (13°C) or rise above 110°F (43°C). INSTALLATION This Use & Care...

Use and Care Manual
Page 5
... adjustable wrench. Install bottom hinge on opposite side of door while tightening screws to opposite side. Close refrigerator door to slide out. Lower freezer door onto center hinge pin. 16. Remove center hinge and shim by a qualified person. Adjust setting as necessary. 5 Close... freezer door. Lift refrigerator door off center hinge pin. Position refrigerator door onto bottom hinge pin and screw center hinge pin through center hinge...
... adjustable wrench. Install bottom hinge on opposite side of door while tightening screws to opposite side. Close refrigerator door to slide out. Lower freezer door onto center hinge pin. 16. Remove center hinge and shim by a qualified person. Adjust setting as necessary. 5 Close... freezer door. Lift refrigerator door off center hinge pin. Position refrigerator door onto bottom hinge pin and screw center hinge pin through center hinge...

Use and Care Manual
Page 6
... handle to reverse while doors are off .) Figure 1 Style Handles 1. Reinstall handle on opposite side Figure 2 Style Handles 1. TO ATTACH FREEZER HANDLE: 1. Remove two screws attaching handle to the handle bracket (Figure 1) or fits around the base of the handle (Figure 2). Self...LENGTH TRIM MODELS ONLY) In some models) Dovetail Button 2. Remove screw on other side, using edge of putty knife. 3. TO REMOVE FREEZER HANDLE: (Handles may be reversed. Self-Adhesive Nameplate Models: Use putty knife to top of refrigerator door. 2. DOOR REMOVAL / REVERSAL INSTRUCTIONS...
... handle to reverse while doors are off .) Figure 1 Style Handles 1. Reinstall handle on opposite side Figure 2 Style Handles 1. TO ATTACH FREEZER HANDLE: 1. Remove two screws attaching handle to the handle bracket (Figure 1) or fits around the base of the handle (Figure 2). Self...LENGTH TRIM MODELS ONLY) In some models) Dovetail Button 2. Remove screw on other side, using edge of putty knife. 3. TO REMOVE FREEZER HANDLE: (Handles may be reversed. Self-Adhesive Nameplate Models: Use putty knife to top of refrigerator door. 2. DOOR REMOVAL / REVERSAL INSTRUCTIONS...

Use and Care Manual
Page 7
...7 Unscrew center hinge bin using edge of handle. Remove center hinge and shim by sliding under base of putty knife. 3. Firmly hold freezer handle while loosening set aside. 5. Figure 3 - Secure side of door. Remove toe grille and top hinge cover. 2. Secure top ...of handle with screws. Secure handle to top of handle to slide out. 6. To Remove Doors Stainless steel doors are off.) 1. Remove freezer handle. 2. Secure bottom of handle with 3/32" allen wrench. Install trim to reverse while doors are not reversible. Figure 1 Figure ...
...7 Unscrew center hinge bin using edge of handle. Remove center hinge and shim by sliding under base of putty knife. 3. Firmly hold freezer handle while loosening set aside. 5. Figure 3 - Secure side of door. Remove toe grille and top hinge cover. 2. Secure top ...of handle with screws. Secure handle to top of handle to slide out. 6. To Remove Doors Stainless steel doors are off.) 1. Remove freezer handle. 2. Secure bottom of handle with 3/32" allen wrench. Install trim to reverse while doors are not reversible. Figure 1 Figure ...

Use and Care Manual
Page 8
... • For warmer temperatures, turn off the compressor and prevents the refrigerator from the wall outlet. If Freezer compartment Is Too Cold Turn Freezer Control Slightly Towards Cold. * To Turn Refrigerator Off Turn Refrigerator Control To 0. 8 OR TEMPERATURE ADJUSTMENT &#...disconnect the power to the light bulb and other electrical components. Turning the freezer control will change only the freezer temperature. Freezer Control (some models) OR OR Refrigerator & Freezer Control (some models) Refrigerator Control (some models) TEMPERATURE ADJUSTMENT GUIDE If ...
... • For warmer temperatures, turn off the compressor and prevents the refrigerator from the wall outlet. If Freezer compartment Is Too Cold Turn Freezer Control Slightly Towards Cold. * To Turn Refrigerator Off Turn Refrigerator Control To 0. 8 OR TEMPERATURE ADJUSTMENT &#...disconnect the power to the light bulb and other electrical components. Turning the freezer control will change only the freezer temperature. Freezer Control (some models) OR OR Refrigerator & Freezer Control (some models) Refrigerator Control (some models) TEMPERATURE ADJUSTMENT GUIDE If ...

Use and Care Manual
Page 9
... models at a rate of your ice maker, hook up " or OFF position. CAUTION DO NOT place the ice container in your model has an adjustable freezer shelf, place the shelf in the UP position. To ensure proper function of 8 cubes every 80 to cycle two or three times before making a full...
... models at a rate of your ice maker, hook up " or OFF position. CAUTION DO NOT place the ice container in your model has an adjustable freezer shelf, place the shelf in the UP position. To ensure proper function of 8 cubes every 80 to cycle two or three times before making a full...

Use and Care Manual
Page 10
...or gurgling sound. E. Cold Control & Defrost Timer or Automatic Defrost Control These parts can produce a snapping or clicking sound REPLACING THE FREEZER LIGHT BULB (SOME MODELS) CAUTION Avoid cuts when replacing light bulbs, wear gloves. 1. If the refrigerator is causing them. J. Evaporator...particularly dusty or greasy conditions, or if there is equipped with an appliance bulb of the same wattage. 5. They also indicate your freezer compartment. G. Hard surfaces, such as the water valve opens to an electric clock. This is not a sound insulator. Replace light...
...or gurgling sound. E. Cold Control & Defrost Timer or Automatic Defrost Control These parts can produce a snapping or clicking sound REPLACING THE FREEZER LIGHT BULB (SOME MODELS) CAUTION Avoid cuts when replacing light bulbs, wear gloves. 1. If the refrigerator is causing them. J. Evaporator...particularly dusty or greasy conditions, or if there is equipped with an appliance bulb of the same wattage. 5. They also indicate your freezer compartment. G. Hard surfaces, such as the water valve opens to an electric clock. This is not a sound insulator. Replace light...

Use and Care Manual
Page 11
... sudsy cloth or sponge. Rinse well, and wipe dry with damp cloth. Wipe water pan with a clean soft cloth. CARE & CLEANING Keep your refrigerator and freezer clean to prevent odor build-up from condenser coils (see illustration on next page). Be sure to clean stainless steel. (Stainless Steel • Stainless Steel...
... sudsy cloth or sponge. Rinse well, and wipe dry with damp cloth. Wipe water pan with a clean soft cloth. CARE & CLEANING Keep your refrigerator and freezer clean to prevent odor build-up from condenser coils (see illustration on next page). Be sure to clean stainless steel. (Stainless Steel • Stainless Steel...

Use and Care Manual
Page 12
... You Need Service Keep your appliance is shipped from your best interest to obtain and keep all costs for repairing or replacing any refrigerator or freezer failures. 6. Service under this warranty must be performed by Electrolux or an authorized service company. Box 212378 Augusta, GA 30907 Canada 1.800.668.4606 Electrolux...
... You Need Service Keep your appliance is shipped from your best interest to obtain and keep all costs for repairing or replacing any refrigerator or freezer failures. 6. Service under this warranty must be performed by Electrolux or an authorized service company. Box 212378 Augusta, GA 30907 Canada 1.800.668.4606 Electrolux...

Use and Care Manual
Page 13
...list. Automatic ice maker not working . Allow 24 hours for the temperature to stabilize. • Set refrigerator control to stabilize. Then check freezer temperatures and adjust as needed. • The cabinet is not level. • Floor is weak. • See Normal Operating Sounds and ...a warmer setting. BEFORE YOU CALL 1-800-944-9044 (United States) 1-800-668-4606 (Canada) Visit our web site at www.frigidaire.com. Freezer temperature is noisy or vibrates. This list includes common occurrences that produce odors should produce 2.5 to "O". • Refrigerator may be stuck....
...list. Automatic ice maker not working . Allow 24 hours for the temperature to stabilize. • Set refrigerator control to stabilize. Then check freezer temperatures and adjust as needed. • The cabinet is not level. • Floor is weak. • See Normal Operating Sounds and ...a warmer setting. BEFORE YOU CALL 1-800-944-9044 (United States) 1-800-668-4606 (Canada) Visit our web site at www.frigidaire.com. Freezer temperature is noisy or vibrates. This list includes common occurrences that produce odors should produce 2.5 to "O". • Refrigerator may be stuck....

Installation Instructions
Page 1
...INSTALLATION IS COMPLETE INSTALLATION CHECKOFF LIST Doors Handles are ready to enjoy your new refrigerator. Final Checks Shipping material removed Fresh Food and Freezer controls set Crisper Humidity controls set Registration Card sent in Registration card to refrigerator No water leaks present at all connections - Then... refrigerator enough so the doors close freely when opened halfway. You are secure and tight Door seals completely to cabinet on all sides Freezer door is level across the top Leveling Refrigerator is level, side to side and tilted 1/4" (6mm) front to back Toe grille ...
...INSTALLATION IS COMPLETE INSTALLATION CHECKOFF LIST Doors Handles are ready to enjoy your new refrigerator. Final Checks Shipping material removed Fresh Food and Freezer controls set Crisper Humidity controls set Registration Card sent in Registration card to refrigerator No water leaks present at all connections - Then... refrigerator enough so the doors close freely when opened halfway. You are secure and tight Door seals completely to cabinet on all sides Freezer door is level across the top Leveling Refrigerator is level, side to side and tilted 1/4" (6mm) front to back Toe grille ...

