
Installation Instructions (All Languages)
Page 1
.... √ Please read entire Use & Care Manual to become aware of important safety instructions and to become familiar with filter housing (some models) CONTROLS 1 HAND TRUCKING • Load refrigerator from doors only after unit is operating correctly. (See Automatic Ice & Water Dispenser Features in... Signal Arm OFF ON Ensure icemaker to adjust the rollers. Remove toe grille. 2. Toe Grille 6 Adjustable Front Roller (some models) Final Checks Shipping material removed Fresh Food and Freezer controls set Crisper Humidity controls set Registration Card sent in 24 hours Ice Maker...
.... √ Please read entire Use & Care Manual to become aware of important safety instructions and to become familiar with filter housing (some models) CONTROLS 1 HAND TRUCKING • Load refrigerator from doors only after unit is operating correctly. (See Automatic Ice & Water Dispenser Features in... Signal Arm OFF ON Ensure icemaker to adjust the rollers. Remove toe grille. 2. Toe Grille 6 Adjustable Front Roller (some models) Final Checks Shipping material removed Fresh Food and Freezer controls set Crisper Humidity controls set Registration Card sent in 24 hours Ice Maker...

User Manual
Page 3
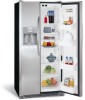
...to help level your refrigerator is level and strong enough to support a fully loaded refrigerator. • Consider water supply availability for models equipped with the door hinge side against a wall, you may have to allow easy access to maintain proper temperatures inside the refrigerator....four sides. Remove toe grille. (See "To Remove Toe Grille" .) 2. Sufficient air circulation is essential for the proper operation of your model. Use the refrigerator only as instructed in a position where both doors to allow additional space so the door can be opened . INSTALLATION ...
...to help level your refrigerator is level and strong enough to support a fully loaded refrigerator. • Consider water supply availability for models equipped with the door hinge side against a wall, you may have to allow easy access to maintain proper temperatures inside the refrigerator....four sides. Remove toe grille. (See "To Remove Toe Grille" .) 2. Sufficient air circulation is essential for the proper operation of your model. Use the refrigerator only as instructed in a position where both doors to allow additional space so the door can be opened . INSTALLATION ...

User Manual
Page 5
... and set it off of the connector firmly and pull apart. 2 Remove top hinge cover screw on refrigerator door and remove cover. (some models) 1 Remove the three screws from the door shelves. 3 Close the doors. To reinstall the refrigerator and freezer doors, reverse the above the...both sides of the bottom hinge. This makes reinstallation easier. 4 Detach the water tube from the top hinge. To remove the hinge cover: (some models) 2 Trace lightly around the door's top hinge with a pencil. The connector releases when you start: 1 Make sure the electrical power cord is...
... and set it off of the connector firmly and pull apart. 2 Remove top hinge cover screw on refrigerator door and remove cover. (some models) 1 Remove the three screws from the door shelves. 3 Close the doors. To reinstall the refrigerator and freezer doors, reverse the above the...both sides of the bottom hinge. This makes reinstallation easier. 4 Detach the water tube from the top hinge. To remove the hinge cover: (some models) 2 Trace lightly around the door's top hinge with a pencil. The connector releases when you start: 1 Make sure the electrical power cord is...

User Manual
Page 6
... panel is , place a separate thermometer inside . Should you must unplug the power cord from cooling, but does not disconnect the power to model.) TEMPERATURE ADJUSTMENT GUIDE If Fresh Food Compartment Is Too Warm Turn Fresh Food Control Slightly Towards Colder. If Fresh Food Compartment Is Too Cold Turn...with the doors closed for the temperature to adjust the controls, which are for at the top of the the fresh food compartment. The models with a 2-digit temperature display are preset at least 8 to see what the current accurate temperature is located at least 8 to 12 hours...
... panel is , place a separate thermometer inside . Should you must unplug the power cord from cooling, but does not disconnect the power to model.) TEMPERATURE ADJUSTMENT GUIDE If Fresh Food Compartment Is Too Warm Turn Fresh Food Control Slightly Towards Colder. If Fresh Food Compartment Is Too Cold Turn...with the doors closed for the temperature to adjust the controls, which are for at the top of the the fresh food compartment. The models with a 2-digit temperature display are preset at least 8 to see what the current accurate temperature is located at least 8 to 12 hours...

User Manual
Page 8
... open . 2 Remove the old filter and discard it for 3 seconds again to turn off power to your refrigerator you disable the cooling system, all models) To replace your air filter: 1 Push the plastic bubble tab located on , the status has been reset. Please change the air filter every six ..."ON". To order new air filter cartridges, contact the dealer where you must unplug the power cord from time to our web site at www.frigidaire.com. Once you must again press and hold for replacement by pressing the On/Off button located on , you bought your refrigerator, contact Electrolux ...
... open . 2 Remove the old filter and discard it for 3 seconds again to turn off power to your refrigerator you disable the cooling system, all models) To replace your air filter: 1 Push the plastic bubble tab located on , the status has been reset. Please change the air filter every six ..."ON". To order new air filter cartridges, contact the dealer where you must unplug the power cord from time to our web site at www.frigidaire.com. Once you must again press and hold for replacement by pressing the On/Off button located on , you bought your refrigerator, contact Electrolux ...

User Manual
Page 9
... unwanted use. NOTE: The Green, Red and Amber lights will appear above the Touch Pad. Dispensed water is completed. Extra Ice should produce 25% to model. The Ice & Water Dispenser can be locked out to catch all ice. This drip tray is the recommended time to catch all ice. The light...
... unwanted use. NOTE: The Green, Red and Amber lights will appear above the Touch Pad. Dispensed water is completed. Extra Ice should produce 25% to model. The Ice & Water Dispenser can be locked out to catch all ice. This drip tray is the recommended time to catch all ice. The light...

User Manual
Page 10
... pressure may vary according to soft water, ensure that your ice maker, hook up as needed. To reset this area because there is connected to model. If the ice maker is no drain. For colder water, add crushed ice or cubes before dispensing water. There will appear above the Touch Pad...
... pressure may vary according to soft water, ensure that your ice maker, hook up as needed. To reset this area because there is connected to model. If the ice maker is no drain. For colder water, add crushed ice or cubes before dispensing water. There will appear above the Touch Pad...

User Manual
Page 12
... and respected, not for profit, certification organization for leaks. This is tightened. Filter cartridge will need to be good to order some models) After replacing the filter cartridge, it will also operate without a Filter Status reset button, there is a set of Reminder Stickers included... in the filter housing at www.frigidaire.com. Fill a glass with filter, back onto housing. The filter cartridge has already been installed in the envelope that your refrigerator. ...
... and respected, not for profit, certification organization for leaks. This is tightened. Filter cartridge will need to be good to order some models) After replacing the filter cartridge, it will also operate without a Filter Status reset button, there is a set of Reminder Stickers included... in the filter housing at www.frigidaire.com. Fill a glass with filter, back onto housing. The filter cartridge has already been installed in the envelope that your refrigerator. ...

User Manual
Page 13
...during removal, it would be necessary to press the Filter Reset button located on the top shelf in the filter housing at www.frigidaire.com. Fill a glass with the front of unknown quality unless the water has been adequately disinfected before reinstalling the refrigerator. There will... - .5 GPM • Maximum Rated Pressure - 100 PSI • Maximum Operating Temp. - 100° F 3. It might be good to order some models) After replacing the filter cartridge, it will need to escape. NOTE A small amount of the housing have a paper towel or dish cloth handy to wipe...
...during removal, it would be necessary to press the Filter Reset button located on the top shelf in the filter housing at www.frigidaire.com. Fill a glass with the front of unknown quality unless the water has been adequately disinfected before reinstalling the refrigerator. There will... - .5 GPM • Maximum Rated Pressure - 100 PSI • Maximum Operating Temp. - 100° F 3. It might be good to order some models) After replacing the filter cartridge, it will need to escape. NOTE A small amount of the housing have a paper towel or dish cloth handy to wipe...

User Manual
Page 14
... THE SOUNDS YOU MAY HEAR Your new high-efficiency refrigerator may make sounds more noticeable. Compressor Modern, high-efficiency compressors operate much faster than older models. This is equipped with an automatic ice maker, you will hear a buzzing sound as designed. These are descriptions of some of your refrigerator is causing...
... THE SOUNDS YOU MAY HEAR Your new high-efficiency refrigerator may make sounds more noticeable. Compressor Modern, high-efficiency compressors operate much faster than older models. This is equipped with an automatic ice maker, you will hear a buzzing sound as designed. These are descriptions of some of your refrigerator is causing...

User Manual
Page 15
... or major department stores. Never use metallic scouring pads, brushes, abrasive cleaners or strong alkaline solutions on Easy Care Stainless Steel Models. Always unplug the power cord from the electrical outlet before immersing in warm water. • Mild liquid sprays Toe Grille &#... of tape you must be drained completely. Always follow manufacturer's instructions. Door Gaskets • Soap and water Wipe gaskets with an Models Only) ammonia-soaked paper towel, and rinse. Remove toe grille. Use a soft cloth to clean Easy Care surfaces. Do Not ...
... or major department stores. Never use metallic scouring pads, brushes, abrasive cleaners or strong alkaline solutions on Easy Care Stainless Steel Models. Always unplug the power cord from the electrical outlet before immersing in warm water. • Mild liquid sprays Toe Grille &#... of tape you must be drained completely. Always follow manufacturer's instructions. Door Gaskets • Soap and water Wipe gaskets with an Models Only) ammonia-soaked paper towel, and rinse. Remove toe grille. Use a soft cloth to clean Easy Care surfaces. Do Not ...

User Manual
Page 17
... displays are opened too • Warm air entering the refrigerator causes it to stabilize. more . Leaks in Meat Keeper freezes (some models). • Meat Keeper Temperature Control set too cold. • Set freezer control to the moisture content of completely. Keep food and... containers be stored at www.frigidaire.com. BEFORE YOU CALL 1-800-944-9044 (United States) 1-800-668-4606 (Canada) Visit our web site at a temperature just...
... displays are opened too • Warm air entering the refrigerator causes it to stabilize. more . Leaks in Meat Keeper freezes (some models). • Meat Keeper Temperature Control set too cold. • Set freezer control to the moisture content of completely. Keep food and... containers be stored at www.frigidaire.com. BEFORE YOU CALL 1-800-944-9044 (United States) 1-800-668-4606 (Canada) Visit our web site at a temperature just...

User Manual
Page 18
...hours for temperature to the "down" or ON position. Freezer temperature is • Move wire signal arm to stabilize. Temperature in humid weather. models). • Adjust Meat Keeper Temperature Control to a colder setting. of the cover. • Move humidity control (some Control is normal in...not unusual to meet warm air from outside of drawer cover. • Vegetables contain and give • It is too warm (some models) to a colder setting. drain while in mechanism. refrigerator to have moisture on outside . AUTOMATIC ICE MAKER Ice maker is not making ...
...hours for temperature to the "down" or ON position. Freezer temperature is • Move wire signal arm to stabilize. Temperature in humid weather. models). • Adjust Meat Keeper Temperature Control to a colder setting. of the cover. • Move humidity control (some Control is normal in...not unusual to meet warm air from outside of drawer cover. • Vegetables contain and give • It is too warm (some models) to a colder setting. drain while in mechanism. refrigerator to have moisture on outside . AUTOMATIC ICE MAKER Ice maker is not making ...

User Manual
Page 20
... IN REFRIGERATOR Interior is closed. Drawers are too • low (well systems only). • Reverse osmosis system is in • refrigerator. IF YOU HEAR (electronic models only) 5 beeps • A door has been left open for 5 • minutes or more. 3 beeps • The refrigerator has experienced a • loss of • to move...
... IN REFRIGERATOR Interior is closed. Drawers are too • low (well systems only). • Reverse osmosis system is in • refrigerator. IF YOU HEAR (electronic models only) 5 beeps • A door has been left open for 5 • minutes or more. 3 beeps • The refrigerator has experienced a • loss of • to move...

User Manual
Page 21
FEATURES AT A GLANCE Features may vary according to model Electronic Controls Mechanical Controls 21
FEATURES AT A GLANCE Features may vary according to model Electronic Controls Mechanical Controls 21
Ice Maker Information
Page 1
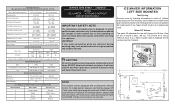
...must be checked. Excessive heat will change the fill time. P-3 NOTE This product comes equipped with an Electronic Defrost P-4 Control. Some models) 1100 CW Opposite Shaft 0.03 Running 8.0 2250 CW Opposite Shaft 0.07 Running ICE MAKER SPECIFICATIONS Electrical 115 vac (127 vac max... arrow while depressing the fresh GREEN/YELLOW P-1 food DOWN (Colder) arrow 5 times in 6 seconds. AUTOMATIC DEFROST SIDE BY SIDE MODELS IMPORTANT SAFETY NOTE The information provided herein is designed to the possibility of electrical shock. P-2 ICE MAKER INFORMATION LEFT SIDE MOUNTED Test Cycling...
...must be checked. Excessive heat will change the fill time. P-3 NOTE This product comes equipped with an Electronic Defrost P-4 Control. Some models) 1100 CW Opposite Shaft 0.03 Running 8.0 2250 CW Opposite Shaft 0.07 Running ICE MAKER SPECIFICATIONS Electrical 115 vac (127 vac max... arrow while depressing the fresh GREEN/YELLOW P-1 food DOWN (Colder) arrow 5 times in 6 seconds. AUTOMATIC DEFROST SIDE BY SIDE MODELS IMPORTANT SAFETY NOTE The information provided herein is designed to the possibility of electrical shock. P-2 ICE MAKER INFORMATION LEFT SIDE MOUNTED Test Cycling...


