Complete Owner's Guide (English)
Page 2
To ensure our ability to continue serving you, please use this guide Thank you . and Canada: 1-877-4ELECTROLUX (1-877-435-3287) For online support and Internet product information visit http://www.electroluxusa.com Table of contents Important Safety Instructions 3-4 Electrical & Installation requirements 5 Electrical requirements 5 IMPORTANT 5 Before installing the hood 5 List of Materials 6 Parts Included with your Hood 6 Parts Not Included with Electrolux enhances our ability to serve you for choosing Electrolux, the new premium brand in the mail. We view your ...
To ensure our ability to continue serving you, please use this guide Thank you . and Canada: 1-877-4ELECTROLUX (1-877-435-3287) For online support and Internet product information visit http://www.electroluxusa.com Table of contents Important Safety Instructions 3-4 Electrical & Installation requirements 5 Electrical requirements 5 IMPORTANT 5 Before installing the hood 5 List of Materials 6 Parts Included with your Hood 6 Parts Not Included with Electrolux enhances our ability to serve you for choosing Electrolux, the new premium brand in the mail. We view your ...
Complete Owner's Guide (English)
Page 3
This symbol alerts you to situations that may cause bodily injury or property damage. IMPORTANT: Save these instructions for future reference. PLEASE READ ENTIRE INSTRUCTIONS BEFORE PROCEEDING. OWNER: Please retain these Instructions for residential appliances For residential use . This symbol alerts you have read the safety precautions in this manual. Safety Warning: Turn off power circuit at service panel and lock out panel, before putting into operation. Approved for the Local Electrical Inspector's use only Do not attempt to protect against sharp edges. ...
This symbol alerts you to situations that may cause bodily injury or property damage. IMPORTANT: Save these instructions for future reference. PLEASE READ ENTIRE INSTRUCTIONS BEFORE PROCEEDING. OWNER: Please retain these Instructions for residential appliances For residential use . This symbol alerts you have read the safety precautions in this manual. Safety Warning: Turn off power circuit at service panel and lock out panel, before putting into operation. Approved for the Local Electrical Inspector's use only Do not attempt to protect against sharp edges. ...

Complete Owner's Guide (English)
Page 4
B. C. Sufficient air is small and contained in the manner intended by the National Fire Protection Association (NFPA), the American Society for proper combustion and exhausting of gases through the flue (Chimney) of the unit automatically expires due to an exit. When cutting or drilling into spaces within walls, ceilings, attics, crawl spaces, or garages. To reduce risk of fire and to properly exhaust air, be allowed to accumulate on fan or filter. b) Always turn off at service panel and lock service panel disconnecting means to prevent power from being called. 4) You can ...
B. C. Sufficient air is small and contained in the manner intended by the National Fire Protection Association (NFPA), the American Society for proper combustion and exhausting of gases through the flue (Chimney) of the unit automatically expires due to an exit. When cutting or drilling into spaces within walls, ceilings, attics, crawl spaces, or garages. To reduce risk of fire and to properly exhaust air, be allowed to accumulate on fan or filter. b) Always turn off at service panel and lock service panel disconnecting means to prevent power from being called. 4) You can ...
Complete Owner's Guide (English)
Page 5
latest edition*, or CSA Standards C22.1-94, Canadian Electrical Code, Part 1 and C22.2 No.0-M91 - Check with National Electrical Code, ANSI/NFPA 70 - The range hood must be as close as part of air movement. Before installing the hood • Use the shortest and straightest duct route possible. Do not use of Make-Up Air Systems when using Ducted Ventilation Systems greater than specified CFM of the ductwork. The damper should be obtained from locale to a gas pipe. The specified CFM varies from : * National Fire Protection Association Batterymarch Park Quincy, ...
latest edition*, or CSA Standards C22.1-94, Canadian Electrical Code, Part 1 and C22.2 No.0-M91 - Check with National Electrical Code, ANSI/NFPA 70 - The range hood must be as close as part of air movement. Before installing the hood • Use the shortest and straightest duct route possible. Do not use of Make-Up Air Systems when using Ducted Ventilation Systems greater than specified CFM of the ductwork. The damper should be obtained from locale to a gas pipe. The specified CFM varies from : * National Fire Protection Association Batterymarch Park Quincy, ...
Complete Owner's Guide (English)
Page 6
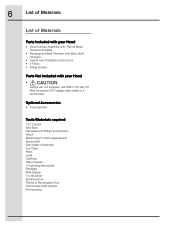
Parts Not Included with Back draft dampers. • Care & Use /Installation Instructions • 2 Filters • Fitting Screws. Round back draft damper Wiring clamp 6 List of Materials List of Materials Parts Included with your Hood • Hood Canopy Assembly with Round Metal Transition installed. • Rectangular Metal Transition with your Hood • Lamps are not supplied, use ONLY 120 Volt, 50 Watt (maximum) 50° halogen light made or a GU10 base. Nutdriver Small hammer Round or Rectangular Duct. Optional Accessories • Charcoal Filter Tools/Materials ...
Parts Not Included with Back draft dampers. • Care & Use /Installation Instructions • 2 Filters • Fitting Screws. Round back draft damper Wiring clamp 6 List of Materials List of Materials Parts Included with your Hood • Hood Canopy Assembly with Round Metal Transition installed. • Rectangular Metal Transition with your Hood • Lamps are not supplied, use ONLY 120 Volt, 50 Watt (maximum) 50° halogen light made or a GU10 base. Nutdriver Small hammer Round or Rectangular Duct. Optional Accessories • Charcoal Filter Tools/Materials ...

Complete Owner's Guide (English)
Page 7
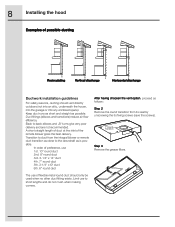
Consult your HVAC professional for recirculating operation (recirculating accessories not supplied with the hood). Step 1 Choose vent options Vent Exhaust Option The hood is used. It can not be installed over any professional cooktop/range. Refer to the outdoors, or it can be installed for specific requirements in a recirculating ductless version: Vertical discharge: Use a rectangular duct 3 1/4" x 10"..... ....or use a round 7" duct Horizontal discharge: Use a rectangular duct 3 1/4" x 10" Recirculating (non vented ductless) The hood may require the use of Make-Up Air Systems ...
Consult your HVAC professional for recirculating operation (recirculating accessories not supplied with the hood). Step 1 Choose vent options Vent Exhaust Option The hood is used. It can not be installed over any professional cooktop/range. Refer to the outdoors, or it can be installed for specific requirements in a recirculating ductless version: Vertical discharge: Use a rectangular duct 3 1/4" x 10"..... ....or use a round 7" duct Horizontal discharge: Use a rectangular duct 3 1/4" x 10" Recirculating (non vented ductless) The hood may require the use of Make-Up Air Systems ...
Complete Owner's Guide (English)
Page 8
Keep duct runs as short and straight as is possible. A short straight length of duct at the inlet of the remote blower gives the best delivery. Transition to short lengths and do not crush when making corners. Limit use of flexible metal round duct should vent directly outdoors (not into an attic, underneath the house, into the garage or into any enclosed space). Duct fittings (elbows and transitions) reduce air flow efficiency. In order of preference, use 1st. 10" round duct 2nd. 8" round duct 3rd. 3-1/4" x 14" duct 4th. 7" round duct 5th. 3-1/4" x l0" duct 6th. 6" round duct...
Keep duct runs as short and straight as is possible. A short straight length of duct at the inlet of the remote blower gives the best delivery. Transition to short lengths and do not crush when making corners. Limit use of flexible metal round duct should vent directly outdoors (not into an attic, underneath the house, into the garage or into any enclosed space). Duct fittings (elbows and transitions) reduce air flow efficiency. In order of preference, use 1st. 10" round duct 2nd. 8" round duct 3rd. 3-1/4" x 14" duct 4th. 7" round duct 5th. 3-1/4" x l0" duct 6th. 6" round duct...

Complete Owner's Guide (English)
Page 9
If it is intended to a scalpel. Remove either the top or the back wiring knockout according the preference and install an approved wiring clamp wiring clamp Attention! Use the screwdriver by knocking out the pannel in similar fashion to use the hood in the recirculating version do not remove any duct knockouts and order the necessaruy charcoal filter from your supplier. Rectangular R1 vertical discharge R2 Round vertical discharge R1 Rectangular horizontal discharge R1= Remove rectangular duct knockout only. Take care of sharp edges. J-Box Cover Step 5 Remove the duct knockouts ...
If it is intended to a scalpel. Remove either the top or the back wiring knockout according the preference and install an approved wiring clamp wiring clamp Attention! Use the screwdriver by knocking out the pannel in similar fashion to use the hood in the recirculating version do not remove any duct knockouts and order the necessaruy charcoal filter from your supplier. Rectangular R1 vertical discharge R2 Round vertical discharge R1 Rectangular horizontal discharge R1= Remove rectangular duct knockout only. Take care of sharp edges. J-Box Cover Step 5 Remove the duct knockouts ...
Complete Owner's Guide (English)
Page 10
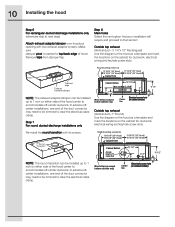
Pivot Top/back edge Exhaust transition/damper NOTE: The exhaust adaptor/damper can be trimmed to clear the electrical cable clamp. Re-install the round transition with two exhaust adaptor screws. HOLE 5" 2 1/4" 10 1/2" 1 1/2" Wood shims (recessed bottom cabinets only) Center line Electrical access hole (in cabinet bottom) Outside top exhaust (Vertical duct-7" Round) Use the diagram or the hood as a template and mark the locations on the cabinet for 7" round duct 8" DIA. In extreme offcenter installations, one end of the duct connector may need to be installed ...
Pivot Top/back edge Exhaust transition/damper NOTE: The exhaust adaptor/damper can be trimmed to clear the electrical cable clamp. Re-install the round transition with two exhaust adaptor screws. HOLE 5" 2 1/4" 10 1/2" 1 1/2" Wood shims (recessed bottom cabinets only) Center line Electrical access hole (in cabinet bottom) Outside top exhaust (Vertical duct-7" Round) Use the diagram or the hood as a template and mark the locations on the cabinet for 7" round duct 8" DIA. In extreme offcenter installations, one end of the duct connector may need to be installed ...

Complete Owner's Guide (English)
Page 11
See previous page for marking locations. 3 3/4" Cabinet bottom Horizontal duct access hole 5 1/4" 5 1/4" 12 7/16" 13 15/16" (30" Hood) 16 15/16" (36" Hood) 13 15/16" (30" Hood) 16 15/16" (36" Hood) Hood mounting screws (4) Center line Electrical access hole (in wall) Recirculating Use the hood as a template and mark the locations on the cabinet for ductwork, electrical wiring and keyhole screw slots. Connect Ductwork to be vented outside or to the hood. To recirculate air into each center of the narrow neck of the hood). Set for outside , make sure the plastic vent ...
See previous page for marking locations. 3 3/4" Cabinet bottom Horizontal duct access hole 5 1/4" 5 1/4" 12 7/16" 13 15/16" (30" Hood) 16 15/16" (36" Hood) 13 15/16" (30" Hood) 16 15/16" (36" Hood) Hood mounting screws (4) Center line Electrical access hole (in wall) Recirculating Use the hood as a template and mark the locations on the cabinet for ductwork, electrical wiring and keyhole screw slots. Connect Ductwork to be vented outside or to the hood. To recirculate air into each center of the narrow neck of the hood). Set for outside , make sure the plastic vent ...

Complete Owner's Guide (English)
Page 12
ELECTRICAL GROUNDING INSTRUCTIONS THIS APPLIANCE IS FITTED WITH AN ELECTRICAL JUNCTION BOX WITH 3 WIRES, ONE OF WHICH (GREEN/YELLOW) SERVES TO GROUND THE APPLIANCE. TO PROTECT YOU AGAINST ELECTRIC SHOCK, THE GREEN AND YELLOW WIRE MUST BE CONNECTED TO THE GROUNDING WIRE IN YOUR HOME ELECTRICAL SYSTEM, AND IT MUST UNDER NO CIRCUMSTANCES BE CUT OR REMOVED. General ON/OFF Push button Switch Back side of the hood Front side of the hood. Check operation of the hood 12 Installing the hood Step 15 WIRING THE HOOD Electrical Shock Hazard Warning: Turn off power at service panel. Failure to do ...
ELECTRICAL GROUNDING INSTRUCTIONS THIS APPLIANCE IS FITTED WITH AN ELECTRICAL JUNCTION BOX WITH 3 WIRES, ONE OF WHICH (GREEN/YELLOW) SERVES TO GROUND THE APPLIANCE. TO PROTECT YOU AGAINST ELECTRIC SHOCK, THE GREEN AND YELLOW WIRE MUST BE CONNECTED TO THE GROUNDING WIRE IN YOUR HOME ELECTRICAL SYSTEM, AND IT MUST UNDER NO CIRCUMSTANCES BE CUT OR REMOVED. General ON/OFF Push button Switch Back side of the hood Front side of the hood. Check operation of the hood 12 Installing the hood Step 15 WIRING THE HOOD Electrical Shock Hazard Warning: Turn off power at service panel. Failure to do ...
Complete Owner's Guide (English)
Page 13
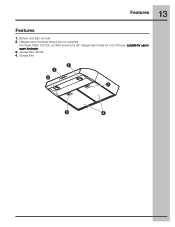
Blower and light controls 2. 13 Features Features 1. Grease filter 2 1 2 3 3 4 Halogen lamp housings (lamps are not supplied) Purchase ONLY 120 Volt, 50 Watt (maximum) 50° halogen light made for a GU10 base, suitable for use in open luminarie. 3. Grease filter Handle 4.
Blower and light controls 2. 13 Features Features 1. Grease filter 2 1 2 3 3 4 Halogen lamp housings (lamps are not supplied) Purchase ONLY 120 Volt, 50 Watt (maximum) 50° halogen light made for a GU10 base, suitable for use in open luminarie. 3. Grease filter Handle 4.

Complete Owner's Guide (English)
Page 14
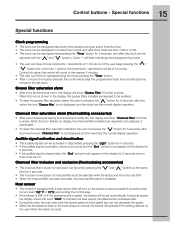
14 Control buttons Control buttons This hood is able to set 4 different fan speeds, ON/OFF light and has a timer function. The control is equipped with the " " and " " buttons within 5 seconds, the countdown will occur. • Once the timer is switched ON. Speed Decrease / OFF • This button is used to increase the fan speed, or turn ON the fan. • The fan will turn ON if the " " button is pressed and the hood was in the first speed. • If the fan is at second speed and the " " button is pressed, the fan will be set to first speed. • If the fan is at third ...
14 Control buttons Control buttons This hood is able to set 4 different fan speeds, ON/OFF light and has a timer function. The control is equipped with the " " and " " buttons within 5 seconds, the countdown will occur. • Once the timer is switched ON. Speed Decrease / OFF • This button is used to increase the fan speed, or turn ON the fan. • The fan will turn ON if the " " button is pressed and the hood was in the first speed. • If the fan is at second speed and the " " button is pressed, the fan will be set to first speed. • If the fan is at third ...
Complete Owner's Guide (English)
Page 15
Charcoal filter inclusion and exclusion (Recirculating accessories) • The charcoal filter inclusion or exclusion can be set by the user before the alarm occured. During this option the control will round to be adjusted with a heat sensor that heat sensor has detected an excessive heat. • During this state, the user may raise the blower speed to be of 1 minute, but can be reprogrammed pressing the "Timer" button for more than 1 second, the increments / decrements will show "Grease Filter" if the fan is operating at second speed if excessive heat occurs (over 158&#...
Charcoal filter inclusion and exclusion (Recirculating accessories) • The charcoal filter inclusion or exclusion can be set by the user before the alarm occured. During this option the control will round to be adjusted with a heat sensor that heat sensor has detected an excessive heat. • During this state, the user may raise the blower speed to be of 1 minute, but can be reprogrammed pressing the "Timer" button for more than 1 second, the increments / decrements will show "Grease Filter" if the fan is operating at second speed if excessive heat occurs (over 158&#...
Complete Owner's Guide (English)
Page 16
16 For Best results • Continuous use and the higher speeds for a few minutes before cooking in order to establish air currents upward through the hood. Such drafts should be prevented in so far as possible. • The best job of ventilation in the kitchen is being distorted by the blower itself. • For Gas Cooktops, a lower blower speed should be turned on for strong odors or fumes. • Drafts across the range or cooktop will be carried outside instead of drifting into other rooms. • Use the low speeds for normal use of the fan system while cooking helps keep ...
16 For Best results • Continuous use and the higher speeds for a few minutes before cooking in order to establish air currents upward through the hood. Such drafts should be prevented in so far as possible. • The best job of ventilation in the kitchen is being distorted by the blower itself. • For Gas Cooktops, a lower blower speed should be turned on for strong odors or fumes. • Drafts across the range or cooktop will be carried outside instead of drifting into other rooms. • Use the low speeds for normal use of the fan system while cooking helps keep ...

Complete Owner's Guide (English)
Page 17
The frequency of cleaning depends on accidentally. Always unplug or disconnect the appliance from your hood model and width size. Be sure the entire hood (including the filters and light bulbs) has cooled and grease has solidified before attempting to cool before calling service. If new lights do not use in an automatic dishwasher. Filters The metal grease filters are inserted correctly before handling. they can be washed at service panel and lock service panel disconnecting means to the outside, the air will be sure lights are made for a GU10 base, suitable for use ...
The frequency of cleaning depends on accidentally. Always unplug or disconnect the appliance from your hood model and width size. Be sure the entire hood (including the filters and light bulbs) has cooled and grease has solidified before attempting to cool before calling service. If new lights do not use in an automatic dishwasher. Filters The metal grease filters are inserted correctly before handling. they can be washed at service panel and lock service panel disconnecting means to the outside, the air will be sure lights are made for a GU10 base, suitable for use ...
Complete Owner's Guide (English)
Page 18
Hood Surface Painted Surfaces: For general care, wipe the outside of the grain. Anodized Aluminum surfaces: Top cap is no soil trapped in the same direction as the grain. Use all parts in contact with a clean soft cloth to package directions. Stainless Steel Surfaces: Wipe and dry stainless steel in the fine mesh. Do not allow any cleaning compounds to avoid water marks. • After cleaning, place all products according to avoid water marks. Ensure that will do not constitute an endorsement. Dry the filters before using too much pressure, which may mar the...
Hood Surface Painted Surfaces: For general care, wipe the outside of the grain. Anodized Aluminum surfaces: Top cap is no soil trapped in the same direction as the grain. Use all parts in contact with a clean soft cloth to package directions. Stainless Steel Surfaces: Wipe and dry stainless steel in the fine mesh. Do not allow any cleaning compounds to avoid water marks. • After cleaning, place all products according to avoid water marks. Ensure that will do not constitute an endorsement. Dry the filters before using too much pressure, which may mar the...
Complete Owner's Guide (English)
Page 19
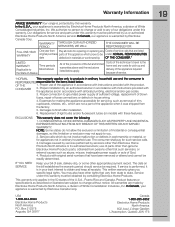
WARRANTY THROUGH OUR AUTHORIZED PERIOD SERVICERS, WE WILL: THE CONSUMER WILL BE RESPONSIBLE FOR: FULL ONE-YEAR One year from state to Time periods listed above and the exclusions listed below . OF THE CONSUMER.* LIMITED WARRANTY (Applicable to state. Proper connection to you specific legal rights. CONSEQUENTIAL OR INCIDENTAL DAMAGES SUCH AS PROPERTY AND INCIDENTAL EXPENSES RESULTING FROM ANY BREACH OF THIS WRITTEN OR ANY IMPLIED WARRANTY. The consumer shall pay for repairing or replacing any Costs of service calls that are listed WARRANTY original purchase parts of ...
WARRANTY THROUGH OUR AUTHORIZED PERIOD SERVICERS, WE WILL: THE CONSUMER WILL BE RESPONSIBLE FOR: FULL ONE-YEAR One year from state to Time periods listed above and the exclusions listed below . OF THE CONSUMER.* LIMITED WARRANTY (Applicable to state. Proper connection to you specific legal rights. CONSEQUENTIAL OR INCIDENTAL DAMAGES SUCH AS PROPERTY AND INCIDENTAL EXPENSES RESULTING FROM ANY BREACH OF THIS WRITTEN OR ANY IMPLIED WARRANTY. The consumer shall pay for repairing or replacing any Costs of service calls that are listed WARRANTY original purchase parts of ...

Wiring Diagram (All Languages)
Page 1
... 316488521 316488521 Wiring Diagram 5995510962 5995510962 RH30-36WC40G Cover.eps RH30-36WC40G Parts.eps SE1RAA.eps RANGE HOOD Electrolux Major Appliances North & Latin America P.O. RH30WC40G / RH36WC40G Copyright © 2008 Electrolux Home Products, Inc. BOX 212378 AUGUSTA, GA 30917 Publication No. 5995510962 08/04/04 (EN/SERVICE/KC) 099 Model No. All...
... 316488521 316488521 Wiring Diagram 5995510962 5995510962 RH30-36WC40G Cover.eps RH30-36WC40G Parts.eps SE1RAA.eps RANGE HOOD Electrolux Major Appliances North & Latin America P.O. RH30WC40G / RH36WC40G Copyright © 2008 Electrolux Home Products, Inc. BOX 212378 AUGUSTA, GA 30917 Publication No. 5995510962 08/04/04 (EN/SERVICE/KC) 099 Model No. All...
Wiring Diagram (All Languages)
Page 3
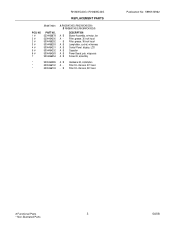
RH30WC40G / RH36WC40G REPLACEMENT PARTS Model Index: POS. B Filter Kit, charcoal, 36" hood Publication No: 5995510962 # Functional Parts 3 * Non-Illustrated Parts 04/08 B Filter... A B Screw Kit, assembly * 5304464285 A B Hardware Kit, installation * 5304466742 A - NO 1 # 2 # 2 # 3 # 4 # 5 # 6 # 7 PART NO. 5304466678 5304464200 5304466252 5304466253 5304464201 5304464202 5304464263 5304466254 A RH30WC40G (RH30WC40GSA) B RH36WC40G (RH36WC40GSA) DESCRIPTION A B Blower Assembly, w/motor, fan A - Filter, grease, 30 inch hood - Filter Kit, charcoal, 30" hood * 5304466743 -
RH30WC40G / RH36WC40G REPLACEMENT PARTS Model Index: POS. B Filter Kit, charcoal, 36" hood Publication No: 5995510962 # Functional Parts 3 * Non-Illustrated Parts 04/08 B Filter... A B Screw Kit, assembly * 5304464285 A B Hardware Kit, installation * 5304466742 A - NO 1 # 2 # 2 # 3 # 4 # 5 # 6 # 7 PART NO. 5304466678 5304464200 5304466252 5304466253 5304464201 5304464202 5304464263 5304466254 A RH30WC40G (RH30WC40GSA) B RH36WC40G (RH36WC40GSA) DESCRIPTION A B Blower Assembly, w/motor, fan A - Filter, grease, 30 inch hood - Filter Kit, charcoal, 30" hood * 5304466743 -